Ibiza 15-1431 User manual
- Category
- Stroboscopes & disco lights
- Type
- User manual
This manual is also suitable for
Page is loading ...

©Copyright LOTRONIC 2016 QUAD8-FX Page 2
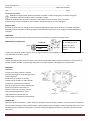
BEFORE YOU BEGIN
Contents of the carton:
• 1 x Spider light effect
• 1x Mains lead
• 1x User Manual
• 2x omega clamps
Unpacking Instructions
Immediately upon receiving a fixture, carefully unpack the carton, check the contents to ensure that all parts are
present and have been received in good condition. Notify the freight company immediately and retain packing
material for inspection if any parts appear to be damaged from shipping or the carton itself shows signs of
mishandling. Keep the carton and all packing materials. In the event that a fixture must be returned to the factory, it
is important that the fixture be returned in the original factory box and packing.
Safety Instructions
Please read these instructions carefully, they include important information about the installation, usage and
maintenance of this product.
• Please keep this User Guide for future reference. If you sell the unit to another user, be sure that he also receives
this instruction booklet.
• Always make sure that you are connecting to the proper voltage, and that the line voltage you are connecting to is
not higher than that stated on the decal or rear panel of the fixture.
• This product is intended for indoor use only!
It is essential that the device is earthed. A qualified person must carry out the electric connection.
• To prevent risk of fire or shock, do not expose fixture to rain or moisture. Make sure there are no flammable
materials close to the unit while operating.
• The unit must be installed in a location with adequate ventilation, at least 20in (50cm) from adjacent surfaces. Be
sure that no ventilation slots are blocked.
• Always disconnect from power source before servicing or replacing fuse and be sure to replace with same fuse size
and type.
• Secure fixture to fastening device using a safety chain. Never carry the fixture solely by its head. Use its carrying
handles.
• Maximum ambient temperature (Ta) is 104° F (40°C). Do not operate the fixture at temperatures higher than this.
• In the event of a serious operating problem, stop using the unit immediately. Never try to repair the unit by
yourself. Repairs carried out by unskilled people can lead to damage or malfunction. Please contact the nearest
authorized technical assistance center. Always use the same type of spare parts.
• Don’t connect the device to a dimmer pack.
• Make sure the power cord is never crimped or damaged.
• Never disconnect the power cord by pulling or tugging on the cord.
• Avoid direct eye exposure to the light source while it is on.
DISCONNECT DEVICE: Where the MAINS plug or an appliance coupler is used as the disconnect device, the
disconnect device shall remain readily operable.
GB

©Copyright LOTRONIC 2016 QUAD8-FX Page 3
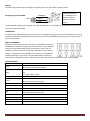
Specifications
Power supply .................................................................................................. 100-240Vac 50/60Hz
Consumption ............................................................................................................................ 80W
Light source ........................................................ 8x 10W LED (2x red, 2x green, 2x blue, 2x white)
Single beam angle ........................................................................................................................ 4°
Dimensions ....................................................................................................... 298 x 149 x 262mm
Weight ..................................................................................................................................... 3.5kg
Installation
The unit should be mounted via its screw holes on the bracket. Always ensure that the unit is firmly fixed to avoid
vibration and slipping while operating. Always ensure that the structure to which you are attaching the unit is secure
and able to support a weight of 10 times of the unit’s weight. Also always use a safety cable that can hold 12 times
the weight of the unit when installing the fixture.
The equipment must be fixed by professionals at a place where is out of the reach of people and where nobody can
pass by or under it.
ORIENTATION
This fixture may be mounted in any position provided there is adequate room for ventilation.
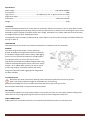
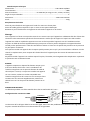
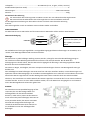
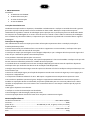
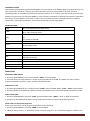
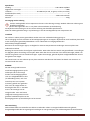
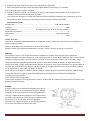
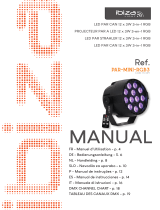
RIGGING
The LED moving head provides a unique mounting
bracket assembly that integrates the bottom of the base,
the included ‘omega bracket’ and the safety cable rigging
point in one unit (see the illustration on the right).When
mounting this fixture on a truss, be sure to use an
appropriate clamp with the included omega bracket using
a M10 screw fitted through the center hole of the ‘omega
bracket’. As an added safety measure, be sure to attach
at least one properly rated safety cable to the fixture
using one of the safety cable rigging points integrated in
the base assembly.
Fuse Replacement
Disconnect the power cord before replacing a fuse and always replace with the same type fuse.
With a flat head screwdriver wedge the fuse holder out of its housing.
Remove the damaged fuse from its holder and replace with exactly the same type of fuse.
Insert the fuse holder back in its place and reconnect power.
Data Cabling
To link fixtures together you must use data cables. If you choose to create your own cable, please use data-grade
cables that can carry a high quality signal and are less prone to electromagnetic interference.
CABLE CONNECTORS
Cabling must have a male XLR connector on one end and a female XLR connector on the other end.

©Copyright LOTRONIC 2016 QUAD8-FX Page 4
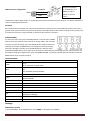
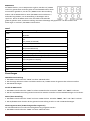
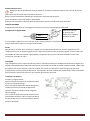
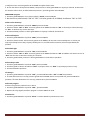
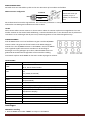
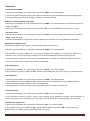
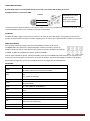
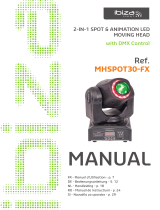
DMX connector configuration
Termination reduces signal errors. To avoid signal transmission problems and interference, it is always advisable to
connect a DMX signal terminator.
CAUTION
Do not allow contact between the common and the fixture’s chassis ground. Grounding the common can cause a
ground loop, and your fixture may perform erratically. Test cables with an ohm meter to check correct polarity and
to make sure the pins are not grounded or shorted to the shield or each other.
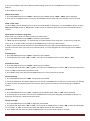
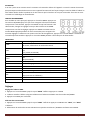
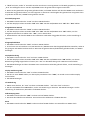
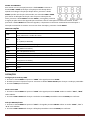
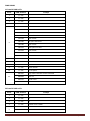
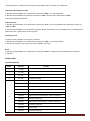
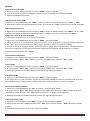
CONTROL PANEL
To access the main menu press the MENU button. Press the UP or DOWN
buttons until you reach function you wish to change. When you reach the
function you wish to change, press the ENTER button. When a function is
selected, use the UP or DOWN buttons to change the function settings.
Once your changes are made, press the ENTER button, and then press
and hold the MENU button for at least three seconds to confirm and lock the change into the system memory. To
exit without making any adjustments, press the MENU BUTTON. The display will lock after 30 secondes. Press the
MENU button for 3 seconds to unlock.
FUNCTION MENU
ADDR
001 - 512, DMX Address setting
CHND
11 ch
39 ch, select the channel mode
SLND
Mast
SL 1
SL 2 ( MASTER, SLAVEC OPTION)
SHND
SHOW 0 – SHOW 15, Select the show mode
AUTO
OFF
ON (Auto Mode)
SOUN
On – Off (SOUND CONTROL)
SENS
000 – 100 Sound sensitivity control (0 close, 100 The most sensitive)
TINT1
Yes - No (TIL Reverse)
TINT2
Yes - No (TIL Reverse)
LED
On - Off (Background LIGHT ON/OFF)
DISP
Disp
Dsip (Reverse Display)
TEST
Test
RSET
Reset
Settings
DMX Address Setting
1. Press the MENU, UP or DOWN button until “ADDR” is displayed, press ENTER.
INPUT
COMMON
DMX +
DMX-
Resistance 120 ohm
1/ 4w between pin 2
(DMX-) and pin 3
(DMX+) of the last
fixture.

©Copyright LOTRONIC 2016 QUAD8-FX Page 5
2. The current address will now be displayed and flashing. Press the UP or DOWN buttons to find your desired
address.
3. Press ENTER to confirm.
DMX channel mode
1. Press the MENU button until “CHND” is displayed, press ENTER. Either “10CH”, “38CH” will be displayed
2. Press the UP or DOWN buttons to find your desired DMX channel mode and press ENTER to confirm and exit.
SLND – Slave mode
To select Slnd, press the ENTER button to show the SLAVE MODE on the display. Use the DOWN/UP button to select
Mast (MASTER),Sl1 (SLAVE 1), Sl2 (SLAVE 2) modes. Once the mode has been selected, press the ENTER button to
confirm.
Show modes 0-15 (Factory programs).
Show mode can run with or without sound active mode active.
1. Press the MENU button until “SHND” is displayed, press ENTER.
2. “Sh X” will now be displayed, “X” representing a number between 0-15. Programs 1-15 are factory programs,
while “Sh 0” is random mode. Press the UP or DOWN buttons to find your desired show.
3. When you have found your desired show press ENTER, then press and hold the MENU button for at least 3
seconds to activate. After you have set your desired show, it can be changed at any time using the UP or DOWN
buttons.
AUTO program
1. Press the MENU button until “AUTO” is displayed, press ENTER.
2. The Display will show either “ON” or “OFF”. Press the UP or DOWN buttons to select “ON” or “OFF”.
Sound Active mode
1. Press the MENU button until “SOUN” is displayed, press ENTER.
2. The display will show either “ON” or “OFF”. Press the UP or DOWN buttons to select “ON” to activate sound active
mode, or “OFF” to deactivate sound active mode.
3. Press ENTER, then press and hold the MENU button for at least 3 seconds to activate.
Sound sensitivity
1. Press the MENU button until “SENS” is displayed, press ENTER.
2. A number between 0-100 will be displayed. Press the UP or DOWN buttons to adjust the sound sensitivity. 0 being
the least sensitive and 100 being the most sensitive. When you have found your desired setting press ENTER to
confirm.
Tilt Inversion
1. Press the MENU button until “TINT” is displayed, press ENTER. Either “YES” or “NO” will be displayed.
2. To activate the Tilt inversion press the UP or DOWN buttons until YES is displayed, press ENTER to confirm. To
deactivate Tilt inversion, select NO and press Enter.
Display back light
1. Press the MENU button until “LED” is displayed, press ENTER.
2. The display will show either “ON” or “OFF”. Press the UP or DOWN buttons to select “ON” to keep the LED display
on at all times, or “OFF” to switch to have the LED display switch off after 10 seconds.
3. Press ENTER and then press and hold the MENU button for at least three seconds to confirm.

©Copyright LOTRONIC 2016 QUAD8-FX Page 6
Display Reverse 180°
1. Press the either the MENU button until “DISP” is displayed, press ENTER.
2. Press the UP button to select “DSIP” to reverse the display, or “DISP” to change the display back.
3. Press ENTER to confirm.
Self test program
1. Press the MENU button until “TEST” is displayed, press ENTER.
2. The fixture will now run a self test. Press MENU to exit.
Reset
1. Press the MENU button until “Reset” is displayed. Press the ENTER button and the unit will reset itself.
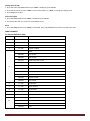
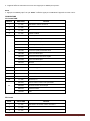
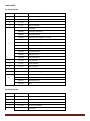
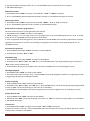
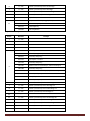
DMX CHANNELS
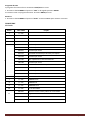
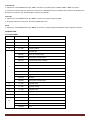
11 channel definition table
Channel DMX Value Function
1 0---255 X motor route
2 0---255 Y1 motor route
3 0---255 Y2 motor route
4 0---255 Dimmer 0-100%
5
Strobe
000-007 Close strobe
008-015 Open strobe
016-131 Strobe from slow to fast
132-139 Open strobe
140-181 fast open slow close
182-189 Open strobe
190-231 Slow open fast close
232-239 Open strobe
240-247 Random strobe
248-255 open strobe
6 0---255 Red dimmer
7 0---255 Green dimmer
8 0---255 Blue dimmer
9 0---255 White dimmer
10 0---255 Y1, Y2 speed
11
000-007 Only others channels can be controlled
008-063 Auto run
064-127 Sound active
128-255 Reset

©Copyright LOTRONIC 2016 QUAD8-FX Page 7
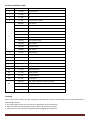
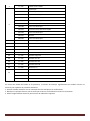
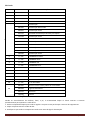
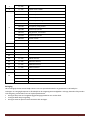
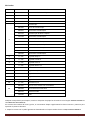
39 channel definition table
Channel DMX Value Function
1 0---255 X motor route
2 0---255 Y1
3 0---255 Y2
4 0---255 Dimmer from 0-100%
5
000-007 Close strobe
008-015 Open strobe
016-131 Strobe from slow to fast
132-139 Open strobe
140-181 fast open slow close
182-189 Open strobe
190-231 Slow open fast close
232-239 Open strobe
240-247 Random strobe
248-255 open strobe
6 0---255 1 Red dimmer
7 0---255 1 Green Dimmer
8 0---255 1 Blue Dimmer
… 0---255 1 White Dimmer
33 … …
34 0---255 8 Red Dimmer
35 0---255 8 Green Dimmer
36 0---255 8 Blue Dimmer
37 0---255 8 White Dimmer
38 0---255 Y1, Y2 speed
39
000-007 Only others channels can be controlled
008-063 Auto run
064-127 Sound active
128-255 Reset
Cleaning
Due to fog residue, smoke, and dust cleaning the internal and external lenses should be carried out periodically to
optimize light output.
1. Use normal glass cleaner and a soft cloth to wipe down the out-side casing.
2. Clean the external optics with glass cleaner and a soft cloth every 20 days.
3. Always be sure to dry all parts completely before plugging the unit back in.
Page is loading ...
Page is loading ...
Page is loading ...
Page is loading ...
Page is loading ...
Page is loading ...
Page is loading ...
Page is loading ...
Page is loading ...
Page is loading ...
Page is loading ...
Page is loading ...
Page is loading ...
Page is loading ...
Page is loading ...
Page is loading ...
Page is loading ...
Page is loading ...
Page is loading ...
Page is loading ...
Page is loading ...
Page is loading ...

©Copyright LOTRONIC 2016 QUAD8-FX Page 30
DMX KANALI
11 kanalni DMX način
Kanal DMX Vrednost Funkcija
1 0---255 X
2 0---255 Y1
3 0---255 Y2
4 0---255 Dimmer 0-100%
5
Strobe
000-007 Close strobe
008-015 Open strobe
016-131 Strobe from slow to fast
132-139 Open strobe
140-181 fast open slow close
182-189 Open strobe
190-231 Slow open fast close
232-239 Open strobe
240-247 Random strobe
248-255 open strobe
6 0---255 Red dimmer
7 0---255 Green dimmer
8 0---255 Blue dimmer
9 0---255 White dimmer
10 0---255 Y1, Y2 speed
11
000-007 Only others channels can be controlled
008-063 Auto run
064-127 Sound active
128-255 Reset
39 kanalni DMC način
Kanal DMX Vrednost Funkcija
1 0---255 X
2 0---255 Y1
3 0---255 Y2
4 0---255 Dimmer from 0-100%
5
Strobe
000-007 Close strobe

©Copyright LOTRONIC 2016 QUAD8-FX Page 31
008-015 Open strobe
016-131 Strobe from slow to fast
132-139 Open strobe
140-181 fast open slow close
182-189 Open strobe
190-231 Slow open fast close
232-239 Open strobe
240-247 Random strobe
248-255 open strobe
6 0---255 Y1 Red dimmer
7 0---255 Y1 Green Dimmer
8 0---255 Y1 Blue Dimmer
… 0---255 Y1 White Dimmer
33 … …
34 0---255 8 Red Dimmer
35 0---255 8 Green Dimmer
36 0---255 8 Blue Dimmer
37 0---255 8 White Dimmer
38 0---255 Y1, Y2 speed
39
000-007 Only others channels can be controlled
008-063 Auto run
064-127 Sound active
128-255 Reset
Čiščenje
Zaradi ostankov megle, dima in praha čiščenja notranjih in zunanjih leč je treba izvajati redno za optimalno oddajanje
svetlobe.
1. Uporabite normalno čistilo za steklo in mehko krpo obrišite zunanjo-stransko ohišje.
2. Čiščenje zunanje optike s čistilom za steklo in mehko krpo vsakih 20 dni.
3. Vedno se prepričajte, da so posušeni vsi deli preden priključite enoto nazaj.
Za Slovenijo:
Page is loading ...
Page is loading ...
Page is loading ...
Page is loading ...
Page is loading ...
Page is loading ...
Page is loading ...
Page is loading ...
Page is loading ...
Page is loading ...
Page is loading ...
Page is loading ...
Page is loading ...
Page is loading ...
Page is loading ...
Page is loading ...
Page is loading ...
Page is loading ...

©Copyright LOTRONIC 2016 QUAD8-FX Page 50
2. Limpie las optics externas con un paño ligeramente humedecido con limpia cristales clasico Y SEQUE
PERFECTAMENTE, cada tres semanas.
3. SEQUE TODO EL EQUIPO PERFECTAMENTE, ANTES DE VOLVER A ENCHUFARLO A LA CORRIENTE.
Imported from China by
LOTRONIC SA – Avenue Zénobe Gramme 9 – 1480 Saintes - Belgium
-
 1
1
-
 2
2
-
 3
3
-
 4
4
-
 5
5
-
 6
6
-
 7
7
-
 8
8
-
 9
9
-
 10
10
-
 11
11
-
 12
12
-
 13
13
-
 14
14
-
 15
15
-
 16
16
-
 17
17
-
 18
18
-
 19
19
-
 20
20
-
 21
21
-
 22
22
-
 23
23
-
 24
24
-
 25
25
-
 26
26
-
 27
27
-
 28
28
-
 29
29
-
 30
30
-
 31
31
-
 32
32
-
 33
33
-
 34
34
-
 35
35
-
 36
36
-
 37
37
-
 38
38
-
 39
39
-
 40
40
-
 41
41
-
 42
42
-
 43
43
-
 44
44
-
 45
45
-
 46
46
-
 47
47
-
 48
48
-
 49
49
-
 50
50


Ibiza 15-1431 User manual
- Category
- Stroboscopes & disco lights
- Type
- User manual
- This manual is also suitable for
Ask a question and I''ll find the answer in the document
Finding information in a document is now easier with AI
in other languages
- français: Ibiza 15-1431 Manuel utilisateur
- español: Ibiza 15-1431 Manual de usuario
- Deutsch: Ibiza 15-1431 Benutzerhandbuch
- Nederlands: Ibiza 15-1431 Handleiding
- português: Ibiza 15-1431 Manual do usuário
- polski: Ibiza 15-1431 Instrukcja obsługi
Related papers
-
Ibiza Light 9BEAM-MINI User manual
-
 Ibiza Light PARLED318-FX2 Owner's manual
-
 Ibiza Light 15-1048 Owner's manual
-
 Ibiza Light 10031028 Owner's manual
-
 Ibiza Light 2-In-1 Warm White Blinder Matrix Animation Bar User manual
-
 Ibiza Light 16-2100 User manual
-
 Ibiza LC806S Owner's manual
-
 Ibiza Light 15-1471 Owner's manual
-
Ibiza Light COMBI-FX3 Owner's manual
-
Ibiza Light 3-in-1 Light Effect User manual


Other documents
-
Ibiza Light LED8-MINI Spider Light User manual
-
 Ibiza Light LMH-MINIWASH Owner's manual
-
TECshow Quad Spider 60 User manual
-
 afx light 16-2800 Owner's manual
-
 Ibiza Light LMH50LED Owner's manual
-
 Ibiza Light MHSPOT30-FX Owner's manual
-
 Ibiza Light CROSS-GOBOFX Owner's manual
-
 Ibiza Light MHBEAM60-FX Owner's manual
-
Beamz 151.230 LED PAR 64 18 x 10W Alu Quad IR DMX User manual
-
 Ibiza Light BEE40-LED Owner's manual


