American Standard 7074010.002 Installation guide

Category
Sanitary ware
Type
Installation guide

This manual is also suitable for

M965774 (9/16)
SINGLE CONTROL
KITCHEN PULL-OUT FAUCET
7074.100
Thank you for selecting American-Standard...
the benchmark of fine quality for over 100 years.
To ensure that your installation proceeds smoothly--
please read these instructions carefully before you begin.
Installation
Instructions
Certified to comply with ANSI A112.18.1M
1
INSTALL FAUCET WITH OR WITHOUT DECK ESCUTCHEON
1
3
7
A
B
PUTTY
SPOUT BASE
SINK OR
MOUNTING
SURFACE
7
2
3
2
Assemble RUBBER WASHER (4), BRASS WASHER (5), and threaded LOCKNUT (6) onto SHANK (3) from underside
of sink or mounting surface. Hand tighten LOCKNUT (6) and check that rotation of HANDLE (7) from HOT to COLD
is centered.
Use a screwdriver to tighten SCREWS (8) on LOCKNUT (6). Work your way around LOCKNUT (6), tightening
the screws slightly each time until all are snug to ensure even pressure.
(A) Installation with ESCUTCHEON (1). Apply a bead of putty to bottom edge of ESCUTCHEON with PUTTY PLATE (1).
Insert supply HOSES (2) and SHANK (3) through hole of ESCUTCHEON with PUTTY PLATE (1) and mounting surface.
Follow mounting instructions below to secure faucet to mounting surface.
(B) Installation less ESCUTCHEON (1). Discard ESCUTCHEON with PUTTY PLATE (1). Insert supply HOSES (2) and
SHANK (3) through mounting hole and seat SPOUT BASE onto sink or mounting surface. Do not use putty.
Plumbers' Putty or Caulking
Adjustable Wrench
Phillips Screwdriver
RECOMMENDED TOOLS
Regular Screwdriver
4
5
8
6
4
5
8
6
Insert HOSES (2) through RUBBER WASHER (4), BRASS WASHER (5), and threaded LOCKNUT (6).
Turn off water at
main supply.
CAUTION
COLONY
®
PRO
2
MAKE WATER SUPPLY CONNECTIONS
4
TEST INSTALLED FAUCET
3
INSTALL WEIGHTS
Move HANDLE (1) down into
"off" position.
With HANDLE (1) down in "off" position,
unthread SPRAY FACE (3) from SPRAY (2).
Turn on water supplies.
Operate handle up and down, in COLD
and HOT positions, to flush water lines
thoroughly.
Check HAND SPRAY (2) operation:
Switch between two functions using SWITCH (3).
Replace SPRAY FACE (3) onto SPRAY (2).
With HAND SPRAY (1) seated in FAUCET (2),
install WEIGHT (4) onto HOSE (3) using the
SCREW (5). Locate the WEIGHT (4) two feet (2')
from the underside of the sink deck.
Tighten SCREW (5) firmly.
Check connections for leaks.
(See Section 5)
3
2
2
1
2
COLD
HOT
Turn off hot and cold water supplies before beginning.
Connect FLEXIBLE SUPPLIES (1, 2) directly
to wall supplies. Connection on fitting
supplies are 3/8" compression. Connect
left supply (Marked with a Red Stripe) to Hot
and right supply (Marked with Blue Stripe) to
Cold wall supply. Use adjustable wrench to
tighten connections. Do not over tighten.
Faucet supplies are 21" long from faucet base.
Note: If additional supply length is
required, installer must purchase
additional parts separately.
Important: If SUPPLY HOSES (1, 2) are
too long, loop as illustrated to avoid kinking.
3
5
4
1
2
24"
3
REMOVE
M965774 (9/16)
1
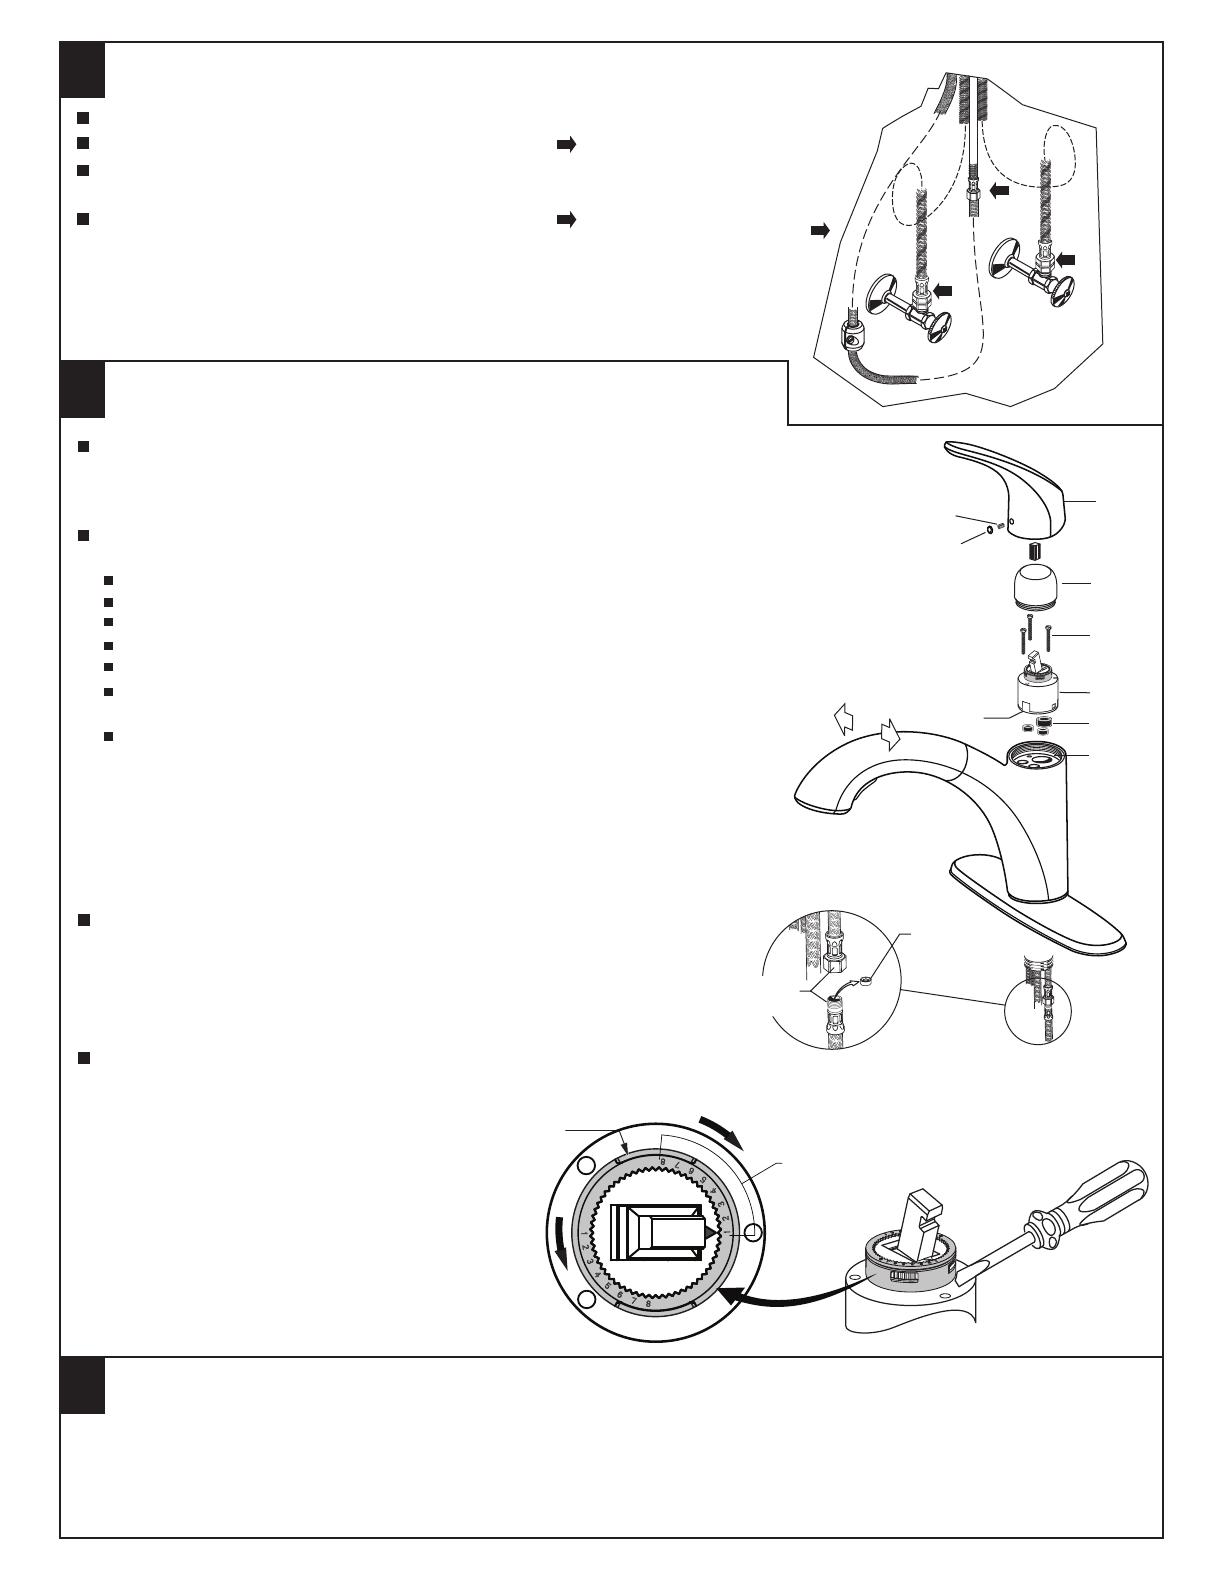
CHECK CONNECTIONS FOR LEAKS.
Move HANDLE down into "off" position.
Turn on water supplies and check connections for leaks
.
Operate HANDLE (2) up and down, left and right to flush
water lines thoroughly.
Operate HAND SPRAY and check connections for leaks.
CHECK CONNECTIONS
FOR LEAKS
5
SERVICE
6
Clogged CARTRIDGE outlets or inlets may cause reduced flow.
To clean, first turn off water supply then:
1
2
3
4
5
6
8
7
7
If faucet drips, operate HANDLE several times from "off" to "on." Do not
apply excessive force.
FLOW CONTROL DEVICE may accumulate dirt. To remove the FLOW CONTROL DEVICE,
unthread SPRAY AND HOSE ASSEMBLY and rinse clean FLOW CONTROL DEVICE.
Remove INDEX BUTTON (1), loosen HANDLE SCREW (2) and remove HANDLE (3).
Unthread the ESCUTCHEON CAP (4). Unthread three MOUNTING SCREWS (5).
Lift CARTRIDGE (6) off MANIFOLD (7) and remove CARTRIDGE SEALS (8).
Place SEALS (8) into CARTRIDGE PORTS (6A).
Replace ESCUTCHEON CAP (4), HANDLE (3), tighten HANDLE
SCREW (1) and install INDEX BUTTON (2).
Clean MANIFOLD (7), CARTRIDGE (6) ports and SEALS (8).
Place CARTRIDGE (6) onto MANIFOLD (7) and tighten MOUNTING
SCREWS (5) alternately.
By restricting handle rotation and limiting the amount of hot water allowed
to mix with the cold, the HOT LIMIT SAFETY STOP reduces risk of accidental
scalding. To set the maximum hot water temperature of your faucets, all you
need to do is adjust the setting on the HOT LIMIT SAFETY STOP.
Remove HANDLE BUTTON (1) and loosen SET SCREW (2). Pull
HANDLE (3) off valve stem. Pull off CAP (4). Use a flat blade
screwdriver or your fingers to pull up and rotate red HOT LIMIT
SAFETY STOP (5). Follow Step "A" or "B" to adjust min./max.
discharge temperature. "0" being the hottest to "7" the coldest
temperature setting. Factory set at "0".
Replace ESCUTCHEON CAP (4), HANDLE (3), tighten
HANDLE SCREW (1) and install INDEX BUTTON (2).
HOT LIMIT SAFETY STOP ADJUSTMENT
6A
CARE:
DO: SIMPLY RINSE THE PRODUCT CLEAN WITH CLEAR WATER. DRY WITH A SOFT COTTON FLANNEL CLOTH.
DO NOT: DO NOT CLEAN THE PRODUCT WITH SOAPS, ACID, POLISH, ABRASIVES, HARSH CLEANERS, OR A
CLOTH WITH A COARSE SURFACE.
FLOW CONTROL
DEVISE
SPRAY AND HOSE
ASSEMBLY
M965774 (9/16)
PRY RED RING UPWARD
AND ROTATE
COUNTER-CLOCKWISE
"A"
ADJUSTMENT WHEN WATER IS TOO HOT
PRY RED RING UPWARD
AND ROTATE CLOCKWISE
"B"
ADJUSTMENT WHEN
WATER IS TOO COLD
"RED RING"- HOT LIMIT SAFETY STOP
"B"
"A"
TEMPERATURE
SETTING NUMBERS
MODEL NUMBERS
7074.100
COLONY
®
PRO
SINGLE CONTROL KITCHEN
PULL-OUT FAUCET
A951470-0070A
CARTRIDGE
M918506-0070A
CARTRIDGE SCREWS
M962806-YYY0A
ESCUTCHEON AND
PUTTY PLATE
M962146-0070A
MOUNTING KIT
M907302-YYY0A
CARTRIDGE CAP
M953660-YYY0A
PULL-OUT SPRAY & HOSE
M923648-0070A
SPRAY HOLDER
M970220-YYY0A
HANDLE KIT
M970221-0070A
BUTTON AND
SCREW KIT
CHROME
STAINLESS STEEL
002
075
Replace the "YYY" with
appropriate finish code
M964320-0070A
WEIGHT
M965774 (9/16)
HOT LINE FOR HELP
For toll-free information and answers to your questions, call:
1 (800) 442-1902
Mon. - Fri. 8:00 a.m. to 8:00 p.m. EST
Saturday 10:00 a.m. to 4:00 p.m. EST
IN CANADA 1-800-387-0369
(TORONTO 1-905-306-1093)
Weekdays 8:00 a.m. to 7:00 p.m. EST
IN MEXICO 01-800-839-1200
Product names listed herein are
trademarks of AS America, Inc.
© AS America, Inc. 2016
M911261-0070A
SPOUT SEAL
  • Page 1 1
  • Page 2 2
  • Page 3 3
  • Page 4 4

American Standard 7074010.002 Installation guide

Category
Sanitary ware
Type
Installation guide
This manual is also suitable for

Ask a question and I''ll find the answer in the document

Finding information in a document is now easier with AI