
1
COMMERCIAL FREEZERS & COOLERS
USER INSTRUCTIONS
UL udg.03

2
Operating instructions
Commercial Freezer/Cooler.
In order to get the max. advantage from your
freezer/cooler it is important that it is placed in the
correct position. This manual should therefore be
read carefully. Keep the manual in a place where
it can always be found for reference. Even with
careful attention to the freezer, a mishap may
occur, with the consequence that the contents of
the cabinet could be lost, therefore a product
insurance is recommended.
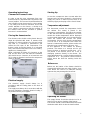
Placing the freezer/cooler.
The freezer/cooler should not be placed where it
might be splashed with water, in extreme high
humidity or in direct sunlight. Any of these factors
may lead to a reduction in performance and
shorten the life span of the components. The
freezer/ cooler should be placed on a horizontal
level, and should not be placed close to a heating
appliance or heating tubes.
Allow a minimum of 50mm (2”) clearance on the
side and the back. The side with the ventilation
grill should have a clearance of at least 100 mm
(4”) in order to allow the heat from the compressor
motor to dissipate.
Electrical supply.
The electrical supply should always be in
accordance with the rating plate on the back of
the freezer.
The supply must always be in accordance with the
law and regulations regarding electrical safety, if
any doubts contact your supplier.
Starting Up.
In case the compressor does not start when the
freezer/cooler has been plugged in, the electrical
supply may not be in order. Check if there is an
electricity supply to the plug or if the fuse is blown.
Temperature adjustment.
The thermostat controls the temperature inside
the cabinet. The control is placed in the
compressor compartment. The higher the number
on the dial the lower the temperature. On some
models the inside temperature will be displayed
on the outside thermometer. A to low temperature
inside the cabinet will increase the power
consumption. Please check that the temperature
is not to low is at an adequate level. When the
freezer is loaded with products, please make sure
that they have a temperature of at least –20 C
As the appliance is not suitable for freezing
products, but meant as a storage unit for pre
frozen products. If products warmer than –15 C
are placed in the freezer, there are a risk of
damaging products already in the freezer. The
inside temperature for a cooler should normally be
adjusted to +4 C . The products should never be
placed above the load line marking inside the
cabinet.
Before use.
Before use the interior of the freezer should be
cleaned with tepid water and dried of with a clean
cloth. Never use soda or an abrasive cleaning
agent as they may damage the inner liner.
Operating the freezer.
The empty freezer should be switched on for at
least 5-6 hours prior to loading of the freezer.
The freezer should not be loaded above the inside
aluminium walls which is also the load line limit.

3
Please note: After the lid has been opened, there will be
a vacuum created inside the freezer due to the low
temperatures. Wait a few minutes before trying to re-
open the lid otherwise the handle could be damaged.
Defrosting.
In order for the freezer to work to its maximum
efficiency the cabinet should be defrosted when a
approx. 2mm thick ice layer has formed inside the
cabinet.
The ice layer is easily removed with a plastic or
wooden scraper. Never use a sharp metal object
which might will cause damage to the inner liner.
The defrosting frequency is determined mainly by
two factors the usage pattern (number of lid
openings) and the relative humidity.
Excess water can be drained out by using the
drain water outlet on the front of the freezer.
Cleaning.
Cleaning should be done when needed. When
used in a dirty environment it might be necessary
to remove the compressor compartment and
clean the compressor compartment eventually
with a vacuum cleaner.
If the cleaning process is neglected there is a risk
that the performance of the freezer will be
effected, and even damage to the compressor
could occur due to overheating.
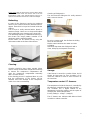
Cleaning of sliding tracks.
The dust from the sliding track is easily removed
with a vacuum cleaner.
By using a cotton swab, the dirt from the sliding
track can be removed.
Dip the cotton swab into the water and start
scrubbing.
After that, wipe down the sliding track with a
clean, damp rag and repeat if necessary.
Storage.
If the freezer is stored for a period of time, the lid
should be kept open for free circulation of air
inside the cabinet in order to avoid corrosion of
the inner liner.
Temperature control LT- freezers.
The temperature inside the freezer is controlled by
the electronic controller placed in the front grill.
The controller has a digital readout of the
temperature inside the cabinet. and the option of
changing the wanted temperature.
Factory setting is –45dgr.C (-49dgr.F).
The LT-freezers are delivered with either a Dixell
controller or a Beta controller.

4
Dixell controller.
Functions.
How to see the set point:
1. Press and immediately release the SET key,
the display will now show the set point value.
2. Press and immediately release the SET key or
wait for 5 seconds to display the probe value
again.
How to lock and unlock the keyboard:
1. Press the up and down keys simultaneously for
more than 3.seconds.
How to change the set point:
1. Press the SET key for more than 2.seconds to
change the set point value.
2. The set point value will be displayed and the
LED starts flashing.
3. To change the set point value, push the up or
down arrow.
4. To memorise the new setting press the SET
key again or wait 15 seconds for the controller to
return to normal display of the probe temperature.
Setting the controllers offset value.
The EL-LT freezer is designed for long time and
safe storage of sensitive food products.
In some situations, the EL-LT freezer is also used
for other applications like in laboratories for
different low temperature test.
Depending on the actual situation, it might be
necessary to change the controllers offset value in
order to get a correspondence between the
reading on the display and the actual temperature
inside the cabinet.
The factory setting is an offset of 0 dgr.C.
The offset can be adjusted in the following way:
Unlock the keyboard.
Enter the programming mode by pressing the SET
and arrow down keys for 3 seconds.
Select the parameter “Ot” by pressing arrow up or
down key.
Press the SET key to display its value.
Use arrow up or down to change its value. The
offset can be adjusted to +/- 12 dgr .C
Press SET to store the new value.
Press SET + arrow up or wait 15 seconds without
pressing any key. The new value will now be
stored.
Beta controller.
Functions.
How to see and change the set point:
Press SET and hold for 3 seconds.
Press SET and adjust the value with up or down
arrow.
Press SET to confirm the new setting,after 10
seconds the controller leaves the set mode and
the data will be stored in the memory.
Setting the Beta controllers offset
value.
Press SET and hold for 10 seconds.
Press arrow up or down until code “OFS” is
displayed.
Press SET to show the set value.
Adjust the value with arrow up or down.
Press SET to confirm the new setting, after 10
seconds the controller leaves the set mode and
the new setting will be stored in the memory.
The offset value of the Beta controller can be
adjusted to +/- 10dgr.
Before useBefore use

5
Trouble shooting.
If the freezer has stopped working, please check
the following before calling for service:
Has the freezer been switched of at the mains?
Is the fuse blown?
Is the plug properly in place?
Is the thermostat set correctly?
The freezer is running continuously.
Thermostat is set to a to low temperature, lowest
temperature is –45dgr.C at 30dgr.C ambient
temperature.
Is the temperature around the freezer higher than
30dgr.C.?
Is there a heavy formation of ice inside the
freezer.?
Has the freezer recently been filled with larger
amounts of warm products?
Is the compressor compartment clean? The
cupper coil inside the compressor compartment
should be free from dust and grease.
Note: Before removing the grill to the compressor
compartment the freezer should be disconnected
from the mains.
After having checked the above mentioned points
and the freezer is still not working satisfactorily
please contact your dealer.
Disposal.
When a freezer is discarded, it must be disposed
of in accordance with local legislation.
Glass lids.
The glass lids on the freezer/cooler are as
vulnerable as any other glass items for scratches
and shock. Therefore you should never place a
glass lid directly on the floor if it is without a frame.
Also you should not place anything on the glass,
which might scratch it, thus avoiding damage or
breaking the glass.
The glass is tempered and can sustain pressure
but not scratches or shock.
N.B. There will be no compensation for incorrect
use.
Service.
Before calling a service engineer, please check:
Not freezing/cooling.
Please check the electricity supply and the fusing.
Temperature to high inside the cabinet.
Has the cabinet been loaded with to warm
products?
Is the cabinet placed correctly with sufficient
ventilation?
Is the thermostat setting correct?
Is the ventilation grill clean?
After having checked these points and the unit is
still mail functioning, please contact your supplier.

6
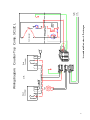
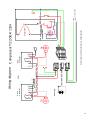
Wiring diagram.
115V
60 HZ
Compressor
Starting relay
Power
suplay
Counter-Top Comp. SC12CL
5
4
8
11
7
Dixell
Controller
Censor
12
3
1
10
75
12
Censor
Beta
Controller
OR
Fan

7
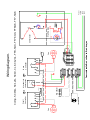
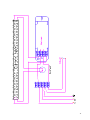
Wiring diagram.
Mechanical
thermostat
Dixell
Controller
8
5
7
4 11
12
3
6
4
Censor
Frame Heater
Fan
Internal light
Beta
Controller
Compressor
Starting relay
Censor
7
1
3
5
12
10
Fan
Power
suplay
115V
60 HZ
Comp. SC15G, SC12G, SC10, CL,SC12CL, FF8,5GX, FF7,5GX, FF6GK, FF7,5GK

8
Compressor
Power
suplay
1
3 5
1210
7
Beta
Controller
4
5
7 12
11
8
Dixell
Controller
Censor
Censor
US 115V 60HZ
Fan
Fan
Compressor T2180GK 115V
RC
Internal light
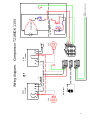
Wiring diagram.

9
Compressor
Power
suplay
1
3
5
12
10
7
Beta
Controller
4
5
7
12
11
8
Dixell
Controller
Censor
Censor
US 115V 60HZ
Fan
Fan
Compressor T2168GK 115V
Internal light
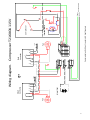
Wiring diagram.
Commercial units:Chest coolers & Chest freezers

10
US 115V 60HZ
Censor
Censor
Dixell
Controller
8
11
127
5
4
Beta
Controller
7
10 12
5
3
1
Power
suplay
Compressor
Commercial units:Chest coolers & Chest freezers
Wiring diagram.
Internal light
Compressor T2155GK 115V
OR
Fan
Fan

11
-
 1
1
-
 2
2
-
 3
3
-
 4
4
-
 5
5
-
 6
6
-
 7
7
-
 8
8
-
 9
9
-
 10
10
-
 11
11


Ask a question and I''ll find the answer in the document
Finding information in a document is now easier with AI
Other documents
-
 Maxx Cold MXCR50B Service, Installation And Care Manual
-
Frigor GLE 30 User Instructions
-
 Heatcraft Refrigeration Products H-IM-82B User manual
-
 Heatcraft Refrigeration Products PRO3 User manual
-
Randell FX-3SS Operating instructions
-
-
 Dixi XWA11V User manual
-
Hoshizaki EF2A-FS User manual
-
Follett FZR5-PL Series Installation, Operation And Service Manual
-


