
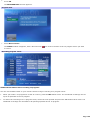
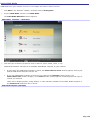
Welcome
Thank you for purchasing a Sony VAIO
®
computer! Your new computer is a superb blend of high technology and easy-to-use
functionality. The information provided here is designed to help you to become familiar with the hardware and software
programs included with your system.
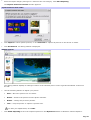
View the Electronic Flyer, which provides updates and supplemental information about your computer.
Go to the Sony Online Support Web site, to view the VAIO
®
Computer Specifications, which lists your computer's
hardware specifications and preinstalled software information.
For Sony software information:
1.
Click Start in the Windows
®
taskbar.
2.
Click Welcome to VAIO life.
Page 1

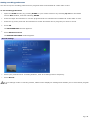
Getting Started
Congratulations on your purchase of the Sony VAIO
®
computer! Your new, high-performance, multimedia computer combines
state-of-the-art computer functionality with the latest audio, video and information technology features.
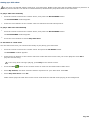
Unpacking your Computer
Planning an Ergonomic Work Space
Page 2

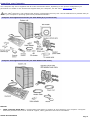
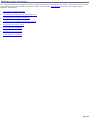
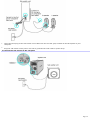
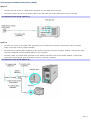
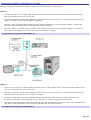
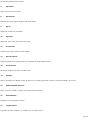
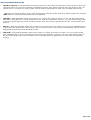
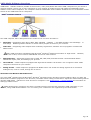
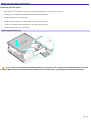
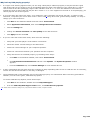
Unpacking your Computer
Your computer may not be supplied with all of the accessories shown, depending on the system configuration you
purchased. For details on the accessories supplied with your computer, see the online Specifications sheet.
Your VAIO
®
computer is not supplied with System or Application Recovery CDs. Use the VAIO Recovery Wizard utility to
recover your computer's operating system and preinstalled software.
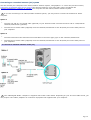
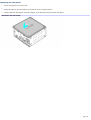
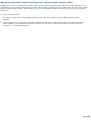
Computer and supplied accessories (For PCV-RZ50 [G/Y] m odel series)
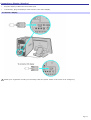
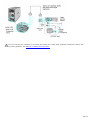
Computer and supplied accessories (For PCV-RZ50 m odel series)
Manuals
VAIO
®
Computer Quick Start — Provides basic information on setting up and registering your computer. The Quick
Start also provides resources for technical support, safety guidelines and owner information.
Online Documentation
Page 3

VAIO
®
Computer User Guide — Contains features and specifications of your computer. It also includes information
on the Microsoft
®
Windows
®
XP Media Center Edition operating system, the software programs included with your
system, and solving common problems.
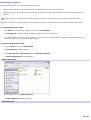
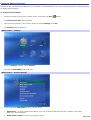
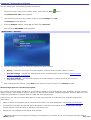
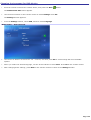
To access the online User Guide:
1.
Click Start in the Windows taskbar, then click Help and Support.
2.
From the VAIO Help and Support Center menu, click VAIO User Guide.
Specifications — This online specification sheet describes the hardware and software configuration of your VAIO
computer. To access this information, go to the online Specifications sheet.
VAIO Software — Provides specific information on certain preinstalled software on your computer.
To access this online software information:
1.
Click Start in the Windows
®
taskbar.
2.
Click Welcome to VAIO life.
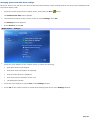
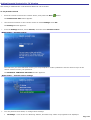
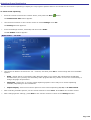
Hard Disk Drive Recovery
Your computer is equipped with the VAIO Recovery Wizard utility program that recovers your computer's operating system
and preinstalled software. For more information about hard disk drive recovery:
1.
Click Start in the Windows
®
taskbar, then click Help and Support.
2.
From the VAIO Help And Support Center, click VAIO Recovery Options.
Other
A software library, containing the Microsoft
®
software and Sony
®
end-user license agreements.
Page 4

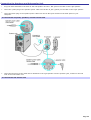
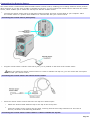
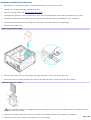
Planning an Ergonomic Work Space
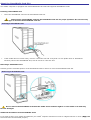
Before you set up your new computer, find the best location for your new computer and plan your work space. There are
several ergonomic factors to consider when you arrange your work space:
Stable work surface — Use a stable work surface large enough to support the computer and other peripheral
equipment.
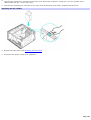
Ventilation — Leave at least eight inches of space on the left and back sides of your computer to enable proper
ventilation.
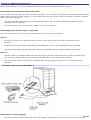
Placement of the keyboard, mouse, and other input devices — Place your keyboard, mouse, and other input
devices so that your arms and hands are in a relaxed, comfortable position. The keyboard should be directly in front
of you. Adjust the level of the keyboard so that your lower arms are parallel to the floor. Keep your wrists in a
relaxed position when you are using the keyboard — not angled up or down. Use the palmrest only briefly, for
resting. While typing, never use the palmrest or rest your hands on the table. Position the mouse at the same level
as the keyboard. Hold the mouse with a relaxed hand, and use your whole arm to move it. Take breaks during
sessions with your computer. Excessive use of the mouse or a joystick may strain muscles or tendons.
Furniture and posture — Sit in a chair with good back support and armrests. Adjust the level of the chair so your
feet are flat on the floor. A footrest may make you more comfortable. Sit with relaxed, upright posture — avoid
slouching forward or leaning far backward.
Viewing angle of the display — Position the display 18 to 26 inches directly in front of you, with the top of the
screen at or a little below eye level. Use the display's tilting feature to find the best position. You can reduce eye
strain and muscle fatigue by placing the display in the proper position.
Lighting — Choose a location where windows and lights do not create glare and reflection on the display. Use
indirect lighting to avoid bright spots on the display. You can also purchase accessories for your display that help
reduce glare. Proper lighting adds to your comfort and work effectiveness.
Page 5

Locating Controls And Ports
This section is intended to familiarize you with the controls, ports and jacks on your computer. Your computer may not be
equipped with all of these hardware features, and the location of the controls, ports, and jacks may vary from the
illustrations shown in this section. To view the specific connection capabilities for your system, see the online Specifications
sheet.
About the Front panel
About the Back panel
About the Sub-woofer
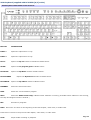
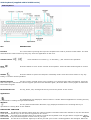
About the Keyboard
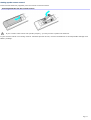
About the Remote Control
Page 6

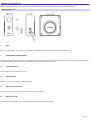
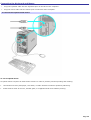
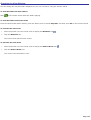
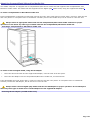
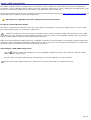
About the Front panel
The front panel of your VAIO
®
Computer enables access to drives, media slots, ports and jacks that enable you to connect
compatible peripheral devices.
Page 7

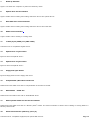
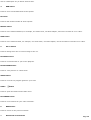
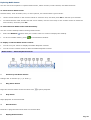
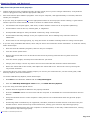
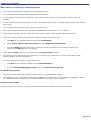
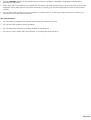
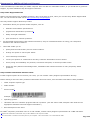
Front panel (PCV-RZ50 [G/Y] series)
Front panel
1 Optical drive 1
See the online Specifications sheet for optical drive information.
2 Optical drive 2
See the online Specifications sheet for optical drive information.
3 Floppy disk drive
Reads and writes data from and to a 3.5-inch floppy disk.
4 Floppy disk drive access indicator
Light is green while reading and writing data from and to a floppy disk.
5 Media Center indicator
Light is blue when a specific Media Center feature is active.
Page 8

6 Optical drive access indicator
Light is amber while reading and writing data from and to the optical drives.
7 Hard disk drive access indicator
Light is amber while reading and writing data from and to the hard disk.
8 Power switch and Stand by indicator
Turns the computer on and off. The indicator light is amber when the computer is placed in Stand by mode.
9 S-video In jack
Connection for an S-video cable (optional).
Composite video In jack
Connection for a video cable (optional).
Composite audio L In jack
Connection for an audio cable (optional).
Composite audio R In jack
Connection for an audio cable (optional).
10 Optical drive 1 eject button
Ejects a disc from Optical drive 1.
11 Optical drive 2 eject button
Ejects a disc from Optical drive 1.
12 Floppy disk eject button
Ejects a floppy disk from the floppy disk drive.
13 Power indicator (VAIO)
Light is white while the computer is on. The indicator turns off when the computer is in Stand by mode or turned off.
14 CompactFlash
®
and Microdrive media slot
Reads and writes data from and to CompactFlash and MicroDrive media.
Page 9

15 SmartMedia media slot
Reads and writes data from and to SmartMedia cards.
16 Memory Stick
®
media slot and access indicator
Reads and writes data from and to a Memory Stick
®
media. The access indicator light is amber when reading or writing
data.
17 Universal Serial Bus (USB 2.0) ports (3)
Connections for compatible high/full/low-speed USB devices.
18 i.LINK (4-pin) S400 port (IEEE 1394)
Connection for a compatible digital device.
i.LINK is a trademark of Sony used only to designate that a product contains an IEEE 1394 connection. The i.LINK
connection may vary, depending on the software programs, operating system, and compatible i.LINK devices. All products
with an i.LINK connection may not communicate with each other.
Refer to the documentation that came with your compatible i.LINK device for information on operating conditions and
proper connection. Before connecting compatible i.LINK devices to your system, such as an optical or hard disk drive,
confirm their operating system compatibility and required operating conditions.
Page 10

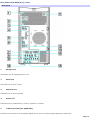
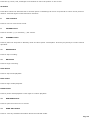
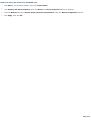
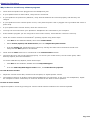
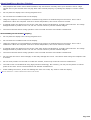
Front panel (PCV-RZ50 series)
Front panel
1 Optical drive 1
See the online Specifications sheet for optical drive information.
2 Optical drive 2
See the online Specifications sheet for optical drive information.
3 Floppy disk drive
Reads and writes data from and to a 3.5-inch floppy disk.
4 Floppy disk drive access indicator
Light is green while reading and writing data from and to a floppy disk.
5 Power indicator
Light is blue while the power is on.
6 Power switch
Turns the computer on and off.
Page 11

7 Stand by indicator
Light is red when the computer is placed in Stand by mode.
8 Optical drive access indicator
Light is amber while reading and writing data from and to the optical drives.
9 Hard disk drive access indicator
Light is amber while reading and writing data from and to the hard disk.
10 Media access indicator
1
Light is amber when reading or writing data.
11 i.LINK (4-pin) S400 port (IEEE 1394)
Connection for a compatible digital device.
12 Optical drive 1 eject button
Ejects a disc from Optical drive 1.
13 Optical drive 2 eject button
Ejects a disc from Optical drive 1.
14 Floppy disk eject button
Ejects a floppy disk from the floppy disk drive.
15 CompactFlash
®
/Microdrive media slot
Reads and writes data from and to CompactFlash or MicroDrive media.
16 SmartMedia media slot
Reads and writes data from and to SmartMedia cards.
17 Memory Stick media slot and access indicator
Reads and writes data from and to a Memory Stick
®
media. The access indicator is amber when reading or writing data to a
Memory Stick media.
18 Universal Serial Bus (USB 2.0) ports (3)
Connections for compatible high/full/low-speed USB devices.
Page 12


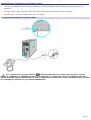
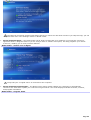
About the Back panel
The back panel of your computer contains the ports for supplied and optional accessories. The icons on the back panel
locate and identify the ports on your computer. The location of certain ports and jacks may vary from the illustration, based
on the computer model purchased.
Page 14

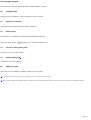
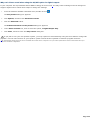
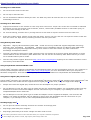
Back Panel (PCV-RZ50 [G/Y] series)
Back panel
1 AC Input port
Connection for the supplied power cord.
2 Mouse port
Connection for a PS/2
®
mouse.
3 Keyboard port
Connection for a PS/2 keyboard.
4 Printer port
Connection for a parallel device, such as a printer or scanner.
5 i.LINK 6-pin S400 port (IEEE 1394)
Connection and power for a compatible digital device, such as a Sony Digital Handycam
®
camcorder.
Page 15

6 Universal Serial Bus (USB 2.0) ports (4)
Connections for compatible high/full/low-speed USB devices.
7 Monitor port
1
Connection for a standard display.
8 Composite audio R In jack
Connection for an audio cable (optional).
Composite audio L In jack
Connection for an audio cable (optional).
Composite video In jack
Connection for a video cable (optional).
S-video In jack
Connection for an S-video cable (optional)
VHF/UHF port
Connection for a TV coaxial cable (supplied).
9 Joystick/MIDI port
Connection for a joystick or MIDI device.
Rear Out jack
Connection for optional speakers or external amplifier.
Line Out jack
2
Connection for the supplied sub-woofer, or optional speakers or headphones.
Microphone In jack
Connection for a microphone (optional).
Line In jack
Connection for an audio device.
Page 16

Analog/Digital Out jack
Connection for external digital devices or digital speaker systems.
10 Telephone jack
Connection for a telephone cable (optional) to the computer.
11 Speaker DC Out jack
Connection for the speaker power cable (supplied).
12 Ethernet port
Connection for a 10BASE-T/100BASE-TX/1000BASE-TX Ethernet.
(The port marked with (Network) is for LAN connections only.)
13 TV Out (S-video/video) jack
Connection for an S-video cable.
14 Monitor (DVI) port
1
Connection for a DVI monitor.
15 Modem line jack
Connection for the modem (supplied) cable to the wall jack.
1
T he location of this monitor port may vary, depending on the computer model purchased.
2
C ertain VA IO c omputers are supplied with a sub-woofer unit. See the Specifications s heet for information on your computer's s upplied accessories.
Page 17

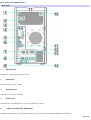
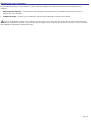
Back panel (PCV-RZ50 series)
Back panel
1 AC Input port
Connection for the supplied power cord.
2 Mouse port
Connection for a PS/2
®
mouse.
3 Keyboard port
Connection for a PS/2 keyboard.
4 Printer port
Connection for a parallel device, such as a printer or scanner.
5 i.LINK 6-pin S400 port (IEEE 1394)
Connection and power for a compatible digital device, such as a Sony Digital Handycam
®
camcorder.
Page 18

6 Universal Serial Bus (USB 2.0) ports (4)
Connections for compatible high/full/low-speed USB devices.
7 Monitor port
1
Connection for a standard display.
8 Joystick/MIDI port
Connection for a joystick or MIDI device.
Rear Out jack
Connection for optional speakers, or external amplifier.
Line Out jack
2
Connection for the supplied sub-woofer, speakers or optional headphones.
Microphone In jack
Connection for a microphone (optional).
Line In jack
Connection for an audio device.
Digital/Analog Out jack
Connection for external digital devices or digital speaker systems.
9 Telephone jack
Connection for a telephone cable (optional) to the computer.
10 Speaker DC Out jack
Connection for the supplied speaker power cable.
11 Ethernet port
Connection for a 10BASE-T/100BASE-TX/1000BASE-TX Ethernet.
(The port marked with (Network) is for LAN connections only.)
12 TV Out (S-video/video) jack
3
Page 19

Connection for an S-video cable (optional).
13 Monitor (DVI) port
1
Connection for a DVI monitor.
14 Modem line jack
Connection for the modem (supplied) cable to the wall jack.
1
T he location of this monitor port may vary, depending on the computer model purchased.
2
C ertain VA IO c omputer models are supplied with a sub-woofer unit. See the specifications s heet for information on your computer's hardware configuration
3
T his feature is available on selected models. See the specifications s heet for information on your computer's hardware configuration
Page 20
Page is loading ...
Page is loading ...
Page is loading ...
Page is loading ...
Page is loading ...
Page is loading ...
Page is loading ...
Page is loading ...
Page is loading ...
Page is loading ...
Page is loading ...
Page is loading ...
Page is loading ...
Page is loading ...
Page is loading ...
Page is loading ...
Page is loading ...
Page is loading ...
Page is loading ...
Page is loading ...
Page is loading ...
Page is loading ...
Page is loading ...
Page is loading ...
Page is loading ...
Page is loading ...
Page is loading ...
Page is loading ...
Page is loading ...
Page is loading ...
Page is loading ...
Page is loading ...
Page is loading ...
Page is loading ...
Page is loading ...
Page is loading ...
Page is loading ...
Page is loading ...
Page is loading ...
Page is loading ...
Page is loading ...
Page is loading ...
Page is loading ...
Page is loading ...
Page is loading ...
Page is loading ...
Page is loading ...
Page is loading ...
Page is loading ...
Page is loading ...
Page is loading ...
Page is loading ...
Page is loading ...
Page is loading ...
Page is loading ...
Page is loading ...
Page is loading ...
Page is loading ...
Page is loading ...
Page is loading ...
Page is loading ...
Page is loading ...
Page is loading ...
Page is loading ...
Page is loading ...
Page is loading ...
Page is loading ...
Page is loading ...
Page is loading ...
Page is loading ...
Page is loading ...
Page is loading ...
Page is loading ...
Page is loading ...
Page is loading ...
Page is loading ...
Page is loading ...
Page is loading ...
Page is loading ...
Page is loading ...
Page is loading ...
Page is loading ...
Page is loading ...
Page is loading ...
Page is loading ...
Page is loading ...
Page is loading ...
Page is loading ...
Page is loading ...
Page is loading ...
Page is loading ...
Page is loading ...
Page is loading ...
Page is loading ...
Page is loading ...
Page is loading ...
Page is loading ...
Page is loading ...
Page is loading ...
Page is loading ...
Page is loading ...
Page is loading ...
Page is loading ...
Page is loading ...
Page is loading ...
Page is loading ...
Page is loading ...
Page is loading ...
Page is loading ...
Page is loading ...
Page is loading ...
Page is loading ...
Page is loading ...
Page is loading ...
Page is loading ...
Page is loading ...
Page is loading ...
Page is loading ...
Page is loading ...
Page is loading ...
Page is loading ...
Page is loading ...
Page is loading ...
Page is loading ...
Page is loading ...
Page is loading ...
Page is loading ...
Page is loading ...
Page is loading ...
Page is loading ...
Page is loading ...
Page is loading ...
Page is loading ...
Page is loading ...
Page is loading ...
Page is loading ...
Page is loading ...
Page is loading ...
Page is loading ...
Page is loading ...
Page is loading ...
Page is loading ...
Page is loading ...
Page is loading ...
Page is loading ...
Page is loading ...
Page is loading ...
Page is loading ...
Page is loading ...
Page is loading ...
Page is loading ...
Page is loading ...
Page is loading ...
Page is loading ...
Page is loading ...
Page is loading ...
Page is loading ...
Page is loading ...
Page is loading ...
Page is loading ...
Page is loading ...
Page is loading ...
Page is loading ...
Page is loading ...
Page is loading ...
Page is loading ...
Page is loading ...
Page is loading ...
Page is loading ...
Page is loading ...
Page is loading ...
Page is loading ...
Page is loading ...
Page is loading ...
Page is loading ...
Page is loading ...
Page is loading ...
Page is loading ...
Page is loading ...
Page is loading ...
Page is loading ...
Page is loading ...
Page is loading ...
Page is loading ...
Page is loading ...
Page is loading ...
Page is loading ...
Page is loading ...
Page is loading ...
Page is loading ...
Page is loading ...
Page is loading ...
Page is loading ...
Page is loading ...
Page is loading ...
Page is loading ...
Page is loading ...
Page is loading ...
Page is loading ...
Page is loading ...
Page is loading ...
Page is loading ...
Page is loading ...
Page is loading ...
Page is loading ...
Page is loading ...
Page is loading ...
Page is loading ...
Page is loading ...
Page is loading ...
Page is loading ...
Page is loading ...
Page is loading ...
Page is loading ...
Page is loading ...
Page is loading ...
Page is loading ...
Page is loading ...
Page is loading ...
Page is loading ...
Page is loading ...
Page is loading ...
Page is loading ...
Page is loading ...
Page is loading ...
-
 1
1
-
 2
2
-
 3
3
-
 4
4
-
 5
5
-
 6
6
-
 7
7
-
 8
8
-
 9
9
-
 10
10
-
 11
11
-
 12
12
-
 13
13
-
 14
14
-
 15
15
-
 16
16
-
 17
17
-
 18
18
-
 19
19
-
 20
20
-
 21
21
-
 22
22
-
 23
23
-
 24
24
-
 25
25
-
 26
26
-
 27
27
-
 28
28
-
 29
29
-
 30
30
-
 31
31
-
 32
32
-
 33
33
-
 34
34
-
 35
35
-
 36
36
-
 37
37
-
 38
38
-
 39
39
-
 40
40
-
 41
41
-
 42
42
-
 43
43
-
 44
44
-
 45
45
-
 46
46
-
 47
47
-
 48
48
-
 49
49
-
 50
50
-
 51
51
-
 52
52
-
 53
53
-
 54
54
-
 55
55
-
 56
56
-
 57
57
-
 58
58
-
 59
59
-
 60
60
-
 61
61
-
 62
62
-
 63
63
-
 64
64
-
 65
65
-
 66
66
-
 67
67
-
 68
68
-
 69
69
-
 70
70
-
 71
71
-
 72
72
-
 73
73
-
 74
74
-
 75
75
-
 76
76
-
 77
77
-
 78
78
-
 79
79
-
 80
80
-
 81
81
-
 82
82
-
 83
83
-
 84
84
-
 85
85
-
 86
86
-
 87
87
-
 88
88
-
 89
89
-
 90
90
-
 91
91
-
 92
92
-
 93
93
-
 94
94
-
 95
95
-
 96
96
-
 97
97
-
 98
98
-
 99
99
-
 100
100
-
 101
101
-
 102
102
-
 103
103
-
 104
104
-
 105
105
-
 106
106
-
 107
107
-
 108
108
-
 109
109
-
 110
110
-
 111
111
-
 112
112
-
 113
113
-
 114
114
-
 115
115
-
 116
116
-
 117
117
-
 118
118
-
 119
119
-
 120
120
-
 121
121
-
 122
122
-
 123
123
-
 124
124
-
 125
125
-
 126
126
-
 127
127
-
 128
128
-
 129
129
-
 130
130
-
 131
131
-
 132
132
-
 133
133
-
 134
134
-
 135
135
-
 136
136
-
 137
137
-
 138
138
-
 139
139
-
 140
140
-
 141
141
-
 142
142
-
 143
143
-
 144
144
-
 145
145
-
 146
146
-
 147
147
-
 148
148
-
 149
149
-
 150
150
-
 151
151
-
 152
152
-
 153
153
-
 154
154
-
 155
155
-
 156
156
-
 157
157
-
 158
158
-
 159
159
-
 160
160
-
 161
161
-
 162
162
-
 163
163
-
 164
164
-
 165
165
-
 166
166
-
 167
167
-
 168
168
-
 169
169
-
 170
170
-
 171
171
-
 172
172
-
 173
173
-
 174
174
-
 175
175
-
 176
176
-
 177
177
-
 178
178
-
 179
179
-
 180
180
-
 181
181
-
 182
182
-
 183
183
-
 184
184
-
 185
185
-
 186
186
-
 187
187
-
 188
188
-
 189
189
-
 190
190
-
 191
191
-
 192
192
-
 193
193
-
 194
194
-
 195
195
-
 196
196
-
 197
197
-
 198
198
-
 199
199
-
 200
200
-
 201
201
-
 202
202
-
 203
203
-
 204
204
-
 205
205
-
 206
206
-
 207
207
-
 208
208
-
 209
209
-
 210
210
-
 211
211
-
 212
212
-
 213
213
-
 214
214
-
 215
215
-
 216
216
-
 217
217
-
 218
218
-
 219
219
-
 220
220
-
 221
221
-
 222
222
-
 223
223
-
 224
224
-
 225
225
-
 226
226
-
 227
227
-
 228
228
-
 229
229
-
 230
230
-
 231
231
-
 232
232
-
 233
233
-
 234
234
-
 235
235
-
 236
236
-
 237
237
-
 238
238
-
 239
239
-
 240
240
-
 241
241
-
 242
242
-
 243
243
-
 244
244
-
 245
245


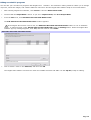
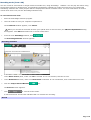
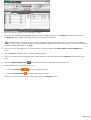
Ask a question and I''ll find the answer in the document
Finding information in a document is now easier with AI
Related papers
Other documents
-
Gateway 610XL User manual
-
Roland CD-2 Owner's manual
-
-
HP Omni 120-1026la Desktop PC User manual
-
HP Media Center PC User manual
-
-
-
Olympus DS-3000 User manual
-
-
Philips MCP9360I User manual