Page is loading ...

INSTALLATION INSTRUCTIONS
Certification and Code Requirements
The refrigerators described herein are certified un-
der the latest edition of ANSI Z21.19 Standards by
the American Gas Association (A.G.A.) for installa-
tion in mobile home or recreational vehicle and ap-
proval by the Canadian Gas Association (CGA).
Installation must be made in accordance with these
standards and with the installation instructions pro-
vided in this manual for the Norcold factory warranty
to be in effect.
Installation must conform with local codes, or in the
absence of local codes, with the following standards
as applicable:
In the United States:
a. National Fuel Gas Code, ANSI Z223.1.
b. Manufactured Home Construction and Safety
Standard, Title 24 CFR, Part 23-80.
c. Standard for Recreational Vehicles,ANSI
A119.2, latest edition.
When an external electrical energy is utilized, the
refrigerator must be electrically grounded in accord-
ance with local codes, or in the absence of local
codes, the National electrical Code, ANSI/NFPA 70.
In Canada:
a. Current CGA B149.1 and B149.2 installation
code for Propane Appliances and Equipment..
b. Current CSA Z240.4.2 installation code for Pro-
pane Appliances and Equipment in Recrea-
tional Vehicles.
c. Current CSA Z240.6.2/C22.2 No. 148 Electrical
Requirement for Recreational Vehicles.
When installed, the appliance must be electrically
grounded in accordance with the current Canadian
Electrical Code C22.2 Parts 1 and 2.
Cut-Out Dimensions
The refrigerators certified for built installation and
requires cut-out dimensions as indicated in Table 2
below.
Combustion Seals
Combustion seals (foam strips) are attached to the
back surface of the refrigerator’s mounting flanges.
These seals isolate the products of combustion from
the vehicle’s living space.
The seals must be con-
tinuous between the wall and the mounting
flanges to
assure a complete combustion sea
l.
When installing or removing the refrigerator, insure
that the seals are not missing or damaged.
Lower Flange Installation
The lower mounting flange and mounting screws
are located in a clear plastic bag positioned in the
coils at the rear of the refrigerator. After removing the
plastic bag, slide the refrigerator partially into the en-
closure and attach the lower mounting flange. Install
the lower mounting flange by maneuvering it under
and behind the bottom hinge and secure with the
screws provided. Refer to Figure 7.
Do not omit in-
stallation of the lower mounting flange. This
flange is part of the combustion seal.
Securing the Refrigerator
Secure the refrigerator with screws through the
mounting flange holes at the front of the refrigerator
and the holes at floor level at the rear of the refrig-
erator. Screw covers are provided to cover the front
mounting flange holes.
TABLE 2
REFRIGERATOR CUT-OUT OPENINGS (INCHES)
Model
662,3
6162,3
682,3
6182,3
652,3
6052,3
Height
52 7/8
52 7/8
59 7/8
59 7/8
43 1/4
43 1/4
Width
23 1/2
23 1/2
23 1/2
23 1/2
23 1/2
23 1/2
Depth
24
24
24
24
24
24
Figure 7
7

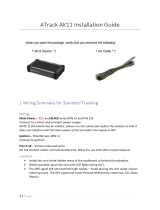
Gas Connection
The refrigerators are designed to operate on pro-
pane gas at a supply pressure of 11 inches water
column. A pressure regulator is required between the
refrigerator and the main gas tank.
Do not connect
the refrigerator directly to the main propane tank
without a pressure regulator.
Use supply piping and fittings that comply with local,
state, and national codes governing type and size.
These components should also comply with NFPA
501C. Flexible metal connectors must comply with
the current CAN 1-6.10 Standard. To prevent gas
pressure loss to the refrigerator, the propane should
be supplies by a 3/8 inch diameter copper piping.
The gas supply piping is connected to the refrigerator
by means of 3/8 inch SAE (UNF 5/8 - 18) male flare
fitting.
Route the gas supply piping to limit vibration and
abrasion. The gas supply piping should enter the re-
frigerator enclosure near the gas connection at the
rear of the refrigerator. The hole through which the
gas piping enters should be of sufficient size (ap-
proximately 1/2 inch diameter) to provide adequate
clearance for the piping. Once the gas piping is in
place, apply a sealant around the piping at its point
of entry to minimize abrasion and vibration, and to
serve as a barrier to external moisture.
CAUTION: Use two wrenches when ma-
nipulating the gas inlet fitting. Failure to
use two wrenches can over stress the pip-
ing and create gas leaks.
The gas supply is connected to the refrigerator at
the inlet to the manual gas valve located at the bot-
tom rear of the refrigerator. Access to this area is
obtained through the vehicle’s lower vent door. Care
must be taken when connecting the gas piping to the
refrigerator to insure the fittings are secure.
120 Volt AC Connection
WARNING: The refrigerators are designed
to operate on a 120 volt, 60 Hertz
grounded AC circuit. The refrigerator’s AC
power cord is equipped with a three-prong
grounding plug which must mate with a
three-prong grounded receptacle to protect
against possible electrical shock hazards.
Operating the refrigerator without proper
ground can cause property damage, se-
vere personal injury, or death. It is the in-
staller’s responsibility and obligation to
provide a properly grounded electrical cir-
cuit to the refrigerator accordance with lo-
cal codes, or in the absence of local
codes, the National Electrical Code,
ANSI/NFPA 70. Do not cut or remove the
round grounding prong from the refrigera-
tor’s AC power cord. Do not use a two
prong adapter or an extension cord.
The free length of the refrigerator’s AC power cord
is 24 inches. It is recommended that the three-prong
grounded receptacle be located to the left side of the
refrigerator (viewed from rear) and approximately 12
inches from the floor (see Figure 9 above). The AC
power cord must be routed so as not to contact the
refrigerator’s burner, flue pipe, or any other compo-
nent which could damage the cord insulation.
12 Volt DC Connection
A 12 volt DC supply is required to maintain the re-
frigerator’s operating control functions. The DC sup-
ply connects to the refrigerator at the power supply
Manual Shut-Off Valve
Hold
Turn
3/8 " Gas Supply
Figure 8
Figure 9
8

board located at the rear of the refrigerator (Figure
9). The 12 volt DC should enter the refrigerator’s en-
closure near the refrigerator’s power supply board.
The 12 volt DC connects at (2) one quarter inch
quick connects. The positive DC input lead connects
to terminal J4, and the DC ground input lead con-
nects to terminal J3.
CAUTION: Correct polarity must be ob-
served when connecting the DC supply.
Do not use the chassis of the refrigerator
or the vehicle frame as one of the conduc-
tors. Connect DC supply wires at the bat-
tery and route to the refrigerator.
The distance the current travels from the battery to
the refrigerator dictates the wire size. Undersized
wire can result in a voltage drop, which will affect the
wattage output of the DC heater and result in re-
duced refrigerator performance. Norcold recommends
the installation of a fuse in the supply wiring between
the battery and the refrigerator. For optimum protec-
tion, install the fuse as close to the battery as possi-
ble.
WARNING: A circuit overload can result in
an electrical fire when undersized wires or
improperly sized fuses are used. To pre-
vent a possible electrical fire, follow
R.V.I.A. A119.2 Standards, Norcold’s wire
size and fuse specifications, or applicable
state and local codes.
TABLE 3
12 VOLT SUPPLY WIRING AND FUSE SIZE
6162, 6182
662, 682
6052, 652
6163, 6183
663, 683
6053, 653
min.
wire
size
max.
fuse
size
min.
wire
size
max.
fuse
size
Min.
wire
size
max.
fuse
size
0 - 20’ 18
AWG
6 Amp 10
AWG
30
Amp
12
AWG
20
Amp
over
20’
18
AWG
6 Amp 8
AWG
40
Amp
10
AWG
30
Amp
If a wire size is installed which is larger than the
minimum size indicated the table above, it must be
fused in accordance with the R.V.I.A. A119.2 stand-
ard or local governing codes.
Hypot Test
A Dielectric Strength test (hypot) has been con-
ducted at the factory; this refrigerator does not re-
quire an additional test. If hypot tests are conducted
on the vehicle’s 12 volt circuit, the 12 volts
must
be
disconnected from the refrigerator to protect the
flame ignition circuit.
Testing the Vehicle’s Gas Supply Piping
When installation of the refrigerator is complete, the
propane gas supply piping must be inspected and
tested for leaks from the refrigerator to the main gas
supply tank. Use a leak detection solution.
Do not
test for leaks with an open flame.
If compressed air is used for leak testing, the gauge
pressure must not exceed 1/2 pound per square inch
(14 inches water column).
The appliance and its individual shut-off valve (Fig-
ure 10) must be disconnected from the gas supply
system during any pressure testing of that system at
test pressures greater than 1/2 psig (14 inches water
column).
The appliance must be isolated from the gas supply
system by closing its individual manual shut-off valve
(Figure 9) during any pressure testing of that system
at test pressure equal to or less than 1/2 psig (14
inches water column).
Check the gas pressure to the refrigerator without
other gas appliances operating. The pressure should
not exceed 11 inches water column. With other appli-
ances operating the pressure should not be less than
10.5 inches water column.
Check Out - Flame Failure Safety Device
Before placing the refrigerator into operation, the
gas safety device must be tested(see Operating In-
structions on page ). The purpose of the gas safety
device is to prevent the escape of unburned gas from
the burner if the burner flame is extinguished. While
there is a flame present at the burner, disconnect the
electrode wire to ignition module (see Figure 11).
Figure 10
9

Within 20 seconds the flame will go out, indicating
the safety lock-out circuit is operational. Reconnect
the wire to the ignition module upon completion of
the test.
Door Panel Installation
The Norcold refrigerator doors provide slots for in-
serting decorative panels. Installation of the panels is
accomplished by removing the handle assembly, in-
serting the decorative panel, and re-inserting the
handle assembly. This procedure applies to both
doors. (See Figure 12)
The frame slots are designed to accept panel thick-
ness up to 3/16" maximum.
TABLE 4
PANEL DIMENSIONS
662, 663
6162, 6163
682, 683
6182, 6183
Upper
Door
19 11/16" x 16" 19 11/16" x 16"
Lower
Door
19 11/16" x 32 1/4"
19 11/16" x 39 1/4"
Note:
use this dimension
for models 652,3 &
6052,3 outer door
INSTRUCTIONS
1. Prepare panel by cutting to size indicated in ac-
companying chart. (See TABLE 4)
2. Remove handle assembly (A) by removing four
screws (B). (See Figure 12)
3. Slide panel into frame slots.
4. Replace the handle assembly.
Instructions for Reversing Door Swing
Your refrigerator is equipped with convertible hinges
which allows the door swing to be changed at any-
time.
TOOLS REQUIRED
Phillips Screwdriver - Size #2
Two Slotted Screwdrivers
REMOVING THE DOORS
1. Remove all items of food, juices, etc., from the
doors. Remove the juice rack and storage bins.
Close both doors before removing hinge pins.
2. Remove the top hinge pin using one of the slot-
ted screwdrivers. Remove the center hinge pin
(both pieces) using the two slotted screwdriv-
ers; one on each end of the pin. Lastly, remove
the bottom hinge pin. Be sure to save the pins
for reassembly later. (See Figure 19)
3. Remove the upper door by opening the door
slightly and pulling the bottom of the door away
from the refrigerator. Allow enough room to
slide the door down off of the upper hinge pin
shoulder. (See Figure 13)
Ignition Module
Electrode Wire
Figure 11
Figure 12
Figure 13
10

4 Remove the lower door by opening it slightly
and pulling the top of the door away from the
refrigerator. Allow enough room so the door
can be lifted up and off of the bottom hinge pin
shoulder (See Figure 14). Be sure to save the
hinge plates along with the spacer used in the
middle hinge bracket, for reassembly later.
(See Figures 19A, 19B, and 19C)
REMOVING AND RELOCATING THE HINGE
BRACKETS
5. Remove the middle hinge bracket by using the
#2 Phillips screwdriver and taking out the three
screws holding it in place. Next, remove the
three screws on the opposite side correspond-
ing to the center hinge location. Relocate them
in the holes just exposed by the removal of the
hinge bracket. Attach the hinge bracket to the
refrigerator on the opposite side. Do not tighten
screws completely. (See Figure 15)
6. Remove the top hinge bracket and reposition it
in the opposite bottom corner. Use the same
technique as outlined in Step #5.
7. Remove the bottom hinge bracket and reposi-
tion it in the opposite top corner. Use the same
technique as outlined in Step #5.
RELOCATING THE TRAVEL LATCHES
8. Remove both travel latches by taking out the
two screws holding each to the refrigerator.
Use the #2 Phillips screwdriver. Remove the
two screws from each of the corresponding
holes on the opposite side of the refrigerator.
Relocate them in the two holes just exposed by
the removal of the latches. Attach the latch in
the new position so the tab points towards the
opposite side of the refrigerator. Do not tighten
screws completely. (See Figure 16)
9. Turn the door over so that the end previously
at the bottom is now at the top. Relocate the
bottom of the door on the bottom hinge pin
shoulder. Close door and align holes in top
hinge brackets. The magnetic gasket will hold
the door in place. Before reinstalling the top
door, check to insure that the spacer is in
place. (See Figures 17 and 19C)
10. Reposition the upper door in a similar manner
as described in Step #9, except the top of the
door must be engaged into the hinge pin
shoulder before setting the door in place.
(See Figure 18)
Figure 14
Figure 15
Figure 16
Figure 17
11

11. Starting at the top, replace the hinge pins using
the slotted screwdrivers as in the removal pro-
cedure. Tighten all screws.
ALIGNMENT OF THE DOORS
12. Align the upper door with the lower so that
there is a parallel gap between the doors and
around the frame. Adjust the doors to the cabi-
net so the gaskets seal but do not bind.
Tighten the screws holding the hinge brackets
in place.
13. Door Seal: The door seal can be checked by
closing the door on a 1" x 6" strip of paper. A
slight drag should be noticed when the paper is
pulled out from between the gasket and the
cabinet. Repeat the process around all four
sides of the door. If the door does not seal
properly, readjust the hinge brackets.
14. Position the travel latches so that they secure
the doors when closed but does not prevent
the doors from closing properly. Tighten the
two screws in each travel latch.
15. Replace the juice rack and storage bins into
the door. Make sure that the milk bins (wider
storage bins) are installed in the lowest door
position.
Figure 18
Figure 19
A: Top Hinge B: Bottom Hinge
C: Middle Hinge D: Middle Hinge
12
/