
Be sure to read this document before using the machine.
We recommend that you keep this document nearby for future reference.
Upgrade KIT
1
Operation Manual
Upgrade KIT
1
Operation Manual

1
New Features................................................................................................................................. 1
New Features of Upgrade KIT I ......................................................................................... 2
Selecting a frame that matches the pattern size .............................................................................. 2
Previewing the Completed Pattern ................................................................................................. 2
Changing the “Embroidery Frame Display”.................................................................................... 3
Adding Line Returns to Character Patterns ..................................................................................... 3
Added Features of Version 2.0
(These features are available for the sewing functions only).............................................. 4
New features ................................................................................................................................. 4
Using Reinforcement Priority ......................................................................................................... 4
Contents
Before you start
It is important to perform the upgrade according to the procedure outlined in the Installation Guide. The
machine can then be used as outlined in this upgrade Operation Manual. The screen illustrations in this
manual may differ from actual ones shown on the machine.
New Features
- Embroidery frames of 20 cm × 20 cm (approx. 8 inches × 8 inches) and 30 cm × 20 cm (approx. 12
inches × 8 inches) can be used.
After the KIT
I is activated, the maximum embroidering area becomes 30 cm × 20 cm (approx. 12
inches × 8 inches), and the “extra large embroidery frame” indicated in error messages refers to the 30
cm × 20 cm (approx. 12 inches × 8 inches) embroidery frame.
- When entering characters for embroidering in the embroidery edit mode, a line return can be entered
for multi-line text.
- 30 new embroidery patterns are included on the CD-ROM.
- A Reinforcement Priority function has been added.*
- The sewing speed for decorative stitches has been improved.*
- The speed to begin sewing utility stitches and decorative stitches has been improved.*
* These features are available for the sewing functions only.

2
The following features are added after KIT I is activated.
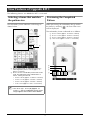
Selecting a frame that matches
the pattern size
The embroidery frame indicators will change as
shown below.
a Shows the boundary for embroidering with the
extra large frame (30 cm × 20 cm (approx. 12
inches × 8 inches)).
b Shows the size of embroidery frames that can be
used. The embroidery frames indicated are as
follows, starting from the left
• 30 cm × 20 cm (approx. 12 inches × 8 inches)
• 18 cm × 13 cm (approx. 7 inches × 5 inches)
• 10 cm × 10 cm (approx. 4 inches × 4 inches)
• 2 cm × 6 cm (approx. 1 inch × 2-1/2 inches)
Previewing the Completed
Pattern
When previewing the embroidery design within
the frame by selecting , the new frame sizes
will be displayed.
The embroidery frames indicated are as follows.
a 30 cm × 20 cm (approx. 12 inches× 8 inches)
b 18 cm × 13 cm (approx. 7 inches × 5 inches)
c 10 cm × 10 cm (approx. 4 inches × 4 inches)
d 2 cm × 6 cm (approx. 1 inch × 2-1/2 inches)
New Features of Upgrade KIT I
Memo
• The 30 cm (H) × 18 cm (W) (approx. 12
inches × 7 inches) embroidery frame will no
longer appear, but can be used as before.
a
b
a
b
c
d

3
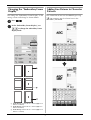
Changing the “Embroidery Frame
Display”
The settings for “Embroidery Frame Display” in the
settings screen will change as shown below.
a
Press .
b
In the “Embroidery Frame Display”, use
to change the embroidery frame
display mode.
a Embroidering area for 30 cm × 20 cm (approx. 12
inches × 8 inches)
b Embroidering area for 20 cm × 20 cm (approx. 8
inches x 8 inches)
c Embroidering area for 30 cm × 18 cm (approx. 12
inches × 7 inches)
Adding Line Returns to Character
Patterns
The second line of text can be added by pressing
after entering your first line of text in the
embroidery edit mode.

4
The following features are added with the upgrade to version 2.0. (These features are added even if KIT I
has not been activated.)
New features
- A Reinforcement Priority function has been
added.
- The sewing speed for decorative stitches has
been improved (from 400spm to 710spm*).
- The speed to begin sewing utility stitches and
decorative stitches has been improved (from
70spm to 110spm*).
* “spm” is the number of stitches sewn in one minute.
Using Reinforcement Priority
“Reinforcement Priority” has been added to page 3
of the settings screen.
When set to “ON”, reinforcement stitches are
sewn while the “Reverse Stitch” button is pressed
for stitches with a dot “ ” at the top of the key
display (for example, ).
For details on reverse/reinforcement stitches, refer
to “Sewing Reinforcement Stitches” and
“Automatic Reinforcement Stitching” in the
machine's Operation Manual.
* If “Reinforcement Priority” on the settings
screen is set to “
ON
”, reinforcement
stitches are sewn instead of reverse stitches.
Added Features of Version 2.0
(These features are available for the sewing functions
only)
“Reverse Stitch”
button
“Reinforcement
Stitch” button
+
Machine starts
sewing the stitches
and only sews reverse
stitches while holding
the “Reverse Stitch”
button.
*
Machine starts
sewing the stitches
and sews 3 - 5
reinforcement
stitches while holding
the “Reinforcement
Stitch” button.
+
Machine sews
reinforcement
stitches at the
beginning and reverse
stitches at the end of
sewing.
*
Machine sews
reinforcement
stitches at the
beginning and end of
sewing.

English
Version 0
-
 1
1
-
 2
2
-
 3
3
-
 4
4
-
 5
5
-
 6
6


Brother Innov-is BP2100 User manual
- Type
- User manual
- This manual is also suitable for
Ask a question and I''ll find the answer in the document
Finding information in a document is now easier with AI
Related papers
-
Brother Brother User manual
-
Brother Innov-is NQ3600D User manual
-
-
-
-
Brother Innov-is 1500D/1500 User manual
-
-
Brother Sewing Machine 882-C40/C42 User manual
-
-
Other documents
-
Baby Lock Accord BLMCC Owner's manual
-
 Baby Lock esante BLN User manual
-
 Baby Lock Ellageo BLL Owner's manual
-
Baby Lock Aerial User guide
-
Bernina artista 635 Limited Edition User manual
-
Baby Lock Altair User guide
-
Bernina Artista 640E User manual
-
Bernina artista 730 User manual
-
 Baby Lock ellegante 2 BLG2-NZ Owner's manual
-
 Baby Lock ellegante 2 BLG2-NZ Instruction And Reference Manual


