Glacier Bay FP4A0105BNV Installation guide
- Category
- Sanitary ware
- Type
- Installation guide

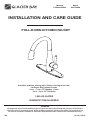
INSTALLATION AND CARE GUIDE
THANK YOU
We appreciate the trust and confidence you have placed in Glacier Bay through the purchase of this kitchen
faucet. We strive to continually create quality products designed to enhance your home. Visit us online to see
our full line of products available for your home improvement needs. Thank you for choosing Glacier Bay!
Questions, problems, missing parts? Before returning to the store,
call Glacier Bay Customer Service
8 a.m. - 7 p.m., EST, Monday - Friday,
9 a.m - 6 p.m., EST, Saturday
1-855-HD-GLACIER
HOMEDEPOT.COM/GLACIERBAY
THD 07/2015 REV.01
PULL-DOWN KITCHEN FAUCET
SKU#
304774959
Model#
FP4A0105BNV

Table of Contents........................................2
Important Information................................2
Warranty......................................................2
Pre-Installation...........................................2
Installation..................................................4
Operation ....................................................7
Care & Cleaning..........................................8
Troubleshooting..........................................8
Service Parts...............................................9
Table of Contents
Warranty
Important Information
LIMITED LIFETIME WARRANTY
Glacier Bay products are manufactured with superior quality standards and workmanship and are backed by our
limited lifetime warranty. Glacier Bay products are warranted to the original consumer purchaser to be free of
defects in materials or workmanship. We will replace FREE OF CHARGE any product or parts that prove defective.
Simply return the product / part to any of The Home Depot retail locations or call 1-855-HD-GLACIER (1-855-434-
5224) to receive the replacement item. Proof of purchase (original sales receipt) from the original consumer
purchaser must be made available for all Glacier Bay warranty claims.
This warranty excludes incidental/inconsequential damages and failures due to misuse, abuse or normal wear and
tear. This warranty excludes all industrial, commercial & business usage, whose purchasers are hereby, extended
a five year limited warranty from the date of purchase, with all other terms of this warranty applying except the
duration of the warranty.
Some states and provinces do not allow the exclusion or limitation of incidental or consequential damages, so the
above limitations may not apply to you. This warranty gives you specific legal rights and you may also have other
rights that vary from state to state and province to province. Please see a store or contact 1-855-HD GLACIER for
more details.
Pre-Installation
PLANNING INSTALLATION
Before you begin to install this product, ensure that all parts are present. Compare parts with the package
contents list. If any part is missing or damaged, do not attempt to install the product. Contact customer service
for replacement parts.
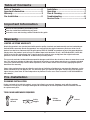
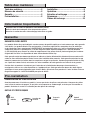
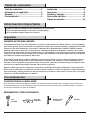
TOOLS AND HARDWARE REQUIRED
Adjustable
Wrench
Safety
Goggles
Phillips
Screwdriver
SILICONE
Sealant
Observe all local plumbing and building codes.
Cover the sink drain to avoid losing any parts.
Review the care and cleaning section included in this guide.
2

Pre-Installation (continued)
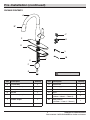
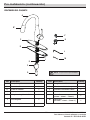
PACKAGE CONTENTS
J*
K
G
I
H
A
B*
C
D
F
E
NOTE: *Items come pre-assembled.
L
M
Part Description Quantity Part Description Quantity
A Faucet body 1 H Outlet hose 1
B* Pull-down spray 1 I Water supply line 2
C Deck plate 1 J Base insert 1
D Gasket 1 K Base 1
E Pull-down spray hose 1 L Allen wrench
(H4mm * 24mm L * 74mm L)
1
F Rubber weight 1 M Allen wrench
(H2.5mm * 11mm L * 53mm L)
1
G Quick connector 1
3 HOMEDEPOT.COM/GLACIERBAY
Please contact 1-855-HD-GLACIER for further assistance.

Without deck plate
With deck plate
1/16” (1mm) min.
1-1/2” (38 mm) max.
Ø 1-3/8” (35 mm) min.
Ø 1-1/2” (38 mm) max.
1/16” (1mm) min.
1” (25.4 mm) max.
Ø 1-3/8” (35 mm) min.
Ø 1-1/2” (38 mm) max.
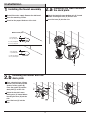
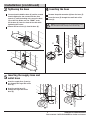
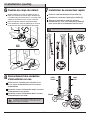
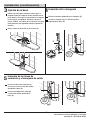
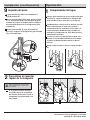
Installation
K
2
K
2
C
D
Installing the faucet with the
deck plate
Place a bead of clear silicone
sealant (not included) around
the base of the gasket (D).
Place the gasket (D) and the
deck plate (C) on the sink.
Rotate the two half-moon
locking nuts (2) inward before
inserting the base (K) into the
sink.
Insert the base (K) into the
sink.
Check for the proper thickness of the sink.
2.b
2.a
Installing the faucet assembly
1
Rotate the two half-moon locking nuts (2) inward
before inserting the base (K) into the sink.
Shut off the water supply. Remove the old faucet.
Clean the mounting surface.
Installing the faucet without
the deck plate
Insert the base (K) into the sink.
4

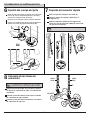
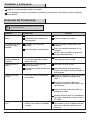
Inserting the hose Tightening the base
Remove the quick connector (G) from the hose (E).
Insert the hose (E) through the small hole of the
base (K).
Remove the base insert (J) from the base (K).
Installation (continued)
4 3
K
J
G
E
L
NOTE: Ensure the flexible hoses do not twist when inserting
them through the small and large holes in the base (K).
Inserting the supply lines and
outlet hose
Insert the supply lines (I) one by
one through the large hole of the
base (K).
Insert the outlet hose (H)
through the large hole of the
base (K).
5
I
H
I
Use one hand to hold the base (K) and the second
hand to tighten the two screws with the allen
wrench (L) until the locking nuts secure the base
(K) on the sink. Make sure the “FRONT” mark
on the base (K) faces the front of the sink while
tightening the screws.
K
K
E
K
K
Small hole
Large hole
Large hole
5 HOMEDEPOT.COM/GLACIERBAY
Please contact 1-855-HD-GLACIER for further assistance.

I
Attaching the quick connectorSecuring the faucet body
Remove the cap from the outlet hose (H).
Reattach the quick connector (G) to the hose (E).
Attach the quick connector (G) to the outlet hose
(H). Pull down the quick connector (G) to ensure it
is secure.
Align the arrow on the faucet body (A) with the
arrow on the base (K). Attach the faucet body (A)
to the base (K) and turn counterclockwise until
it locks.
After installation, remove the arrow sticker.
Secure the faucet body (A) by tightening the set
screw with the provided allen wrench (M).
Installation (continued)
76
A
A
M
H
H
G
G
E
NOTE: For removal, see Step 2 of the Operation section.
Connecting the supply lines
Use an adjustable wrench to connect and tighten
the supply lines to the supply valves.
Connect the red supply line to the hot water supply
valve.
Connect the blue supply line to the cold water supply
valve.
F
RED
LINE
HOT
COLD
BLUE
LINE
8
CAUTION: Ensure the supply lines do not kink, twist or bend
into a “V” or “L” shape during installation. Do not use if there
are visible signs of damage.
K
6

3
2
1
Attaching the weight
Installation (continued)
9
F
E
B
Removing the quick connector hose
If it is necessary to remove the quick
connector (G), push the quick connector
housing up, hold the housing together and
pull down.
Operation
CAUTION: Use caution when removing
the quick connector hose to prevent cutting
your hands.
2
Checking for leaks
1
Detach the pull-down spray (B) from the pull-down
spray hose (E). Hold the pull-down spray hose (E)
firm to prevent it from retracting into the faucet
body (A).
Ensure the handle is in the off position. Turn the hot
and cold water supplies on and check all connections
for leaks. If leaks are discovered, check the connec-
tions to ensure they are tight and properly secured.
Lift the handle to allow the water to run for approxi-
mately one minute. This flushes away any debris that
could damage the internal parts.
Turn the water off and reattach the pull-down spray (B).
The pull-down spray (B) should be nested in the
faucet body (A).
Use a Phillips screwdriver to secure the weight (F)
at the lowest point on the pull-down spray hose (E).
The weight (F) should cover the weight location de-
cal on the pull-down spray hose (E).
Pull the pull-down spray (B) away from the faucet
body (A) and ensure the pull-down spray hose (E) is
not obstructed.
Weight
Location
Decal
7 HOMEDEPOT.COM/GLACIERBAY
Please contact 1-855-HD-GLACIER for further assistance.

Care and Cleaning
Clean periodically with a soft cloth.
This faucet is designed for years of trouble-free performance. Keep it looking new by doing the following:
Avoid abrasive cleaners, steel wool, and harsh chemicals as these will dull the finish and void your warranty.
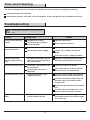
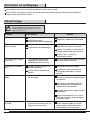
Troubleshooting
Problem Possible Cause Solution
There are leaks from the
handle.
The bonnet nut is loose.
The O-ring on the cartridge is
dirty or damaged.
Tighten the bonnet nut.
Clean or replace the O-ring.
The aerator leaks or has a
reduced water flow.
The aerator is dirty or mis-fitted.
The cartridge may be clogged.
Remove the aerator and check for debris.
Remove the cartridge and check for
debris.
Ensure the aerator is properly installed.
There are leaks from
the hose underneath the
deck.
The connection between the pull-
down spray and pull-down spray
hose may be loose.
Tighten the connection between the pull-
down spray and pull-down spray hose.
The hose does not retract. The weight is not installed in the
correct position.
The pull-down spray hose is
obstructed.
Reinstall or readjust the weight.
Check under the sink to ensure the pull-
down spray hose is not obstructed.
The water pressure is low. The quick connector may be
clogged with debris.
Turn off the water supply and disconnect
the quick connector from the outlet hose.
Disconnect the quick connector from the
pull-down spray hose and flush under
running water.
Reattach the quick connector to the outlet
hose.
Test water flow. If water pressure is still
low then replace the quick connector.
There is no hot or cold
water.
The hot or cold water supply lines
may be kinked or twisted.
Ensure hot and cold water supply lines are
not kinked or twisted. Reinstall the supply
line if necessary.
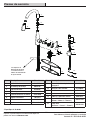
NOTE: Refer to the service parts section in this manual for
a detailed drawing showing the location of the parts listed
below.
8

Faucet ID Tags can
be found on the hot
supply line
Service Parts
Part Description Part No.
1 Index Button A66D558
2 Handle Assembly A069745*
3 Trim Cap A103016*
4 Bonnet Nut A104207
5 Ceramic Disc Cartridge A507348N
6 Pattern Clip A012357
7 Spout A139290*
8 Pull-Down Spray A528036N-54*
Part Description Part No.
9 Hose Adaptor Assembly A66G142N
10 Spray Hose A51400GR
11 Weight A504713
12 Base A504027*
13 Plate & Gasket A667289*
14 Allen Wrench
(H2.5 * 11 mm L * 53mm L)
A031217NI
15 Allen Wrench
(H4 * 24mm L * 74mm L)
A031011NI
*Specify Finish
Many replacement cartridges, aerators, and drain
assemblies can be purchased at your local The
Home Depot store or online at HOMEDEPOT.COM
2.
3.
4.
10.
11.
12.
9.
5.
1.
14.
15.
6.
7.
8.
13.
DATE CODE
DO NOT REMOVE
1-888-328-2383
HOT
9 HOMEDEPOT.COM/GLACIERBAY
Please contact 1-855-HD-GLACIER for further assistance.

Questions, problems, missing parts? Before returning to the store,
call Glacier Bay Customer Service
8 a.m. - 7 p.m., EST, Monday - Friday
9 a.m. - 6 p.m., EST, Saturday
1-855-HD-GLACIER
HOMEDEPOT.COM/GLACIERBAY
Retain this manual for future use.
Page is loading ...
Page is loading ...
Page is loading ...
Page is loading ...
Page is loading ...
Page is loading ...
Page is loading ...
Page is loading ...
Page is loading ...
Page is loading ...
Page is loading ...
Page is loading ...
Page is loading ...
Page is loading ...
Page is loading ...
Page is loading ...
Page is loading ...
Page is loading ...
Page is loading ...
Page is loading ...
-
 1
1
-
 2
2
-
 3
3
-
 4
4
-
 5
5
-
 6
6
-
 7
7
-
 8
8
-
 9
9
-
 10
10
-
 11
11
-
 12
12
-
 13
13
-
 14
14
-
 15
15
-
 16
16
-
 17
17
-
 18
18
-
 19
19
-
 20
20
-
 21
21
-
 22
22
-
 23
23
-
 24
24
-
 25
25
-
 26
26
-
 27
27
-
 28
28
-
 29
29
-
 30
30


Glacier Bay FP4A0105BNV Installation guide
- Category
- Sanitary ware
- Type
- Installation guide
Ask a question and I''ll find the answer in the document
Finding information in a document is now easier with AI
in other languages
Related papers
-
Glacier Bay FP4A0105BL Installation guide
-
-
-
-
-
-
-
-
-
Other documents
-
none 3190-K820-GB Installation guide
-
 Richelieu BP871696CHBRZ Dimensions Guide
-
-
Danze D404558 User manual
-
-
-
-
 Zenna Home ELT2006W Installation guide
-
-
Danze D306957T Installation guide

