Tripp Lite POS UPS Owner's manual
- Type
- Owner's manual

1
Owner’s Manual
POS (Point-of-Sale)
Series UPS System,
120V AC Input
Model: POS500
Series Number: AGBC6780
Not suitable for mobile applications.
Español 9 • Français 17
1111 W. 35th Street, Chicago, IL 60609 USA • www.tripplite.com/support
Copyright © 2017 Tripp Lite. All rights reserved.
PROTECT YOUR INVESTMENT!
Register your product for quicker service
and ultimate peace of mind.
You could also win an
ISOBAR6ULTRA surge protector—
a $100 value!
www.tripplite.com/warranty
17-05-141-932716.indb 1 5/24/2017 3:17:35 PM

2
Important Safety Instructions
SAVE THESE INSTRUCTIONS
This manual contains important instructions that should be followed during
the installation, operation and storage of this product. Failure to heed these
warnings may affect the warranty.
UPS Location Warnings
• Use caution when lifting the UPS system. Because of the considerable weight of all
rack-mount UPS systems, at least two people should assist in lifting and installing
them.
• Install the UPS system indoors in an area free from excess moisture, heat, dust,
conductive contaminants, and direct sunlight.
• The UPS system operating temperature is 32° to 104°F (0° to 40°C). For optimum
battery performance, the ambient temperature should be maintained between 68° and
77°F (20° and 25°C).
• Leave adequate space around all sides of the UPS system for proper ventilation. Do
not obstruct its vents or fan openings.
• When mounting the UPS system in tower orientation, make sure the LCD screen panel
is at the top of the UPS system, not at the bottom.
• Do not mount unit with its front or rear panel facing down (at any angle). Mounting in
this manner will seriously inhibit the unit’s internal cooling, eventually causing product
damage not covered under warranty.
• The UPS system must be returned to Tripp Lite for battery replacement. Visit www.
tripplite.com/support and click the product returns link to request a Returned Material
Authorization (RMA) number (an RMA number is required for servce). Once the product
request information is completed, an assigned RMA number and shipping instructions
will be sent to your email account. See Storage and Service for more information
UPS Connection Warnings
• CAUTION: To reduce the risk of fire, connect only to a circuit provided
with branch circuit overcurrent protection in accordance with the National
Electrical Code, ANSI/NFPA 70 and the Canadian Electrical Code, Part I, C22.1.
Short circuit backup protection overcurrent protection is provided by the
building installation. Be sure to use the proper overcurrent protection for the
installation in accordance with the plug/equipment rating.
• The UPS system contains its own energy source (battery). The output terminals may be
live even when the UPS system is not connected to an AC supply.
• Connect the UPS system to a properly grounded AC power outlet. Do not modify the
UPS system’s plug in a way that would eliminate its connection to ground. Do not use
adapters that eliminate the UPS system’s connection to ground.
• Do not plug the UPS system into itself. This will damage the UPS system and void the
warranty.
• If connecting the UPS system to a motor-powered AC generator, the generator must
provide filtered, frequency-regulated computer-grade output.
17-05-141-932716.indb 2 5/24/2017 3:17:35 PM

3
Important Safety Instructions
Equipment Connection Warnings
• Use of this equipment in life support applications where failure of this equipment
can reasonably be expected to cause the failure of the life support equipment or to
significantly affect its safety or effectiveness is not recommended.
•
Do not connect surge protectors or extension cords to the output of your UPS system. This
might damage the UPS system and may affect the surge protector and UPS warranties.
Battery Warnings
• Batteries can present a risk of electrical shock and burn from high short-circuit current.
Observe proper precautions. Do not dispose of the batteries in a fire. Do not open the
UPS or batteries. Do not short or bridge the battery terminals with any object. There
are no user-serviceable parts inside the UPS. At the end of the UPS system’s life,
follow best practice by discharging the battery prior to disposal. Refer to local codes
for disposal requirements. Do not connect or disconnect battery packs when the UPS
system is operating on battery power.
• Do not operate the UPS system without batteries.
Battery Replacement Door
• Under normal conditions, the original battery in your UPS system will last several years.
Battery replacement should be performed only by qualified service personnel. Refer to
the Battery Warnings section. Should your UPS system require battery replacement,
visit Tripp Lite at http://www.tripplite.com/products/battery-finder/ to locate the specific
replacement battery for your UPS system.
Quick Installation
Note: UPS system will function properly upon initial startup. However, maximum runtime for the
unit’s battery will only be accessible after it has been charged for 24 hours.
1 Plug the UPS system into an outlet that does not share a circuit with a heavy
electrical load, such as an air conditioner or refrigerator.
2 Press and hold the ON/OFF/TEST button for one second to power on the UPS system.
The alarm will beep once briefly after one second has passed.
Note: the UPS system will only power on, even if connected to live utility power, using the ON/
OFF/TEST button.
3 Plug your equipment into the UPS system’s outlets. Select outlets (see Basic
Operation section) provide surge protection and battery backup. Essential equipment
that also requires battery support during power failures, such as a computer and
monitor, should be plugged into these outlets. Nonessential devices, such as a
printer, should be plugged into other outlets that provide surge protection only.
Note: your UPS system is designed to support electronic equipment only. You will overload the
UPS system if the total VA rating for all equipment connected to the battery backup outlets
exceeds the UPS system’s output capacity. Look at the equipment’s nameplates to find their VA
ratings. If the equipment is listed in amps, multiply the number of amps by 120 to determine
VA (for example, 1 amp x 120 = 120VA). If you are unsure you have overloaded the battery
backup outlets, use the ON/OFF/TEST button to run a self-test.
17-05-141-932716.indb 3 5/24/2017 3:17:35 PM

4
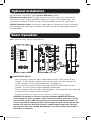
Optional Installation
Note: individual models may vary from diagrams.
Basic Operation
For connection instructions, see the Basic Operation section.
USB Communication Port: This port connects your UPS system to a computer for
automatic file saves and unattended shutdown in the event of a power failure. This
connection is optional. The UPS system will work properly without this connection.
Tel/DSL Protection Jacks: These jacks stop surges on a phone or fax line. Connecting
your equipment to these jacks is optional. Your UPS system will work properly without
this connection.
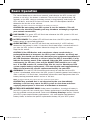
1
ON/OFF/TEST Button
• To turn the UPS system on: press and hold the ON/OFF/TEST Button for one
second.* If utility power is absent, pressing the button will cold-start the UPS
system (power it on and supply power from its batteries**).
• To turn the UPS system off: press and hold the ON/OFF/TEST Button for one
second.* The UPS system will be completely deactivated.
• To run a self-test: with your UPS system plugged in and turned ON, press and hold
the ON/OFF/TEST button for three seconds.
* The alarm will beep once briefly after one second has passed. **If fully charged.
CAUTION! To perform a self-test, you must hold the ON/OFF/TEST button
continuously for three seconds. If you release the button too early, you will
turn the UPS system OFF and cut power to connected equipment loads. To
ensure you hold the button for the correct length of time, do not release the
button until you hear the UPS system’s audible alarm beep twice. The first
beep occurs after one second and indicates the UPS system will turn OFF if
the button is released.
1
4
5
3
2
7
8
9
12
11
13
6
10
17-05-141-932716.indb 4 5/24/2017 3:17:37 PM

5
Basic Operation
The second beep occurs after three seconds and indicates the UPS system will
perform a self-test if the button is released. The test will last approximately 10
seconds as the UPS switches to battery to test its load capacity and charge. All
LEDs will be lit, and the UPS alarm will sound. See LED descriptions below to
determine the results of the self-test.
Note: You can leave connected equipment on during a self-test.
CAUTION! Do not unplug your UPS system to test its batteries. This will
remove safe electrical grounding and may introduce a damaging surge into
your network connections.
2
LINE POWER: This green LED will illuminate whenever the UPS system is ON and
receiving normal AC line power.
3
BATTERY POWER: This yellow LED will illuminate when the UPS system is providing
battery power to connected equipment.
4
CHECK BATTERY: This red LED will illuminate continuously if a UPS self-test
determines the battery is weak. If it remains illuminated when a second self-test is
run after the UPS system has been allowed to charge for 12 hours, contact
Tripp Lite for service.
CAUTION! If the LED flashes and a continuous alarm sounds during a
prolonged blackout or brownout, the UPS system’s batteries are nearly out
of power. You should save files and shut down your equipment immediately. If
the LED illuminates following a self-test (after the UPS is turned ON), it may
indicate the battery needs to be replaced. Allow the UPS system to recharge
continuously for 12 hours, then use the ON/OFF/TEST button to run a self-
test. If the LED remains lit, contact Tripp Lite for service. Should your UPS
system require battery replacement, visit www.tripplite.com/support/battery/
index.cfm to locate the specific replacement battery for your UPS.
5
OVERLOAD: This red LED will illuminate continuously to indicate that the UPS
system is overloaded, either when the UPS system is providing power from battery or
after a self-test. If it illuminates, immediately disconnect some equipment from the
battery backup protected outlets and run a self-test.
Note: A large overload may cause the UPS system to shut down.
CAUTION! Any overload that is not corrected by the user immediately
following a self-test may cause the UPS system to shut down and cease
supplying output power in the event of a blackout or brownout.
6
BATTERY REPLACEMENT DOOR: Under normal conditions, the original battery in
your UPS system will last several years. Battery replacement should be performed
only by qualified service personnel. Refer to the Battery Warnings section. Should
your UPS system require battery replacement, visit www.tripplite.com/products/
battery-finder/ to locate the specific replacement battery for your UPS system.
17-05-141-932716.indb 5 5/24/2017 3:17:37 PM

6
Basic Operation
7
USB/RJ45 COMMUNICATION PORT: This port connects your UPS system to a
computer for automatic file saves and unattended shutdown in the event of a
power failure. Use with Tripp Lite’s free downloadable PowerAlert
®
software and the
included USB/RJ45 cable. A PowerAlert CD may be included with your UPS system.
If so, insert the CD into the CD tray of your computer and follow the installation
instructions. If PowerAlert software did not come with your UPS system, you can
obtain the software free at www.tripplite.com.
Note: This connection is optional. The UPS system will work properly without this connection.
CAUTION! The USB/RJ45 port is not a phone or network port. Do not connect
a phone or network line to this port.
8
TEL/DSL PROTECTION JACKS: These jacks stop surges on a phone or fax line.
Using telephone (RJ11) cables, connect your wall jack to the UPS jack marked “IN.”
Connect your equipment to the UPS jack marked “OUT.” Make sure the equipment
you connect to the tel/DSL jacks is also protected against surges on the AC line.
Note: Connecting your equipment to these jacks is optional. Your UPS system will work
properly without this connection.
9
RESETTABLE CIRCUIT BREAKER: Protects your electrical circuit from overcurrent
draw from the UPS load. If this breaker trips, remove some of the load, then reset it
by pressing it in.
10
BATTERY BACKUP PROTECTED/SURGE PROTECTED OUTLETS: Provide both
battery backup and surge protection. Plug your computer, monitor and other critical
equipment into these outlets.
Note: do not plug laser printers into these outlets.
11
SURGE-ONLY PROTECTED OUTLETS: Provide surge and line noise protection, but
not battery backup. Plug equipment (such as a printer, scanner or fax machine) that
does not require battery backup during a utility power failure into these outlets.
12
BUILDING WIRING FAULT INDICATOR: This red LED illuminates if improper building
wiring is detected (usually an open ground connection). If a wiring fault is detected,
have the building wiring checked by a qualified electrician to assure the safety of all
connected equipment.
13
AC INPUT PLUG: Insert the plug into a compatible outlet to provide AC power for
the UPS system and connected equipment.
17-05-141-932716.indb 6 5/24/2017 3:17:37 PM

7
Storage and Service
Storage
To avoid battery drain, all connected equipment should be turned off and disconnected
from the UPS system. Press and hold the ON/OFF/TEST switch for one second. Your UPS
system will be completely turned off (deactivated), and will be ready for storage. If you
plan on storing your UPS system for an extended period, fully recharge the UPS batteries
every three months. Plug the UPS system into a live AC outlet, turn it on by pressing and
holding the ON/OFF/TEST switch for one second, and allow the batteries to recharge for
8 to 12 hours. If you leave your UPS batteries discharged for a long period of time, they
will suffer a permanent loss of capacity.
Service
A variety of On-Site Service Programs are also available from Tripp Lite. For more
information on service, visit www.tripplite.com/support. Before returning your product for
service, follow these steps:
1. Review the installation and operation procedures in this manual to insure that the
service problem does not originate from a misreading of the instructions.
2. If the problem continues, do not contact or return the product to the dealer. Instead,
visit www.tripplite.com/support.
3. If the problem requires service, visit www.tripplite.com/support and click the Product
Returns link. From here you can request a Returned Material Authorization (RMA)
number, which is required for service. This simple on-line form will ask for your unit’s
model and serial numbers, along with other general purchaser information. The
RMA number, along with shipping instructions will be emailed to you. Any damages
(direct, indirect, special or consequential) to the product incurred during shipment
to Tripp Lite or an authorized Tripp Lite service center is not covered under warranty.
Products shipped to Tripp Lite or an authorized Tripp Lite service center must
have transportation charges prepaid. Mark the RMA number on the outside of the
package. If the product is within its warranty period, enclose a copy of your sales
receipt. Return the product for service using an insured carrier to the address given to
you when you request the RMA.
Product Registration
Visit www.tripplite.com/warranty today to register your new Tripp Lite product. You’ll be automatically entered into a
drawing for a chance to win a FREE Tripp Lite product!*
*No purchase necessary. Void where prohibited. Some restrictions apply. See website for details.
17-05-141-932716.indb 7 5/24/2017 3:17:37 PM

8
1111 W. 35th Street, Chicago, IL 60609 USA • www.tripplite.com/support
Regulatory Compliance
Regulatory Compliance Identification Numbers
For the purpose of regulatory compliance certifications and identification, your Tripp Lite product has been
assigned a unique series number. The series number can be found on the product nameplate label, along with
all required approval markings and information. When requesting compliance information for this product, always
refer to the series number. The series number should not be confused with the marketing name or model number
of the product.
FCC Notice, Class B
This device complies with part 15 of the FCC Rules. Operation is subject to the following two conditions: (1) This
device may not cause harmful interference, and (2) this device must accept any interference received, including
interference that may cause undesired operation.
Note: This equipment has been tested and found to comply with the limits for a Class B digital device, pursuant to
part 15 of the FCC Rules. These limits are designed to provide reasonable protection against harmful interference
in a residential installation. This equipment generates, uses and can radiate radio frequency energy and, if not
installed and used in accordance with the instructions, may cause harmful interference to radio communications.
However, there is no guarantee that interference will not occur in a particular installation. If this equipment does
cause harmful interference to radio or television reception, which can be determined by turning the equipment off
and on, the user is encouraged to try to correct the interference by one or more of the following measures:
• Reorient or relocate the receiving antenna.
• Increase the separation between the equipment and receiver.
• Connect the equipment into an outlet on a circuit different from that to which the receiver is connected.
• Consult the dealer or an experienced radio/TV technician for help.
Any changes or modifications to this equipment not expressly approved by Tripp Lite could void the user’s authority
to operate this equipment.
FCC Part 68 Notice (United States Only)
If your Modem/Fax Protection causes harm to the telephone network, the telephone company may temporarily
discontinue your service. If possible, they will notify you in advance. If advance notice isn’t practical, you will be
notified as soon as possible. You will be advised of your right to file a complaint with the FCC. Your telephone
company may make changes in its facilities, equipment, operations or procedures that could affect the proper
operation of your equipment. If it does, you will be given advance notice to give you an opportunity to maintain
uninterrupted service. If you experience trouble with this equipment’s Modem/Fax Protection, please visit
www.tripplite.com/support for repair/warranty information. The telephone company may ask you to disconnect
this equipment from the network until the problem has been corrected or you are sure the equipment is not
malfunctioning. There are no repairs that can be made by the customer to the Modem/Fax Protection. This
equipment may not be used on coin service provided by the telephone company. Connection to party lines is
subject to state tariffs. (Contact your state public utility commission or corporation commission for information.)
UPS and Battery Recycling
Please recycle Tripp Lite Products. The batteries used in Tripp Lite products are sealed Lead-Acid batteries.
These batteries are highly recyclable. Please refer to local codes for disposal requirements. Call Tripp Lite
at 1.773.869.1234 or visit www.tripplite.com/support/recycling-program for up-to-date information on
recycling the batteries or any Tripp Lite product.
Tripp Lite has a policy of continuous improvement. Specifications are subject to change without notice.
17-05-141-932716.indb 8 5/24/2017 3:17:37 PM

9
Manual de Operación
Sistemas UPS Serie POS
(Punto-de-Venta),
Entrada 120V CA
Modelo: POS500
Número de Serie: AGBC6780
No adecuado para aplicaciones móviles.
English 1 • Français 17
1111 W. 35th Street, Chicago, IL 60609 USA • www.tripplite.com/support
Copyright © 2017 Tripp Lite. Todos los derechos reservados.
17-05-141-932716.indb 9 5/24/2017 3:17:38 PM

10
Instrucciones de Seguridad Importantes
GUARDE ESTAS INSTRUCCIONES
Este manual contiene instrucciones importantes que deberán seguirse durante la
instalación, el funcionamiento y el almacenamiento de este producto. La falta de
observar estas advertencias podría afectar su garantía.
Advertencias para la Ubicación del UPS
• Tenga cuidado cuando levante el UPS. Debido al peso considerable de todos los sistema
UPS para instalación en rack, deben ayudar al menos dos personal al levantarlos e
instalarlos.
• Instale el UPS en interiores, en un área libre de humedad excesiva, calor, polvo,
contaminantes conductores y luz solar directa.
• La temperatura de operación del UPS es de 0 °C a 40 °C [32 °F a 104 °F]. Para el
rendimiento óptimo de la batería, la temperatura ambiente debe mantenerse entre 20 °C y
25 °C [68 °F y 77 °F].
• Deje espacio suficiente alrededor del sistema UPS para una ventilación adecuada. No
obstruya las ventilaciones o las aberturas del ventilador.
• Al instalar el sistema de UPS en posición de torre, asegúrese de que la pantalla LCD esté
en la parte superior del UPS, no en la inferior.
• No instale la unidad con el panel frontal o trasero orientado hacia abajo (en cualquier
ángulo). Si la instala de esta manera inhibirá gravemente la capacidad de enfriamiento
interno de la unidad, lo que eventualmente provocará daños en el producto no cubiertos
por la garantía.
•
Debe devolverse al UPS a Tripp Lite para el reemplazo de la batería. Visite www.tripplite.
com/support y haga click en el enlace de devoluciones de producto para solicitar un número
de Autorización de Devolución de Material (RMA) [Returned Material Authorization] (para
servicio se requiere un número RMA). Una vez llenada la información del producto solicitada,
se enviarán a su cuenta de correo electrónico un número RMA asignado e instrucciones de
embarque. Para información adicional, consulte Almacenamiento y Servicio.
Advertencias para la Conexión del UPS
• PRECAUCIÓN: Para reducir el riesgo de incendio, conecte solo a un circuito
equipado con protección contra sobrecorriente de circuito derivado, de acuerdo
con el Código Eléctrico Nacional, ANSI/NFPA 70 y el Código Eléctrico Canadiense,
Parte I, C22.1. El respaldo de protección de sobrecorriente de protección contra
corto circuito es proporcionada por la instalación del edificio. Asegúrese de usar la
protección adecuada contra sobrecorriente para la instalación, de conformidad con
la especificación de la clavija y del equipo.
• El UPS contiene su propia fuente de energía (batería). Las terminales de salida pueden
tener corriente aún cuando el sistema de UPS no esté conectado a una fuente de CA.
• Conecte el UPS a un tomacorriente CA adecuadamente conectado a tierra. No modifique
el enchufe del UPS de alguna forma que elimine la conexión a tierra del UPS. No utilice
adaptadores que eliminen la conexión a tierra del UPS.
• No enchufe el UPS a sí mismo, lo dañará y anulará la garantía.
• Si conecta el UPS a un generador de CA accionado por motor, el generador debe
proporcionar salida filtrada y regulada de grado de computadora. Si conecta el UPS a un
generador se anulará el Seguro máximo de por vida.
17-05-141-932716.indb 10 5/24/2017 3:17:38 PM

11
Instrucciones de Seguridad Importantes
Advertencias sobre la conexión de equipos
• No se recomienda usar este equipo en aplicaciones de mantenimiento artificial de
vida, donde se puede esperar razonablemente que su falla cause la falla del equipo de
mantenimiento de vida o que afecte de manera importante su seguridad o eficiencia.
•
No conecte supresores de sobretensiones o cables de extensión al tomacorriente del UPS. Esto
puede dañar el UPS y puede afectar las garantías del supresor de sobretensiones y del UPS.
Advertencias sobre las baterías
• Las baterías pueden presentar un riesgo de descarga eléctrica y quemaduras por la alta
corriente de corto circuito. Observe las precauciones apropiadas. No deseche las baterías
en el fuego. No abra el UPS o las baterías. No ponga en corto o puentee las terminales
de la batería con ningún objeto. No hay partes dentro del UPS a las que el usuario pueda
dar servicio. Al final de la vida de la unidad del UPS, siga las siguientes buenas prácticas
para descargar la batería antes de desecharla. Para los requisitos de desecho, consulte los
reglamentos y códigos locales. No conecte ni desconecte los módulos de batería cuando el
UPS esté funcionando con energía de la batería.
• No utilice el UPS sin baterías.
Puerta de reemplazo de la batería
• En condiciones normales, las baterías originales de este sistema UPS tienen varios
años de vida útil. Sólo deberá reemplazar la batería personal técnico calificado. Véase
Advertencias sobre las baterías, en la sección sobre seguridad. Si requiere reemplazar
la batería de su UPS, visite Tripp Lite en la web en http://www.tripplite.com/products/battery-
finder/ para localizar la batería de reemplazo específica para su UPS.
Instalación Rápida
Nota: El sistema UPS funcionará correctamente desde el arranque inicial. No obstante, la autonomía
máxima para la batería de la unidad sólo será accesible después de haberse cargado por 24 horas.
1 Enchufe el sistema UPS en un tomacorriente que no comparta un circuito con una carga
eléctrica pesada, como un aire acondicionado o refrigerador.
2 Oprima y sostenga por un segundo el botón ON / OFF / TEST para encender el sistema
UPS. La alarma emitirá un breve bip después de transcurrido un segundo.
Nota: el sistema UPS encenderá solamente usando el botón ON / OFF / TEST, incluso si está
conectado a la energía activa de la red pública.
3 Enchufe su equipo en los tomacorrientes del sistema UPS. Tomacorrientes selectos (vea la
sección de Operación Básica) proporcionan protección contra sobretensiones y respaldo
por batería. El equipo esencial que también requiere soporte de batería durante fallas de
energía, como una computadora y monitor, debe conectarse a estos tomacorrientes. Los
dispositivos no esenciales, como una impresora, deben conectarse a otros tomacorrientes
que proporcionen protección contra sobretensiones solamente.
Nota: Su sistema UPS está diseñado para soportar solamente equipo electrónico. Usted sobrecargará
el sistema UPS si el valor total en VA para todo el equipo que conecte a los tomacorrientes
respaldados por batería excede la capacidad de salida del sistema UPS. Consulte las placas de
identificación de su equipo para localizar sus valores de VA. Si el equipo está especificado en
amperes, multiplique el número de amperes por 120 para determinar VA (por ejemplo, 1 amp x 120
= 120VA). Si no está seguro de haber sobrecargado los tomacorrientes respaldados por batería, use
el botón ON / OFF / TEST para realizar un auto-diagnóstico.
17-05-141-932716.indb 11 5/24/2017 3:17:38 PM

12
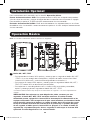
Instalación Opcional
Nota: Los modelos individuales pueden variar de los diagramas.
Operación Básica
Para instrucciones de la conexión, vea la Sección Operación Básica.
Puerto de Comunicaciones USB: Este puerto conecta su UPS con cualquier computadora
a fin de salvar los archivos y apagar el equipo de forma automática en el caso de un apagón.
Esta conexión es opcional. El UPS trabajará correctamente sin esta conexión.
Enchufes de Protección Tel/DSL: Estos enchufes detienen las sobretensiones en una línea
de teléfono o fax. La conexión a estos contactos es opcional. Su UPS trabajará correctamente
sin esta conexión.
1
Botón ON / OFF / TEST
• Para encender el sistema UPS: oprima y sostenga por un segundo el botón ON / OFF
/ TEST.* Si no hay energía de la red pública, al oprimir el botón arrancará en frío el
sistema UPS (Arrancará y suministrará energía desde sus baterías**).
• Para apagar el sistema UPS: oprima y sostenga por un segundo el botón ON / OFF /
TEST.* El sistema UPS se desactivará por completo.
• Para ejecutar un auto-diagnóstico: con su sistema UPS enchufado y encendido,
oprima y sostenga por tres segundos el botón ON / OFF / TEST.
*La alarma emitirá un breve bip después de transcurrido un segundo. **Si está completamente
cargado.
¡PRECAUCIÓN! Para ejecutar un auto-diagnóstico, debe sostener por tres
segundos el botón ON / OFF / TEST en forma continua. Si suelta el botón
demasiado pronto, apagará el sistema UPS e interrumpirá la alimentación a los
equipos conectados. Para asegurarse de que usted mantiene presionado el botón
por la duración correcta de tiempo, no suelte el botón hasta escuchar dos veces
el bip de la alarma acústica del sistema UPS. El primer bip se produce después
de un segundo e indica que el sistema UPS se apagará si se suelta el botón. El
segundo bip se produce después de tres segundos e indica que el sistema UPS
ejecutará un auto-diagnóstico si se suelta el botón.
1
4
5
3
2
7
8
9
12
11
13
6
10
17-05-141-932716.indb 12 5/24/2017 3:17:39 PM

13
Operación Básica
La prueba durará aproximadamente 10 segundos mientras el UPS cambia a la batería
para probar su capacidad de carga y la carga. Todos los LEDs se encenderán y sonará
la alarma del UPS. Para determinar los resultados del auto-diagnóstico, vea las
descripciones de los LEDs a continuación.
Nota: Puede dejar el equipo conectado durante un auto-diagnóstico.
¡PRECAUCIÓN! No desconecte su sistema UPS para probar las baterías. Esto
eliminará la conexión segura a tierra y puede introducir una sobretensión dañina
en las conexiones de su red.
2
LINE POWER [Alimentación de Línea]: Este LED verde se encenderá cuando el
sistema UPS esté encendido y recibiendo energía normal de la línea de CA.
3
BATTERY POWER [Alimentación de la Batería]: Este LED verde se encenderá cuando
el sistema UPS esté suministrando energía de la batería al equipo conectado.
4
CHECK BATTERY [Comprobar Batería]: Este LED rojo se encenderá continuamente
si un auto-diagnóstico del UPS determina que la batería está débil. Si permanece
encendido cuando se ejecuta un segundo auto-diagnóstico después que se ha permitido
al UPS cargar por 12 horas, solicite servicio a Tripp Lite.
¡PRECAUCIÓN! Si el LED destella y la alarma suena continuamente durante
un apagón o caída de voltaje prolongados, las baterías del sistema UPS están
próximas a agotarse. Usted debe guardar inmediatamente sus archivos y apagar
su equipo. Si el LED se enciende después de un auto-diagnóstico (después de
encender el UPS), puede indicar que la batería necesita remplazarse. Permita al
sistema UPS recargar continuamente por 12 horas, entonces use el botón ON /
OFF / TEST para ejecutar un auto-diagnóstico. Si el LED permanece encendido,
solicite servicio a Tripp Lite. Si su UPS requiere reemplazo de la batería, visite
www.tripplite.com/support/battery/index.cfm para localizar la batería de remplazo
específica de Tripp Lite para su UPS.
5
OVERLOAD [Sobrecarga]: Este LED rojo se iluminará continuamente para indicar que
el sistema UPS está sobrecargado, ya sea cuando el sistema UPS esté proporcionando
energía de baterías o después de un auto-diagnóstico. Si se enciende, desconecte
inmediatamente algún equipo de los tomacorrientes respaldados por batería y opere un
auto-diagnóstico.
Nota: Una sobrecarga grande puede causar que el sistema UPS se apague.
¡PRECAUCIÓN! Cualquier sobrecarga que no sea corregida de inmediato por el
usuario después de un auto-diagnóstico puede causar que el sistema UPS se
apague y deje de suministrar energía en caso de un apagón o caída de voltaje.
6
PUERTA PARA REMPLAZO DE LA BATERÍA: Bajo condiciones normales, la batería
original de su sistema UPS durará varios años. El reemplazo de la batería debe llevarse
a cabo sólo por personal de servicio calificado. Consulte la sección Advertencias de la
Batería. Si su sistema UPS requiere el reemplazo de la batería, visite www.tripplite.com/
products/battery-finder/ para localizar la batería de remplazo específica para su sistema
UPS.
17-05-141-932716.indb 13 5/24/2017 3:17:39 PM

14
Operación Básica
7
PUERTO DE COMUNICACIÓN USB / RJ45: Este puerto conecta su sistema UPS a una
computadora para guardado automático de archivos y apagado sin supervisión en caso
de una falla de energía. Use con el programa PowerAlert® descargable en forma gratuita
de Tripp Lite y el cable USB / RJ45 incluido. Con su sistema UPS puede estar incluido un
CD de PowerAlert. Si es así, inserte el CD en la bandeja de CD de la computadora y siga
las instrucciones de instalación. Si el programa PowerAlert no vino con su sistema UPS,
puede obtener el programa gratuito en www.tripplite.com.
Nota: Esta conexión es opcional. El sistema UPS trabajará correctamente sin esta conexión.
¡PRECAUCIÓN! El puerto USB / RJ45 no es un puerto de teléfono o red. No
conecte un teléfono o línea de red a este puerto.
8
CONECTORES PARA PROTECCIÓN DE TEL / DSL: Estos conectores detienen
sobretensiones en una línea de teléfono o fax. Usando cables telefónicos (RJ11),
conecte su enchufe de pared al enchufe del UPS marcado “IN.” Conecte su equipo al
enchufe del UPS marcado “OUT”. Cerciórese que el equipo que conecte a los enchufes
de tel/ DSL esté además protegido contra sobretensiones en la alimentación de CA.
Nota: La conexión de su equipo a estos enchufes es opcional. Su sistema UPS trabajará
correctamente sin esta conexión.
9
BREAKER RESTAURABLE: Protege su circuito eléctrico contra sobrecorriente originada
en la carga del UPS. Si este breaker se dispara, retire algo de la carga y entonces
reestablézcalo oprimiéndolo.
10
TOMACORRIENTES RESPALDADOS POR BATERÍA / TOMACORRIENTES PROTEGIDOS
CONTRA SOBRETENSIONES: Proporcionan respaldo por batería y protección contra
soblretensiones. Enchufe su computadora, monitor y otro equipo crítico en estas salidas.
Nota: No enchufe impresoras láser en estos tomacorrientes.
11
TOMACORRIENTES PROTEGIDOS ÚNICAMENTE CONTRA SOBRETENSIONES:
Proporcionan protección contra sobretensiones y ruido en la línea pero no respaldo por
batería. Enchufe en estos tomacorrientes el equipo (como una impresora, scanner o
máquina de fax) que no requiera respaldo por batería durante una falla de energía de la
red pública.
12
INDICADOR DE FALLA DE CABLEADO DEL EDIFICIO: Este LED rojo se enciende si
se detecta un cableado inadecuado del edificio (generalmente una conexión a tierra
abierta). Si se detecta una falla de cableado, haga que un electricista calificado revise el
cableado del edificio para garantizar la seguridad de todo el equipo conectado.
13
CLAVIJA DE ENTRADA DE CA: Inserte la clavija en un tomacorriente compatible para
suministrar energía de CA al sistema UPS y el equipo conectado.
17-05-141-932716.indb 14 5/24/2017 3:17:39 PM

15
Almacenamiento y Servicio
Almacenaje
Para evitar que la batería se descargue, todo el equipo conectado deberá apagarse y
desconectarse del UPS. Presione y mantenga así por un segundo el botón ON/OFF/TEST
[Encendido/Apagado/Prueba]. Su UPS se apagará completamente (desactivado) y estará
listo par su almacenaje. Si planea almacenar su UPS por un periodo prolongado, recargue
completamente las baterías del UPS cada tres meses. Conecte el UPS a una toma de
corriente CA viva, enciéndalo presionando por un segundo el interruptor ON/OFF/TEST
[Encendido/Apagado/Prueba] y permita que las baterías se recarguen de 8 a 12 horas. Si
deja las baterías de su UPS descargadas por un largo periodo, perderán permanentemente su
capacidad de carga.
Servicio técnico
Tripp Lite también pone a su disposición una variedad de Garantías extendidas y Programas
de servicio técnico en el sitio. Si desea más información sobre el servicio técnico, visite
www.tripplite.com/support. Antes de devolver su producto para servicio técnico, siga estos
pasos:
1. Revise la instalación y los procedimientos de operación que se encuentran en este
manual para asegurarse de que el problema de servicio no se debe a una mala lectura de
las instrucciones.
2. Si el problema persiste, no se comunique ni devuelva el producto al mayorista. En cambio,
visite www.tripplite.com/support.
3. Si el problema exige servicio técnico, visite www.tripplite.com/support y haga clic en el
enlace Devoluciones de productos. Desde aquí puede solicitar un número de Autorización
de Material Devuelto (RMA), que se necesita para el servicio técnico. En este sencillo
formulario en línea se le solicitarán los números de serie y modelo de la unidad, junto con
otra información general del comprador. El número RMA y las instrucciones para el envío
se le enviarán por correo electrónico. La presente garantía no cubre ningún daño (directo,
indirecto, especial o consecuencial) del producto que ocurra durante el envío a Tripp Lite o
a un centro de servicio técnico de Tripp Lite autorizado. Los productos enviados a
Tripp Lite o a un centro de servicio técnico de Tripp Lite autorizado deben tener prepagos
los cargos de transporte. Escriba el número RMA en el exterior del embalaje. Si el
producto se encuentra dentro del período de garantía, adjunte una copia de su recibo de
venta. Envíe el producto para servicio técnico mediante un transportador asegurado a la
dirección que se le proporcionó cuando solicitó el número RMA.
17-05-141-932716.indb 15 5/24/2017 3:17:39 PM

16
1111 W. 35th Street, Chicago, IL 60609 USA • www.tripplite.com/support
Cumplimiento de las normas
Cumplimiento de las normas de los números de identificación
Para fines de identificación y certificación del cumplimiento de las normas, su producto Tripp Lite tiene asignado
un número de serie único. Puede encontrar el número de serie en la etiqueta de la placa de identificación
del producto, junto con los símbolos de aprobación e información requeridos. Al solicitar información sobre el
cumplimiento de las normas para este producto, siempre mencione el número de serie. El número de serie no
debe ser confundido con el nombre de identificación ni con el número de modelo del producto.
Reciclaje de UPS y Baterías
Por favor recicle los productos de Tripp Lite. Las baterías usadas en los productos de Tripp Lite son
baterías selladas de Plomo-Ácido. Estas baterías son altamente reciclables. Refiérase por favor a sus
códigos locales para requerimientos de desecho. Puede llamar a Tripp Lite para reciclar, información al
1.773.869.1234. Puede acudir al sitio Web de Tripp Lite en busca de información actualizada sobre el
reciclaje de baterías o cualquier producto de Tripp Lite. Siga por favor este enlace:
http://www.tripplite.com/support/recycling-program/
Tripp Lite tiene una política de mejora continua. Las especificaciones están sujetas a cambio sin previo aviso.
17-05-141-932716.indb 16 5/24/2017 3:17:39 PM

17
Guide de L’utilisateur
Systèmes UPS Séries
POS (Point-de-Vente),
Entrée 120 v CA
Modèles : POS500
Numéro de Série: AGBC6780
Ne convient pas aux applications mobiles.
English 1 • Español 9
1111 W. 35th Street, Chicago, IL 60609 USA • www.tripplite.com/support
Copyright © 2017 Tripp Lite. Tous droits réservés.
17-05-141-932716.indb 17 5/24/2017 3:17:40 PM

18
Consignes de sécurité importantes
CONSERVEZ CES INSTRUCTIONS
Ce manuel contient des instructions importantes qui doivent être respectées
pendant l’installation, l’utilisation et l’entreposage de ce produit. Tout manquement
à ces avertissements peut affecter votre garantie.
Avertissements du site de l’onduleur
• Soyez prudent pour soulever l’onduleur. En raison du poids considérable de tous les
systèmes onduleurs montés en bâti, au moins deux personnes doivent participer à leur
soulèvement et à leur installation.
• Installer l’onduleur à l’intérieur, dans un endroit exempt d’excès d’humidité, de chaleur, de
poussière, de contaminants conducteurs et des rayons directs du soleil.
• La température de fonctionnement de l’onduleur se situe entre 0° et 40 °C (32° et
104 °F). Pour une performance optimale de la batterie, la température ambiante devrait
être maintenue entre 20° et 25 °C (68° et 77 °F).
• Laissez suffisamment de place autour de l’onduleur pour avoir une bonne ventilation.
N’obstruez pas ses évents ou les ouvertures du ventilateur.
• Lorsque l’onduleur est monté en tour, assurez-vous que le panneau de l’écran LCD se
trouve dans la partie supérieure de l’onduleur et non pas dans la partie inférieure.
• Ne montez pas les panneaux avant ou arrière de l’unité orientés vers le bas (peu importe
l’angle). En montant le système de cette façon, vous pourriez causer des dommages
sérieux et non couverts par la garantie, en bloquant le système de refroidissement interne
de l’appareil.
•
L’onduleur doit être retourné à Tripp Lite pour le remplacement de la batterie. Visiter www.
tripplite.com/support et cliquer sur le lien de retour de produit pour demander un numéro
d’autorisation de retour de matériel (RMA) (ce numéro est requis pour le service). Une fois la
demande de renseignements concernant le produit complétée, un numéro RMA sera attribué
et des instructions concernant l’expédition seront envoyées à votre adresse de courrier
électronique. Consulter Entreposage et entretien pour de plus amples renseignements.
Avertissements liés aux connexions du système onduleur
• MISE EN GARDE : Pour réduire les risques d’incendie, raccorder uniquement à un
circuit fourni avec une protection contre les surcharges du circuit de dérivation
conformément au National Electrical Code (NEC), ANSI/NFPA 70 ou au code local
de l’électricité, partie I, C22.1. Une protection de secours contre les courts-circuits
et les surintensités est fournie par l’installation des lieux. S’assurer d’utiliser la
bonne protection contre les surintensités pour l’installation, conformément aux
valeurs nominales de la fiche et de l’équipement.
• L’onduleur contient sa propre source d’énergie (batterie). Les bornes de sortie peuvent être
sous tension même lorsque l’onduleur n’est pas branché à une alimentation CA.
• Branchez le système onduleur à une prise de courant CA mise à la terre correctement. Ne
modifiez pas la fiche du système onduleur d’une façon qui éliminerait la mise à la terre de
l’onduleur. N’utilisez pas d’adaptateurs qui élimineraient la mise à la terre de l’onduleur.
• Ne branchez pas l’onduleur sur lui-même : ce qui endommagerait l’onduleur et annulerait
votre garantie.
• Si vous connectez l’onduleur à une génératrice à courant alternatif alimenté par un moteur,
celle-ci doit fournir un courant filtré et à fréquence régulière, de classe ordinateur. Brancher
l’onduleur sur une génératrice annulera son assurance à vie ultime.
17-05-141-932716.indb 18 5/24/2017 3:17:40 PM

19
Consignes de sécurité importantes
Avertissements liés à la connexion de l’équipement
• Utiliser cet équipement pour des appareils de survie où une défaillance de cet équipement
peut, selon toute vraisemblance, entraîner la défaillance de l’appareil de maintien de vie ou
affecter de façon majeure sa sécurité ou son efficacité n’est pas recommandé.
• Ne branchez pas de parasurtenseurs ni de rallonges sur la sortie de l’onduleur. Ce qui peut
endommager l’onduleur et peut affecter les garanties de l’onduleur et du parasurtenseur.
Avertissements portant sur les batteries
• Les batteries peuvent présenter un risque de décharge électrique et de brûlures causés par
les courants élevés des courts-circuits. Prenez les précautions appropriées. Ne jetez pas les
batteries dans le feu. Ne pas ouvrir l’onduleur ou les batteries. Ne pas créer de court-circuit
ou de pont entre les bornes de la batterie et un quelconque objet. Il n’existe aucune pièce
réparable par l’utilisateur à l’intérieur de l’onduleur. À la fin de la durée de vie de l’onduleur,
suivre les meilleures pratiques en déchargeant la batterie avant l’élimination. Se reporter
aux codes locaux pour les exigences en ce qui a trait à l’élimination Ne pas brancher ou
débrancher les modules de batteries lorsque l’onduleur s’alimente sur la batterie.
• Ne faites pas fonctionner l’onduleur sans batteries.
Porte de remplacement de batterie
• Dans des conditions normales, la batterie initiale de votre système UPS durera plusieurs
années. Le remplacement de la batterie ne doit être réalisé que par du personnel de
service qualifié. Référezvous à la rubrique Mises en garde relatives à la batterie à la
section Sécurité. Si votre UPS nécessite un remplacement de batterie, rendez visite à
Tripp Lite sur le Web à http://www.tripplite.com/products/battery-finder/ pour trouver la
batterie de remplacement spécifique à votre UPS.
Installation rapide
Remarque : L’onduleur fonctionnera correctement dès le démarrage initial. Cependant, la durée de fonctionnement
maximale de la batterie de l’appareil ne sera accessible qu’après qu’elle soit chargée pendant 24 heures.
1 Raccorder l’onduleur dans une sortie qui ne partage pas un circuit avec une charge
électrique élevée comme un climatiseur ou un réfrigérateur.
2 Appuyer sur le bouton ON/OFF/TEST (marche/arrêt/essai) et le maintenir enfoncé pendant
une seconde pour mettre l’onduleur sous tension. L’alarme se fera entendre brièvement
(une fois), après le délai d’une seconde.
Remarque : même s’il est raccordé à l’alimentation du secteur, l’onduleur ne peut être mis sous
tension qu’en utilisant le bouton ON/OFF/TEST (marche/arrêt/essai).
3
Brancher l’équipement dans les sorties de l’onduleur. Certaines prises (voir la section
Fonctionnement de base) fournissent une protection contre les surtensions et une
alimentation de secours. L’équipement essentiel qui exige également le support des batteries
pendant les pannes de courant, comme un ordinateur et un moniteur, doit être raccordé à
ces sorties. Les appareils non essentiels, comme une imprimante, devraient être branchés
dans d’autres sorties qui fournissent uniquement une protection contre les surtensions.
Remarque : L’onduleur n’est conçu que pour prendre en charge l’équipement électronique. L’équipement
raccordé surchargera l’onduleur si la valeur VA nominale totale pour tout l’équipement raccordé aux
sorties des batteries de secours excède la capacité de sortie de l’onduleur. Pour déterminer les valeurs
nominales VA de votre équipement, consulter leurs plaques signalétiques. Si la valeur indiquée sur
l’équipement est en ampères, multiplier le nombre d’ampères par 120 pour déterminer la valeur VA
(Exemple : 1 ampère x 120 = 120 VA). En cas de doute à savoir si les sorties des batteries de secours
sont surchargées, utiliser le bouton ON/OFF/TEST (marche/arrêt/essai) pour effectuer un autotest.
17-05-141-932716.indb 19 5/24/2017 3:17:40 PM

20
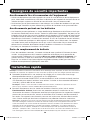
Installation optionnelle
Remarque: Les modèles individuels peuvent être différents du schéma.
Fonctionnement général
Pour les instructions de connexion, consultez la section Fonctionnement général.
Port de communication USB: ce port connecte l’UPS à un ordinateur pour la sauvegarde
automatique des fichiers et arrêt imprévu en cas de panne de courant. Cette connexion est
facultative. Le système d’UPS fonctionnera correctement sans elle.
Prises de protection tél/DSL: ces prises arrêtent les surtensions sur une ligne de téléphone
ou de télécopieur. La connexion de votre équipement à ces prises est facultative. Le système
d’UPS fonctionnera correctement sans ces connexions.
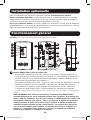
1
Bouton ON/OFF/TEST (marche/arrêt/essai)
• Pour mettre l’onduleur sous tension : Appuyer et maintenir le bouton ON/OFF/TEST
(marche/arrêt/essai) enfoncé pendant une seconde.* Si l’alimentation du secteur est
absente, appuyer sur ce bouton permettra le démarrage à froid de l’onduleur (mise
sous tension et alimentation par batteries**).
•
Pour mettre l’onduleur sous tension : Appuyer et maintenir le bouton ON/OFF/TEST (marche/
arrêt/essai) enfoncé pendant une seconde.* L’onduleur sera complètement désactivé.
• Pour effectuer un autotest : avec l’onduleur branché et sous tension, appuyer et
maintenir le bouton ON/OFF/TEST (marche/arrête/essai) pendant trois secondes.
* L’alarme se fera entendre brièvement (une fois), après le délai d’une seconde. **Si complètement
chargé
MISE EN GARDE! Pour effectuer un autotest, tenir le bouton ON/OFF/TEST
(marche/arrêt/essai) de façon continue pendant trois secondes. Si le bouton est
relâché trop tôt, l’onduleur sera mis hors tension et l’alimentation aux charges de
l’équipement branché sera coupée. Pour s’assurer que le bouton est maintenu
enfoncé pendant la durée nécessaire, ne pas relâcher le bouton avant d’avoir
entendu l’onduleur émettre un bip à deux reprises. Le premier bip a lieu après
une seconde et indique que l’onduleur se mettra hors tension si le bouton est
relâché. Le second bip a lieu après trois secondes et indique que l’onduleur
effectuera un autotest si le bouton est relâché.
1
4
5
3
2
7
8
9
12
11
13
6
10
17-05-141-932716.indb 20 5/24/2017 3:17:40 PM
Page is loading ...
Page is loading ...
Page is loading ...
Page is loading ...
-
 1
1
-
 2
2
-
 3
3
-
 4
4
-
 5
5
-
 6
6
-
 7
7
-
 8
8
-
 9
9
-
 10
10
-
 11
11
-
 12
12
-
 13
13
-
 14
14
-
 15
15
-
 16
16
-
 17
17
-
 18
18
-
 19
19
-
 20
20
-
 21
21
-
 22
22
-
 23
23
-
 24
24


Tripp Lite POS UPS Owner's manual
- Type
- Owner's manual
Ask a question and I''ll find the answer in the document
Finding information in a document is now easier with AI
in other languages
Related papers
-
Tripp Lite UPS Systems Owner's manual
-
-
-
-
 Bender OMNIX350HG / SMX700 / SMX1200 Owner's manual
-
Tripp Lite SUINT3000RTXL2U Owner's manual
-
-
-
Tripp Lite AVRX550U Owner's manual
-
Tripp-Lite VS650T Owner's manual

Other documents
-
 bXterra 350VA UPS BG350 Standby UPS Battery Backup, 6 Outlets, Easy Mute Button, RJ11, Energy Star, LEDs, Contoured Design, Compact User manual
-
Dynex DX-800U User manual
-
 AutoTest Euro Trailer Socket Tester User manual
-
APC ES 350G User manual
-
Legrand KEOR PDU Single Phase UPS User manual
-
APC BE550G-FR User manual
-
Draper APM1024WF Installation guide
-
Koblenz 12007-USR Operating Instructions Manual
-
 Digital Energy 25 Foot Long Surge Protector 8-Outlet Heavy Duty Metal Mountable 1050 Joules Protection Extension Cord Power Strip User manual
-
Radio Shack 61-2425 User manual


