Page is loading ...

Questions, problems, missing parts? Before returning to your retailer, call our Customer
Service Department at U.S.A:1-855-634-2627 , 8 a.m. - 5 p.m., PST, Monday-Friday.
OUTDOOR
CHARCOAL KETTLE GRILL
MODEL #810-0026H
ITEM # 1900670
GRIL À CHARBON
EXTÉRIEUR
MODÈLE 810-0026H
ARTICLE # 1900670
PARRILLA A CARBÓN
PARA EXTERIORES
MODELO 810-0026H
ARTICULO # 1900670
• This instructions manual contains important information necessary for the
proper assembly and safe use of the appliance.
• Read and follow all warnings and instructions before assembling and using the
appliance.
• Keep this manual for future reference.
SERIAL # _________________ MFG. DATE _________________ PURCHASE DATE: _________________
NUMÉRO DE SÉRIE____________DATE DE FABRICATION ____________ DATE D'ACHAT ____________
NÚM. DE SERIE ___________ FECHA DE MANUFACTURA ___________ FECHA DE COMPRA ___________
OWNER’S GUIDE
GUIDE DU PROPRIÉTAIRE
GUÍA DEL PROPIETARIO
19000804A0
CALIFORNIA RESIDENTS ONLY - WARNING:
This product and the fuels used to operate this product (charcoal or wood), and the products of
combustion of such fuels, can expose you to chemicals including carbon black, which is known to
the state of California to cause cancer, and carbon monoxide, which is known to the State of
California to cause birth defects or other reproductive harm.
For more information go to: www.P65Warnings.ca.gov.

WARNING
Do not burn more than 5 lbs of charcoal in this unit at one time.
Keep a fire extinguisher nearby at all times.
This grill is for outdoor use only, in well-ventilated areas.
The use of alcohol, prescription or non-prescription drugs may impair the user’s ability to
properly assemble and safely operate this unit.
Use caution when lifting and moving the unit to avoid back strain or back injury. Two
people are recommended to lift or move the unit. Do not move the unit while it is in use.
DO NOT operate the
unit near or under flammable or combustible materials such as decks,
porches or carports. A minimum clearance of 36 in. (91cm) is required from all combustible
materials. DO NOT operate the unit under overhead construction or combustible materials.
ATTENTION: This barbecue will become
very hot while in use. Do not move it during
operation. Do not use indoors.
CAUTION: Do not use spirit, petrol or
comparable fluids for lighting or re-lighting!
WARNING: Keep children and pets away.
WARNING
This product is not to be used as a heater.
Operate the unit on a stable, level, non-flammable surface such as asphalt, concrete or solid
ground. DO NOT operate the unit on flammable material such as carpet or a wood deck.
Use caution when assembling and operating this unit to avoid cuts and scrapes from edges.
DO NOT use this product in a manner other than its intended purpose. It is NOT intended for
commercial use. It is not intended to be installed or used in or on a recreational vehicle
and/o
r boats.
DO NOT Store this unit near gasoline or other combustible liquids or where other
combustible vapors may be present.
DO NOT store or operate this product in an area accessible to children or pets. Store this
unit in a dry, protected location.
DO NOT leave the unit unattended while in use.
DO NOT leave hot ashes unattended until the grill cools completely.
DO NOT move the unit while in use or while ashes are still hot. Allow the unit to cool
completely before moving or storing.
NEVER use g
asoline or other highly volatile fluids as a starter.
Always wait for any charcoal flames to subside before placing food on cooking grid.
Dispose of cold ashes by wrapping them in a heavy-duty aluminum foil and placing in a
noncombustible container. Make sure that there are no other combustible materials in or
near the container.
Allow the unit to cool completely before conducting any routine cleaning or maintenance.
3
Failure to comply with these instructions could result in a fire or explosion that could
cause serious bodily injury, death, or property damage.
Your grill will be very hot. Never lean over the cooking area while using your grill. Do
not touch cooking surfaces, grill housing, lid or any other grill parts while the grill is in
operation, or until the charcoal grill has cooled down after use.
Safety Instructions

Flat Washer
M4
Rondelle plate
M4
Arandela plana
M4
Truss Head Screw
5/32-32 x 2/5
"
Vis cruciform
5/32-32 x 2/5
"
Tornillo de cabeza ovalada
B
x2
Truss Head Screw
1/4-20 x 3/5
"
Vis cruciforme
1/4-20 x 3/5
"
Tornillo de cabeza ovalada
(1/4-20 x 3/5
")
A
x40
7
Hardware Package List
Liste des vis de l'emballage
Lista de tornillos del paquete
D
x5
Flat Washer
M6
Rondelle plate
M6
Arandela plana
M6
E
x3
Self Tapping Screw
ST3.5*12
Vis autotaraudeuse
ST3.5*12
Tornillo autorroscante
ST3.5*12
C
x43
F
x1
Nut
1/4
"-20
Écrou
1/4"-20
Tuerca
G
x2
H
x2
Locknut
1/4
"-20
Écrou de blocage
1/4"-20
Tuerca de bloqueo
Square Neck Screw
1/4
"-20
Vis tête ronde à collet carré
1/4"-20
Tornillo de cuello cuadrado
0,63 cm-20 x 1,52 cm 0,39 cm-32 x 1,01 cm (5/32-32 x 2/5
")
0,63 cm-20 (1/4"-20)
0,63 cm-20 (1/4"-20)
0,63 cm-20 (1/4"-20)

1. La rejilla de cocina y la rejilla de carbón son planas y descansan en la
posición correcta.
2. El receptor de ceniza está montado correctamente.
3. Las ventilas se pueden girar suavemente.
4. Las piernas se mantienen firmes.
5. Todo el empaque ha sido eliminado.
SP
25
Your charcoal kettle is ready to use!
Votre barbecue à charbon est prêt à l'emploi!
¡Su parrilla a carbón está lista para usar!
Installation Final Check List
Installation Liste de vérification finale
Lista de verificación final de instalación
1. The cooking grate and charcoal grate are flat and resting in proper position.
2. Ash catcher is properly mounted.
3. Vents can be turned smoothly.
4. Legs stand securely.
5. All packaging has been removed.
1. La grille de cuisson et la grille à charbon sont plates et reposent dans la
bonne position.
2. Le receveur de cendres est correctement monté.
3. Les évents peuvent être tournés doucement.
4. Les jambes se tiennent
solidement.
5. Tous les emballages ont été supprimés.
EN
FR

Consignes d‘Allumage
LISEZ TOUTES LES CONSIGNES DE SÉCURITÉ AVANT D'UTILISER VOTRE
GRIL.
Préparation de la bouilloire au charbon pour l'éclairage
1. Retirez le couvercle et placez-le sur le côté de votre bouilloire au charbon en utilisant le crochet du
couvercle situé à l'intérieur du couvercle.
2. Retirez la grille de cuisson (supérieure) de votre bouilloire au charbon de bois.
3. Retirez la grille de charbon de bois (en bas) et nettoyez les cendres ou les morceaux de vieux charbon
du fond du bol. Le charbon de bois nécessite de l'oxyg
ène pour brûler, alors assurez-vous que rien ne
bloque les évents.
4. Libérez le récupérateur de cendres, puis jetez les cendres.
5. Ouvrir l'évent du bol en déplaçant la poignée en position ouverte.
6. Remplacer la grille de charbon de bois (en bas).
26
Lighting Instructions
Preparing the charcoal kettle for lighting
1. Remove the lid and position it on the side of your charcoal kettle using the lid hook located on the inside of the lid.
2. Remove the cooking (top) grate from your charcoal kettle.
3. Remove the charcoal (bottom) grate and clear ashes or chunks of old charcoal from the bottom of the bowl.
Charcoal requires oxygen to burn, so be sure that nothing clogs the vents.
4. Release the ash catcher, then dispose of the ashes.
5. Open bow
l vent by moving the handle to the open position.
6. Replace charcoal (bottom) grate.
READ ALL SAFETY WARNINGS AND INSTRUCTIONS CAREFULLY BEFORE
OPERATING YOUR GRILL.
Instrucciones de Encendido
LEA CUIDADOSAMENTE TODAS LAS ADVERTENCIAS E INSTRUCCIONES
DE SEGURIDAD ANTES DE OPERAR SU PARRILLA.
Preparación de la caldera de carbón para el encendido
1. Retire la tapa y colóquela en el costado de la caldera de carbón utilizando el gancho de la tapa
ubicado en el interior de la tapa.
2. Retire la rejilla de cocción (superior) de su caldera de carbón.
3. Retire la rejilla de carbón (inferior) y despeje las cenizas o trozos de carbón viejo del fondo del
recipiente. El carbón vegetal requiere oxígeno para quemar, así que asegúrese de que nada
obstruya
las rejillas de ventilación.
4. Libere el colector de cenizas, luego elimine las cenizas.
5. Abra la ventilación del recipiente moviendo la manija a la posición abierta.
6. Reemplace la rejilla de carbón (inferior).

27
NOTE: To extend the life of your grill, make sure that hot coals and wood do not touch the walls of grill.
IF USING CHARCOAL CHIMNEY STARTER, PROCEED TO STEP 4
If you choose to use charcoal lighting fluid, ONLY use charcoal lighting fluid approved for lighting charcoal.
Do not use gasoline, kerosene, alcohol or other flammable material for lighting charcoal.
1. Follow all manufacturer’s warnings and instructions regarding the use of their product. Start with 2.5
pounds of charco
al. Placed the charcoal in center of charcoal grate.
2. With lid removed, saturate charcoal with lighting fluid. Wait 2 to 3 minutes to allow lighting fluid to soak
into charcoal. Store charcoal lighting fluid safely away from the grill.
3. Carefully light charcoal with a match or long reach lighter according to directions on the charcoal
packaging.
4. Spread the charcoal evenly across the charcoal grate.
5. Place cooking grate on grill support lips.
6. Place food on cooking grill and clo
se grill lid. By closing the front air ventilation, the burning intensity is
slowed. Always use a meat thermometer to ensure food is fully cooked before removing from grill.
7. Allow grill to cool completely, then follow instructions in the “Proper Care & Maintenance” section of
this manual.
Add Charcoal/Wood During Cooking
Additional charcoal and/or wood may be required to maintain or increase cooking temperature.
1. Stand back and carefully open grill lid. Use caution since flames can flare-up when fresh air suddenly
comes in contact with fire.
2. Stand back a safe distance and use long cooking tongs to lightly brush aside ashes on hot coals. Us
e
co
oking tongs to add charcoal wood to charcoal grate, being careful not to stir-up ashes and sparks. If
necessary, use your charcoal chimney starter to light additional charcoal or wood and add to existing
fire.
3. When the charcoal is burning strong again, wear oven mitts/gloves a
nd
carefully return cooking grate
on grill support lips.
WARNING: Never use charcoal that has been pre-treated with lighter fluid. Use only a high grade
plain charcoal or charcoal wood mixture.
WARNING: Charcoal lighting fluid must be allowed to completely burn off prior to closing grill lid
(approximately 20 minutes). Failure to do this could trap fumes from charcoal lighting fluid in grill and
may result in a flash-fire or explosion when lid is opened.
WARNING: Wear protective gloves or oven mitts when removing the cooking grate.
WARNING: Never add charcoal lighting fluid to hot or even warm coals as flashback may occur
causing severe burns.
Operating and Cooking Instructions

● To protect your grill from excessive rust, the unit must be properly cleaned and covered at all times
when not in use.
● Wash cooking grill and charcoal grate with hot, soapy water, rinse well and dry.
● Clean inside and outside of grill by wiping off with a damp cloth. Apply a light coat of vegetable oil or
vegetable oil spray to the interior surface to prevent rusting. Do not coat charcoal tray or charcoal ash
tray.
● If rust appears on the exterior surface of your grill, clean and buff the affected area with steel wool or
fine grit eme
ry cloth, Touch-up with a good quality high-temperature resistant paint.
● Never apply paint to the interior surface. Rust spots on the interior surface can be buffed, cleaned, then
lightly coated with vegetable oil or vegetable oil spray to minimize rusting.
30
Proper Care & Maintenance
Bon entretien et nettoyage
● Pour protéger le gril de la rouille, l unité doit être nettoyée soigneusement et couverte à tout moment
quand il n'est pas utilisé.
● Lavez la grille de cuisson et la grille de charbon à l'eau chaude savonnée, rincez bien et séchez.
● Nettoyez l'intérieur et l'extérieur du gril en essuyant avec un linge humide. Appliquez une fine couche
d'huile végétale ou d'huile végétale en aérosol sur la surface intérieur afin d'éviter la rouille. Ne couvrez
pas le plateau à charbon ou le platea
u de cendres à charbon.
● Si la rouille apparait sur la surface extérieure du gril, nettoyez et frottez la zone affectée avec de laine
de verre ou une toile émeri fine. Retouchez avec une peinture résistante aux températures élevées de
bonne qualité.
● Ne jamais peindre la surface intérieure. Les endroits rouiilés à l'intérieur peuvent être frottés, nettoyés et
recouvert d'une fine couche d'huile végétale ou d'huile végétale en aérosol.
Cuidado y mantenimiento apropiados
● Para proteger su parrilla de la oxidación excesiva, la unidad debe limpiarse adecuadamente y cubrirse
en todo momento cuando no está en uso.
● Lave la parrilla de cocción y la bandeja de carbón con agua caliente, jabonosa, enjuague bien y seque.
● Limpie el interior y el exterior de la parrilla, limpiándola con un trapo húmedo. Aplique una capa ligera
de aceite vegetal o atomice aceite vegetal en la superficie interior para evitar la oxidación. No cubra la
bandeja de carbón ni la bandeja para la
ceniza.
● Si aparece óxido en la superficie exterior de su parrilla, limpie y frote el área afectada con lana de
acero o con papel de lija fina y retoque con pintura resistente a altas temperaturas de buena calidad.
● Nunca aplique pintura a la superficie interior. Los puntos de óxido en la superficie interior pueden
frotarse, limpiarse y cubrirse ligeramente con aceite vegetal o con aceite vegetal en aerosol para
minimizar la oxidación.

Cleaning
Follow a few basic maintenance instructions to keep your grill looking and grilling better for years to come!
• For proper air flow and better grilling, remove accumulated ashes and old charcoal from the bottom of
the kettle and the ash catcher before use. Make sure that all of the charcoal is fully extinguished and the
grill is cool before doing so.
• You may notice "paint-like” flakes on the inside of the lid. During use, grease and smoke vapors slowly
oxidize into carton and deposit on the inside of your lid. Brush the carbonized
grea
se from the inside of
the lid with a stainless steel bristle grill brush. To minimize further build-up, the inside of the lid can be
wiped with a paper towel after cooking while the grill is still warm (not hot).
• If your grill is subject to a particularly harsh environment, you will want to clean the outside more of
ten.
A
cid rain, chemicals and salt water can cause surface rusting to appear. Megamaster recommends
wiping down the outside of your grill with warm soapy water. Follow up with a rinse and thorough drying.
• Do not use sharp objects or abrasive cl
eaners to
clean the surfaces of your grill.
31
Proper Care & Maintenance
Bon entretien et nettoyage
Nettoyage
Suivez quelques instructions d'entretien de base pour garder votre gril à l'air et griller mieux pour les
années à venir!
• Pour un bon écoulement de l'air et une meilleure cuisson, retirez les cendres accumulées et le vieux
charbon du fond de la bouilloire et du récupérateur de cendres avant utilisation. Assurez-vous que tout
le charbon de bois est complètement éteint et que la grille est froide avant de le faire.
• Vous remarquerez peut-être des floc
ons d
e peinture à l'intérieur du couvercle. Lors de l'utilisation, les
vapeurs de graisse et de fumée s'oxydent lentement dans le carton et se déposent à l'intérieur de votre
couvercle. Brossez la graisse carbonisée de l'intérieur du couvercle avec un acier inoxydable Brosse à
poils Pour réduire au minimum les accumulations, l'intérieur du couvercle peut être essuyé avec une
serviette en papier après la cuisson alors que la grille est encore chaude (pas chaude).
• Si votre gril est
soumis à un environnement particulièrement difficile, vous devrez nettoyer l'extérieur
plus souvent. Les pluies acides, les produits chimiques et l'eau salée peuvent provoquer l'apparition de
rouille de surface. Megamaster recommande d'essuyer l'extérieur de votre gril avec de l'eau chaude
savonneuse. Suivi avec un rinçage et un séchage complet.
• N'utilisez pas d'objets tranchants ou de nettoyants abrasifs pour nettoyer les surfaces de votre gril.
Cuidado y mantenimiento apropiados
Limpieza
¡Siga algunas instrucciones básicas de mantenimiento para mantener su parrilla y parrilladas mejor en los
años venideros!
• Para un flujo de aire adecuado y una mejor cocción, retire las cenizas acumuladas y el carbón viejo del
fondo del hervidor y del colector de cenizas antes de usar. Asegúrese de que todo el carbón se haya
extinguido por completo y que la parrilla esté fría antes de hacerlo.
• Puede observar escamas "similares a la pintura" en el interior de la tapa. Durante el uso, la grasa y los
vapores de humo se oxidan lentamente en el cartón y se depositan en el interior de la tapa. Use un cepillo
de cerdas para minimizar la acumulación de más. El interior de la tapa se puede limpiar con una
toalla de papel después de cocinar mientras la parrilla todavía está tibia (no caliente).
• Si su parrilla está sujeta a un ambiente particularmente hostil, querrá limpiar el exterior con más
frecuencia. La lluvia ácida, los productos químicos y el a
gu
a salada pueden provocar la aparición de
oxidación en la superficie. Se recomienda limpiar la parte exterior de su parrilla con agua tibia
y jabón. Haga un seguimiento con un enjuague y un secado completo.
• No use objetos filosos o limpiadores abrasivos para limpiar las superficies de su parrilla.

HOW TO ORDER REPLACEMENT PARTS
To make sure you obtain the correct replacement part
(s) for your grill, please refer to the parts list on page
36. The following information is required to assure
getting the correct part. Please note the shipping cost
for the delivery of any replacement parts will be at
your cost.
• Grill model number (see data sticker on grill).
• Part number of replacement part needed.
• Description of replacement part needed.
• Quantity of parts needed.
To obtain replacement parts, contact our customer
service h
otline U.S.A:1-855-634-2627 .
IMPORTANT
Use only factory authorized parts. The use of any
part that is not factory authorized can be dangerous.
This will also void your warranty.
Keep this assembly and operating instruction
manual for convenient referral, and for replacement
parts ordering.
COMMENT PASSER UNE COMMANDE DE
PIÈCES DE REMPLACEMENT
Pour garantir que les pièces de remplacement
convenant à votre gril seront envoyées, veuillez
consulter les numéros de pièces sur le page 37.
Les informations suivantes sont re
quises pour
assurer que la pièce envoyée est correcte. Prière de
remarquer que les frais de livraison des pièces de
rechange sont à votre charge.
• Numéro du modèle du gril au gaz (voir l’étiquette
apposée sur le gril).
• Numéro de la pièce de remplacement nécessaire.
• Description de la pièce de remplacement
nécessaire.
• Quantité de pièces requises
Pour obtenir des pièces de rechange, contactez
notre service clientèle au 1-855-634-2627 .
IMPORTANT
Utilisez uniquement les pièces autorisées par l’usine.
L'emploi d
e pièces qui ne seraient pas autorisées par
l’usine peut être dangereux. Toute substitution
annulerait votre garantie.
Conservez ce manuel d’instructions pour
l’assemblage et de fonctionnement qui vous servira
de référence et facilitera votre commande de pièces
de remplacement.
32
Ordering Parts
Commande de pièces
CÓMO SOLICITAR PIEZAS DE REPUESTO
Para asegurarse de que recibe el / los repuesto(s)
adecuado(s) para su parrilla, consulte la lista de
partes en la página 38. Es necesaria la siguiente
información para asegurarse que obtenga el repuesto
correcto. Tenga en cuenta que el costo de envío para
la entrega de piezas de repuesto corre por su cuenta.
• Número de modelo de la parrilla (ver la eti
queta de
in
formación en la parrilla).
• Es necesario saber el número de repuesto de l
a
p
ieza solicitada.
• Es necesari
o ha
cer una descripción del repuesto
que se necesita.
• Cantidad de partes que necesita.
Para obtener piezas de repuesto, comuníquese con
la línea del Servicio de Atención al Cliente
Estados Unidos:1-855-634-2627. (Teléfono y
IMPORTANTE
Sólo utilice repuestos autorizados de fábrica.
Puede ser peligroso que utilice repuestos no
autorizados de fábrica. Esto también dejará sin
validez su garantía. (Garantía del fabricante no
válida en México).
Conserve este manual de armado e instrucciones
de uso para consultas futuras y para ordenar
repuestos.
Ordenar repuestos (Servicio no válido en México)
servicio no válidos en México).

The manufacturer warrants to the original consumer-purchaser only that this product (Model #810-0026H) shall be free from defects in
workmanship and materials after correct assembly and under normal and reasonable home use for the periods indicated below
beginning on the date of purchase. The manufacturer reserves the right to require photographic evidence of damage, or that defective
parts be returned, postage and/or freight pre-paid by the consumer, for review and examination.
WARRANTY COVERAGE:
• 5 YEAR warranty on Kettle bowl & lid, with exception of rust/ burn damage.
• 5 YEAR warranty on Ash Catcher, with exception of rust/ burn damage.
• 2 YEAR warranty on all remaining parts.
Upon consumer supplying proof of purchase as provided herein, Manufacturer will repair or replace the parts which are proven defective
during the applicable warranty period. Parts required to complete such repair or replacement shall be free of charge to you except for
shipping costs, as long
as the purchaser is within the warranty period from the original date of purchase. The original consumer-
purchaser will be responsible for all shipping charges of parts replaced under the terms of this limited warranty. This limited warranty is
applicable in the United States and Canada only, is only available to the original owner of the product and is not transferable.
Manufacturer requires reasonable proof of yo
ur date of purchase. Therefore, you should retain your sales receipt and/or invoice. If the
unit was received as a gift, please ask the gift-giver to send in the receipt on your behalf, to the below address. Defective or missing
parts subject to this limited warranty will not be replaced without registration or proof of purchase. This limited warranty applies to the
functionality of the product ONLY and does not cover cosmetic issues such
as scratches, dents, corrosions or discoloring by heat,
abrasive and chemical cleaners or any tools used in the assembly or installation of the appliance, surface rust, or the discoloration of
stainless steel surfaces. Surface rust, corrosion, or powder paint chipping on metal parts that does not affect the structural integrity of
the product is not considered a defect in workmanship or material and is not
covered by this warranty. This limited warranty will not
reimburse you for the cost of any inconvenience, food, personal injury or property damage. If an original replacement part is not
available, a comparable replacement part will be sent. You will be responsible for all shipping charges of parts replaced under the terms
of this limited warranty.
MANUFACTURER WILL NOT PAY FOR:
• Service calls to your home.
• Repairs when your product is used for other than normal, single-family household or residential use.
• Damage resulting from accident, alteration, misuse, lack of maintenance/cleaning, abuse, fire, flood, acts of God, improper
installation, and installation not in accordance with electrical or plumbing codes or misuse of product..
• Any food loss due to product failures.
• Replacement parts or repair labor costs for units operated outside the United States or Canada.
• Pickup and delivery of your product.
• Postage fees or photo processing fees fo
r photos sent in as documentation.
• Repairs to parts or systems resulting from unauthorized modifications made to the product.
• The removal and/or reinstallation of your product.
• Shipping cost, standard or expedited, for warranty/non warranty and replacement parts.
DISCLAIMER OF IMPLIED WARRANTIES; LIMITATION OF REMEDIES
Repair or replacement of defective parts is your exclusive remedy under the terms of this limited warranty. Manufacturer will not be
responsible for any consequential or incidental damages arising from the breach of either this limited warranty or any applicable implied
warranty, or for failure or damage resulting from acts of God, improper care and maintenance, grease fire, accident, alteration,
replacement of parts b
y anyone other than manufacturer, misuse, transportation, commercial use, abuse, hostile environments
(inclement weather, acts of nature, animal tampering), improper installation or installation not in accordance with local codes or printed
manufacturer instructions.
THIS LIMITED WARRANTY IS THE SOLE EXPRESS WARRANTY GIVEN BY THE MANUFACTURER. NO PRODUCT
PERFORMANCE SPECIFICATION OR DESCRIPTION WHEREVER APPEARING IS WARRANTED BY MANUFACTURER EXCEPT
TO THE EXTENT SET FORTH IN THIS LIMITED WARRANTY. ANY IMPLIED WARRANTY PROTECTION ARISING UNDER THE
LAWS OF ANY STATE, INCLUDING IMPLIED WARRANTY OF MERCHANTABILITY OR FITNESS FOR A PARTICULAR PURPOSE
OR USE, IS HEREBY LIMITED IN DURATION TO THE DURATION OF THIS LIMITED WARRANTY.
Neither dealers nor the retail establishment selling this product has any authority to make any additional warranties or to promise
remedies in addition to or inconsistent with those stated above. Manufacturer's maximum liability, in any event, shall not exceed the
documented purchase price of the product paid by the original consumer. This warranty only applies to units purchased from an
authorized retailer and or re-
se
ller. NOTE: Some states do not allow an exclusion or limitation of incidental or consequential damages,
so some of the above limitations or exclusions may not apply to you; this limited warranty gives you specific legal rights as set for herein.
You may also have other rights which vary from state to state.
If you wish to obtain performance of any obligation under this limited warranty, you should write to:
Nexgrill Customer Relations
14050 Laurelwood PIace
Chino, CA 91710
All consumer returns, parts orders, general questions, and troubleshooting
assistance can be acquired by calling U.S.A:1-855-634-2627
33
Limited Warranty

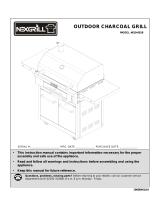
37
Parts List
No. Part Description
Warranty coverage
(years)
QTY
1 Main lid handle assembly 2 1
2 Lid handle decorative sheet 2 1
3 Temperature gauge 2 1
4 Ventilation adjustment bracket 2 1
5 Lid 5 1
6 Cooking grate 2 1
7 Charcoal grate 2 1
8 Bowl vent assembly 2 1
9 Ash cup bracket 2 1
10 Charcoal bowl assembly 5 1
11 Ash cup 5 1
12 Side shelf, left 2 1
13 Utensil hook 2
2
14 Side shelf support bracket A 2 1
15 Side shelf support bracket B 2 1
16 Top panel 2 1
17 Logo 2 1
18 Cart side handle seat 2
2
19 Side handle 2
1
20 Side panel 2
2
21 Back panel 2
1
22 Condi
ment tray heat shield 2
1
23 Cart front panel 2
1
24 Condiment tray 2
1
25 Cart leg front, left 2
1
26 Cart leg rear, left 2
1
27 Cart leg front, right 2
1
28 Cart leg rear, right 2
1
29 Bottom panel 2
1
30 Caster 2
2
31 Swivel caster with brake 2 2
Manual
1
Hardware pack
1

40
MADE IN CHINA
FABRIQUÉ EN CHINE
HECHO EN CHINA
Distributed by:
Costco Wholesale Corporation
P.O. Box 34535
Seattle, WA 98124-1535
USA
1-800-774-2678
www.costco.com
Costco Wholesale Australia Pty Ltd
17-21 Parramatta Road
Lidcombe NSW 2141
Australia
www.costco.com.au
Costco Wholesale UK Ltd /
Costco Online UK Ltd
Hartspring Lane
Watford, Herts
WD25 8JS
United Kingdom
01923 213113
www.costco.co.uk
Costco Wholesale Japan Ltd.
3-1-4 Ikegami-Shincho
Kawasaki-ku, Kawasaki-shi,
Kanagawa 210-0832 Japan
0570-032600
www.costco.co.jp
Costco Wholesale Korea, Ltd.
40, Iljik-ro
Gwangmyeong-si
Gyeonggi-do, 14347, Korea
1899-9900
www.costco.co.kr
Costco President Taiwan, Inc.
No. 656 Chung-Hwa 5th Road
Kaohsiung, Taiwan
Company Tax ID: 96972798
449-9909 or 02-449-9909 (if cellphone)
www.costco.com.tw
Shanghai Minhang Costco Trading Co., Ltd
No.235 ZhuJian Road
Minhang District, Shanghai
China 201106
+86-21-6257-7065
Importado por:
Importadora Primex S.A. de C.V.
Blvd. Magnocentro No. 4
San Fernando La Herradura
Huixquilucan, Estado de México
C.P. 52765
RFC: IPR-930907-S70
(55)-5246-5500
www.costco.com.mx
Costco Wholesale Spain S.L.U.
Polígono Empresarial Los Gavilanes
C/ Agustín de Betan
court, 17
28906 Getafe (Madrid) España
NIF: B86509460
900 111 155
www.costco.es
/