Page is loading ...

SANTO N 8 18 40 i
Integrierbare Kühl-Gefrierkombination
Integrating Fridge Freezer
Integrerbare Kjøle-frysekombinasjoner
Gebrauchs- und Einbauanweisung
Operating and Installation Instructions
Bruksanvisning
AEG Hausgeräte GmbH
Postfach 1036
D-90327 Nürnberg
http://www.aeg.hausgeraete.de
Technische Änderungen vorbehalten
© Copyright by AEG Subject to change without notice
2222 208-31 03/02 Med forbehold om endringer
Kundendienst
Im Kapitel „Was tun, wenn...“ sind die wichtigsten Fehlerquellen zusam-
mengestellt, die Sie selbst beheben können.
Wenn Sie trotzdem für einen der aufgeführten Hinweise oder aufgrund von
Fehlbedienung den Kundendienst in Anspruch nehmen, so erfolgt der Besuch
des Kundendienst-Technikers auch während der Garantiezeit nicht kostenlos.
Wenn Sie für eine Störung keinen Hinweis in dieser Gebrauchsanweisung
finden, haben Sie zwei Möglichkeiten:
• Haben Sie Fragen zu Bedienung und Gebrauch Ihres Kühlgerätes?
Dann wenden Sie sich an AEG DIRECT INFO SERVICES 0180 – 555 4555*,
unsere telefonische Beratung. Dort bekommen Sie Tips zum Umgang mit
Ihrem Kühlgerät und zur Nutzung der zahlreichen Funktionen.
• Hat Ihr Gerät eine technische Störung?
Dann wenden Sie sich bitte an unseren Kundendienst. Unter der
kostengünstigen Rufnummer 0180 322 66 22** erreichen Sie immer die
nächstgelegene Niederlassung unseres Werkskundendienstes oder
einen unserer Service-Partner.
Geben Sie dem Kundendienst die PNC-Nummer und die S-No (Seriennum-
mer) an, die Sie auf dem Typschild finden.
Damit Sie die Nummern bei der Hand haben, empfehlen wir, sie hier einzu-
tragen:
• Modellbezeichnung
• Erzeugnis-Nummer (PNC)
• Fertigungs-Nummer (S-No.)
Halten Sie weiterhin möglichst genau fest:
• Wie äußert sich die Störung?
• Unter welchen Umständen tritt die Störung auf?
* 0,12 Euro/Min **0,009 Euro/Min
Garantiebedingungen für Deutschland
Der Endabnehmer dieses Gerätes (Verbraucher) hat bei einem Kauf dieses Gerä-
tes von einem Unternehmer (Händler) in Deutschland im Rahmen der Vorsch-
riften über den Verbrauchsgüterkauf gesetzliche Rechte, die durch diese
Garantie nicht eingeschränkt werden. Diese Garantie räumt dem Verbraucher
also zusätzliche Rechte ein. Dies vorausgeschickt, leisten wir, AEG Hausgeräte
GmbH, gegenüber dem Verbraucher Garantie für dieses Gerät für den Zei-
traum von 24 Monaten ab Übergabe zu den folgenden Bedingungen:
23
50
Regulations, Standards, Guidelines
This appliance was designed for household use and was manufactured in
accordance with the appropriate standards. The necessary measures in
accordance with appliance safety legislation regulations (GSG), accident
prevention regulations for refrigeration appliances (VBG 20) and the regu-
lations of the German Society of Electrical Engineers (VDE) were observed in
the manufacture of this appliance.
The refrigerant circuit has been checked for leaks.
This appliance is in accordance with the following EU guidelines:
– 73/23/EWG dated 19 February 1973 - low voltage guidelines.
– 89/336/EWG dated 3 May 1989
(including guideline change notice 92/31/EWG) - EMV guideline
Customer Service
If you cannot find the remedy for a malfunction in these operating instruc-
tions, please contact your dealer or our customer service department.
Addresses and telephone numbers are listed in the accompanying booklet
"Guarantee Conditions/Customer Service Locations".
Selective ordering of replacement parts can save unnecessary travel and
costs. For this reason always provide the following appliance information:
This information can be found on the serial plate in the interior at the left
of the appliance.
• Model Name
• Model Number (PNC)
• Serial Number (S-No.)
We recommend that you enter this information here, so that it is handy if
needed.
Note: The customer bears the costs of unjustified customer service calls
even during the guarantee period.
24
1. Mit dieser Garantie haften wir dafür, dass dieses neu hergestellte Gerät im
Zeitpunkt der Übergabe vom Händler an den Verbraucher die in unserer
Produktbeschreibung für dieses Gerät aufgeführten Eigenschaften aufwei-
st. Ein Mangel liegt nur dann vor, wenn der Wert oder die Gebrauchstaugli-
chkeit dieses Gerätes erheblich gemindert ist. Zeigt sich der Mangel nach
Ablauf von sechs (6) Monaten ab dem Übergabezeitpunkt, so hat der Ver-
braucher nachzuweisen, dass das Gerät bereits im Übergabezeitpunkt man-
gelhaft war. Nicht unter diese Garantie fallen Schäden oder Mängel aus
nicht vorschriftsmäßiger Handhabung sowie Nichtbeachtung der Einbau-
vorschriften und Gebrauchsanweisungen.
2. Dieses Gerät fällt nur dann unter diese Garantie, wenn es von einem Unter-
nehmer in einem der Mitgliedstaaten der Europäischen Union gekauft wurde,
es bei Auftreten des Mangels in Deutschland betrieben wird und Garantielei-
stungen auch in Deutschland erbracht werden können. Mängel müssen uns
innerhalb von zwei (2) Monaten nach dessen Kenntnis angezeigt werden.
3. Mängel dieses Gerätes werden wir innerhalb angemessener Frist nach Mittei-
lung des Mangels unentgeltlich beseitigen; die zu diesem Zweck erford-erli-
chen Aufwendungen, insbesondere Transport-, Wege-, Arbeits- und Mate-
rialkosten werden von uns getragen. Über diese Nachbesserung hinaus-
gehende Ansprüche werden durch diese Garantie dem Verbraucher nicht ein-
geräumt.
4. Bei Großgeräten (stationär betriebene Geräte) ist im Garantiefall unter der
für den Endabnehmer kostengünstigen Rufnummer 0180 322 66 22 *die
nächstgelegene Kundendienststelle zu benachrichtigen, von der Ort, Art und
Weise der Garantieleistungen festgelegt werden. Nachbesserungsarbeiten
werden, soweit möglich, am Aufstellungsort, sonst in unserer Kundendien-
stwerkstatt durchgeführt.
5. Garantieleistungen bewirken weder eine Verlängerung noch einen Neube-
ginn der Garantiezeit für dieses Gerät; ausgewechselte Teile gehen in unser
Eigentum über.
6. Mängelansprüche aus dieser Garantie verjähren in zwei (2) Jahren ab dem
Zeitpunkt der Übergabe des Gerätes vom Händler an den Verbraucher, der
durch Original-Kaufbeleg (Kassenzettel, Rechnung) zu belegen ist; wenn die-
ses Gerät gewerblich oder - bei Waschgeräten und Wäschetrocknern - in
Gemeinschaftsanlagen genutzt wird, beträgt die Verjährungsfrist sechs (6)
Monate.
AEG Hausgeräte GmbH
Markenvertrieb
Muggenhofer Straße 135 *Deutsche Telekom
D-90429 Nürnberg Eur 0,09 / Minute
49
Unusual noises.
The appliance is touching the
wall or other objects.
Appliance is not level.
A component, e.g. a pipe, on
the rear of the appliance is
touching another part of the
appliance or the wall.
The compressor starts after a
period of time.
See the "Cleaning and Care"
section.
This is normal, no error has
occurred.
The compressor does not start
immediately after changing
the temperature setting.
Water on the floor or on sto-
rage shelves.
Water drain hole is blocked.
If necessary, carefully bend
the component out of the
way.
Move the appliance slightly.
Readjust the feet.
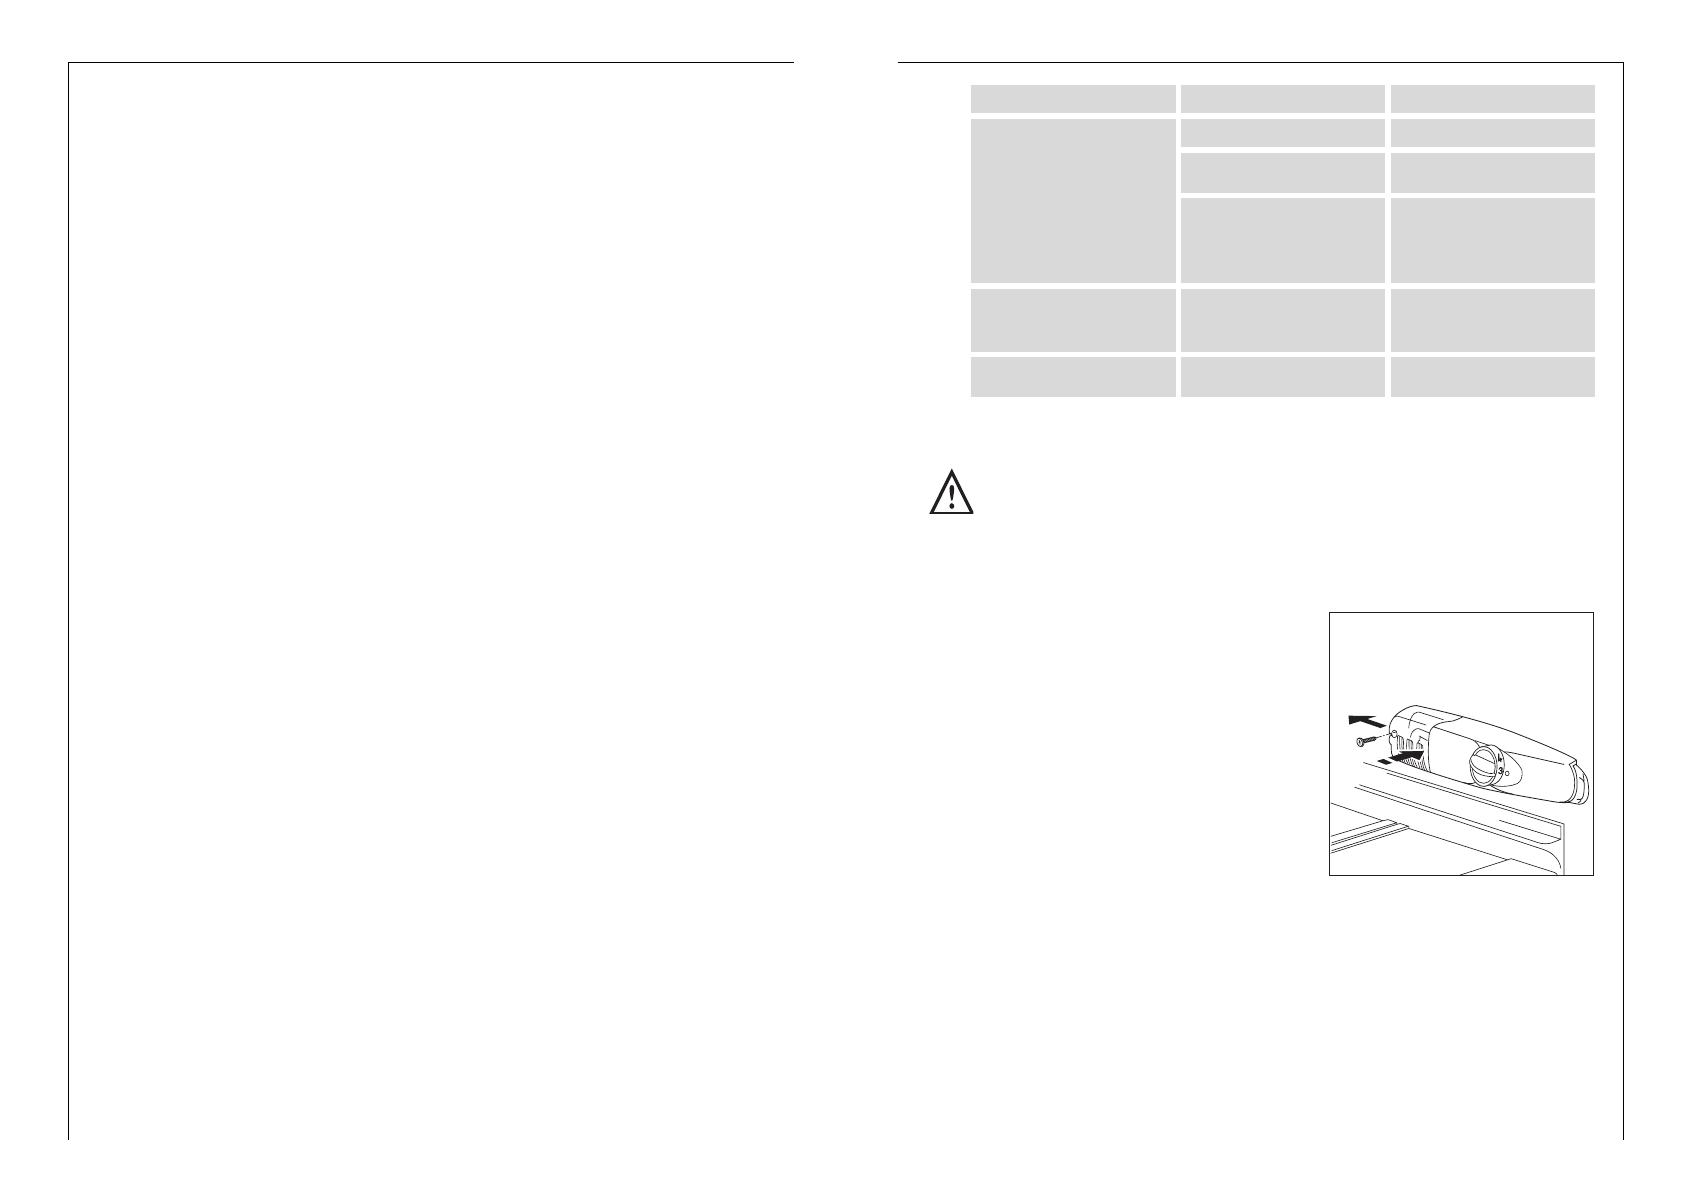
Changing the light bulb
Warning! There is a risk of electric shocks! Before changing the light bulb,
switch off the appliance and unplug it, or pull the fuse or the circuit breaker.
Light bulb data: 220-240 V, max. 15 W
1. To switch off the appliance, turn the
temperature regulator to position
"0".
2. Unplug the mains plug.
3. To change the light bulb, undo the
screw.
4. Press the light bulb cover as shown
and slide it backwards.
5. Change the defective light bulb.
6. Refit the light bulb cover and the
screw.
7. Put the refrigerator back into opera-
tion.
Malfunction Possible Cause Remedy
AEG65

25
Reparaturbedingungen
Für sämtliche dem Kundendienst von AEG Hausgeräte (nachfolgend AEG
genannt) erteilten Reparaturaufträge gelten die folgenden Bedingungen.
Für Reparaturen im Rahmen der Garantie finden die Garantiebedingungen
von AEG Anwendung, die jedem Gerät beiliegen.
1. Reparatur-Ausführung
1.1. Bei Großgeräten (z. B. Waschvollautomaten, Geschirrspüler) erfolgen die
Reparaturarbeiten am Aufstellungsort, wenn nicht die fachgerechte Repa-
ratur nur in der Werkstatt vorgenommen werden kann. Es ist der Zugriff auf
das Gerät so zu ermöglichen, daß eine fachgerechte Reparatur oder gege-
benenfalls Abholung vorgenommen werden kann. Wird dem Auftraggeber
für eine Reparatur am Aufstellungsort neben dem Tag der Reparatur auch
der Zeitpunkt des Reparaturbeginns genannt, so kann sich dieser in Ausnah-
mefällen wegen der Besonderheiten des Außendienstes und der Schwie-
rigkeiten der Vorausbestimmungen von Reparatur- und Wegezeiten ändern.
1.2 Kleingeräte werden nicht beim Kunden repariert.
1.3 Stellt sich nach Beginn der Reparatur heraus, daß die voraussichtlichen
Reparaturkosten nicht in einem wirtschaftlichen vertretbaren Verhältnis
zum derzeitigen Wert des Gerätes stehen, werden die Arbeiten unterbro-
chen und dem Kunden die voraussichtlichen Reparaturkosten zur Geneh-
migung mitgeteilt. Zeigen sich bei der Reparatur Mängel, deren Beseitigung
über den eigentlichen Reparaturumfang hinausgehen, wird AEG dem Auf-
traggeber die geschätzten Mehrkosten mitteilen oder einen Kostenanschlag
vornehmen. Eine Erweiterung des Reparaturumfanges bedarf der Zustim-
mung des Auftraggebers. Hat AEG einen Kostenanschlag erstellt, ist AEG zu
einer Überschreitung bis ca. 10 % berechtigt.
1.4 Die Abrechnung der Arbeitszeit des Kundendienst-Technikers erfolgt nach
Arbeitswerten. Ein Arbeitswert entspricht einer Arbeitszeit von 5 Minuten.
In den pro Auftrag abgerechneten Werten sind 2 Arbeitswerte für die
Arbeitsvorbereitung enthalten.
Die Anfahrtskosten setzen sich aus anteiliger Wegezeit und einer Kraftfahr-
zeugpauschale zusammen.
1.5 Die Reparaturkosten sind in bar sofort an den Kundendienst-Techniker von
AEG oder bei Abholung zu entrichten.
Die Kundendienst-Techniker sind beauftragt, den Rechnungsbetrag zu kas-
sieren. Die Auslieferung von in der Werkstatt reparierten Geräten kann
gegen Nachnahme erfolgen.
48
What to do if ...
Correcting Malfunctions
A malfunction may be caused by only a minor fault that you can rectify
yourself using the following instructions. Do not perform any other work on
the appliance if the following information does not provide assistance in
your specific case.
Warning! Repairs to refrigerators/freezers may only be performed by
qualified service engineers. Improper repairs can give rise to significant
hazards for the user. If your appliance needs repairing, please contact your
specialist dealer or our Customer Service.
Malfunction Possible Cause Remedy
Appliance does not work.
Appliance is not switched on Switch on the appliance.
Mains plug is not plugged in
or is loose.
Insert mains plug.
Fuse has blown or is defective.
Check fuse, replace if neces-
sary.
Socket is defective.
Mains malfunctions are to be
corrected by an electrician.
The food is too warm.
The appliance is near a heat
source.
Temperature is not properly
adjusted.
Please look in the "Initial Start
Up" section.
Turn the temperature regula-
tor to a colder setting tempo-
rarily.
Door was open for an exten-
ded period.
Please look in the "Installation
location" section.
A large quantity of warm
food was placed in the
appliance within the last 24
hours.
Open the door only as long as
necessary.
Appliance cools too much. Temperature is set too cold.
Turn the temperature regula-
tor to a warmer setting tem-
porarily..
Interior lighting does not
work.
Light bulb is defective.
Please look in the "Changing
the Light Bulb" section.
Carefully warm the leaking
sections of the door seal with
a hair dryer (not hotter than
approx. 50 °C). At the same
time shape the warmed door
seal by hand such that it sits
correctly
Heavy build up of frost, possi-
bly also on the door seal.
Door seal is not air tight (pos-
sibly after changing over the
hinges).

26
2. Reparatur-Gewährleistung
AEG leistet für die einwandfreie Ausführung der Reparaturarbeiten und die
Mangelfreiheit der Ersatzteile 6 Monate Gewähr. Ist der innerhalb der
Gewährleistungsfrist beanstandete Fehler auf eine andere technische Ursa-
che zurückzuführen als der bei der ursprünglichen Reparatur behobene
Fehler, so besteht kein Anspruch auf Gewährleistung.
3. Aufbewahrung, Verwertung
AEG steht wegen ihrer Forderung aus dem Auftrag ein vertragliches Pfan-
drecht an den aufgrund des Auftrags in den Besitz von AEG gelangten Gerä-
ten zu. Wird ein Gerät nicht spätestens 3 Monate nach schriftlicher Auffor-
derung abgeholt und die Vergütung bezahlt oder die Annahme einer Post-
nachnahmesendung verweigert, so entfällt die Verpflichtung zur weiteren
Aufbewahrung und eine Haftung für leichte Fahrlässigkeit bei Beschädi-
gung und Untergang. Nach Ablauf der Frist ist AEG berechtigt, das Gerät
zum Verkehrswert zu veräußern, wobei AEG den Verkauf 1 Monat zuvor
ankündigt. Ein etwaiger Mehrerlös wird dem Auftraggeber erstattet.
4. Datenspeicherung
AEG erfaßt und speichert die zum Geschäftsverkehr notwendigen auftrag-
sbezogenen Daten der Auftraggeber.
AEG Hausgeräte GmbH
Kundendienst
Stand: Oktober 1994
Bestimmungen, Normen, Richtlinien
Das Kältegerät ist für den Haushalt bestimmt und wurde unter Beachtung
der für diese Geräte geltenden Normen hergestellt.
Bei der Fertigung wurden insbesondere die nach dem Gerätesicherheitsgesetz
(GSG), der Unfallverhütungsvorschrift für Kälteanlagen (VBG 20) und den
Bestimmungen des Verbandes Deutscher Elektrotechniker (VDE) notwendigen
Maßnahmen getroffen. Der Kältekreislauf wurde auf Dichtheit geprüft.
Dieses Gerät entspricht den folgenden EG-Richtlinien:
– 73/23/EWG vom 19.2.1973 - Niederspannungsrichtlinie
– 89/336/EWG vom 3.5.1989 (einschließlich Änderungsrichtlinie
92/31/EWG) - EMV-Richtlinie
47
Energy Saving Tips
• Do not install the appliance near cookers, radiators or other sources of
warmth. High ambient temperatures cause longer, more frequent opera-
tion of the compressor.
• Ensure sufficient air circulation and exhaust at the appliance base and at
the back wall of the appliance. Never cover air vent openings.
• Do not place warm foods into the appliance. Allow warm foods to cool
first.
• Only leave door open as long as necessary.
• Do not set temperature any colder than necessary.
• Put frozen food in the fridge to defrost. The cold in the frozen food will
then be used to cool the fridge.
• Keep the heat emitting condenser, the metall grille on the rear wall of
your appliance, always clean.
2. Defrost the freezer compartment prior to cleaning (see "Defrosting" sec-
tion).
3. Switch the appliance off and remove the plug from the mains, or switch off
or turn out the circuit breaker or fuse.
4. Clean the appliance and the interior accessories with a cloth and lukewarm
water. Commercially available dish washing detergents may also be used.
5. After cleaning wipe with fresh water and rub dry.
Accumulation of dust at the condenser increases energy consumption. For
this reason carefully clean the condenser at the back of the appliance once
a year with a soft brush or a vacuum cleaner.
6. Check the water drain hole on the rear wall of the fridge. Clear a blocked
drain hole with the aid of the green peg in the pack of accessories included
with the appliance.
7. After everything is dry place appliance back into service.

27
Garantiebedingungen für Österreich
Sehr geehrte Kunden!
Wir, die Electrolux Hausgeräte GmbH, beglückwünschen Sie zum Erwerb
eines Gerätes aus dem Electrolux Konzern. Für dieses Geräte räumen wir
Ihnen, gemäß den nachstehenden Bedingungen, eine besondere Garantie
ein, die Ihnen also zusätzliche Rechte gewährt.
1. Die Garantie beginnt mit dem Tag an dem das Gerät gekauft wurde und
erstreckt sich über einen Zeitraum von 24 Monaten. Wir empfehlen daher,
den Kaufbeleg unbedingt aufzubewahren.
2. Die Garantie umfaßt Mängel am Gerät, die nachweislich auf einen Mate-
rial- und/oder Herstellungsfehler beruhen, wenn sie uns innerhalb von 14
Tagen nach dem Auftreten angezeigt werden. Nicht unter diese Garantie
fallen Schäden oder Mängel, die durch nicht vorschriftsgemäße Handha-
bung des Gerätes, durch Nichtbeachtung oder Einbauvorschriften und
Gebrauchsanweisungen und durch Reparaturen oder Eingriffe, die von
Personen vorgenommen wurden, die hierzu von uns nicht ermächtigt
sind, verursacht wurden. Werden unsere Geräte mit Ersatzteilen oder
Zubehörteilen versehen, die keine Originalteile sind und wurde dadurch
ein Defekt verursacht, ist dieser ebensfalls nicht durch die Garantie
gedeckt.
3. Mängel dieses Gerätes werden wir innerhalb angemessener Frist nach
Mitteilung des Mangels unentgeltlich beseitigen. Die zu diesem Zweck
erforderlichen Aufwendungen, insbesondere Transport-, Weg-, Arbeits-
und Materialkosten werden von uns getragen. Ab dem siebten Monat der
Garantiezeit übernehmen wir nur die Arbeits- und Materialkosten. Über
diese Nachbesserung hinausgehende Ansprüche werden durch diese
Garantie nicht eingeräumt. Nachbesserungsarbeiten werden, soweit
möglich, am Aufstellungsort, sonst in unseren Kundendienstwerkstätten,
durchgeführt. Ersetzte Teile gehen in unser Eigentum über. Es ist jeweils
der Kaufbeleg mit Kauf- bzw. Lieferdatum vorzulegen.
4. Garantieleistungen bewirken weder eine Verlängerung der Garantiefrist
noch setzen sie eine neue Garantiefrist in Lauf. Die Garantiefrist für
ausgewechselte Teile endet mit der Garantiefrist für das ganze Gerät.
5. Weitergehende oder ander Ansprüche, inbesondere solche auf Ersatz
außerhalb des Gerätes entstandener Schäden sind - soweit eine Haftung
nicht zwingend gesetzlich angeordnet ist - ausgeschlossen.
46
Switching off the appliance
To switch off the appliance, turn the temperature regulator to position "0".
If the appliance is not going to be used for an extended period:
1. Remove all refrigerated and deep-frozen packages as well as ice trays.
2. Switch off the appliance by turning the temperature regulator to position
"0".
3. Remove the mains plug or switch off or turn out the circuit breaker or fuse.
4. Defrost freezer compartment and clean thoroughly (see section: “Cleaning
and Care”).
5. Leave the door open to avoid the build up of odours.
Cleaning and Care
For hygienic reasons the appliance interior, including interior accessories,
should be cleaned regularly.
Warning!
• The appliance may not be connected to the mains during cleaning. Dan-
ger of electrical shock! Before cleaning switch the appliance offand rem ve
the plug from the mains, or switch off or turn out the circuit breaker or fuse.
• Never clean the appliance with a steam cleaner. Moisture could accumu-
late in electrical components, danger of electrical shock! Hot vapours can
lead to the damage of plastic parts.
• The appliance must be dry before it is placed back into service.
Attention!
• Ethereal oils and organic solvents can attack plastic parts, e.g.
– lemon juice or the juice from orange peals;
– butyric acid;
– cleansers which contain acetic acid.
Do not allow such substances to come into contact with appliance parts.
• Do not use any abrasive cleansers.
1. Remove frozen food and the food from the refrigerator. Wrap frozen
food in several layers of newspaper. Store it in a cool place, well covered.

28
6. Durch diese Garantie wird der Gewährleistungsanspruch des Kunden
gegen den Händler, bei dem er das Gerät gekauft hat, weder einge-
schränkt noch aufgehoben.
Wir wünschen Ihnen viel Freude mit dem neuen Gerät und erlauben uns, sie
darauf aufmerksam zu machen, daß Ihnen auch nach Ablauf der Garantie
unser Werkkundendienst und unsere Servicepartner gerne mit Rat und Tat
zur Verfügung stehen.
Electrolux Hausgeräte G.m.b.H.
Adresse
Herziggasse 9
A-1230 Wien
Vertrieb Telefon Vertrieb Telefax
(01) 866 40 -200 (01) 866 40 -250
Kundendienst Telefon Kundendienst Telefax
(01) 866 40-333 (01) 866 40-300
WIEN FN 98903x
DVR: 0595411
ARA LIZENZ NR. 2702
UID: ATU 14758207
45
Defrosting
Refrigerator
Frost is automatically eliminated from the evaporator of the refrigerator
compartment every time the motor compressor stops, during normal use.
The defrost water drains out through a trough into a special container at
the back of the appliance, over the motor compressor, where it evaporates.
We particulary recommend that you peridically clean the defrost-water
drainage outlet, located in the center of the drainage groove in the refrige-
rator compartment, to prevent the defrost water form overflowing on to
foods stored in the compartment.
Use a special cleaner provided, which you will find already inserted into the
discharge hole.
Freezer
The inner walls of the freezer are automatically defrosted
Preparation of Ice Cubes
1. Fill the ice cube tray 3/4 full with cold water, place it in the freezer com-
partment and leave to freeze.
2. To loosen the frozen cubes, either bend the ice cube tray or hold it under
running water for a few seconds.
Important! Never try to free an ice tray that is frozen to the freezer com-
partment using pointed or sharp edged objects. Use the ice scraper supplied.
Freezing Calendar
• The symbols on the drawers show different types of frozen goods.
• The numbers indicate storage times
in months for the appropriate
types of frozen goods. Whether
the upper or lower value of the
indicated storage time is valid
depends on the quality of the
foods and pre-treating before
freezing. The lower value applies to
foods with high fat content.

29
Dear customer,
Before placing your new refrigerator/freezer into operation please read the-
se operating instructions carefully. They contain important information for
safe use, for installation and for care of the appliance.
Please keep these operating instructions for future reference. Pass them on
to possible new owners of the appliance.
These operating instructions are for use with several technically comparable
models with varying accessories. Please observe the notes which apply to
your model.
Notes which are important for your safety or for the proper functioning of
the appliance are stressed with a warning triangle and/or with signal words
(Warning!, Caution!, Attention!). Please observe the following carefully.
Supplementary information regarding operation and practical applications
of the appliance appear after this symbol.
Tips and notes concerning economical and environmentally sound use of
the appliance are marked with the flower.
The operating instructions contain instructions for the correction of possi-
ble malfunctions by the user in the section "What to do if ...". If these
instructions should not be sufficient, our customer service department is
always available to you.
Printed on paper manufactured with environmentally sound processes.
who thinks ecologically acts accordingly ...
44
• Please note the maximum storage times specified by the manufacturer.
• Thawed foods which have not been processed further (cooked into meals)
may not under any circumstances be frozen a second time.
• Containers with flammable gases or liquids can leak at low temperatures.
There is a risk of an explosion! Do not store any containers with flamma-
ble materials such as, for example, spray cans, fire extinguisher refill car-
tridges etc in the refrigerator/freezer.
• Bottles and cans must not be placed in the freezer. They can burst when
the contents freeze, high carbonate content drinks can even explode!
Never store lemonade, juices, beer, wine, sparkling wine etc. in the free-
zer. Exception: high alcohol content spirits can be stored in the freezer.
• All foods must be packed air tight prior to freezing, so that they do not
dry out or lose their flavour, and so that no flavour contamination of
other frozen goods occurs.
Caution! Do not touch frozen food with wet hands. Your hands could free-
ze to the food.
To garantee a good operation of the appliance during normally use, please
do not take out the drawers.
1. Place the packed food in the drawers. Place food to be frozen in the middle
drawer equipped with its own refrigerating unit. Unfrozen food must not tou-
ch items already frozen, otherwise the frozen food could begin to defrost.
2. When frezzing fresh food, depress theambient temperature switch (A) 24
hours before loading the food without modifying the thermostat setting.
The pilot light will come on. At the end of the freezing process, do not for-
get to depress again the ambient switch in order to avoid an increase of the
power consumption.
3. Place frozen foods in the drawers sorted by type, as far as possible.
Ice pack
There could be one or more ice packs in one drawer of the freezer.
In the event of a power failure or malfunction, the ice pack will lengthen
the amount of time it takes for the frozen food to become too warm by
several hours. The ice pack can only fulfil this task optimally if it is placed in
the uppermost drawer, at the front, above the frozen food. You can use the
ice pack for cooling cold bags.

30
Contents
Safety . . . . . . . . . . . . . . . . . . . . . . . . . . . . . . . . . . . . . . . . . . . . . .31
Disposal . . . . . . . . . . . . . . . . . . . . . . . . . . . . . . . . . . . . . . . . . . . . .33
Appliance Packaging Information . . . . . . . . . . . . . . . . . . . . . . . . . . . .33
Disposal of old Appliances . . . . . . . . . . . . . . . . . . . . . . . . . . . . . . . . . .33
Remove transport safeguard . . . . . . . . . . . . . . . . . . . . . . . . . . . . .33
Installation . . . . . . . . . . . . . . . . . . . . . . . . . . . . . . . . . . . . . . . . . .34
Installation Location . . . . . . . . . . . . . . . . . . . . . . . . . . . . . . . . . . . . . . .34
Your refrigerator needs air . . . . . . . . . . . . . . . . . . . . . . . . . . . . . . . . . .35
Rehingeing the door . . . . . . . . . . . . . . . . . . . . . . . . . . . . . . . . . . . . . . .35
Housing dimensions . . . . . . . . . . . . . . . . . . . . . . . . . . . . . . . . . . . . . . .36
Instructions for total built-in . . . . . . . . . . . . . . . . . . . . . . . . . . . . . . . .36
Electrical Connection . . . . . . . . . . . . . . . . . . . . . . . . . . . . . . . . . . .39
Prior to Initial Start–Up . . . . . . . . . . . . . . . . . . . . . . . . . . . . . . . .39
Starting up and temperature regulation . . . . . . . . . . . . . . . . . . . .39
Ambient Temperature switch . . . . . . . . . . . . . . . . . . . . . . . . . . . . .41
Interior Accessories . . . . . . . . . . . . . . . . . . . . . . . . . . . . . . . . . . . .41
Storage shelves . . . . . . . . . . . . . . . . . . . . . . . . . . . . . . . . . . . . . . . . . . .41
Variable Inner Door . . . . . . . . . . . . . . . . . . . . . . . . . . . . . . . . . . . . . . .42
Moisture regulator . . . . . . . . . . . . . . . . . . . . . . . . . . . . . . . . . . . . . . . .42
Variable Storage Box . . . . . . . . . . . . . . . . . . . . . . . . . . . . . . . . . . . . . .42
Fresh food refrigeration . . . . . . . . . . . . . . . . . . . . . . . . . . . . . . . . .43
Freezing and storing frozen food . . . . . . . . . . . . . . . . . . . . . . . . . .43
Ice pack . . . . . . . . . . . . . . . . . . . . . . . . . . . . . . . . . . . . . . . . . . . . .44
Preparation of Ice Cubes . . . . . . . . . . . . . . . . . . . . . . . . . . . . . . . .45
Freezing calender . . . . . . . . . . . . . . . . . . . . . . . . . . . . . . . . . . . . . .45
Defrosting . . . . . . . . . . . . . . . . . . . . . . . . . . . . . . . . . . . . . . . . . . .45
Switching off the appliance . . . . . . . . . . . . . . . . . . . . . . . . . . . . .46
Cleaning and Care . . . . . . . . . . . . . . . . . . . . . . . . . . . . . . . . . . . . .46
Energy Saving Tips . . . . . . . . . . . . . . . . . . . . . . . . . . . . . . . . . . . .47
What to do if . . . . . . . . . . . . . . . . . . . . . . . . . . . . . . . . . . . . . . . .48
Correcting Malfunctions . . . . . . . . . . . . . . . . . . . . . . . . . . . . . . . . . . . .48
Changing the light bulb . . . . . . . . . . . . . . . . . . . . . . . . . . . . . . . . . . . .49
Customer Service . . . . . . . . . . . . . . . . . . . . . . . . . . . . . . . . . . . . . .50
Regulations, Standards, Guidelines . . . . . . . . . . . . . . . . . . . . . . . .50
43
Freezing and storing frozen food
You can use your freezer for freezing fresh food yourself.
Important!
• The temperature in the freezer compartment must be –18 °C or colder
before freezing food.
• Please observe the freezing capacity given on the rating plate. The free-
zing capacity is the maximum quantity of fresh food that can be frozen
within a period of 24 hours. If you wish to freeze food several days in a
row, please observe a maximum capacity of only 2/3 to 3/4 of that on the
rating plate. The quality of the food is best preserved when it is frozen
right through to the core as quickly as possible.
• Allow warm food to cool down before freezing. The warmth will cause
increased ice formation and increase the power consumption.
Fresh food refrigeration
To obtain the best performance:
• do not store warm food or evaporating liquide in the refrigeator
• do cover or wrap the food, particularly if it has a strong flavour.
• Position food so that air can circuiate freely round it.
Useful hints:
Meat (all types): wrap in polythene bags and place on the glass shelf above
the vegetable drawer(s)For safety, store in this way only one or two days
at the most.
Cooked foods, cold dishes, etc: these should be covered and may be placed
on any shelf.
Fruit and vegetables: these should be thoroughly cleaned and placed in the
special drawer(s) provided.
Butter and cheese: these should be placed in special airtight containers or
wapped in aluminium foil or polythene bags to exclude as much air as pos-
sible.
Milk bootles: these should have a cap and should be stored in the bottle
rack on the door.
Bananas, potatoes, onions and garlic, if not packed, must not be kept in
the refrigerator.
31
Safety
The safety aspects of our refrigerators/freezers comply with accepted tech-
nical standards and the German Appliance Safety Law. Nevertheless, we
consider it our obligation to make you aware of the following safety infor-
mation:
Intended use
• The refrigerator is intended for use in the home. It is suitable for the coo-
ling, freezing and storing of frozen food, as well as for making ice. If the
appliance is used for purposes other than those intended or used incor-
rectly, no liability can be accepted by the manufacturer for any damage
that may be caused.
• Alterations or changes to the freezer are not permitted for reasons of
safety.
• If you use the refrigerator in a commercial application or forpurposes
other than the cooling, freezing or frozen storage of foods,please obser-
ve all valid legal regulations for your application.
Prior to initial start–up
• Check the refrigerator for transport damage. Under no circumstance
should a damaged appliance be plugged in! In the event of damage, please
contact the vendor.
Refrigerant
The refrigerant isobutane (R600a) is contained within the refrigerant circuit
of the appliance, a natural gas with a high level of environmental compa-
tibility, which is nevertheless flammable.
• During transportation and installation of the appliance, be certain that
none of the components of the refrigerant circuit become damaged.
• If the refrigerant circuit should become damaged:
– avoid open flames and sources of ignition;
– thoroughly ventilate the room in which the appliance is situated.
Safety of children
• Packaging (e.g. wraps, polystyrene) can be dangerous for children. There is
a risk of suffocation! Keep packaging material away from children!
• Please make old appliances unusable prior to disposal. Pull out the mains
plug, cut off the mains cable, break or remove spring or boltcatches, if fit-
ted. By doing this you ensure that children cannot lock themselves in the
42
To insert at a different height use the same procedure in reverse.
Adjustment for tall goods:
Remove the front half of the two-part vario glass storage shelf and insert it
at a different level. Space is thus gained for storage of tall goods on the
underlying storage shelf.
Variable Inner Door
The door compartments can be pulled up and removed, and inserted at
other positions as needed.
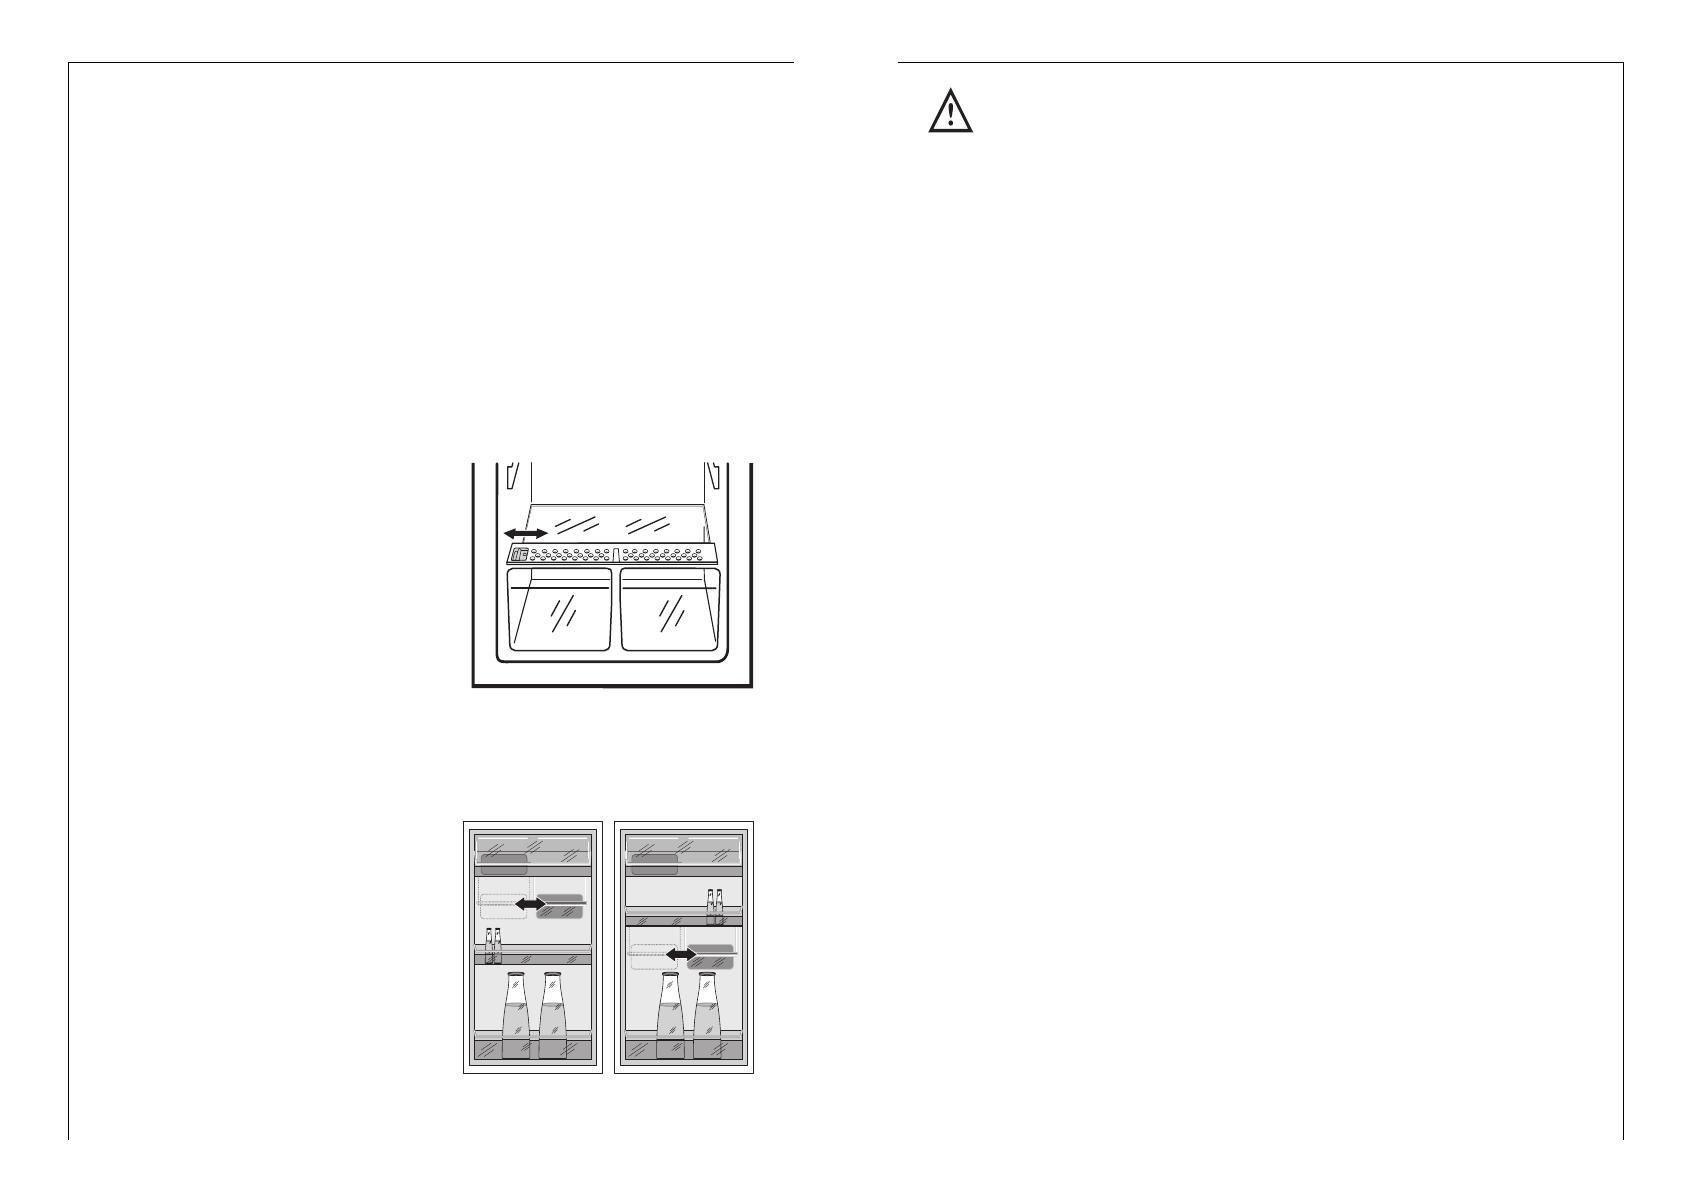
Moisture regulator
There is an adjustable air grille in front of the shelf above the fruit and vege-
table compartments.
The opening in the ventilation slots can be adjusted with the slider.
Right slider: Ventilation slots opened.
With the ventilation slots open, more
air circulation results in a lower air
moisture content in the fruit and
vegetable compartments.
Left slider: Ventilation slots closed.
When the ventilation slots are closed,
the natural moisture content of the
food in the fruit and vegetable com-
partments is preserved for longer.
Variable Storage Box
Some models are equipped with a variable storage box which is fitted under
a door shelf compartment and can be slid sideways.
The box can be inserted under any
door shelf compartment.
1. To change the position of the stora-
ge box; lift the shelf compartment
with the box upwards and out of the
holders in the door and remove the
retaining bracket out of the guide
under the shelf compartment.
2. Reverse the above operation to insert
the shelf at a different height.

32
fridge when playing (there is risk of suffocation!)or get themselves into
other dangerous situations.
• Often children cannot recognise the hazards present in household
appliances. It is therefore important that you ensure adequate supervision
and never let children play with the appliance!
Daily Operation
• Containers with flammable gases or liquids can leak at low temperatures.
There is a risk of an explosion! Do not store any containers with flamma-
ble materials such as, for example, spray cans, fire extinguisher refill car-
tridges etc in the refrigerator/freezer.
• Bottles and cans must not be placed in the freezer compartment. They can
burst when the contents freeze, high carbonate content drinks can even
explode! Never store lemonade, juices, beer, wine, sparkling wine etc. in
the freezer compartment. Exception: high alcohol content spirits can be
stored in the freezer compartment.
• Do not put ice creams or ice cubes in the mouth immediately after remo-
val from the freezer compartment. Very cold ice can freeze to the lips or
tongue and cause injury.
• Do not touch frozen food with wet hands. Your hands could freeze to the
food.
• Do not operate any electrical appliances in the refrigerator/freezer (e.g.
electric ice cream makers, mixers etc.).
• Before cleaning the appliance, always switch off the appliance and unplug
it, or pull the house fuse or switch off the circuit breaker.
• When unplugging always pull the plug from the mains socket, do not pull
on the cable.
In case of malfunction
• If the a malfunction occurs on the appliance, please look first in the "What
to do if ..." section of these instructions. If the information given there
does not help, please do not perform any further repairs yourself.
• Refrigerators/freezers may only be repaired by qualified service engineers.
Improper repairs can give rise to significant hazards. If your appliance
needs repairing, please contact your specialist dealer or our Customer Ser-
vice.
41
Ambient Temperature switch
With a room temperature below
+ 16°C the refrigerator compart-
ment may not function correctly.
If the room temperature is lower
than +16°C it will be necessary to
depress switch (A). The relevant
pilot light comes on.
D710
A
The temperatures in the refrigerator compartment and freezer co partment
cannot be independently regulated.
If you want the freeze fresh food rapidly, select setting „6“, ensuring that
the temperature in the refrigerator compartment does not drop blow 0°C.
You should also promptly reset the temperature regulator to setting „3“ or
„4“.
Important!
High ambient temperatures (e.g. on hot summer days) and a cold setting on
the temperature regulator (position"5" to "6") can cause the compressor to
run continuously.
If this happens, turn the temperature regulator back to a warmer setting
(position "3" to "4"). At this setting the compressor will be switched on and
off as usual and automatic defrosting recommenced.
Interior Accessories
Storage Shelves
The glass shelf above the fruit and
vegetable compartment should
always remain in position, to ensure
fruit and vegetables stay fresh lon-
ger.
The remaining storage shelves can be
adjusted to various heights:
Pull the storage shelf forward until it
can be tipped up or down and remo-
ved.
D338

33
Disposal
Appliance Packaging Information
All materials are environmentally sound! They can be dumped or burned at
an incinerating plant without danger!
About the materials: The plastics can be recycled and are identified as fol-
lows:
>PE< for polyethylene, e.g. the outer covering and the bags in the interior.
>PS< for polystyrene foam, e.g. the pads, which are all free of chlorofluo-
rocarbon.
The carton parts are made from recycled paper and should be disposed of
at a waste-paper recycling collection location.
Disposal of old Appliances
For environmental reasons, refrigeration appliances must be disposed of
properly. This applies to your old appliance, and - at the end of its service
life - for your new appliance as well.
Warning! Before disposing of old appliances make them inoperable. Remo-
ve plug from mains, sever the power cable, remove or destroy any snap or
latch closures. This eliminates the danger that playing children lock them-
selves into the appliance (danger of suffocation!) or place themselves into
other life-endangering situations.
Disposal:
• The appliance may not be disposed of with domestic waste or bulky refu-
se.
• The refrigerant circuit, especially the heat exchanger at the back of the
appliance, may not be damaged.
• Information concerning collection schedules or locations can be obtained
from the local disposal authorities or town hall.
Remove transport safeguard
The appliance and the interior fittings are protected for transport.
• Pull off the adhesive tape on the left and right side of the door.
• Remove all adhesive tape and packing pieces from the interior of the
appliance.
40
Prior to Initial Start–Up
• Please clean the appliance interior and all accessories prior to initial start-
up (see section: “Cleaning and Care”).
Electrical connection
Before initial start-up, refer to the appliance rating plate to ascertain if sup-
ply voltage and current values correspond with those of the mains at the
installation location.
e.g.: AC 220 ... 240 V 50 Hz or
220 ... 240 V~ 50 Hz
(i.e. 220 to 240 volts alternating current, 50 Hertz)
The rating plate is inside the appliance on the left.
A correctly installed, earthed socket is required for the electrical supply. The
supply must have a fuse rating of at least 10 Amps.
If the socket is not accessible once the appliance is built in, the electrical
installation must include suitable means of isolating the appliance from the
mains (e.g. fuse, cut-out, current trip or similar with a minimum contact
separation of 3 mm).
Attention: The mains connection cable may only be replaced by a skilled
electrician. Please contact your dealer or our customer service department
for repairs.
Starting up and temperature regulation
0 Insert the plug of the connection lead into the plug socket with protecti-
ve earth contact. When the refrigerator compartment door is opened, the
internal lighting is switched on. The temperature selector knob is located on
the RH side of the refrigerator compartment.
Setting „0“ means: Off.
Setting „1“ means: Hightest temperature, (warmest setting).
Setting „6“ (end-stop) means: Lowest temperature, (coldest setting).
However, the exact setting should be chosen keeping in the mind that the
temperature inside the refrigerator depends on:
-the quantity of food stored
-how often the door is opened
34
Installation
Installation Location
The appliance should be set up in a well ventilated, dry room.
Energy use is affected by the ambient temperature. The appliance should
therefore
– not be exposed to direct sunlight;
– not be installed next to radiators, cookers or other sources of heat;
– only be installed at a location whose ambient temperature corresponds to
the climate classification, for which the appliance is designed.
The climate classification can be found on the serial plate, which is located
at the left on the inside of the appliance.
The following table shows which ambient temperature is correct for each
climate classification: each climate classification:
Climate classification
for an ambient temperature of
SN +10 bis +32 °C
N +16 bis +32 °C
ST +18 bis +38 °C
T +18 bis +43 °C
If installation next to a source of heat is unavoidable, the following mini-
mum clearances must be maintained at the sides of the appliance:
– for electric cookers 3 cm;
– for oil and coal fired ranges 30 cm.
If these clearances cannot be maintained a heat insulating pad is required
between the cooker and the refrigeration appliance.
If the refrigeration appliance is installed next to another refrigerator or free-
zer a clearance of 5 cm at the sides is required, in order to prevent the for-
mation of condensation on the outside of the appliance.
39
D735
E
E
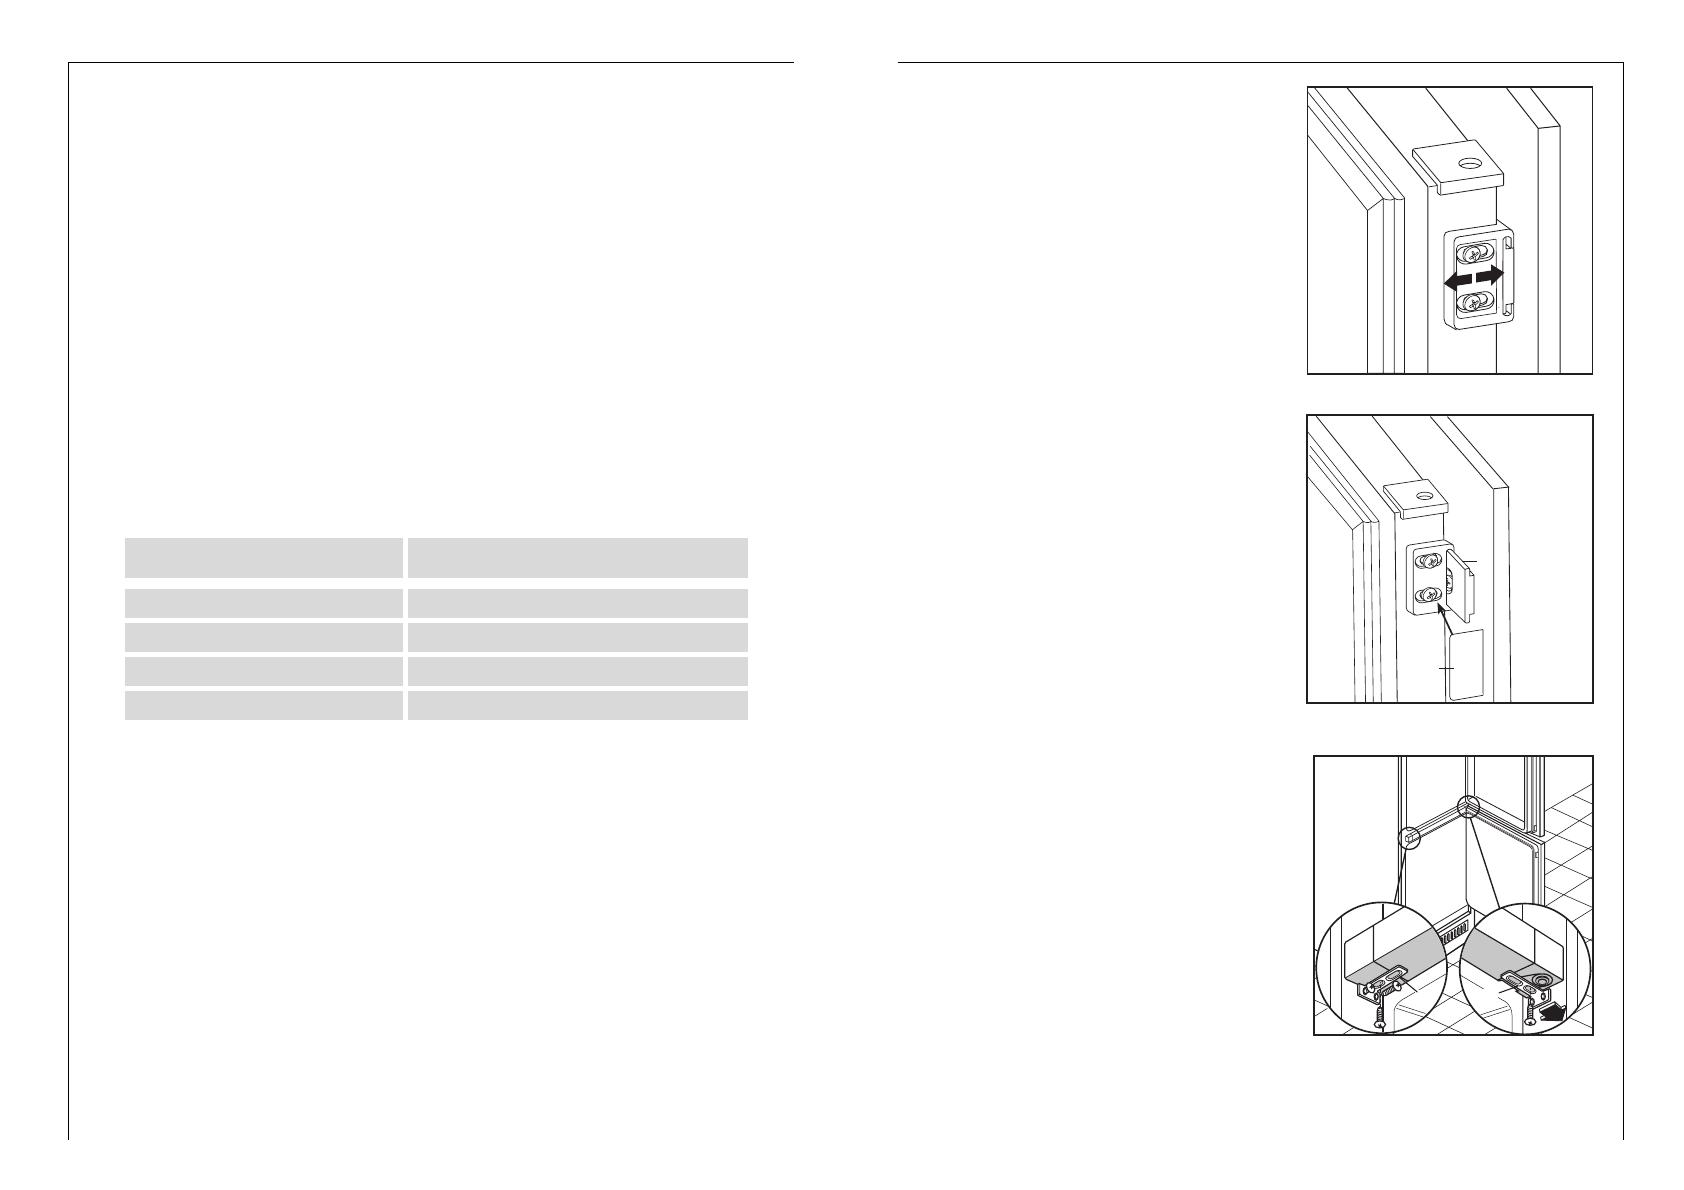
If the appliance is fixed to the
side of the kitchen unit, simply
slacken the screws in the fixing
brackets (E), move the brackets as
shown in the figure and re-tight-
en the screws.
PR168
Should the lining up of the furniture
door be necessary, use the clearance
of slots.
At the end of operations, it is neces-
sary to check if the door of the fur-
niture closes properly.
PR167/1
D
B
Fix cover (D) on guide (B) until it cli-
ps into place.
35
Your appliance needs air
For safety reasons, minimum
ventilationmust be as shown Fig.
Attention: keep ventilation ope-
nings clear of obstruction;
50 mm
min.
200 cm
2
200 cm
2
min.
D567
Rehingeing the door
The side at which the door opens can be changed from the right side (fac-
tory adjustment) to the left side, if the installation site requires.
Warning! When changing the side at which the door opens, the appliance
may not be connected to the mains. Remove plug from the mains befo-
rehand.
1. Unscrew the upper pin and remo-
ve the spacer
2. Remove the upper door
3. Unscrew the pins (B) and the spa-
cers (C) and refit them on the
middle hinge of the opposite side.
Snap the hinge cover (A).
4. Refit the upper door, the upper
pin and the spacer on the oppo-
site side
B
C
A
38
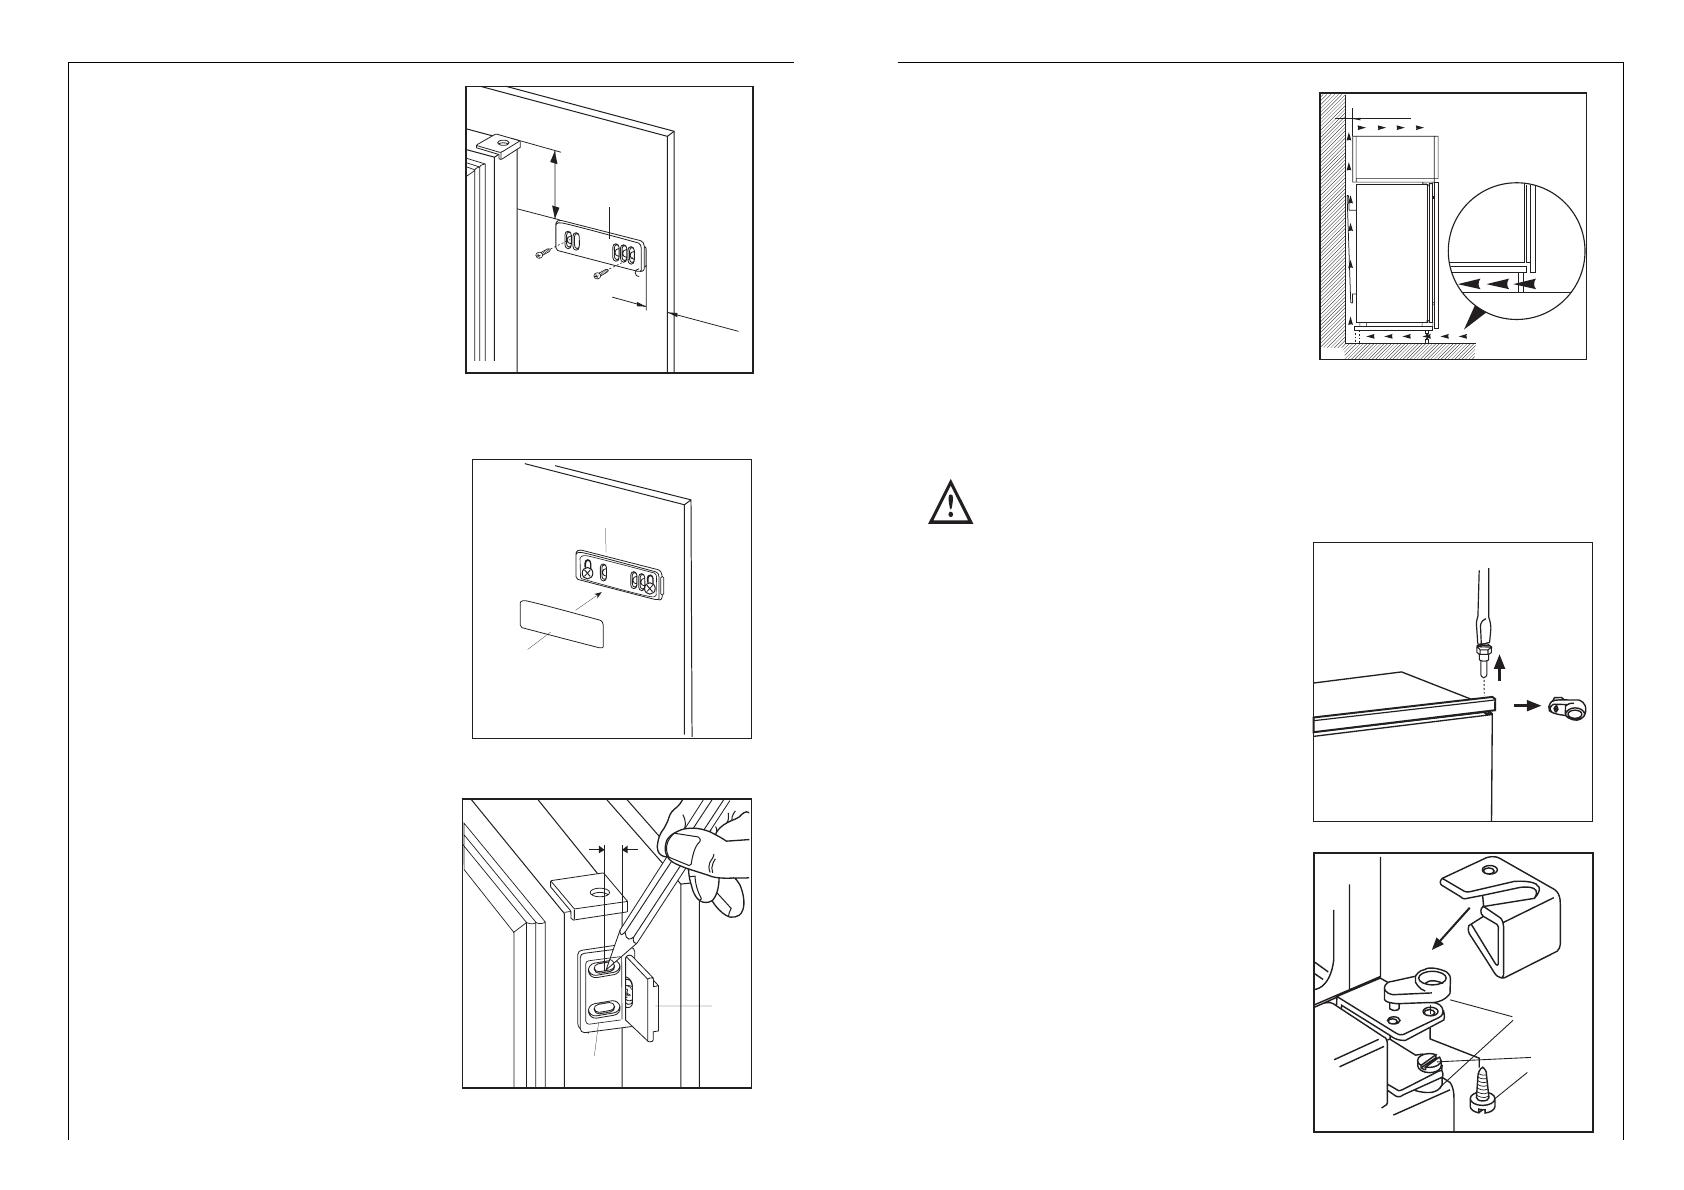
Place guide (A) on the inside part of
the furniture door, up and down as
shown in the figure and mark the
position of external holes. After
having drilled holes, fix the guide
with the screws supplied.
20 mm
A
50mm
PR166
PR33
C
A
Fix cover (C) on guide (A) until it cli-
ps into place.
Open the appliance door and the fur-
niture door at 90°. Insert the small
square (B) into guide (A). Put
together the appliance door and the
furniture door and mark the holes as
indicated in the figure. Remove the
squares and drill holes with ø 2 mm
at 8 mm from the outer edge of the
door. Place the small square on the
guide again and fix it with the screws
supplied.
8mm
PR167
A
B
36
Housing dimensions
Height 1780 mm
Depth 550 mm
Width 560 mm
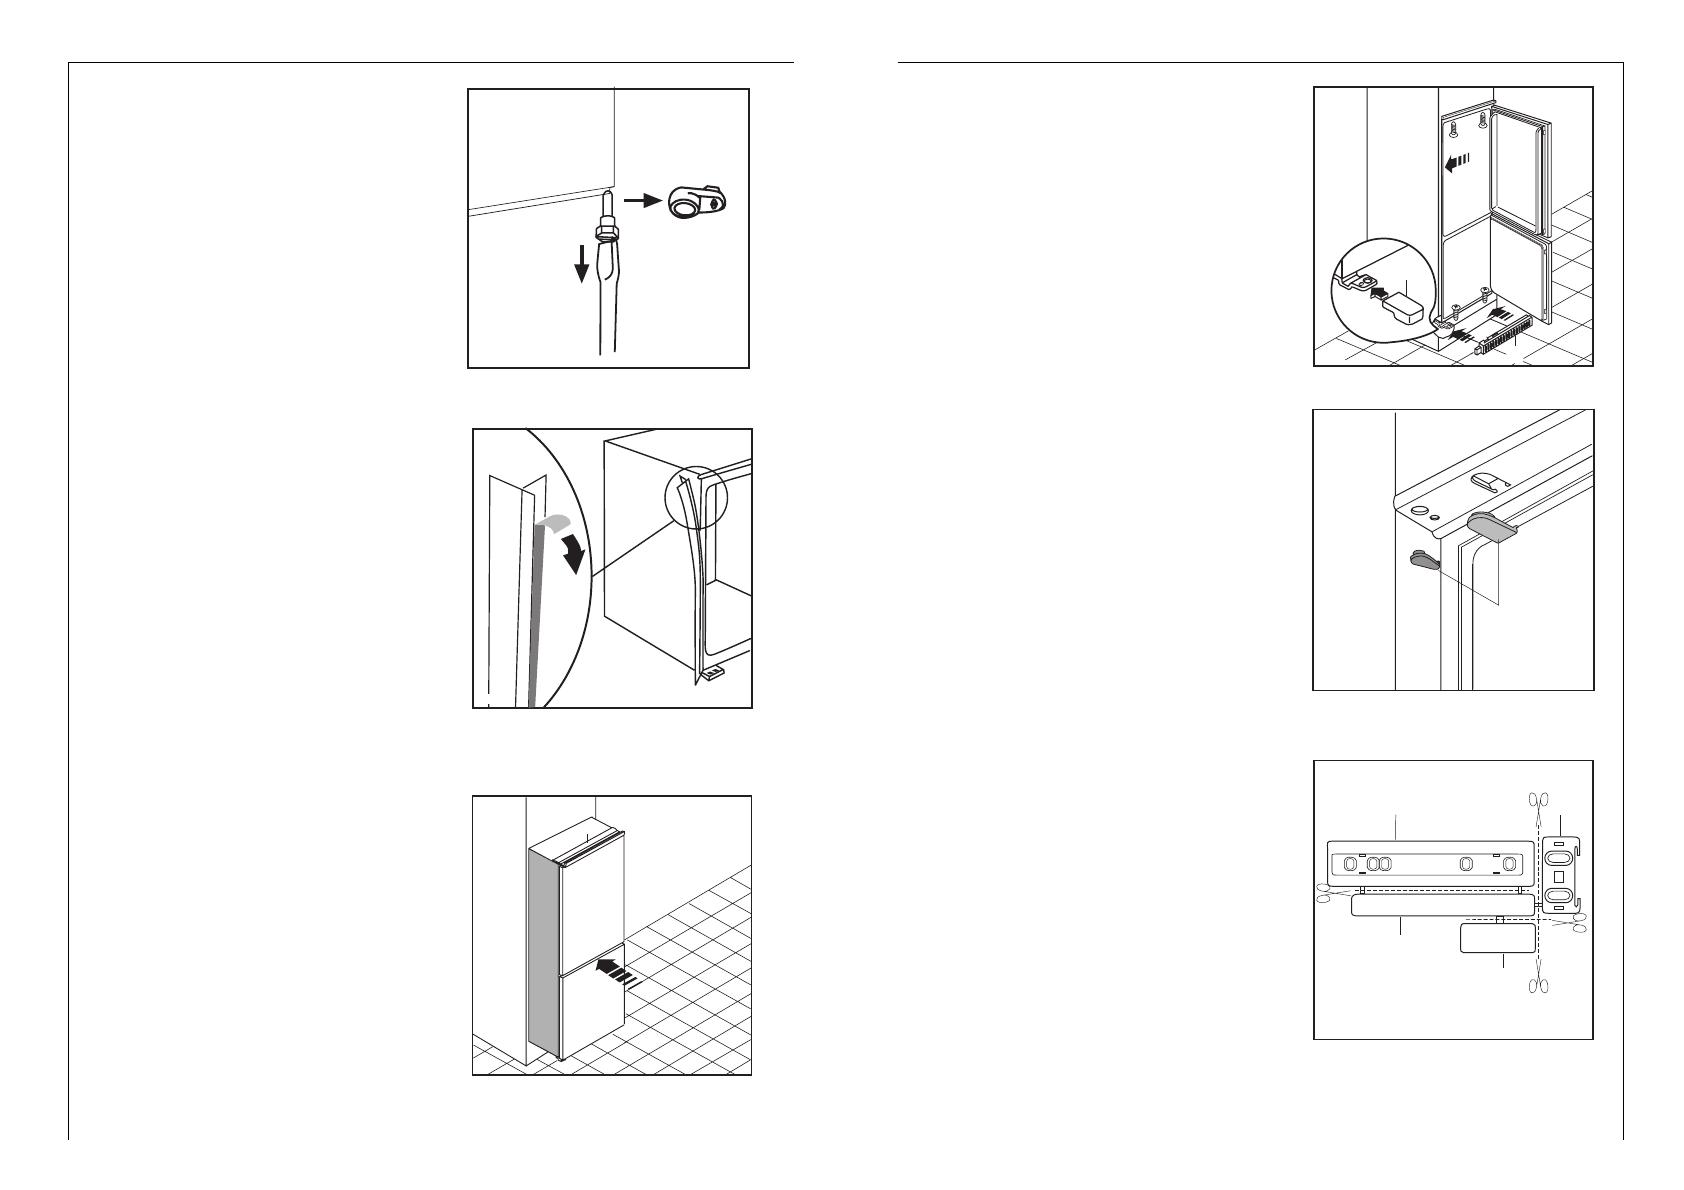
Instructions for total built-in
D765
Apply joint the sealing strip as shown
in figure.
5. Unscrew the lower pin and remo-
ve the spacer and refit them on
the opposite side
A
D023
Push appliance into the hous-
ing until stop strip (A) touches
the kitchen unit.
37
D
C
D723
Open the door and push the
appliance against the side of the
kitchen unit opposite to that of
appliance hinges.
Fasten the appliance with 4
screws provided in the kit
included with the appliance.
Snap vent grille (C) and hinge
cover (D) into position.
D726
B
Apply covers (B) on joint cover lugs
and into hinge holes.
Separate parts A, B, C, D as shown in
the figure
PR266
A
B
C
D
/