6
2
5
4
3
1
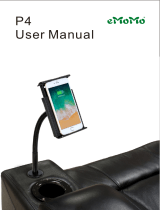
BACK PANEL
FEATURES & FUNCTIONS
TOP PANEL
iW18-053119-A Printed in China
© 2019 SDI Technologies, Inc. All rights reserved
Questions? Visit www.ihome.com
or call 1-800-288-2792 Toll Free
WARRANTY
For product support information and warranty please visit:
www.ihome.com/support
USB Charging Port
(5V/1A)
QUESTIONS? visit www.ihome.com or call 1-800-288-2792
Model: iW18
(%%+&'/1+9
+%$+9
Model: iW18
Quick Start Guide
-1 +1 Auto
DST
usb charging
LEFT PANEL RIGHT PANEL
press down whole unit to snooze
BOTTOM PANEL
GETTING STARTED
DST Switch DC Jack
(9V/2.5A)
Alarm
Set
Time Set/
Display Dimmer
Forward
Reverse
Battery Backup
Compartment
Wireless
Charging
Area
Before use, remove the battery pull
tab from the bottom of the unit.
Connect the included AC adapter to
the DC jack located on the back of
the unit and connect the other end
to a working wall outlet.
Connecting the Unit
Step One
RESETRESET
RESETRESET
TESTTEST
TESTTEST
Setting Your Clock
Step Two
• Press and hold the Time Set
Button until the display flashes.
• Press the – or + Buttons to adjust
selections and press Time Set to
confirm.
• Do this for time, year, month and
date.
• All done!
Daylight Savings Time (DST) Switch:
By default, the DST Switch is set to Auto and will automatically
adjust the time each March and November.
DISPLAY ICONS
PM Indicator
Wireless
Charging
Indicator
Low Backup
Battery Indicator
Alarm
Indicator
SETTING THE ALARM
0QVG: Each step must be completed while display is flashing or
setting will time-out with any changes saved.
1. Press and hold the Alarm Button for 2 seconds until the alarm time
display and alarm icon flash.
2. Press the – or + Buttons to adjust the alarm time to the desired time
(hold for rapid setting).
Make sure you set the correct AM/PM alarm
time. The PM indicator appears to the left of the display.
3. Press the Alarm Button to confirm the alarm time setting. The alarm
schedule will flash: 7 (every day), 5 (weekdays) or 2 (weekend only).
Press the – or + Buttons to select the desired alarm schedule.
4. Press the Alarm Button to confirm the alarm schedule. 2 beeps will
confirm alarm setting is complete. The alarm icon will remain on the
display, indicating the alarm is armed.
5. To turn o a sounding alarm and reset it to come on the next day at
the same time, press the Alarm Button to reset alarm.
Press and release the desired Alarm Button as needed to preview the
alarm and to toggle the alarm ON (indicated by the alarm icon) or
OFF (no alarm icon).
PREVIEWING THE ALARM
PROGRAMMABLE SNOOZE
To adjust the brightness of the display, press the Time Set Button
repeatedly to cycle through brightness settings, including OFF.
Snooze
(press down on unit)
WIRELESS CHARGING
Check the lightning icon on the iW18 display for charging status:
Slow blinking icon: Device is charging properly.
Solid icon: Device is charged.
Rapid blinking icon: Device is not charging properly. Reposition
device.
Note: The lightning icon may continue to blink slowly when iOS
devices are fully charged.
CAUTION:
Remove metal protective or magnetic case from phone before
charging. When charging phone, do not place magnetic-striped or
other metal objects on the charger. Doing so could damage the
object or this unit. Qi compatible phones with metallic looking
finishes will charge normally.
USB CHARGING
BATTERY BACK-UP
The unit comes with a CR-2450 back-up battery installed to
provide continuous alarm operation and clock settings in the event
of a temporary power failure. Remove the battery pull tab before
use. When the battery icon on the clock display is flashing, it is time
to replace the back-up battery. The battery compartment is
located on the bottom of the unit.
1. Make sure the AC adapter is
connected, or you will lose your time
and alarm settings during battery
replacement.
2. Use a Phillips screwdriver to open
the battery compartment door.
3. Remove the exhausted battery from
the compartment and insert 1
CR-2450 battery, checking that the
+ side is facing you. Replace the
compartment door. Do not
overtighten.
WARNING: Lithium batteries can explode or cause burns if disassembled,
shorted, recharged, exposed to water, fire, or high temperatures. Do not
place loose batteries in a pocket, purse, or other container containing metal
objects, mix with used or other battery types, or store with hazardous or
combustible materials. Store in cool, dry, ventilated area. Follow applicable
laws and regulations for transport and disposal.
• Do not ingest the battery, Chemical Burn Hazard. This product contains a
coin/button cell battery. If the coin/button cell battery is swallowed, it can
cause severe internal burns in just 2 hours and can lead to death.
• Keep new and used batteries away from children. If the battery
compartment does not close securely, stop using the product and keep it
away from children. If you think batteries might have been swallowed or
placed inside any part of the body, seek immediate medical attention.
• Attention should be drawn to the environmental aspects of battery
disposal.
IMPORTANT SAFETY INSTRUCTIONS
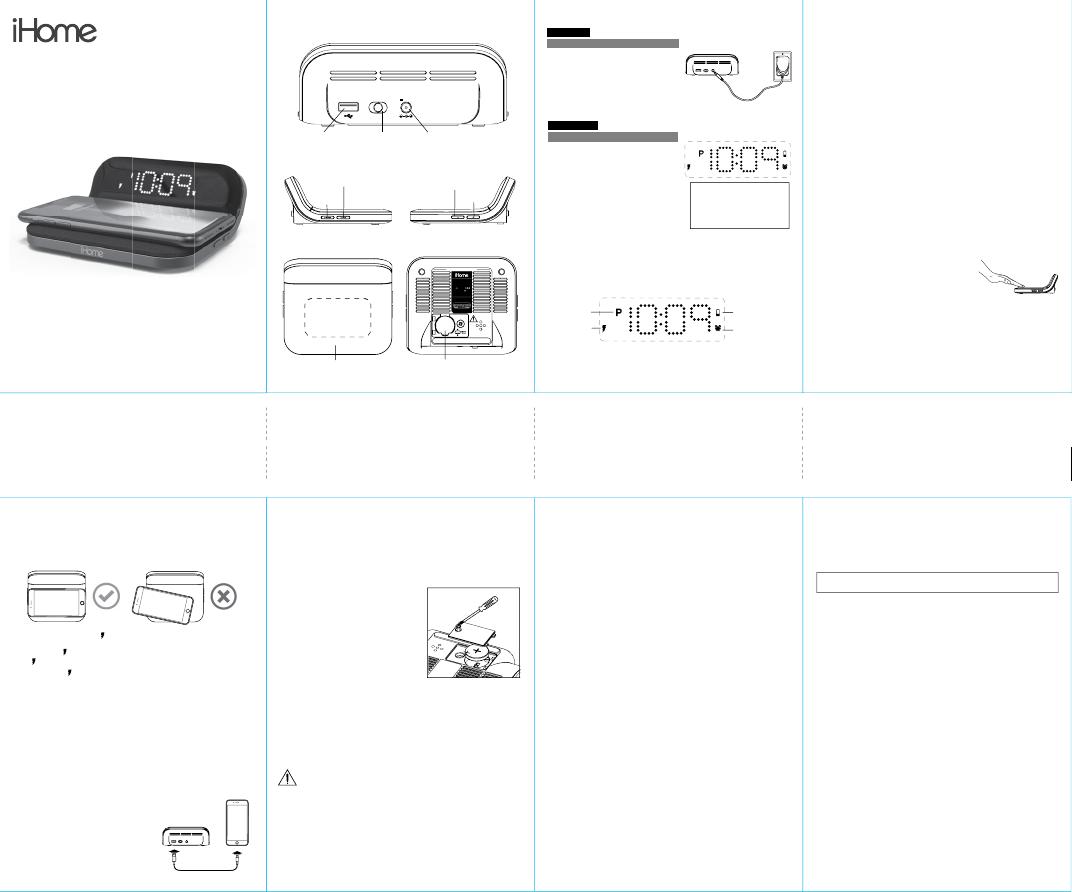
Supports:
• Qi compatible phones (also works with plastic cases up to 3mm thick)
• AirPods with wireless charging case
Place Qi compatible device face up on the charging rest as pictured below:
When used in the directed manner, this unit has been designed and manufactured to ensure your
personal safety. However, improper use can result in potential electrical shock or fire hazards.
Please read and follow all safety and operating instructions carefully before installation and use, and
keep these instructions handy for future reference. Take special note of all warnings listed in these
instructions and on the unit.
1. Water and Moisture – The unit should not be used near water. For example: near a bathtub,
washbowl, kitchen sink, laundry tub, swimming pool or in a wet basement.
2. Ventilation – The unit should be situated so that its location or position does not interfere with
its proper ventilation. For example, it should not be situated on a bed, sofa, rug or similar
surface that may block ventilation openings. Also, it should not be placed in a built-in
installation, such as a bookcase or cabinet, which may impede the flow of air through the
ventilation openings.
3. Heat – The unit should be situated away from heat sources such as radiators, heat registers,
stoves or other appliances (including amplifiers) that produce heat.
4. Power Sources – The unit should be connected to a power supply only of the type described in
the operating instructions or as marked on the appliance. Only use the AC adapter that came
with the unit.
5. Power-Cable Protection – Power supply cables should be routed so that they are not likely to
be walked on or pinched by items placed upon or against them. It is always best to have a clear
area from where the cable exits the unit to where it is plugged into an AC socket.
6. Cleaning – Clean only with dry cloth.
7. Objects and Liquid Entry – Care should be taken so that objects do not fall and liquids are not
spilled into any openings or vents located on the product.
8. Attachments – Do not use attachments not recommended by the product manufacturer.
9. Lightning and Power Surge Protection – Unplug the unit from the wall socket and disconnect
the antenna or cable system during a lightning storm or when it is left unattended and unused
for long periods of time. This will prevent damage to the product due to lightning and
power-line surges.
10. Overloading – Do not overload wall sockets, extension cords, or integral convenience
receptacles as this can result in a risk of fire or electric shock.
11. Damage Requiring Service – The unit should be serviced by qualified service personnel when:
A. the power supply cable or plug has been damaged.
B. objects have fallen into or liquid has been spilled into the enclosure.
C. the unit has been exposed to rain.
D. the unit has been dropped or the enclosure damaged.
E. the unit exhibits a marked change in performance or does not operate normally.
12. Periods of Nonuse – If the unit is to be left unused for an extended period of time, such as a
month or longer, remove batteries before storage
13. Servicing – The user should not attempt to service the unit beyond those methods described
in the user manual. Service methods not covered in the operating instructions should be
referred to qualified service personnel.
14. Magnetic Interference: This product’s speakers contain powerful magnets which could cause
interference or damage to sensitive equipment such as hard drives, CRT televisions and
monitors, as well as medical, scientific, and navigational devices. Keep this unit away from these
products at all times.
15. Only use attachments/accessories specified by the manufacturer. This product is suitable for
use in tropical and/or moderate climates.
16. The unit should be serviced by qualified service personnel when the enclosure damaged or
does not operate normally.
17. No naked flame sources, such as lighted candles, should be placed on the apparatus.
18.
WARNING: To reduce the risk of fire or electric shock, do not expose this product to rain or moisture.
19. CAUTION – Danger of explosion if battery is incorrectly replaced. Replace only with the same
or equivalent type.
20. Do not dispose of batteries in the household trash or fire
21. The mains plug of power adaptor is used as the disconnect device, it shall remain readily
operable.
1. To program Snooze, press down on the
front of the unit for 2 seconds during
normal operation (when no alarm is
sounding).
2. Press the – or + Buttons to select a snooze time (between 01 and
29 minutes).
3. Press down and release the front of the unit to confirm setting.
While the alarm is sounding, press down on the front of the unit to
temporarily silence the alarm (9 minutes is the default). Snooze
can be used several times during the one hour alarm cycle.
Connect the standard size end of a
USB cable (not included) to the USB
port on the back of the unit and
connect the other end to the charging
port on your device.
(Make sure the unit is plugged into a
working outlet in order to charge
devices.)
This device complies with Part 15 of the FCC Rules, operation is subject to the following two
conditions: (1) This device may not cause harmful interference, and (2) this device must accept
any interference received, including interference that may cause undesired operation.
• Warning: Changes or modifications to this unit not expressly approved by the party responsible for compliance
could void the user’s authority to operate the equipment.
• NOTE: This equipment has been tested and found to comply with the limits for a Class B digital device,
pursuant to Part 15 of the FCC Rules.
These limits are designed to provide reasonable protection against harmful interference in a residential
installation. This equipment generates, uses and can radiate radio frequency energy and, if not installed and
used in accordance with the instructions, may cause harmful interference to radio communications.
However, there is no guarantee that interference will not occur in a particular installation. If this equipment
does cause harmful interference to radio or television reception, which can be determined by turning the
equipment o and on, the user is encouraged to try to correct the interference by one or more of the following
measures:
• Reorient or relocate the receiving antenna.
• Increase the separation between the equipment and receiver.
• Connect the equipment into an outlet on a circuit dierent from that to which the receiver is connected.
• Consult the dealer or an experienced radio/TV technician for help.
CAN ICES-3 (B)/NMB-3(B), CAN RSS216 / CNR-216
This equipment complies with FCC RF radiation exposure limits set forth for an uncontrolled environment.
This device complies with Industry Canada’s licence-exempt RSSs. Operation is subject to the following
two conditions:
(1) This device may not cause interference and (2) This device must accept any interference received,
including interference that may cause undesired operation
This equipment should be installed and operated with minimum distance 20cm between the radiator &
your body.
IC Statement
This device contains licence-exempt transmitter(s)/receiver(s) that comply with Innovation, Science and
Economic Development Canada’s licence-exempt RSS(s). Operation is subject to the following two
conditions:
(1) This device may not cause interference.
(2) This device must accept any interference, including interference that may cause undesired operation
of the device.
The device meets the exemption from the routine evaluation limits in section 2.5 of RSS 102 and
compliance with RSS-102 RF exposure, users can obtain Canadian information on RF exposure and
compliance.
This equipment should be installed and operated with a minimum distance of 20 cm between the
radiator and your body.
L’émetteur/récepteur exempt de licence contenu dans le présent appareil est conforme aux CNR
d’Innovation, Sciences et Développement économique Canada applicables aux appareils radio exempts
de licence. L’exploitation est autorisée aux deux conditions suivantes :
(1) L’appareil ne doit pas produire de brouillage;
(2) L’appareil doit accepter tout brouillage radioélectrique subi, même si le brouillage est susceptible
d’en compromettre le fonctionnement.
Le dispositif rencontre l'exemption des limites courantes d'évaluation dans la section 2.5 de RSS 102 et
la conformité à l'exposition de RSS-102 rf, utilisateurs peut obtenir l'information canadienne sur
l'exposition et la conformité de rf.
Cet équipement doit être installé et utilisé avec une distance minimale de 20 cm entre le radiateur et
votre corps.
FCC INFORMATION
DC 9V, 2.5A
Designed and Engineered in the USA
Mfd. & Srvcd. by SDI Technologies, Inc.
Model No: iW18
Service No: iW18-A-A
AC Adaptor:
DC 9V, 2.5A
USB Output:DC 5V, 1A
www.iHome.com | Made in China
Patents: www.ihome.com/patents
Toll Free: 1-800-288-2792
WIRELESS CHARGER:
FCC ID:EMOIW18
IC:986B-IW18
Model: iW18 - QSG (US English)
Size: 408 x 150 mm (folded: 102 x 150 mm)
Date: May 31, 2019
Bedside/Oce Clock
with Dual Charging
To toggle the clock display
between 12/24 hour time,
press the Alarm Button
while the display is flashing
during time setting.