Page is loading ...

Thank You For Choosing Kohler Company
Thank you for choosing Kohler Company. Your Kohler Company
product reflects the true passion for design, craftsmanship, artistry, and
innovation Kohler Company stands for. We are confident its
dependability and beauty will surpass your highest expectations,
satisfying you for years to come.
All the information in this guide is based upon the latest product
information available at the time of publication. At Kohler Company,
we strive to fulfill our mission of improving the level of gracious living
for each person who is touched by our products and services. We
reserve the right to make changes in product characteristics, packaging,
or availability at any time without notice.
Please take a few minutes to review this guide. If you encounter any
installation or performance problems, please call 1-800-4KOHLER
(1-800-456-4537) from within the USA and Canada, or 001-877-680-1310
from within Mexico.
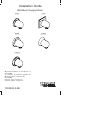
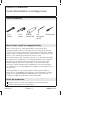
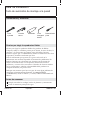
Tools and Materials
Before You Begin
Observe all local plumbing and building codes.
Shut off the main water supply.
Replace waste or supply tubing if necessary.
Kohler Co. reserves the right to make revisions in the design of
products without notice, as specified in the Price Book.
Adjustable
Wrench
Blade
Screwdriver
Strap
Wrench
Caulk
3/8" Hex
Wrench
1000524-2-AE 2 Kohler Co.

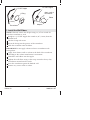
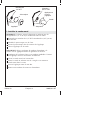
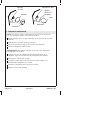
1. Install the Wall Elbow
NOTE: If desired, remove the adapter using a 3/8″ hex wrench if a
male hose connection is used.
Rough-in a 1/2″ NPT nipple that extends 9/16″ (1.4 cm) from the
finished wall.
Wet the O-ring with water.
Insert the O-ring into the grooves of the escutcheon.
Slide the escutcheon onto the elbow.
IMPORTANT! Do not apply silicone sealant to escutcheons with
foam gaskets.
Apply clear silicone caulk or sealant to the back of the escutcheon
according to the sealant manufacturer’s instructions.
Thread the wall elbow onto the nipple.
Tighten the wall elbow using a clean strap wrench or heavy duty
screwdriver inserted into the outlet.
Press the escutcheon against the finished wall.
Remove any excess caulk or sealant.
Escutcheon
O-Ring
1/2" NPT Nipple
9/16"
(1.4 cm)
Adapter
Elbow
1/2" NPT Nipple
9/16"
(1.4 cm)
Apply caulk to
escutcheon.
Kohler Co. 3 1000524-2-AE

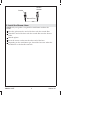
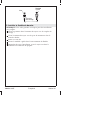
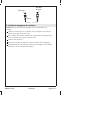
2. Install the Shower Hose
NOTE: Only one gasket is required for installations without the
handle.
Place the gasket into the end of the hose with the wrench flats.
Thread the end of the hose with the wrench flats into the shower
outlet.
Wrench tighten.
Insert the screen washer into the other end of the hose.
Depending on the installation type, thread the hose into either the
handshower or the handle extension.
Gasket
Wrench-Flats
Screen
Washer
1000524-2-AE 4 Kohler Co.
Page is loading ...
Page is loading ...
Page is loading ...
Page is loading ...
Page is loading ...
Page is loading ...
Page is loading ...
Page is loading ...
Page is loading ...
Page is loading ...
Page is loading ...
Page is loading ...
-
 1
1
-
 2
2
-
 3
3
-
 4
4
-
 5
5
-
 6
6
-
 7
7
-
 8
8
-
 9
9
-
 10
10
-
 11
11
-
 12
12
-
 13
13
-
 14
14
-
 15
15
-
 16
16


Ask a question and I''ll find the answer in the document
Finding information in a document is now easier with AI
in other languages
- français: Kohler K-10574-2BZ Guide d'installation
- español: Kohler K-10574-2BZ Guía de instalación
Related papers
-
Kohler K-10574-BV Installation guide
-
-
-
Kohler K-368-2BZ Installation guide
-
-
-
-
Kohler K-8002-CP Installation guide
-
-
Kohler K-8014-TT Installation guide
Other documents
-
Ekena Millwork ROS03X03SPRW Installation guide
-
Ekena Millwork ROS02X02OX Installation guide
-
-
Ekena Millwork CAP12X02X09BRCH Installation guide
-
Ekena Millwork ROS05X07ASAL Installation guide
-
-
WaterWorks CNHS01 Installation guide
-
Ekena Millwork CAP12X02X09BRCH Installation guide
-
-
 BrassCraft 647 Installation guide
