Page is loading ...

©
HICKORY HARDWARE, INC.
3438 Briley Park Blvd • Nashville, TN 37269
SATISFACTION GUARANTEED
(See website for details http://www.hickoryhardware.com/warranty)
Made to Hickory Hardware’s specications in China
INSTRUCTIONS
Single Cylinder
Interlocking
Deadbolt
1120
CAUTION: Do not unscrew small retaining screws at rear of cylin-
der. Use only dry lubricant (graphite) on locks. Keep keyway clear
of foreign objects.
To Install:
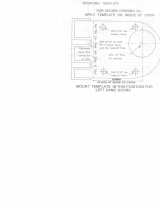
1. Select convenient height for lock and place template against
edge of door.
2. Mark hole positions. Bore 1-3/8" hole for cylinder where indi-
cated. Note: Bore through door until tip of drill barely emerges
from other side. Remove drill bit and complete hole by drilling
from opposite side to reduce splintering.
3. Drill 3/32" diameter holes 1/2" deep for attachment screws.
4. Insert cylinder and trim ring from outside of door. Attach back-
plate with two connecting bolts. Note: If bolts are too long, saw
or break at groove, using caution to avoid marring the thread.
Cylinder,
Cylindre,
Cilindro
Brass Trim Ring,
Anneau de finition de laiton,
Anillo decorativo de latón
Backing Plate,
Plaque de renforcement,
Placa de apoyo,
Connecting Bar,
Barre de raccordement,
Barra de conexión
Lock Body,
Corps de la serrure,
Cuerpo de la cerradura
Strike,
Gâche,
Placa receptora de pestillo
Connecting Bolt,
Verrou de raccordeemnt,
Cerrojo de conexión,
Inside of Door,
Intérieur de la porte,
Parte interior de la puerta
Outside of Door,
Extérieur de la porte,
Parte exterior de la puerta
Inside of Door,
Intérieur de la porte,
Parte interior de la puerta
Outside of Door,
Extérieur de la porte,
Parte exterior de la puerta
Inside of Door Jamb,
Intérieur du montant,
Parte interior de la jamba de la puerta
5. Cut or break connecting bar so it projects 3/8" to 1/2" beyond
the inside of the door.
6. Place lock on door so connecting bar enters "X" slot in back of
lock. Secure with large mounting screws.
7. Align strike carefully, using template as a guide. Draw outline
of strike on door jamb trim and chisel wood away (mortise) so
strike mates freely with locking bars.
8. Mark mounting holes for strike, drill pilot holes, and secure
strike to door jamb with screws provided.
6.125x2.3125_IS.indd 1 2/19/07 9:52:06 AM
/