Mclntosh MHA200 Tube Headphone Amplifier Owner's manual

Type
Owner's manual

This manual is also suitable for

McIntosh Laboratory, Inc. 2 Chambers Street Binghamton, New York 13903-2699 Phone: 607-723-3512 www.mcintoshlabs.com
M HA200
Tube Headphone Amplier
Owners Manual
2
Important Safety Information is supplied in a separate document “Important Additional Operation Information Guide
Copyright 2020 © by McIntosh Laboratory, Inc.
Inside the Box
Besides all the protective packaging you should nd:
A literature pack including this manual
An AC Power Cord
An MHA200 Headphone Amplier
Taking it out of the Box
The easiest way to remove the MHA200 from its
shipping carton is to:
Open the top of the box
Remove and read this manual
Gently turn the box over with the aps
extended outward
Lift the box upward to reveal the foam
encased MHA200
Carefully remove the MHA200 from the
packaging
Where to Put it
Place the MHA200 upright on a sturdy at surface
that can support its weight with adequate open space.
Cool operation ensures the longest possible operating
life for any electronic instrument. Always allow air to
ow through the ventilation holes on the bottom of the
amplier and space for the warm air to escape at the
top.
Allow at least 19 inches (48.3cm) above the top; 4
inches (10.2cm) for the Rear and Sides; allow 1/2 inch
(1.3cm) below the Power Amplier so the airow is
not obstucted. Do not remove the feet.
For dimensions see “Dimensions” on page 6.
DO THIS FIRST
Removal of Foam Inserts over Vacuum
Tubes
IMPORTANT!
REMOVE THE FOAM INSERTS OVER THE
VACUUM TUBES PRIOR TO CONNECTING
THE A.C. POWER SUPPLY CORD.
To prevent damage to the Tubes during
shipping, there are special foam inserts
surrounding the Tubes of the Power Amplier
The Foam Inserts must be removed from
the MHA200 before connecting the AC Power
Supply Cord to the Power Amplier
Failure to do so has the potential of a
Fire Hazard, resulting in damage to the
MHA200 and the surrounding environment
Follow these instructions for removal of
the packing foam before connecting the AC
Power Supply Cord to the MHA200
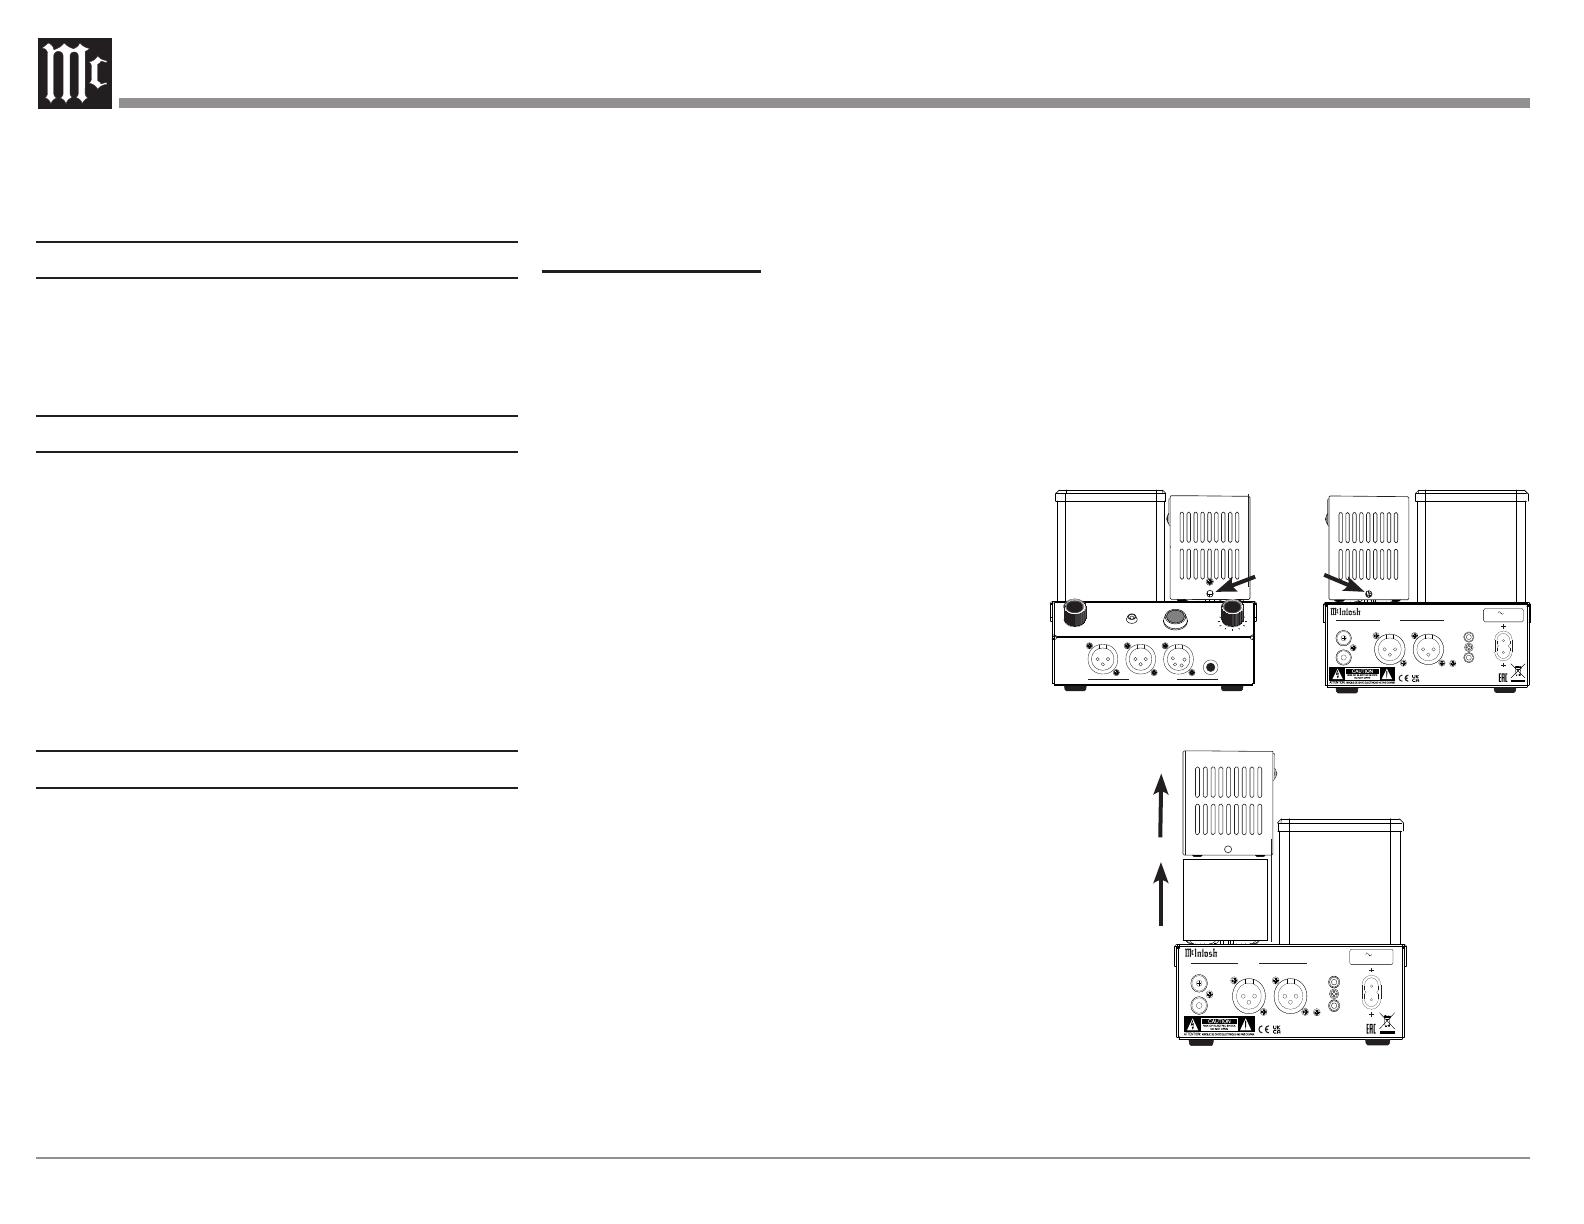
To remove the protective foam, it is necessary to
temporarily remove the two Tube Covers. To remove
each Tube Cover:
Use a Phillips Head #2 screw driver to remove
the two screws that hold the Tube Cover (see
Figure 01)
Pull the Tube Cover upward o of the Tube
Cover Retaining Posts (see Figure 02)
Pull the protective foam straight up o the
Vacuum Tubes (see Figure 02)
Replace the Tube Cover
Replace the two screws to secure the cover to
the Tube Cover Retaining Posts (see Figure
01)
Save the protective foam and warning label for
possible future use.
4
ANDBY /
ST ON
1
LOAD RANGE
STER EO
R
HEAD PHONE OUTPUT S
STER EO
L
INPUTS
120V 50 60Hz/
50 WATTS
McINTOSH LABORATORY, INC., BINGHAMTON, NY
HANDCRAFTED IN USA WITH US AND IMPORTED PARTS
MHA 200 TUBE HEADP HO NE AMPLIF IE R
POWER
CONTROL
L
R
L
R
BALANCEDUNBALANCED
IN
OUT
Screws
Figure 01– Tube cover screws
INPUTS
120V 50 60Hz/
50 WATTS
McINTOSH LABORATORY, INC., BINGHAMTON, NY
HANDCRAFTED IN USA WITH US AND IMPORTED PARTS
MHA 200 TU BE HEADP HO NE AMPLI FI ER
POWER
CONTROL
L
R
L
R
BALANCEDUNBALANCED
IN
OUT
Figure 02– Lift Tube Cover and foam up
3
Thank you from all of us at McIntosh
You have invested in a precision instrument that will
provide you with many years of enjoyment. Please
take a few moments to familiarize yourself with
the features and instructions to get the maximum
performance from your equipment.
If you need further technical assistance, please contact
your dealer who may be more familiar with your
particular setup including other brands. You can also
contact McIntosh with additional questions or in the
unlikely event of needing service.
McIntosh Laboratory, Inc.
2 Chambers Street
Binghamton, New York 13903
Technical Assistance: (607) 723-3512
Customer Service: (607) 723-3515
Fax: (607) 724-0549
Website: mcintoshlabs.com
Make a Note
For future reference, you can jot down your serial
number and purchase information here. We can
identify your purchase from this information if the
occasion should arise.
Serial Number:
Purchase Date:
Dealer Name:
List of Figures
Figure 01– Tube cover screws ............................... 2
Figure 02– Lift Tube Cover and foam up ............. 2
Figure 03– Rear Panel .......................................... 4
Figure 04– XLR cable ......................................... 4
Figure 05– RCA Cable ......................................... 4
Figure 06– Power control (trigger) mini plug ....... 4
Figure 07– Front View .......................................... 5
Figure 08– 3-pin XLR wiring .............................. 5
Figure 09– 4-pin XLR wiring .............................. 5
Figure 10– Tube locations..................................... 5
The MHA200 is a McIntosh Vacuum Tube
Amplifier designed and crafted for one
purpose- to power your headphones with
the best possible sound.
Output stage is a Push-Pull pure
Class-A triode
Only Headphone Amplifier with Unity
Coupled Output Transformers and
Proprietary Push-pull configuration
technology
Guaranteed 500mW power for ALL
loads from 32 to 600 Ohm
Table of Contents
Inside the Box ........................................................ 2
Taking it out of the Box ......................................... 2
Where to Put it ....................................................... 2
Removal of Foam Inserts over Vacuum Tubes ...... 2
Thank you from all of us at McIntosh ................... 3
Make a Note ........................................................... 3
Making Connections ............................................. 4
The Inputs on the Back ..................................... 4
Balanced or Unbalanced Input .......................... 4
Power Control (Trigger) Input .......................... 4
Power Control (Trigger) Output ....................... 4
The Knobs on the Front ......................................... 4
The Left Knob (Load) ...................................... 4
The Right Knob (Volume) ................................ 4
Connecting Headphones ................................... 5
The Power Button and Standby LED ............... 5
Dimensions ............................................................ 6
Re-packing the MHA200 ...................................... 6
Technical Specifications ....................................... 7
4
Making Connections
The Inputs on the Back
One Pair of Unbalanced RCA Jacks
One Pair of Balanced XLR Female
Connectors
One Power Control (Trigger) Input
One Power Control (Trigger) Output
One AC Power Inlet
Balanced or Unbalanced Input
The BALANCED INPUT allows a source to be
connected using Balanced (XLR) cables (see Figure
03.)
The Unbalanced Input accepts RCA/Phono Plugs
(see Figure 05.)
Choose either Balanced or Unbalanced as an Input
source for the MHA200. Connecting both is not
optimal.
You may wish to use a xed output source and
control the volume solely with the MHA200 Volume
Knob. You may use a variable volume source and
use the source (a preamplier for example) to
control volume. In this case the Volume Knob of the
MHA200 can be left at unity gain with the notch at
12 o’clock (at the top).
Power Control (Trigger) Input
The Trigger Input can be connected to other
McIntosh equipment using a 3.5mm stereo mini
phone plug to receive a +12 Volt/0 Volt signal for
power control (see Figure 06). When a signal is
received, the MHA200 will power on.
Power Control (Trigger) Output
The Trigger Out is an output that can be connected
to other McIntosh equipment using a 3.5mm stereo
mini phone plug to send a +12 Volt/0 Volt signal
for power control. This will enable additional
equipment to be powered on and o when the
MHA200 is powered on or o.
AC Power
Use the included AC Power Cord to connect the
MHA200 to a working AC outlet. Make sure the
Voltage matches the value printed above the AC
Connector on the right side of the rear of the unit.
The Knobs on the Front
The Left Knob (Load)
The Left Knob, aka the Load Knob, allows you
to impedance match the MHA200 with your
headphones. Set the Left Knob to the value closest
to the impedance value specied by your headphone
manufacturer. The options are:
32 ohms
100 ohms
250 ohms
600 ohms
There is no need to be exact since the impedance
rating of a headphone is an average of the varying
impedance across the frequency range. Choosing
a value above your headphone’s impedence, will
result in louder output (and visa versa).
The Right Knob (Volume)
Turn clockwise for more volume and counter-
clockwise for less volume.
Figure 03Rear Panel
INPUTS
120V 50 60Hz/
50 WATTS
McINTOSH LABORATORY, INC., BINGHAMTON, NY
HANDCRAFTED IN USA WITH US AND IMPORTED PARTS
MHA200 TUBE HEADPHONE AMPLIFIER
POWER
CONTROL
L
R
L
R
BALANCEDUNBALANCED
IN
OUT
Figure 05– RCA Cable
Connect components for
Power Control using a
3.5mm stereo mini plug.
Power
Control
Meter
Illumination
Control
Ground
Figure 06– Power control (trigger) mini plug
PIN 1
PIN 2
PIN 3
Figure 04XLR cable
PIN 1: Shield/Ground
PIN 2: + Signal
PIN 3: - Signal
5
The center indented position is unity gain. If your
connected source is a variable output and you will
be using the source (a preamplier for example) to
control the volume, then set the Right Knob to unity
gain.
When using a xed output source, you will use
the Right Knob to control the Volume. To avoid
damaging headphones and ears, do not start the
MHA200 at a high volume. If the starting volume
is above unity gain, the MHA200 will ramp up to
this volume rather than starting suddenly.
Connecting Headphones
There are three ways to connect your headphones to
the MHA200:
1/4” 3-conductor (stereo) phone plug
One pair of 3-pin male XLR plugs
One 4-pin male XLR connector (Neutrik
NC4MX)
1/4” Stereo plug provides an unbalanced
connection. This is a common connector for
headphones (along with the smaller 1/8” plug).
The next two solutions may require replacing the
original jack.
With 3-pin XLR connectors, there is a separate jack
for left and right. See Figure 08 for proper wiring.
The 4-pin XLR connector uses a single plug for
both left and right channels. See Figure 09 for
proper wiring.
The Power Button and Standby LED
The Standby LED glows red when the MHA200 is
connected to AC Power and in Standby Mode. To
power the MHA200 on, press the Power Button.
The Tubes will ash green during the tube warm-up
phase. The Power Button will have no eect during
tube warm-up. When the tubes are ready, they will
glow a steady green. The Standby LED is o when
the MHA200 is on.
To power down the MHA200, press the power
button again.
If the MHA200 is being controlled by another
device through Power Control (see “Power Control
(Trigger) Input” on page 4), the Power Button
will have no eect.
THE MHA200 will automatically power o after
approximately 30 minutes of receiving no input
signal if not being controlled by another device
through Power Control.
About Those Tubes
The MHA200 features four tubes that can be seen
glowing. These tubes (two 12AT7 and two 12BH7
to be precise) are expertly incorporated into the
amplier circuit to provide warm detailed playback.
The 12AT7s are used in the Driver stage and the
12BH7s are used for the Power stage.
Tubes should be replaced by trained McIntosh
authorized technicians. The tube locations are
shown in Figure 10.
Figure 07– Front View
STAN DBY / ON VOLUME
STEREO
R
HEADPHONE OUTPUTS
STEREO
L
600
1
32
LOAD
V1-12AT7
V2-12BH7A V4-12BH7A
V3-12AT7
Figure 10Tube locations
RIGHT
LEFT
+
+
Figure 083-pin XLR wiring
RIGHT
LEFT
+
+
Figure 094-pin XLR wiring
PIN 1
PIN 1
PIN 4
PIN 3
PIN 2
View of XLR Jacks (not plugs)
PIN 2
12BH7
12AT7
6
Re-packing the MHA200
When shipping the MHA200, it is highly
recommended that the unit be packed as it was
originally shipped to avoid damage. Failure to
properly pack the unit will likely result in damage.
If you need any of the packing material, you can
contact McIntosh Customer Service.
15.6cm
6 1/8"
6.4cm
2-1/2"
15.6cm
6 1/8
"
23.2cm
9 1/8”
14.6cm
5 3/4"
4
1
LOAD RANGE
STE REO
R
HEA DPH ONE OUTP UTS
STE REO
L
ANDBY /ST ON
7.3cm
2-7/8"
Dimensions
Quantity Part Number Description
1 034621 Shipping Carton (A)
1 034618 Foam Pad Front (B)
1 034619 Foam Pad Back (C)
1 034620 Foam Tube Cover (D)
Foam Tube
Protection Cover (D)
Foam Front
Side (B)
Shipping
Carton (A)
Power Cord
Manual
Foam Back
Side (C)
7
Technical Specifications
Power Output
32 Ohm Load 500mW
100 Ohm Load 500mW
250 Ohm Load 500mW
600 Ohm Load 500mW
Output Load Impedance
32 , 100 , 250 , 600
Rated Power Band
20Hz to 20kHz
Total Harmonic Distortion
0.5%
Dynamic Headroom
1dB 8 ohm load
1.3dB 4 ohm load
Frequency Response
+0, -0.5dB from 20Hz to 20,000Hz
Input Sensitivity (for rated output)
1.0 Vrms Unbalanced
2.0 Vrms Balanced
A-Weighted Signal to Noise Ratio
94dB unbalanced
Voltage gain
12dB 32 Ohm
17dB 100 Ohm
21dB 250 Ohm
25dB 600 Ohm
Trigger Output
12VDC, 50mA maximum
Power Requirements
Refer to the rear panel of the MHA200 for the
correct Voltage. The MHA200 is factory congured
for one of the following AC Voltages:
100 Volts, 50/60Hz at 50 watts
110 Volts, 50/60Hz at 50 watts
120 Volts, 50/60Hz at 50 watts
220 Volts, 50/60Hz at 50 watts
230 Volts, 50/60Hz at 50 watts
240 Volts, 50/60Hz at 50 watts
Standby Power, less than 0.5 watts
Field AC Voltage conversion of the MHA200 is not
possible.
Dimensions
Width 6-1/8 inches (15.6cm)
Height 5-3/4inches (14.6cm) including feet
Depth 9-1/8 inches (23.2cm) including antenna
Weight
10.5 pounds (4.8 kg) net
12.0 pounds (5.5 kg) in shipping carton
Shipping Carton Dimensions
Width 12 inches (30.5cm)
Height is 10 inches (25.4cm)
Depth is 9-1/2 inches (24.1cm)
The continuous improvement of its products is
the policy of McIntosh Laboratory Incorporated
who reserve the right to improve design without
notice.
Printed in the U.S.A.
McIntosh Laboratory, Inc.
2 Chambers Street
Binghamton, NY 13903
www.mcintoshlabs.com
McIntosh Part No. 24102301
  • Page 1 1
  • Page 2 2
  • Page 3 3
  • Page 4 4
  • Page 5 5
  • Page 6 6
  • Page 7 7
  • Page 8 8

Mclntosh MHA200 Tube Headphone Amplifier Owner's manual

Type
Owner's manual
This manual is also suitable for

Ask a question and I''ll find the answer in the document

Finding information in a document is now easier with AI