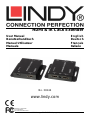
Lindy 50m Cat.6 HDMI & IR Extender User manual
- Category
- Network extenders
- Type
- User manual

© LINDY Group - FIRST EDITION (May 2016)
HDMI & IR Cat.6 Extender
User Manual English
Benutzerhandbuch Deutsch
Manuel Utilisateur Français
Manuale Italiano
No. 38144
www.lindy.com
Tested to Comply with
FCC Standards
For Home and Office Use!
Page is loading ...

User Manual English
Introduction
Thank you for purchasing the HDMI & IR Cat.6 Extender. This product has been designed to provide
trouble free, reliable operation. It benefits from both a LINDY 2 year warranty and free lifetime technical
support. To ensure correct use, please read this manual carefully and retain it for future reference.
The HDMI & IR Cat.6 Extender is a simple to use plug and play solution which lets you extend an HDMI
AV signal up to 50m* using a single low cost Cat.6 UUTP cable (not included). For added convenience
IR signals (20-60 kHz) can also be extended using the supplied IR Receiver and Emitter cables.
Supporting resolutions up to Full HD 1080p, including 1080p 3D, the Extender is designed for use in AV
and digital signage applications in a variety of settings such as home, education, business, retail and
healthcare.
The Extender features an HDMI loop-through output on the Transmitter with simultaneous viewing so
that a local display can be connected for monitoring or to create an additional viewing zone. To ensure
the maximum compatibility when two displays are connected the EDID data, which determines the
supported video and audio formats, can be used from either a local monitor connected to the Transmitter
or the remote monitor connected to the Receiver.
Power over Cat.6 (PoC) functionality enables the Extender to operate from a single power supply
connected to the Transmitter, allowing the Receiver to be located where there is limited access to mains
power sockets making it ideal for retro fit installations. In addition to PoC functionality the Extenders slim
design and integrated mounting brackets make it easier to install in limited spaces behind modern flat
screen displays.
*Please Note: The quoted lengths and resolutions are possible with a direct connection between
Transmitter and Receiver using good quality Cat.6 solid core cable. Using a different cable type, or
introducing wall plates, couplers or patch panels will result in a reduction of possible distances.
Package Contents
HDMI & IR Cat.6 Extender with local HDMI Output
5V DC 1A Multi-Country Power Supply
IR Emitter Cable
IR Receiver Cable
LINDY Manual
Specification
Extends HDMI (including HDCP) & IR signals via Cat5e/Cat6 UTP Cable
Connection is via cat.5e/6/7 cable, up to 50m (CAT6 solid core recommended)
Local HDMI Output allows local & remote displays to be used simultaneously
Supports resolutions up to Full HD 1080p 60Hz (4:4:4 @ 8bpc / 4:2:2 @ 12bpc ) at 50m
Supports Full HD 1080p24 3D according to HDMI 1.4
Audio Formats: LPCM, DTS Digital, DTS HD, Dolby Digital & Dolby True HD
PoC (Power over CAT6) feature allows requires only a 5V 1A PSU to be attached
Supports 20 – 60kHz IR Frequencies
Maximum HDMI Cable length, 3m in/out
EDID can be selected from either the remote or local display
Transmitter ports: HDMI Type A In, 1x CATX Out, 3.5mm IR Out & DC Socket
Receiver ports: HDMI Type A Out, 1x CATX In & 3.5mm IR In
Power consumption: 5W Max
ESD Protection: Human Body model: +/- 8kV (air-gap discharge) +/- 4kV (contact discharge)
Temperature: Operating 0
o
C to 40
o
C (32
o
F to 104
o
F) / Storage -20
o
C to 60
o
C (-4
o
F to 140
o
F)
Relative Humidity: 20 to 90% RH (Non-condensing)

User Manual English
Overview
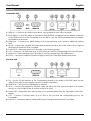
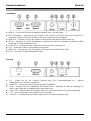
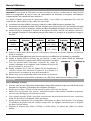
Transmitter Unit
1. HDMI In – Connect to an HDMI source device, such as Media Player or Blu-ray player.
2. EDID Switch – Locate the switch to the right to copy the EDID information from the display connected
to the HDMI Out port of the Transmitter or to the left to copy the EDID information from the display
connected to the Receiver.
3. HDMI Out – Connect to an HDMI display to for local monitoring or to create an additional viewing
zone.
4. IR Out – Connect the supplied IR Emitter cable and place the other end of the cable in line of sight of
the IR port of the device to be controlled.
5. Power LED – Illuminates when the Transmitter unit is receiving power.
6. CAT – Connect a Cat.5e/6 cable of up to 50m to this port and the corresponding port on the Receiver.
7. LINK LED – Illuminates when the Transmitter is receiving a signal from the HDMI source.
8. DC5V – Connect the supplied 5V power supply to power the Transmitter and Receiver units.
Receiver Unit
1. EQ – Set the EQ dip switches to the corresponding setting for the length of Cat.5e/6 cable you are
using. Please refer to the Installation section for further information.
2. HDMI Out – Connect to an HDMI display or projector.
3. IR IN – Connect the supplied IR Receiver cable and place the other end of the cable in a location
where it is in line of sight of the IR remote control to be used.
4. Power LED – Illuminates when the Receiver unit is receiving power from the Transmitter via the PoC
feature.
5. CAT – Connect a Cat.5e/6 cable of up to 50m to this port and the corresponding port on the
Transmitter.
6. Lock LED – Illuminates when a stable HDMI signal is being received from the Transmitter.

User Manual English
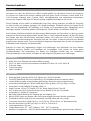
Installation
Important! If you want to lay cables inside a cable duct or through a wall, please test your Cat.5e/6
cables in a test installation at the highest desired resolution/colour space/colour depth combination with
the extender BEFORE you install them in your wall or cable duct!
The following steps are for an installation using HDMI equipment, if you are using DVI equipment, please
substitute the HDMI cables for DVI to HDMI cables where required.
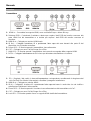
1. Connect your HDMI source to the Transmitter unit using a HDMI cable (maximum length 3m).
2. Connect one end of the CAT5e/6 cable (max. length 50m) to the CAT port on the Transmitter and the
other end to the CAT port of the Receiver. Use solid core installation cable of at least Cat.5e UTP.
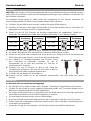
3. Set the EQ on the Receiver to the setting which matches the Cat.5e/6 cable length (see table below),
either the Primary or Secondary may be used depending on picture and cable quality.
4. Use another HDMI cable (maximum length 3m) to connect your HDMI display device to the HDMI
output port on the Receiver unit.
5. An additional HDMI display can be connected to the HDMI Out port of the Transmitter if required.
6. Set the EDID Switch according to your requirement, to the right uses the EDID from the display
connected to the Transmitter, to the left uses the EDID from the display connected to the Receiver.
7. For additional Infrared remote signal functionality, connect the
included IR Extension Cables to the Transmitter and Receiver
units, using the IR Emitter with the IR Out port and the IR
Receiver with the IR In port.
8. Place the IR Emitter in front of the IR Port of the equipment you
want to control, and ensure you place the IR Receiver in a
location where it may easily receive the signal of your IR remote.
9. Power on your HDMI Source and Display to complete the installation.
10. Finally plug the DC power supply into the Transmitter unit, the Power LED will illuminate on both
units.
Troubleshooting
There is no display on the screen.
Check that the DC plug and jack used by external power supply is firmly connected and that the
Power LED on both the Transmitter and Receiver are illuminated.
Check that the CAT5e/6 cable is seated correctly and that the Lock LED on is illuminated.
Power off all the devices, then power on in this order: first, the Transmitter unit, followed by the
display(s) and finally the source.
For some HDMI devices it may be helpful to unplug and replug their HDMI connection to re-initiate
the HDMI handshake and recognition.
Check that the EQ setting matches the Cat.5e/6 cable length being used. If the primary EQ setting
does not work, please try the secondary setting for the length of Cat.5e/6 cable being used.
Reduce the length of CAT5e/6 or HDMI cable used, or use a higher quality cable.
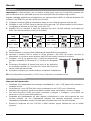
Cable
Length
Primary
Setting
Secondary
Setting
Cable
Length
Primary
Setting
Secondary
Setting
Under 15m
(49.5ft)
30 – 40m
(99 – 132ft)
15 – 30m
(49.5 – 99ft)
40 – 50m
(132 – 164ft)
IR Receiver
IR Emitter
Page is loading ...
Page is loading ...
Page is loading ...
Page is loading ...
Page is loading ...
Page is loading ...
Page is loading ...
Page is loading ...
Page is loading ...

CE/FCC Statement
CE Certification
This equipment complies with the requirements relating to Electromagnetic Compatibility Standards
EN55022/EN55024 and the further standards cited therein. It must be used with shielded cables only.
It has been manufactured under the scope of RoHS compliance.
CE Konformitätserklärung
Dieses Produkt entspricht den einschlägigen EMV Richtlinien der EU für IT-Equipment und darf nur
zusammen mit abgeschirmten Kabeln verwendet werden.
Diese Geräte wurden unter Berücksichtigung der RoHS Vorgaben hergestellt.
Die formelle Konformitätserklärung können wir Ihnen auf Anforderung zur Verfügung stellen
FCC Certification
This equipment has been tested and found to comply with the limits for a Class B digital device, pursuant
to part 15 of the FCC Rules. These limits are designed to provide reasonable protection against harmful
interference in a residential installation.
You are cautioned that changes or modification not expressly approved by the party responsible for
compliance could void your authority to operate the equipment.
This device complies with part 15 of the FCC Rules.
Operation is subject to the following two conditions:
1. This device may not cause harmful interference, and
2. This device must accept any interference received, including interference that may cause undesired
operation.
LINDY Herstellergarantie – Hinweis für Kunden in Deutschland
LINDY gewährt für dieses Produkt über die gesetzliche Regelung in Deutschland hinaus eine zweijährige
Herstellergarantie ab Kaufdatum. Die detaillierten Bedingungen dieser Garantie finden Sie auf der LINDY Website
aufgelistet bei den AGBs.
Hersteller / Manufacturer (EU):.
LINDY-Elektronik GmbH LINDY Electronics Ltd
Markircher Str. 20 Sadler Forster Way
68229 Mannheim Stockton-on-Tees, TS17 9JY
GERMANY United Kingdom
Email: in[email protected]m , T: +49 (0)621 470050 postmaster@lindy.co.uk , T: +44 (0)1642 754000

Recycling Information
WEEE (Waste of Electrical and Electronic Equipment),
Recycling of Electronic Products
Europe, United Kingdom
In 2006 the European Union introduced regulations (WEEE) for the collection and recycling of all waste electrical
and electronic equipment. It is no longer allowable to simply throw away electrical and electronic equipment.
Instead, these products must enter the recycling process.
Each individual EU member state has implemented the WEEE regulations into national law in slightly different
ways. Please follow your national law when you want to dispose of any electrical or electronic products. More
details can be obtained from your national WEEE recycling agency.
Germany / Deutschland
Die Europäische Union hat mit der WEEE Direktive Regelungen für die Verschrottung und das Recycling von
Elektro- und Elektronikprodukten geschaffen. Diese wurden im Elektro- und Elektronikgerätegesetz – ElektroG in
deutsches Recht umgesetzt. Dieses Gesetz verbietet das Entsorgen von entsprechenden, auch alten, Elektro- und
Elektronikgeräten über die Hausmülltonne! Diese Geräte müssen den lokalen Sammelsystemen bzw. örtlichen
Sammelstellen zugeführt werden! Dort werden sie kostenlos entgegen genommen. Die Kosten für den weiteren
Recyclingprozess übernimmt die Gesamtheit der Gerätehersteller.
France
En 2006, l'union Européenne a introduit la nouvelle réglementation (DEEE) pour le recyclage de tout équipement
électrique et électronique.
Chaque Etat membre de l’ Union Européenne a mis en application la nouvelle réglementation DEEE de manières
légèrement différentes. Veuillez suivre le décret d’application correspondant à l’élimination des déchets électriques
ou électroniques de votre pays.
Italy
Nel 2006 l’unione europea ha introdotto regolamentazioni (WEEE) per la raccolta e il riciclo di apparecchi elettrici
ed elettronici. Non è più consentito semplicemente gettare queste apparecchiature, devono essere riciclate. Ogni
stato membro dell’ EU ha tramutato le direttive WEEE in leggi statali in varie misure. Fare riferimento alle leggi del
proprio Stato quando si dispone di un apparecchio elettrico o elettronico.
Per ulteriori dettagli fare riferimento alla direttiva WEEE sul riciclaggio del proprio Stato.
LINDY No 38144
1
st
Edition, May 2016
www.lindy.com
Tested to Comply with
FCC Standards
For Home and Office Use!
-
 1
1
-
 2
2
-
 3
3
-
 4
4
-
 5
5
-
 6
6
-
 7
7
-
 8
8
-
 9
9
-
 10
10
-
 11
11
-
 12
12
-
 13
13
-
 14
14
-
 15
15
-
 16
16


Lindy 50m Cat.6 HDMI & IR Extender User manual
- Category
- Network extenders
- Type
- User manual
Ask a question and I''ll find the answer in the document
Finding information in a document is now easier with AI
in other languages
Related papers
-
Lindy 38155 HDMI Cat.6 Splitter Extender User manual
-
Lindy 38032 User manual
-
-
-
-
-
-
-
-
Lindy 38205 User manual
Other documents
-
 Projector People LIBDLHD50CWPKTW User manual
-
 PRO SIGNAL PSG3426 Operating instructions
-
CYP PU-Q1H8CS Owner's manual
-
Black Box AC2000A Datasheet
-
Comprehensive CHE-1 User manual
-
Triax PtP 1080P User manual
-
DigiTech AC1785 Owner's manual
-
Speaka Professional 2369286 User manual
-
AV Access HDEX40-L User manual
-

