Melitta Avanza® series 600 Owner's manual
- Category
- Coffee makers
- Type
- Owner's manual
This manual is also suitable for
Page is loading ...
Page is loading ...
Page is loading ...
Page is loading ...
Page is loading ...
Page is loading ...
Page is loading ...
Page is loading ...
Page is loading ...
Page is loading ...
Page is loading ...
Page is loading ...
Page is loading ...
Page is loading ...
Page is loading ...
Page is loading ...
Page is loading ...
Page is loading ...
Page is loading ...
Page is loading ...
Page is loading ...
Page is loading ...
Page is loading ...
Page is loading ...
Page is loading ...
Page is loading ...
Page is loading ...
Page is loading ...
Page is loading ...
Page is loading ...

31
GB
Table of contents
Table of contents
1 Overview of the appliance ............................................................................................33
1.1 Appliance at a glance ...........................................................................................33
1.2 Overview of the control panel ...........................................................................34
1.3 The Cappuccinatore at a glance .......................................................................35
2 For your safety ....................................................................................................................35
2.1 Proper use .................................................................................................................35
2.2 Danger from electric current..............................................................................35
2.3 Risk of burns and scalds ....................................................................................... 36
2.4 Other dangers .........................................................................................................36
3 First steps ..............................................................................................................................37
3.1 Unpacking the appliance ....................................................................................37
3.2 Checking the delivery contents ........................................................................37
3.3 Installing the appliance........................................................................................37
3.4 Connecting the appliance...................................................................................37
3.5 Connecting the Cappuccinatore ......................................................................37
3.6 Switching on the appliance for the rst time ...............................................37
4 Basic operation ..................................................................................................................38
4.1 Switching the appliance on and o ................................................................38
4.2 Filling coee beans into the bean container ................................................39
4.3 Filling with water ....................................................................................................40
4.4 Adjusting the outlet for coee beverages ....................................................40
4.5 Using milk .................................................................................................................40
4.6 Emptying the drip tray and coee grounds container .............................41
5 Preparing beverages .......................................................................................................41
5.1 Setting the coee strength .................................................................................41
5.2 Setting the coee quantity .................................................................................42
5.3 Preparing the coee beverage ..........................................................................42
5.4 Stopping coee preparation ..............................................................................42
5.5 Preparing two coee beverages simultaneously .......................................42
5.6 Preparing milk foam ..............................................................................................43
5.7 Preparing hot water ..............................................................................................44
6 Changing basic settings .................................................................................................44
6.1 Service mode 1 ........................................................................................................44
6.2 Setting Auto OFF ....................................................................................................44
6.3 Setting the water hardness.................................................................................45
6.4 Activating/deactivating switch-o rinsing ...................................................45
6.5 Setting the brewing temperature ....................................................................46
6.6 Service mode 2 ........................................................................................................46

32
GB
Table of contents
6.7 Resetting the appliance to the factory settings .......................................... 47
6.8 Setting the grinding neness ............................................................................47
7 Care and maintenance ....................................................................................................47
7.1 General cleaning.....................................................................................................48
7.2 Cleaning the Cappuccinatore ............................................................................48
7.3 Cleaning the brewing unit ..................................................................................48
7.4 Running the cleaning programme ..................................................................49
7.5 Running the descaling programme ................................................................50
7.6 Using a water lter .................................................................................................52
8 Transport, storage and disposal .................................................................................54
8.1 Venting the appliance ..........................................................................................54
8.2 Transporting the appliance ................................................................................55
8.3 Disposing of the appliance .................................................................................55
9 Technical data .....................................................................................................................55
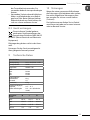
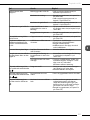
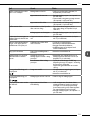
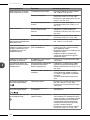
10 Trouble shooting ...............................................................................................................56

Overview of the appliance
33
GB
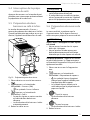
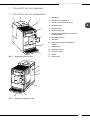
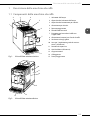
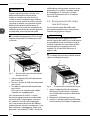
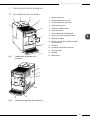
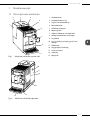
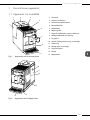
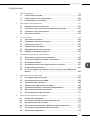
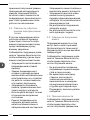
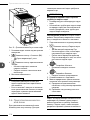
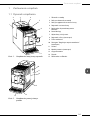
1 Overview of the appliance
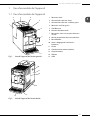
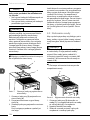
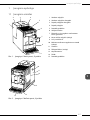
1.1 Appliance at a glance
1
3
4
5
6
7
8
9
2
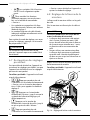
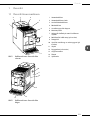
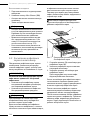
Fig. 1: Front left of the appliance
11
12
13
15
14
10
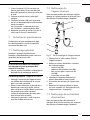
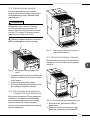
Fig. 2: Front right of the appliance
1 Water tank
2 Water tank lid
3 Lid of the bean container
4 Bean container
5 Cup rest
6 Control panel
7 Outlet with 2 coee nozzles for coee
beverages
8 Coee grounds container (inner)
9 Drip tray
10 "Grinding neness adjustment" lever
(inner)
11 Cover
12 Brewing unit (inner)
13 Cappuccinatore
14 Float
15 Cup plate

Overview of the appliance
34
GB
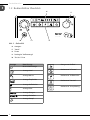
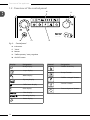
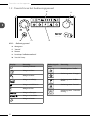
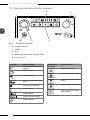
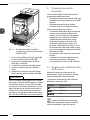
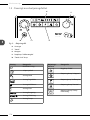
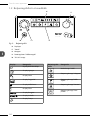
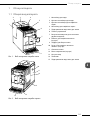
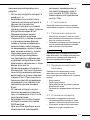
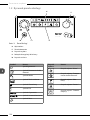
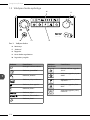
1.2 Overview of the control panel
18
17
16
1920
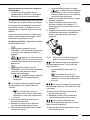
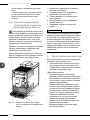
Fig. 3: Control panel
16 Indications
17 "Valve"
18 Buttons
19 "Coee quantity" rotary regulator
20 ON/OFF button
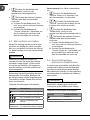
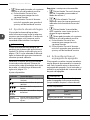
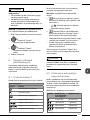
Display Designation
Ready display
2 cups display
Water display
Drip tray display
Coee beans display
Filter display
Clean display
Descaling display
Steam display
Control Designation
"Coee" direct key
"2cups" button
"Coees strength" button
"Service" button
"Steam dispenser" button

For your safety
35
GB
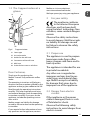
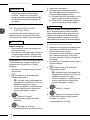
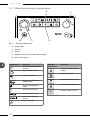
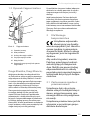
1.3 The Cappuccinatore at a
glance
22
21
23
24
25
26
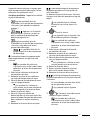
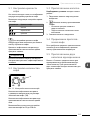
Fig. 4: Cappuccinatore
21 Steam pipe
22 Air intake nozzle
23 Holder for the milk hose
24 Connection of the milk hose
25 Milk hose
26 Outlet for hot water or milk foam
Dear Customer,
Thank your for purchasing the
Melitta® Avanza® fully automatic coee
maker.
The operating instructions will help you
discover the diverse options oered by the
appliance and enjoy your coee to the full.
Read through the operating instructions
carefully. This helps avoid personal injury
and material damage. Store the operating
instructions carefully. If you pass on the
appliance, include the operating instruc-
tions with it.
Melitta accepts no liability for damage
caused by failure to observe the operating
instructions.
If you require further information or have
any questions on the appliance, contact
Melitta or visit our website at:
www.international.melitta.de/
We hope you enjoy using your appliance.
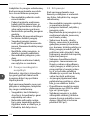
2 For your safety
The appliance conforms
to the relevant European
directives and has been built
using the latest technology. Nev-
ertheless, some residual dangers
remain.
Observe the safety instructions
to avoid dangers. Melitta accepts
no liability for damage caused
by failure to observe the safety
instructions.
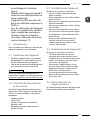
2.1 Proper use
The appliance is used to prepare
beverages made from coee
beans, prepare milk foam and to
heat up water.
The appliance is intended for use
in private households.
Any other use is regarded as
improper and may lead to per-
sonal injury and material dam-
age. Melitta accepts no liability
for damage that arises due to
improper use of the appliance.
2.2 Danger from electric
current
If the appliance or the power
cable is damaged, there is a risk
of fatal electric shock.
Observe the following safety
instructions to avoid danger from
electric current:

For your safety
36
GB
Do not use a damaged power
cable.
A damaged power cable may
only be replaced by the manu-
facturer or its customer service
or service partner.
Do not open any covers rmly
screwed onto the appliance
housing.
Only use the appliance when
it is in a technically awless
condition.
A defective appliance may
only be repaired by an author-
ised workshop. Do not repair
the appliance yourself.
Do not make any changes to
the appliance, its components
or its accessories.
Do not immerse the appliance
in water.
Do not let the power cable
come into contact with water.
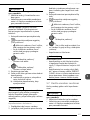
2.3 Risk of burns and scalds
Escaping uids and steam may
be very hot. Parts of the appli-
ance can also become very hot.
Observe the following safety
instructions to avoid scalds and
burns:
Avoid escaping uids and
steam coming into contact
with the skin.
Do not touch the nozzles on
the outlet and the steam pipe
during and immediately after
dispensing a beverage. Wait
until the components have
cooled down.
2.4 Other dangers
Observe the following safety
instructions to avoid personal
injury and material damage:
Do not operate the appliance
in a cabinet or similar.
Do not reach into the interior
of the appliance during oper-
ation.
Keep the appliance and its
power cable out of the reach
of children under 8years of
age.
This appliance may be used
by children over 8 years of age
and by persons with reduced
physical, sensory or mental
capabilities or a lack of expe-
rience and knowledge if they
are supervised or have been
instructed in using the appli-
ance safely and understand
the resulting risks.
Children must not play with
the appliance. Cleaning
and maintenance must not
be undertaken by children
younger than 8 years of age.
Children over 8years of age
must be supervised during
cleaning and maintenance.
Disconnect the appliance from
the power supply when left
unsupervised for a long time.
The appliance must not be
operated at altitudes over
2000m.
Please observe the instructions
in the corresponding section
when cleaning the appliance
and its components (Care and
maintenance on page47).

First steps
37
GB
3 First steps
This chapter describes how to prepare
your appliance for use.
3.1 Unpacking the appliance
Unpack the appliance. Remove the
packaging material, the adhesive
strips and the protective lms from the
appliance.
Keep the packaging material for trans-
port and any return shipments.
Information
The appliance may contain traces of coee
and water. The appliance has been tested
in the factory to ensure that it functions
perfectly.
3.2 Checking the delivery
contents
Check the completeness of delivery using
the following list. If parts are missing,
contact your retailer.
Cappuccinatore
Milk hose
Screw-in aid for the water lter
Test strip for determining the water
hardness.
3.3 Installing the appliance
Observe the following instructions:
Do not install the appliance in damp
rooms.
Install the appliance on a stable, at
and dry surface.
Do not install the appliance in the vicin-
ity of sinks or the like.
Do not install the appliance on hot
surfaces.
Install the appliance at a sucient
distance (approx. 10cm) from the wall
and other objects. The space above the
appliance should be at least 20cm.
Route the power cable so it cannot be
damaged by edges or hot surfaces.
3.4 Connecting the appliance
Observe the following instructions:
Check that the supply voltage matches
the operating voltage specied in the
technical data (see tableTechnical data
on page55).
Only connect the appliance to a prop-
erly installed earthing contact socket. If
in doubt, consult a specialist electrician.
The earthing contact socket must have
a fuse of at least 10 A.
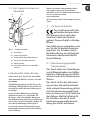
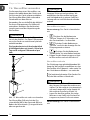
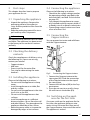
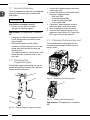
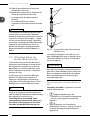
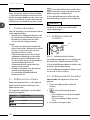
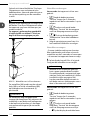
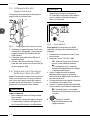
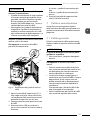
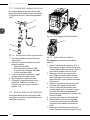
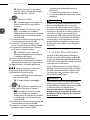
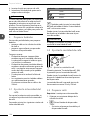
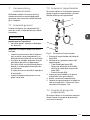
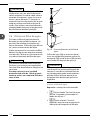
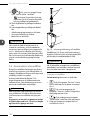
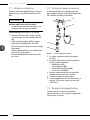
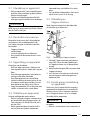
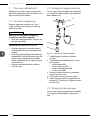
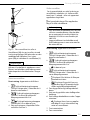
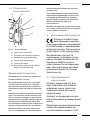
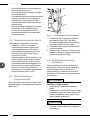
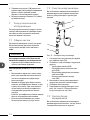
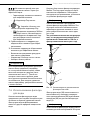
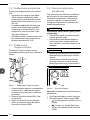
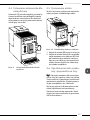
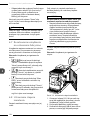
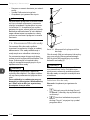
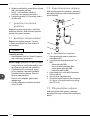
3.5 Connecting the
Cappuccinatore
You can prepare hot water and milk foam
with the Cappuccinatore.
23
25
21
Fig. 5: Connecting the Cappuccinatore
1. Connect the Cappuccinatore to the
steam pipe(21). Slide the connection
of the Cappuccinatore to the stop of
the steam pipe.
2. Connect the milk hose(25) to the Cap-
puccinatore.
3. If you do not want to use milk, clamp
the milk hose in the holder(23).
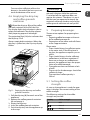
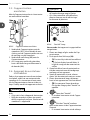
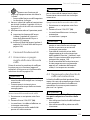
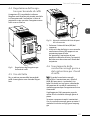
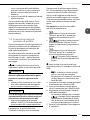
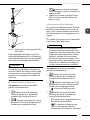
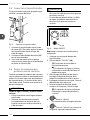
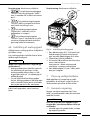
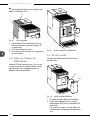
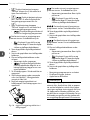
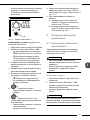
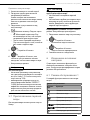
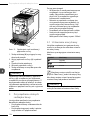
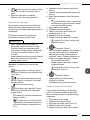
3.6 Switching on the appli-
ance for the rst time
Once you switch on the appliance for the
rst time, the appliance performs auto-
matic rinsing. Hot water rst ows out of
the Cappuccinatore, then out of the outlet.
The appliance is vented.

Basic operation
38
GB
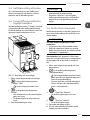
CAUTION
Hot water and hot steam owing out of
the pipe
Do not reach into the outowing hot
water.
Do not touch the steam pipe during
and immediately after use. Wait until
the steam pipe has cooled down.
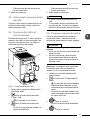
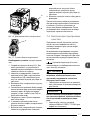
Information
We recommend pouring away the rst
two cups of coee after initial start-up.
If you want to use a water lter, only
insert this after starting up for the rst
time.
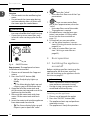
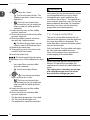
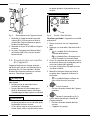
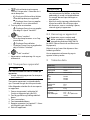
20
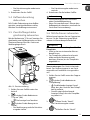
Fig. 6: ON/OFF button
Requirement: The appliance has been
installed and connected.
1. Place a vessel beneath the Cappucci-
natore.
2. Press the ON/OFF button (20).
» The Ready display lights up
briey.
» The Water display lights up and
requests you to ll the water tank.
3. Open the lid of the water tank and
pull the water tank upwards out of the
appliance by the handle.
4. Rinse out the water tank with clean
water. Fill the water tank with fresh
water.
5. Insert the water tank into the appliance
from above and close the lid.
» The Steam display lights up and
requests you to open the "valve".
6. Open the "valve".
» Hot water rst ows out of the Cap-
puccinatore.
7. Once no more water ows
out of the Cappuccinatore, close the
"valve".
» Hot water ows out of the outlet.
» The appliance is vented.
8. Fill coee beans into the bean con-
tainer (see section4.3 Filling coee
beans into the bean container on
page11).
9. As required, you can now either
a) set the water hardness (see sec-
tion6.3 Setting the water hardness on
page45) or
b) screw in a water lter (see sec-
tion7.6 Using a water lter on
page52).
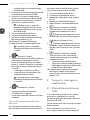
4 Basic operation
4.1 Switching the appliance
on and o
Before switching on after starting up the
appliance for the rst time, read sec-
tion3.6 Switching on the appliance for the
rst time on page37.
Information
When switched on and o, the appli-
ance performs automatic rinsing.
During rinsing, rinsing water is also
conducted into the drip tray.
Switching on the appliance
1. Place a vessel beneath the outlet.
2. Press the "ON/OFF" button (20).
» The appliance heats up and performs
automatic rinsing.
» The appliance is ready for operation.

Basic operation
39
GB
Information
If the appliance was only switched o
briey, there is no automatic rinsing after
switching on.
Switching o the appliance
1. Place a vessel beneath the outlet.
2. Press the "ON/OFF" button (20).
» The appliance performs automatic
rinsing.
» The appliance switches o.
Information
The appliance switches o automati-
cally when it is not operated for a long
time. Automatic rinsing is also carried
out in this case.
You can set the o time in Service
mode1 (see section6.2 Setting Auto
OFF on page44).
If no beverage has been prepared since
switching on or if the water tank is
empty, no rinsing takes place.
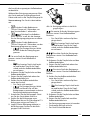
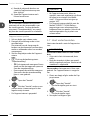
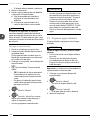
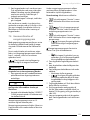
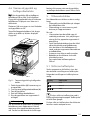
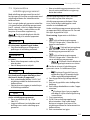
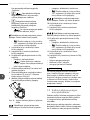
4.2 Filling coee beans into
the bean container
Roasted coee beans lose their aroma.
Only ll the bean container with as many
coee beans as you will consume over the
next 3 to 4days.
ATTENTION
The use of unsuitable types of coee can
lead to clogging of the grinder.
Do not use freeze-dried or caramelised
coee beans.
Do not use any coee powder or
instant products.
Information
When changing the type of beans, remains
of the old type of beans can still be in the
grinder.
Even if the bean container runs empty
and a new type of bean is lled in, there
are still remains of the old type of bean in
the grinder. For this reason, the rst two
coees dispensed can contain remains of
the old type of bean.
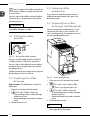
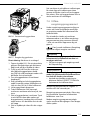
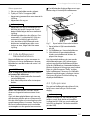
The ashing Coee bean display
requests you to rell coee beans.
3
4
Fig. 7: Opening the lid of the bean con-
tainer
1. Open the lid (3) of the bean con-
tainer(4).
2. Fill coee beans into the bean con-
tainer.
3. Close the lid of the bean container.
The next time a coee is dispensed, the
display no longer ashes.
If the bean container runs empty during
beverage preparation, output is inter-
rupted and the Coee bean display ashes.
When you ll the bean container with cof-
fee beans, the display will initially continue
to ash. After pressing the "Coee" direct
key, coee beans fall into the grinder.
Coee is prepared and the display stops
ashing. The Ready display and the Coee
beans display light up.

Basic operation
40
GB
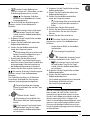
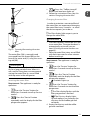
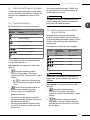
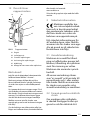
4.3 Filling with water
Only use fresh, cold water without carbon
dioxide for optimum coee enjoyment.
Change the water daily.
Information
The quality of the water largely deter-
mines the avour of the coee. Therefore,
use a water lter (see section6.3 Setting
the water hardness on page45 and sec-
tion7.6 Using a water lter on page52).
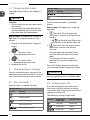
The Water display lights up and
requests you to rell water.
2
1
Fig. 8: Removing the water tank
1. Open the lid(2) of the water tank(1)
and pull the water tank upwards out of
the appliance by the handle.
2. Fill the water tank with water.
3. Insert the water tank into the appliance
from above and close the lid.
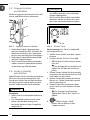
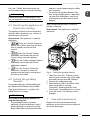
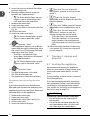
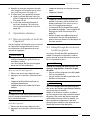
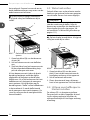
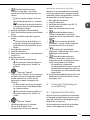
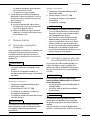
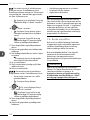
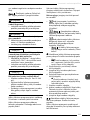
4.4 Adjusting the outlet for
coee beverages
The outlet (7) is height-adjustable. Set the
greatest possible distance between the
outlet and the vessel. Depending on the
vessel, push the outlet up or down.
7
Fig. 9: Adjusting the outlet for coee
beverages
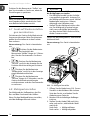
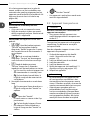
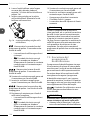
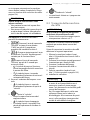
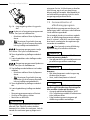
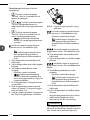
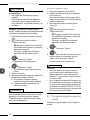
4.5 Using milk
Use cooled milk for optimum coee
enjoyment.
27
25
Fig. 10: Commercial milk pack
1. Remove the milk hose(25) from the
holder.
2. Insert the milk hose into a conventional
milk pack(27) or into a vessel lled
with milk.

Preparing beverages
41
GB
To ensure that sucient milk can be
drawn in, the end of the hose must not
touch the bottom of the vessel.
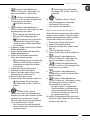
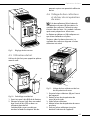
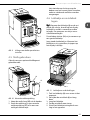
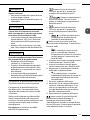
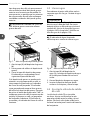
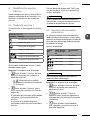
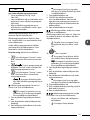
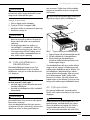
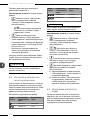
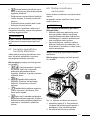
4.6 Emptying the drip tray
and coee grounds
container
When the drip tray(9) and the coee
grounds container(8) are full, the Drip
tray display lights up and requests you to
empty the container The display appears
after preparing approx. 8 beverages.
The projecting oat(14) also indicates that
the drip tray is full.
Always empty both containers. When the
drip tray is pulled out, the Drip tray display
ashes.
9
8
14
Fig. 11: Emptying the drip tray and coee
grounds container
1. Pull the drip tray (9) forwards out of the
appliance.
2. Remove the coee grounds container
(8) and empty it.
3. Empty the drip tray.
4. Insert the coee grounds container.
5. Push the drip tray into the appliance up
to the stop.
Information
If you empty the drip tray and the coee
grounds container while the appliance
is switched o, the appliance does not
register this process. Therefore, it is possi-
ble that you are requested to empty the
containers although the drip tray and the
coee grounds container are not yet full.
5 Preparing beverages
There are two options for preparing bev-
erages:
Preparing coee beverages at the out-
let for coee beverages or
Preparation of hot water and milk foam
at the Cappuccinatore.
Please note:
There should always be sucient water
in the water tank. If the lling level is
too low, the appliance requests you to
rell it.
There should always also be sucient
coee beans in the bean container. If
there are no longer any coee beans
present, the appliance stops the prepa-
ration of a coee beverage.
The appliance does not indicate a lack
of milk.
The vessels for the beverages should be
suciently large.
The maximum coee quantity is
220ml.
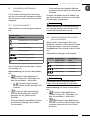
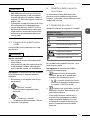
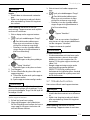
5.1 Setting the coee
strength
As soon as the appliance is ready for oper-
ation, it displays the current setting of the
coee strength.
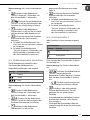
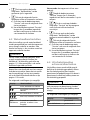
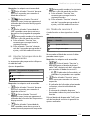
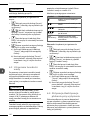
The following settings for the coee
strength are possible:
Display Coee strength
Mild
Normal
Strong

Preparing beverages
42
GB
You can adjust the coee strength by
pressing the "Coee strength" button one
or more times.
You can adjust the coee strength before
the beverage is dispensed or during the
grinding process.
Information
When switching o the appliance, the last
set coee strength is stored.
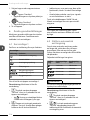
5.2 Setting the coee
quantity
19
Fig. 12: Setting the coee quantity
You can set the coee quantity with the
"Coee quantity"(19) rotary regulator.
You can adjust the coee quantity before
the beverage is dispensed or during the
grinding process.
Coee quantities are continuously adjusta-
ble between 25ml and 220ml.
5.3 Preparing the coee
beverage
Requirement: The appliance is ready for
operation.
1. Place a vessel beneath the outlet.
2. Press the "Coee" direct key.
» The grinding process and beverage
dispensing start.
» Beverage dispensing ends automat-
ically.
3. Remove the vessel.
5.4 Stopping coee
preparation
If you want to stop the preparation of a
coee beverage prematurely, press the
direct key again.
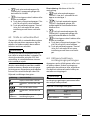
5.5 Preparing two coee
beverages simultaneously
You can prepare two coee drinks simul-
taneously with the "2cups" button. For
two-cup dispensing, the appliance carries
out two grinding processes.
28
Fig. 13: Two-cup dispensing
1. Place two vessels beneath the outlet.
2. Press the"2cups" button(28).
» The 2 cups display lights up.
3. Press the "Coee" direct key.
» The grinding process and beverage
dispensing start.
» Beverage dispensing ends automat-
ically.
4. Remove both vessels.
Information
The setting only applies to the single
beverage that is prepared.

Preparing beverages
43
GB
If a coee beverage is not prepared
within 1 minute, the appliance switches
to single-cup dispensing.
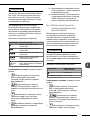
5.6 Preparing milk foam
You prepare milk foam on the Cappuccina-
tore. Steam is required for the preparation
of milk foam.
CAUTION
Outowing steam and hot steam pipe
Do not reach into the steam that is
owing out.
Do not touch the steam pipe during
and immediately after use. Wait until
the steam pipe has cooled down.
Requirement: The appliance is ready
for operation. The Cappuccinatore is
connected to the appliance and milk is
connected.
1. Place a vessel beneath the Cappucci-
natore.
2. Press the "Steam dispenser"
button.
» The ashing Steam display indi-
cates that the appliance is heating
up for the steam dispenser.
» Afterwards, the lit Steam display
indicates that the steam dispenser
is ready.
3. Open the "valve".
» Beverage dispensing starts.
4. Close the "valve".
» Beverage dispensing stops.
5. Remove the vessel.
6. Prepare further beverages or rinse the
Cappuccinatore:
a) Prepare further beverages and rinse
the Cappuccinatore later.
b) Rinse the Cappuccinatore as
described below.
Information
After 30 seconds the appliance automati-
cally switches from steam mode to ready
mode. Press the "Steam dispenser", button
to switch to ready mode beforehand.
Rinsing the Cappuccinatore
1. Fill a vessel with clear water.
2. Immerse the milk hose in the lled
vessel.
To ensure that sucient water can be
drawn in, the end of the hose must not
touch the bottom of the vessel.
3. Place an empty vessel beneath the
Cappuccinatore.
4. Press the "Steam dispenser"
button.
» The ashing Steam display indi-
cates that the appliance is heating
up for the steam dispenser.
» Afterwards, the lit Steam display
indicates that the steam dispenser
is ready.
5. Open the "valve".
6. As soon as a clean water/steam
mixture ows into the empty vessel,
close the "valve".
» The Cappuccinatore is rinsed.
Information
We recommend:
Not only rinsing the Cappuccinatore,
but dismantling and cleaning it at reg-
ular intervals (see section7.2 Cleaning
the Cappuccinatore on page48).
Rinsing the Cappuccinatore each week
with the Melitta® PERFECT CLEAN
milk system cleaning agent for fully
automatic coee makers. Use the milk
system cleaning solution instead of
fresh water.

Changing basic settings
44
GB
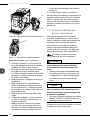
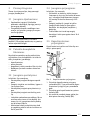
5.7 Preparing hot water
You prepare hot water on the Cappucci-
natore.
CAUTION
Hot water and hot steam owing out of
the pipe
Do not reach into the hot water that is
owing out.
Do not touch the steam pipe during
and immediately after use. Wait until
the steam pipe has cooled down.
Requirement: The appliance is ready for
operation. The Cappuccinatore is con-
nected.
1. Place a vessel beneath the Cappucci-
natore.
2. Open the "valve".
» Beverage dispensing starts.
3. Close the "valve".
» Beverage dispensing stops.
4. Remove the vessel.
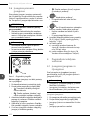
6 Changing basic settings
You can change the basic settings of the
appliance with several functions. The func-
tions are divided into two service modes.
6.1 Service mode 1
Each function is assigned a display.
Service mode 1
Display function
Auto OFF
Water hardness
Switch-o rinsing
Filter programme
Cleaning programme
Service mode 1
Display function
Descaling programme
Brewing temperature
To call up Service mode1, proceed as
follows:
Requirement: The appliance is ready for
operation.
1. Press the "Service" button for
more than 2seconds to call up Service
mode1.
» The Ready display ashes rap-
idly and the 2 cups button lights up.
2. Press the "Service" button one or
more times to access the desired
function.
» A display lights up according to the
function selected, see Service mode1
table.
» The number of lit bean symbols
indicates the current setting of the
function.
Press the "Coee" direct key to exit the
service mode without saving the settings.
Information
If no further input is made within 1min-
ute, the appliance returns to Ready mode.
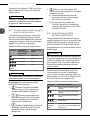
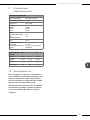
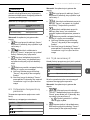
6.2 Setting Auto OFF
If you do not operate the machine for a
long time, it initially switches to energy
save mode. After a further preset time, the
appliance switches o.
The following settings are possible:
Display Energy save
mode after:
Switch o after:
3 minutes 30 minutes
10 minutes 1 hour
20 minutes 4 hours

Changing basic settings
45
GB
Display Energy save
mode after:
Switch o after:
ash
30 minutes 8 hours
Information
Press any button to exit Energy Save
mode.
Requirement: The appliance is ready for
operation.
1. Press the "Service" button for
more than 2seconds to call up Service
mode1.
2. Press the "Service" button
repeatedly until the display for the Auto
O function appears.
3. Press the "Coee strength" button
repeatedly until the desired time is set.
4. You can call up the next function
or exit Service mode:
a) Briey press the "Service" button to
navigate to the next function.
b) Press the "Service" button for more
than 2seconds to save the setting
and exit the service mode.
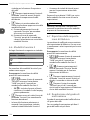
6.3 Setting the water
hardness
Setting the water hardness regulates how
frequently you are requested to descale
the appliance. The harder the water, the
more frequently the appliance has to be
descaled.
Information
Water hardness cannot be set while using
a water lter (see section7.6 Using a water
lter on page52). If a water lter is used,
the water hardness is set to soft.
Determine the water hardness with the
enclosed test strip. Observe the instruc-
tions on the test strip packaging and in the
table Water hardness range on page56.
The following settings are possible:
Display Water hardness
soft, descale after 150litres
medium, descale after 100litres
hard, descale after 70litres
ash
very hard, descale after 30litres
no
coee beans
A water lter is used. No adjust-
ment is possible.
Requirement: The appliance is ready for
operation.
1. Press the "Service" button for
more than 2seconds to call up Service
mode1.
2. Press the "Service" button
repeatedly until the display for the
Water hardness function appears.
3. Press the "Coee strength" button
repeatedly until the desired water
hardness is set.
4. You can call up the next function
or exit Service mode:
a) Briey press the "Service" button to
navigate to the next function.
b) Press the "Service" button for more
than 2seconds to save the setting
and exit the service mode.
6.4 Activating/deactivating
switch-o rinsing
Rinsing is always carried out immediately
after switching on the coee system.
Only switch-o rinsing can be activated
or deactivated. If it is activated, the coee
system is rinsed after being switched o.
Information
We recommend that you do not per-
manently deactivate switch-o rinsing,
because switch-o rinsing cleans the
coee system.

Changing basic settings
46
GB
The following settings are possible:
Display Switch-o rinsing
activated
no coee beans deactivated
Requirement: The appliance is ready for
operation.
1. Press the "Service" button for
more than 2seconds to call up Service
mode1.
2. Press the "Service" button
repeatedly until the display for the
Switch-o rinsing function appears.
3. Press the "Coee strength" button
repeatedly until switch-o rinsing is
activated or deactivated.
4. You can call up the next function
or exit Service mode:
a) Briey press the "Service" button to
navigate to the next function.
b) Press the "Service" button for more
than 2seconds to save the setting
and exit the service mode.
6.5 Setting the brewing
temperature
The brewing temperature inuences the
avour of the coee beverage.
The following settings are possible:
Display Brewing temperature
Low
Medium
High
Requirement: The appliance is ready for
operation.
1. Press the "Service" button for
more than 2seconds to call up Service
mode1.
2. Press the "Service" button
repeatedly until the display for the
Brewing temperature function appears.
3. Press the "Coee strength" button
repeatedly until the desired brewing
temperature is set.
4. You can call up the next function
or exit Service mode:
a) Briey press the "Service" button to
navigate to the next function.
b) Press the "Service" button for more
than 2seconds to save the setting
and exit the service mode.
6.6 Service mode 2
Each function is assigned a display.
Service mode 2
Display function
Factory settings
Venting
To call up Service mode2, proceed as
follows:
Requirement: The appliance is ready for
operation.
1. Press the "Service" button as
well as the "Coee" direct key for more
than 2seconds to enter Service
mode2.
» The Ready display and the 2
cups display ash rapidly.
2. Press the "Service" button one or
more times to access the desired
function.
» A display lights up according to the
function selected, see Service mode2
table.
» The number of lit bean symbols
indicates the current setting of the
function.

Care and maintenance
47
GB
Press the "Coee" direct key to exit the
service mode without saving the settings.
Information
If no further input is made within 1min-
ute, the appliance returns to Ready mode.
6.7 Resetting the appliance to
the factory settings
The appliance can be reset to the factory
settings. When resetting, your settings in
the functions will be lost.
Requirement: The appliance is ready for
operation.
1. Press the "Service" button as
well as the "Coee" direct key for more
than 2seconds to enter Service
mode2.
2. Press the "Service" button
repeatedly until the display for the
Factory settings function appears.
3. Press the "Coee strength" button
repeatedly until the display of one
coee bean appears.
4. Press the "Service" button for
more than 2seconds to reset the
appliance to the factory settings and
exit the service mode.
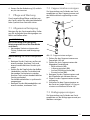
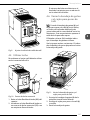
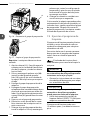
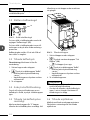
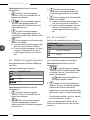
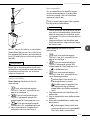
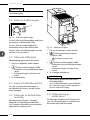
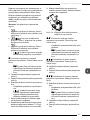
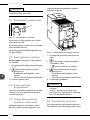
6.8 Setting the grinding
neness
The grinding neness of the coee pow-
der inuences the avour of the coee.
If the grinding neness is set ner, the
coee avour is stronger.
ATTENTION
Very nely ground coee powder can
clog the brewing unit.
The grinding neness has been
optimally set prior to delivery. Adjust
grinding neness at the earliest after
about 100coees are dispensed (after
approx.1month, depending on coee
consumption).
Do not set the grinding neness too
ne. The grinding neness is optimally
set when the coee ows evenly out
of the outlet and a ne, dense crema
appears.
Adjust the grinding neness while the
grinder is running.
Requirement: The appliance is ready for
operation.
11
10
Fig. 14: Setting the grinding neness
1. Open the cover (11). To do this, reach
into the recess on the right of the appli-
ance and pull the cover o sideways.
2. Prepare any coee beverage.
3. Move the lever (10) to the left or right
while the grinder is running.
To the left = grinding neness ner
To the right = grinding neness coarser
4. Insert the cover(11) sideways until it
engages.
7 Care and maintenance
Regular care and maintenance of the
appliance ensure the consistent high qual-
ity of your beverages.

Care and maintenance
48
GB
7.1 General cleaning
Clean the appliance regularly. Immediately
remove external soiling caused by milk
and coee.
ATTENTION
The use of unsuitable cleaning agents
may lead to scratched surfaces.
Do not use any abrasive cloths,
sponges or cleaning agents.
Requirement: The appliance is switched
o.
Clean the outside of the appliance with
a soft, damp cloth and normal wash-
ing-up liquid.
Rinse o the drip tray, the coee
container and the cup plate. Use a soft,
damp cloth and normal washing up
liquid for this.
The coee container is dishwasher-safe.
Clean the bean container with a soft,
dry cloth.
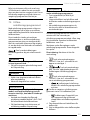
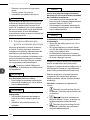
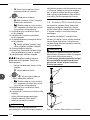
7.2 Cleaning the
Cappuccinatore
To avoid damage to the appliance, we rec-
ommend regularly cleaning the Cappucci-
natore and the milk hose.
21
26
22
25
29
Fig. 15: Dismantling the Cappuccinatore
1. Detach the Cappuccinatore from the
steam pipe(21).
2. Detach the following individual parts
from the Cappuccinatore:
Milk hose(25)
Air intake nozzle(22),
Outlet for milk foam(26)
Insert outlet(29).
3. Clean the Cappuccinatore and the
individual parts with warm water.
4. Re-assemble the Cappuccinatore.
5. Connect the Cappuccinatore to the
appliance (see section3.5 Connecting
the Cappuccinatore on page37).
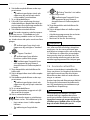
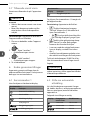
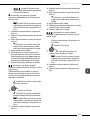
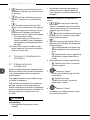
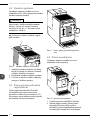
7.3 Cleaning the brewing unit
To avoid damage to the appliance, we
recommend cleaning the brewing unit
once a week.
12
30
Fig. 16: Removing the brewing unit
31
Fig. 17: Cleaning the brewing unit
Requirement: The appliance is switched
o.

Care and maintenance
49
GB
1. Open the cover (11). To do this, reach
into the recess on the right of the appli-
ance and pull the cover o sideways.
2. Press and hold the red lever(30) on the
brewing unit handle(12) and turn the
handle clockwise until it engages at the
stop.
3. Pull the brewing unit out of the appli-
ance by the handle.
4. Rinse the entire brewing unit thor-
oughly from all sides under running
water. In particular, make sure that
coee residues are removed from the
sieve(31).
5. Allow the brewing unit to drip dry.
6. Use a soft, dry cloth to remove coee
residues from the surfaces inside the
appliance.
7. Insert the brewing unit into the appli-
ance. Press and hold the red lever on
the handle of the brewing unit and
turn the handle anticlockwise until it
engages at the stop.
8. To do this, insert the cover sideways
until it engages.
When the appliance is switched on, an
alternating ashing of the Ready display
and the Clean display indicates a missing
brewing unit. After the brewing unit has
been inserted, the appliance switches to
Ready mode.
7.4 Running the cleaning
programme
This cleaning programme is used to
remove residues and coee oil residues
with the aid of fully automatic coee
maker cleaning agents.
To avoid damage to the appliance, we
recommend running the cleaning pro-
gramme every 2 months or as requested
by the appliance.
The Clean display light requests
you to clean the unit.
CAUTION
Contact with fully automatic coee
maker cleaning agent may lead to eye
and skin irritation.
Observe the processing instructions on
the packaging of the fully automatic
coee maker cleaning agent.
ATTENTION
The use of unsuitable fully automatic
coee maker cleaning agent can damage
the appliance.
Only use Melitta® PERFECT CLEAN
cleaning tablets for fully automatic
coee machines.
The cleaning programme takes approx.
15minutes and should not be interrupted.
The cleaning programme runs in several
stages. Progress is indicated by the num-
ber of coee beans displayed.
The appliance performs several rinsing
operations during the cleaning pro-
gramme. The drip tray is also rinsed.
Requirement: The appliance is ready for
operation.
1. Press the "Service" button for
more than 2seconds to call up Service
mode1.
2. Press the "Service" button
repeatedly until the display for the
cleaning programme appears.
3. Press the "Service" button for
more than 2seconds to start the
cleaning programme.
» The Clean display ashes
until the cleaning programme is
nished.
The rst stage of the cleaning pro-
gramme starts. One coee bean lights up.
» The Drip tray display lights
up and requests you to empty the
drip tray and the coee grounds
container.

Care and maintenance
50
GB
4. Empty the drip tray and the coee
grounds container.
5. Insert the drip tray without the coee
grounds container.
6. Place the coee grounds container
beneath the outlet.
» The appliance rinses twice.
» The Clean display ashes
rapidly and requests you to remove
the brewing unit and insert a clean-
ing tablet.
7. Remove the brewing unit. Do not
switch o the appliance.
8. Rinse the brewing unit under running
water (see section7.3 Cleaning the
brewing unit on page48).
9. Place a cleaning tablet in the brewing
unit. Insert the brewing unit into the
appliance.
Fig. 18: Placing a cleaning tablet in the
brewing unit.
The second stage of the cleaning
programme starts. Two coee beans light
up.
» The appliance performs several
rinsing operations.
» The Drip tray display lights
up and requests you to empty the
drip tray and the coee grounds
container.
The third stage of the cleaning
programme starts. Three coee beans light
up.
10. Empty the drip tray and the coee
grounds container.
11. Insert the drip tray without the coee
grounds container.
The fourth stage of the cleaning
programme starts. The three coee beans
ash.
12. Place the coee grounds container
beneath the outlet.
» The appliance performs several
rinsing operations.
» The Drip tray display lights
up and requests you to empty the
drip tray and the coee grounds
container.
13. Empty the drip tray and the coee
grounds container.
14. Insert the drip tray and the coee
grounds container.
» The cleaning programme is nished.
» The Clean display goes out.
» The appliance is ready for operation.
Information
If the cleaning programme has been
interrupted, e.g. because you uninten-
tionally switched o the appliance, you
must switch the appliance on again and
follow the instructions from step 10. The
appliance is then ready for operation, even
if it has not been completely cleaned.
For complete cleaning, you must run the
cleaning programme from the beginning.
7.5 Running the descaling
programme
The descaling programme is used to
remove limescale deposits in the interior
of the appliance with fully automatic
coee maker descaling agents.
To avoid damage to the appliance, we
recommend running the descaling pro-
gramme every 3 months or as requested
by the appliance, unless you regularly use
a water lter.
The Descaling display light
requests you to descale the appliance.
Page is loading ...
Page is loading ...
Page is loading ...
Page is loading ...
Page is loading ...
Page is loading ...
Page is loading ...
Page is loading ...
Page is loading ...
Page is loading ...
Page is loading ...
Page is loading ...
Page is loading ...
Page is loading ...
Page is loading ...
Page is loading ...
Page is loading ...
Page is loading ...
Page is loading ...
Page is loading ...
Page is loading ...
Page is loading ...
Page is loading ...
Page is loading ...
Page is loading ...
Page is loading ...
Page is loading ...
Page is loading ...
Page is loading ...
Page is loading ...
Page is loading ...
Page is loading ...
Page is loading ...
Page is loading ...
Page is loading ...
Page is loading ...
Page is loading ...
Page is loading ...
Page is loading ...
Page is loading ...
Page is loading ...
Page is loading ...
Page is loading ...
Page is loading ...
Page is loading ...
Page is loading ...
Page is loading ...
Page is loading ...
Page is loading ...
Page is loading ...
Page is loading ...
Page is loading ...
Page is loading ...
Page is loading ...
Page is loading ...
Page is loading ...
Page is loading ...
Page is loading ...
Page is loading ...
Page is loading ...
Page is loading ...
Page is loading ...
Page is loading ...
Page is loading ...
Page is loading ...
Page is loading ...
Page is loading ...
Page is loading ...
Page is loading ...
Page is loading ...
Page is loading ...
Page is loading ...
Page is loading ...
Page is loading ...
Page is loading ...
Page is loading ...
Page is loading ...
Page is loading ...
Page is loading ...
Page is loading ...
Page is loading ...
Page is loading ...
Page is loading ...
Page is loading ...
Page is loading ...
Page is loading ...
Page is loading ...
Page is loading ...
Page is loading ...
Page is loading ...
Page is loading ...
Page is loading ...
Page is loading ...
Page is loading ...
Page is loading ...
Page is loading ...
Page is loading ...
Page is loading ...
Page is loading ...
Page is loading ...
Page is loading ...
Page is loading ...
Page is loading ...
Page is loading ...
Page is loading ...
Page is loading ...
Page is loading ...
Page is loading ...
Page is loading ...
Page is loading ...
Page is loading ...
Page is loading ...
Page is loading ...
Page is loading ...
Page is loading ...
Page is loading ...
Page is loading ...
Page is loading ...
Page is loading ...
Page is loading ...
Page is loading ...
Page is loading ...
Page is loading ...
Page is loading ...
Page is loading ...
Page is loading ...
Page is loading ...
Page is loading ...
Page is loading ...
Page is loading ...
Page is loading ...
Page is loading ...
Page is loading ...
Page is loading ...
Page is loading ...
Page is loading ...
Page is loading ...
Page is loading ...
Page is loading ...
Page is loading ...
Page is loading ...
Page is loading ...
Page is loading ...
Page is loading ...
Page is loading ...
Page is loading ...
Page is loading ...
Page is loading ...
Page is loading ...
Page is loading ...
Page is loading ...
Page is loading ...
Page is loading ...
Page is loading ...
Page is loading ...
Page is loading ...
Page is loading ...
Page is loading ...
Page is loading ...
Page is loading ...
Page is loading ...
Page is loading ...
Page is loading ...
Page is loading ...
Page is loading ...
Page is loading ...
Page is loading ...
Page is loading ...
Page is loading ...
Page is loading ...
Page is loading ...
Page is loading ...
Page is loading ...
Page is loading ...
Page is loading ...
Page is loading ...
Page is loading ...
Page is loading ...
Page is loading ...
Page is loading ...
Page is loading ...
Page is loading ...
Page is loading ...
Page is loading ...
Page is loading ...
Page is loading ...
Page is loading ...
Page is loading ...
Page is loading ...
Page is loading ...
Page is loading ...
Page is loading ...
Page is loading ...
Page is loading ...
Page is loading ...
Page is loading ...
Page is loading ...
Page is loading ...
Page is loading ...
Page is loading ...
Page is loading ...
Page is loading ...
Page is loading ...
Page is loading ...
Page is loading ...
Page is loading ...
Page is loading ...
Page is loading ...
Page is loading ...
Page is loading ...
Page is loading ...
Page is loading ...
Page is loading ...
Page is loading ...
Page is loading ...
Page is loading ...
Page is loading ...
Page is loading ...
Page is loading ...
Page is loading ...
Page is loading ...
Page is loading ...
Page is loading ...
Page is loading ...
Page is loading ...
Page is loading ...
Page is loading ...
Page is loading ...
Page is loading ...
Page is loading ...
Page is loading ...
Page is loading ...
Page is loading ...
Page is loading ...
Page is loading ...
Page is loading ...
Page is loading ...
Page is loading ...
Page is loading ...
Page is loading ...
Page is loading ...
Page is loading ...
Page is loading ...
Page is loading ...
Page is loading ...
Page is loading ...
Page is loading ...
Page is loading ...
Page is loading ...
Page is loading ...
Page is loading ...
Page is loading ...
Page is loading ...
Page is loading ...
Page is loading ...
Page is loading ...
Page is loading ...
Page is loading ...
Page is loading ...
Page is loading ...
Page is loading ...
Page is loading ...
Page is loading ...
Page is loading ...
Page is loading ...
Page is loading ...
Page is loading ...
Page is loading ...
Page is loading ...
Page is loading ...
Page is loading ...
Page is loading ...
Page is loading ...
Page is loading ...
Page is loading ...
Page is loading ...
Page is loading ...
Page is loading ...
Page is loading ...
Page is loading ...
Page is loading ...
Page is loading ...
Page is loading ...
Page is loading ...
Page is loading ...
Page is loading ...
Page is loading ...
Page is loading ...
Page is loading ...
Page is loading ...
Page is loading ...
Page is loading ...
Page is loading ...
Page is loading ...
-
 1
1
-
 2
2
-
 3
3
-
 4
4
-
 5
5
-
 6
6
-
 7
7
-
 8
8
-
 9
9
-
 10
10
-
 11
11
-
 12
12
-
 13
13
-
 14
14
-
 15
15
-
 16
16
-
 17
17
-
 18
18
-
 19
19
-
 20
20
-
 21
21
-
 22
22
-
 23
23
-
 24
24
-
 25
25
-
 26
26
-
 27
27
-
 28
28
-
 29
29
-
 30
30
-
 31
31
-
 32
32
-
 33
33
-
 34
34
-
 35
35
-
 36
36
-
 37
37
-
 38
38
-
 39
39
-
 40
40
-
 41
41
-
 42
42
-
 43
43
-
 44
44
-
 45
45
-
 46
46
-
 47
47
-
 48
48
-
 49
49
-
 50
50
-
 51
51
-
 52
52
-
 53
53
-
 54
54
-
 55
55
-
 56
56
-
 57
57
-
 58
58
-
 59
59
-
 60
60
-
 61
61
-
 62
62
-
 63
63
-
 64
64
-
 65
65
-
 66
66
-
 67
67
-
 68
68
-
 69
69
-
 70
70
-
 71
71
-
 72
72
-
 73
73
-
 74
74
-
 75
75
-
 76
76
-
 77
77
-
 78
78
-
 79
79
-
 80
80
-
 81
81
-
 82
82
-
 83
83
-
 84
84
-
 85
85
-
 86
86
-
 87
87
-
 88
88
-
 89
89
-
 90
90
-
 91
91
-
 92
92
-
 93
93
-
 94
94
-
 95
95
-
 96
96
-
 97
97
-
 98
98
-
 99
99
-
 100
100
-
 101
101
-
 102
102
-
 103
103
-
 104
104
-
 105
105
-
 106
106
-
 107
107
-
 108
108
-
 109
109
-
 110
110
-
 111
111
-
 112
112
-
 113
113
-
 114
114
-
 115
115
-
 116
116
-
 117
117
-
 118
118
-
 119
119
-
 120
120
-
 121
121
-
 122
122
-
 123
123
-
 124
124
-
 125
125
-
 126
126
-
 127
127
-
 128
128
-
 129
129
-
 130
130
-
 131
131
-
 132
132
-
 133
133
-
 134
134
-
 135
135
-
 136
136
-
 137
137
-
 138
138
-
 139
139
-
 140
140
-
 141
141
-
 142
142
-
 143
143
-
 144
144
-
 145
145
-
 146
146
-
 147
147
-
 148
148
-
 149
149
-
 150
150
-
 151
151
-
 152
152
-
 153
153
-
 154
154
-
 155
155
-
 156
156
-
 157
157
-
 158
158
-
 159
159
-
 160
160
-
 161
161
-
 162
162
-
 163
163
-
 164
164
-
 165
165
-
 166
166
-
 167
167
-
 168
168
-
 169
169
-
 170
170
-
 171
171
-
 172
172
-
 173
173
-
 174
174
-
 175
175
-
 176
176
-
 177
177
-
 178
178
-
 179
179
-
 180
180
-
 181
181
-
 182
182
-
 183
183
-
 184
184
-
 185
185
-
 186
186
-
 187
187
-
 188
188
-
 189
189
-
 190
190
-
 191
191
-
 192
192
-
 193
193
-
 194
194
-
 195
195
-
 196
196
-
 197
197
-
 198
198
-
 199
199
-
 200
200
-
 201
201
-
 202
202
-
 203
203
-
 204
204
-
 205
205
-
 206
206
-
 207
207
-
 208
208
-
 209
209
-
 210
210
-
 211
211
-
 212
212
-
 213
213
-
 214
214
-
 215
215
-
 216
216
-
 217
217
-
 218
218
-
 219
219
-
 220
220
-
 221
221
-
 222
222
-
 223
223
-
 224
224
-
 225
225
-
 226
226
-
 227
227
-
 228
228
-
 229
229
-
 230
230
-
 231
231
-
 232
232
-
 233
233
-
 234
234
-
 235
235
-
 236
236
-
 237
237
-
 238
238
-
 239
239
-
 240
240
-
 241
241
-
 242
242
-
 243
243
-
 244
244
-
 245
245
-
 246
246
-
 247
247
-
 248
248
-
 249
249
-
 250
250
-
 251
251
-
 252
252
-
 253
253
-
 254
254
-
 255
255
-
 256
256
-
 257
257
-
 258
258
-
 259
259
-
 260
260
-
 261
261
-
 262
262
-
 263
263
-
 264
264
-
 265
265
-
 266
266
-
 267
267
-
 268
268
-
 269
269
-
 270
270
-
 271
271
-
 272
272
-
 273
273
-
 274
274
-
 275
275
-
 276
276
-
 277
277
-
 278
278
-
 279
279
-
 280
280
-
 281
281
-
 282
282
-
 283
283
-
 284
284
-
 285
285
-
 286
286
-
 287
287
-
 288
288
-
 289
289
-
 290
290
-
 291
291
-
 292
292
-
 293
293
-
 294
294
-
 295
295
-
 296
296
-
 297
297
-
 298
298
-
 299
299
-
 300
300
-
 301
301
-
 302
302
-
 303
303
-
 304
304
-
 305
305
-
 306
306
-
 307
307
-
 308
308
-
 309
309
-
 310
310
-
 311
311
-
 312
312
-
 313
313
-
 314
314
-
 315
315
-
 316
316
-
 317
317
-
 318
318
-
 319
319
-
 320
320
-
 321
321
-
 322
322
-
 323
323
-
 324
324
-
 325
325
-
 326
326
-
 327
327
-
 328
328
-
 329
329
-
 330
330
-
 331
331
-
 332
332
-
 333
333
-
 334
334
-
 335
335
-
 336
336
-
 337
337
-
 338
338
-
 339
339
-
 340
340
-
 341
341
-
 342
342
-
 343
343
-
 344
344


Melitta Avanza® series 600 Owner's manual
- Category
- Coffee makers
- Type
- Owner's manual
- This manual is also suitable for
Ask a question and I''ll find the answer in the document
Finding information in a document is now easier with AI
in other languages
- italiano: Melitta Avanza® series 600 Manuale del proprietario
- français: Melitta Avanza® series 600 Le manuel du propriétaire
- español: Melitta Avanza® series 600 El manual del propietario
- Deutsch: Melitta Avanza® series 600 Bedienungsanleitung
- русский: Melitta Avanza® series 600 Инструкция по применению
- Nederlands: Melitta Avanza® series 600 de handleiding
- dansk: Melitta Avanza® series 600 Brugervejledning
- polski: Melitta Avanza® series 600 Instrukcja obsługi
- svenska: Melitta Avanza® series 600 Bruksanvisning
Related papers
-
Melitta CAFFEO® Varianza® CSP Export Operating instructions
-
Melitta Purista Argent F230-101 Owner's manual
-
-
-
-
-
-
-
-
Other documents
-
Saeco CA6801/00 User manual
-
Amica CT 5012 User manual
-
 Chef Matteo MULINO KAFFEMASKIN User manual
-
Neff c77v60n01 Owner's manual
-
Neff HNF9101 User manual
-
-
Bosch TES51551DE/01 Owner's manual
-
-
Electrolux ECS5200 User manual
-
Siemens TE515509DE User manual
