Garmin echoMAP 74dv Installation guide

Category
Measuring, testing & control
Type
Installation guide
Transom-Mount Transducer Installation Instructions......................................................................... 2
Instructions d'installation de la sonde avec montage sur tableau arrière...........................................5
Istruzioni di installazione del trasduttore di poppa............................................................................. 8
Schwinger für die Heckspiegelmontage – Installationsanweisungen.............................................. 11
Instrucciones de instalación del transductor de montaje en espejo de popa...................................14
Instruções de instalação do transdutor com suporte para painel de popa...................................... 17
Installatie-instructies voor transducer met spiegelmontage............................................................. 20
Installationsvejledning til agterspejlsmonteret transducer................................................................23
Peräpeiliin kiinnitettävän kaikuanturin asennusohjeet..................................................................... 26
Installeringsinstruksjoner for hekkmontert svinger........................................................................... 29
Akterspegelmonterad givare – installationsinstruktioner..................................................................32
Instrukcja instalacji przetwornika na pawęży................................................................................... 35
Pokyny pro instalaci sonarové sondy připevněné k záďové stěně.................................................. 38
Upute za montažu sonde na krmenom zrcalu................................................................................. 41
艉舷板上的转换器安装说明.............................................................................................................. 44
Garmin
®
and the Garmin logo are trademarks of Garmin Ltd. or its subsidiaries, registered in the USA and other countries. These trademarks may not be used without the express permission of Garmin.
November 2014 190-01850-87_0APrinted in Taiwan
Transom-Mount Transducer
Installation Instructions
To obtain the best performance and to avoid damage to your
boat, you must install the Garmin
®
transducer according to these
instructions.
Read all installation instructions before proceeding with the
installation. If you experience difficulty during the installation,
contact Garmin Product Support.
Registering Your Device
Help us better support you by completing our online registration
today.
Go to http://my.garmin.com.
Keep the original sales receipt, or a photocopy, in a safe
place.
Contacting Garmin Product Support
Go to www.garmin.com/support for in-country support
information.
In the USA, call 913-397-8200 or 1-800-800-1020.
In the UK, call 0808 238 0000.
In Europe, call +44 (0) 870 850 1241.
Important Safety Information
WARNING
See the Important Safety and Product Information guide in the
product box for product warnings and other important
information.
You are responsible for the safe and prudent operation of your
vessel. Sonar is a tool that enhances your awareness of the
water beneath your boat. It does not relieve you of the
responsibility of observing the water around your boat as you
navigate.
CAUTION
Failure to install and maintain this equipment in accordance with
these instructions could result in damage or injury.
Always wear safety goggles, ear protection, and a dust mask
when drilling, cutting, or sanding.
NOTICE
When drilling or cutting, always check what is on the opposite
side of the surface.
This equipment must be installed by a qualified marine installer.
Loading the New Software on a Memory
Card
You must copy the software update to a memory card.
1
Insert a memory card into the card slot on the computer.
2
Go to www.garmin.com/support/software/marine.html.
3
Select Download next to “Garmin Marine Network with SD
card”.
4
Read and agree to the terms.
5
Select Download.
6
If necessary, select Run or save and open the file.
7
If necessary, select the drive associated with the memory
card, and select Next > Finish.
Updating the Device Software
Before you can update the software, you must obtain a
software-update memory card or load the latest software onto a
memory card.
1
Turn on the chartplotter.
2
After the home screen appears, insert the memory card into
the card slot.
NOTE: In order for the software update instructions to
appear, the device must be fully booted before the card is
inserted.
3
Follow the on-screen instructions.
4
Wait several minutes while the software update process
completes.
The device returns to normal operation after the software
update process is complete.
5
Remove the memory card.
NOTE: If the memory card is removed before the device
restarts fully, the software update is not complete.
Tools Needed
Drill and drill bits
Two 13 mm hex wrenches
Number 2 Phillips screwdriver
Masking tape
Marine sealant
About the Transducer
The transducer transmits and receives sound waves through the
water, and relays sound-wave information to your Garmin sonar
device.
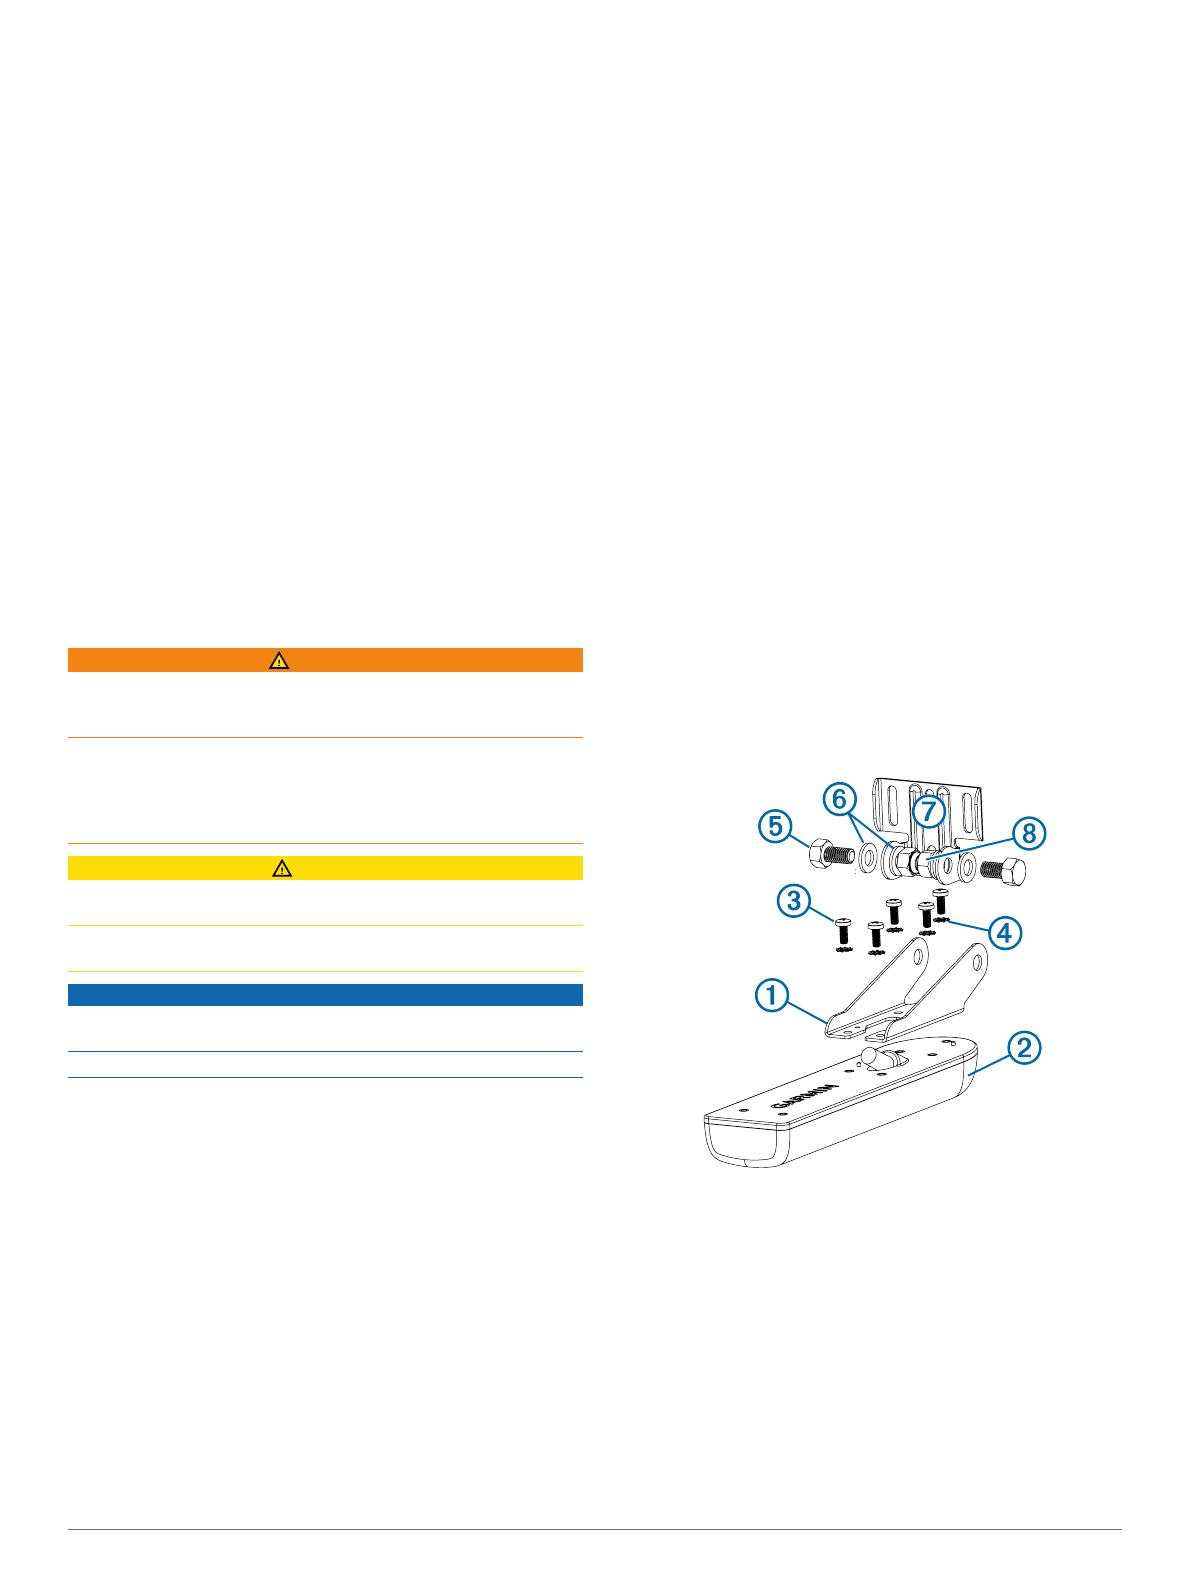
Assembling the Transducer
1
Attach the mount
À
to the transducer
Á
with the included
8 mm M4 screws
Â
, and 4 mm star washers
Ã
.
2
Attach the mount to the bracket
Æ
with the included 16 mm
M8 screws
Ä
, M8 flat washers
Å
, and M8 lock nuts
Ç
.
Installing the Transducer on a Transom
Mounting Location Considerations
The transducer should be mounted as close to the center of
the boat as possible.
The transducer should not be mounted behind strakes, struts,
fittings, water intake or discharge ports, or anything that
creates air bubbles or causes the water to become turbulent.
The transducer must be in clean (non-turbulent) water for
optimal performance.
The transducer should not be mounted in a location where it
might be jarred when launching, hauling, or storing.
2
On single-drive boats, the transducer must not be mounted in
the path of the propeller.
The transducer can cause cavitation that can degrade the
performance of the boat and damage the propeller.
On twin-drive boats, the transducer should be mounted
between the drives, if possible.
Installing the Transom-Mount Hardware
NOTICE
If you are mounting the bracket on fiberglass with screws, it is
recommended to use a countersink bit to drill a clearance
counterbore through only the top gel-coat layer. This will help to
avoid any cracking in the gel-coat layer when the screws are
tightened.
The cables connected to the transducer should not be cut,
because cutting the transducer cables voids your warranty.
1
Position the transducer mount
À
so the center of the bottom
of the transducer is level with the bottom edge of the transom
and is parallel to the water line.
2
Align the transducer parallel to the water line
Á
, and mark the
center location of the two outer holes and the center hole of
the transducer mount.
3
Wrap a piece of tape around a 4 mm (
5
/
32
in.) bit at 15 mm
(
19
/
32
in.) from the point of the bit, to avoid drilling the pilot
holes too deep.
4
If you are installing the bracket on fiberglass, place a piece of
tape over the pilot-hole location to reduce cracking of the gel
coat.
5
Using the 4 mm (
5
/
32
in.) bit, drill the pilot holes approximately
15 mm (
19
/
32
in.) deep at the marked locations.
6
Apply marine sealant to the included 20 mm screws, and
attach the transducer assembly to the transom.
NOTE: A third screw in the lower center screw hole stabilizes
the mount.
7
If you must route the cable through the transom, choose a
pilot-hole location well above the waterline
Ã
and mark it.
8
Place a cable clamp on the transducer cable
Ä
,
approximately one third of the distance between the
transducer and the top of the transom or the pilot hole.
9
Mark the pilot-hole location for the cable clamp, and using a
3.2 mm (
1
/
8
in.) bit, drill a pilot hole approximately 10 mm
(
3
/
8
in.) deep.
10
Apply marine sealant to the included 12 mm screw, and
attach the cable clamp to the transom.
11
Repeat steps 10–12 to install the other cable clamp
approximately two thirds of the distance between the
transducer and the top of the transom or the pilot hole.
12
If you marked a pilot hole in step 9, use a 25 mm (1 in.) drill
bit to drill a pass-through hole completely through the
transom.
13
Route the transducer cable to the sounder:
If you are routing the cable using a pass-through hole,
feed it through the hole you drilled in step 14, and install
the cable-entry cover
Ã
.
If you are not routing the cable using a pass-through hole,
route the cable up and over the top of the transom
Å
.
Avoid routing the cable close to electrical wires or other
sources of electrical interference.
Installing the Cable-Entry Cover
If you routed the cable through the transom after you installed
the transducer, you should install the cable-entry cover to keep
water from entering your boat.
1
Place the cable-entry cover
À
over the hole and the cable,
with the opening pointing downward, and mark the location of
the two pilot holes.
2
Remove the cable-entry cover, and, using a 3.2 mm (
1
/
8
in.)
bit, drill the pilot holes approximately 10 mm (
3
/
8
in.) deep.
3
Fill the pass-through hole with marine sealant so it covers the
cable completely and there is excess sealant around the hole
and the cable.
4
Place the cable-entry cover over the hole and the cable, with
the opening pointing downward.
3
5
Apply marine sealant to the included 12 mm M4 screws, and
attach the cable-entry cover to the transom.
6
Wipe away all excess marine sealant.
Testing the Installation
NOTICE
You should check your boat for leaks before you leave it in the
water for an extended period of time.
Because water is necessary to carry the sonar signal, the
transducer must be in the water to work properly. You cannot
get a depth or distance reading when out of the water. When
you place your boat in the water, check for leaks around any
screw holes that were added below the water line.
Testing the Transom-Mount Transducer Installation
NOTICE
When adjusting the depth of the transducer, make the
adjustments in small increments. Placing the transducer too
deep can adversely affect the performance of the boat and put
the transducer at risk of striking underwater objects.
Test the transom-mount transducer installation in open water
free of obstacles. Pay attention to your surroundings as you test
the transducer.
1
With the boat in the water, turn on the chartplotter.
2
Drive the boat at a slow speed. If the chartplotter appears to
be working properly, gradually increase speed while
observing the chartplotter.
3
If the sonar signal is suddenly lost or the bottom return is
severely degraded, note the speed at which this occurs.
4
Return the boat to the speed at which the signal was lost,
and make moderate turns in both directions while observing
the chartplotter.
5
If the signal strength improves while turning, adjust the
transducer so that it extends another
1
/
8
in. (3 mm) below the
transom of the boat.
6
Repeat steps 2–4 until the degradation is eliminated.
7
If the signal does not improve, move the transducer to a
different location on the transom, and repeat the test.
4
© 2014 Garmin Ltd. or its subsidiaries www.garmin.com/support
  • Page 1 1
  • Page 2 2
  • Page 3 3
  • Page 4 4
  • Page 5 5
  • Page 6 6
  • Page 7 7
  • Page 8 8
  • Page 9 9
  • Page 10 10
  • Page 11 11
  • Page 12 12
  • Page 13 13
  • Page 14 14
  • Page 15 15
  • Page 16 16
  • Page 17 17
  • Page 18 18
  • Page 19 19
  • Page 20 20
  • Page 21 21
  • Page 22 22
  • Page 23 23
  • Page 24 24
  • Page 25 25
  • Page 26 26
  • Page 27 27
  • Page 28 28
  • Page 29 29
  • Page 30 30
  • Page 31 31
  • Page 32 32
  • Page 33 33
  • Page 34 34
  • Page 35 35
  • Page 36 36
  • Page 37 37
  • Page 38 38
  • Page 39 39
  • Page 40 40
  • Page 41 41
  • Page 42 42
  • Page 43 43
  • Page 44 44
  • Page 45 45
  • Page 46 46

Garmin echoMAP 74dv Installation guide

Category
Measuring, testing & control
Type
Installation guide

Ask a question and I''ll find the answer in the document

Finding information in a document is now easier with AI