
D01278500B
iXR
USB Audio/MIDI Interface
ENGLISH
FRANÇAIS
ESPAÑOL
DEUTSCH
ITALIANO
日本語
OWNER'S MANUAL
MODE D’EMPLOI
MANUAL DEL USUARIO
BEDIENUNGSANLEITUNG
MANUALE DI ISTRUZIONI
取扱説明書

2
TASCAM iXR
http://tascam.jp/
〒206-8530 東京都多摩市落合1-47
TEAC AMERICA, INC.
http://tascam.com/
Phone: +1-323-726-0303
1834 Gage Road, Montebello, California 90640
USA
TEAC MEXICO, S.A. de C.V.
http://teacmexico.net/
Phone: +52-55-5010-6000
Río Churubusco 364, Colonia Del Carmen, Del-
egación Coyoacán, CP 04100, México DF, México
TEAC UK LIMITED
http://tascam.eu/
Phone: +44-8451-302511
2 Huxley Road, Surrey Research Park, Guildford,
GU2 7RE, United Kingdom
TEAC EUROPE GmbH
http://tascam.eu/
Phone: +49-611-71580
Bahnstrasse 12, 65205 Wiesbaden-Erbenheim,
Germany
TEAC SALES & TRADING(SHENZHEN) CO.,
LTD
http://tascam.cn/
Phone: +86-755-88311561~2
Room 817, Block A, Hailrun Complex, 6021 Shen-
nan Blvd., Futian District, Shenzhen 518040, China
• TASCAM is a trademark of TEAC CORPORATION,
registered in the U.S. and other countries.
• Microsoft, Windows and Windows Vista are
either registered trademarks or trademarks of
Microsoft Corporation in the United States and/
or other countries.
• Apple, Mac, Mac OS, OS X, iPad, iPhone, iPod
touch and Lightning are trademarks of Apple
Inc.
• IOS is a trademark or registered trademark of
Cisco in the U.S. and other countries and is used
under license.
• App Store is a service mark of Apple Inc.
• Cubase, Cubasis and VST are registered
trademarks of Steinberg Media Technologies
GmbH.
• ASIO is a trademark of Steinberg Media
Technologies GmbH.
• Blackfin® and the Blackfin logo are registered
trademarks of Analog Devices, Inc.
• Other company names, product names and
logos in this document are the trademarks
or registered trademarks of their respective
owners.

TASCAM iXR
3
Owner's Manual
IMPORTANT SAFETY PRECAUTIONS
INFORMATION TO THE USER
This equipment has been tested and found to comply
with the limits for a Class B digital device, pursuant to
Part 15 of the FCC Rules. These limits are designed to
provide reasonable protection against harmful inter-
ference in a residential installation. This equipment
generates, uses, and can radiate radio frequency
energy and, if not installed and used in accordance
with the instruction manual, may cause harmful
interference to radio communications. However, there
is no guarantee that interference will not occur in a
particular installation. If this equipment does cause
harmful interference to radio or television reception,
which can be determined by turning the equipment
off and on, the user is encouraged to try to correct
the interference by one or more of the following
measures.
a) Reorient or relocate the receiving antenna.
b) Increase the separation between the equipment
and receiver.
c) Connect the equipment into an outlet on a circuit
different from that to which the receiver is connected.
d) Consult the dealer or an experienced radio/TV
technician for help.
CAUTION
Changes or modifications to this equipment not
expressly approved by TEAC CORPORATION for
compliance could void the user’s authority to operate
this equipment.
For U.S.A.
For Canada
THIS CLASS B DIGITAL APPARATUS COMPLIES WITH
CANADIAN ICES-003.
CET APPAREIL NUMERIQUE DE LA CLASSE B EST
CONFORME A LA NORME NMB-003 DU CANADA.
DECLARATION OF CONFORMITY
We, TEAC EUROPE GmbH. Bahnstrasse
12, 65205 Wiesbaden-Erbenheim,
Germany declare in own responsibility,
the TEAC product described in this
manual is in compliance with the corresponding
technical standards.
Declaration of Conformity
Responsible party: TEAC AMERICA, INC.
Address: 1834 Gage Road, Montebello,
California, U.S.A.
Telephone number: 1-323-726-0303
This device complies with Part 15 of the FCC Rules.
Operation is subject to the following two conditions:
(1) this device may not cause harmful interference,
and (2) this device must accept any interference
received, including interference that may cause
undesired operation.
IMPORTANT SAFETY INSTRUCTIONS
1 Read these instructions.
2 Keep these instructions.
3 Heed all warnings.
4 Follow all instructions.
5 Do not use this apparatus near water.
6 Clean only with dry cloth.
7 Do not block any ventilation openings. Install in
accordance with the manufacturer’s instructions.
8 Do not install near any heat sources such as
radiators, heat registers, stoves, or other apparatus
(including amplifiers) that produce heat.
9 Do not defeat the safety purpose of the polarized
or grounding-type plug. A polarized plug has two
blades with one wider than the other. A grounding
type plug has two blades and a third grounding
prong. The wide blade or the third prong are
provided for your safety. If the provided plug does
not fit into your outlet, consult an electrician for
replacement of the obsolete outlet.
10 Protect the power cord from being walked on or
pinched particularly at plugs, convenience recep-
tacles, and the point where they exit from the
apparatus.
11 Only use attachments/accessories specified by the
manufacturer.
12 Use only with the cart, stand,
tripod, bracket, or table
specified by the manufacturer,
or sold with the apparatus.
When a cart is used, use
caution when moving the cart/apparatus combi-
nation to avoid injury from tip-over.
13 Unplug this apparatus during lightning storms or
when unused for long periods of time.
14 Refer all servicing to qualified service personnel.
Servicing is required when the apparatus has been
damaged in any way, such as power-supply cord or
plug is damaged, liquid has been spilled or objects

4
TASCAM iXR
have fallen into the apparatus, the apparatus has
been exposed to rain or moisture, does not operate
normally, or has been dropped.
• The apparatus draws nominal non-operating
power from the AC outlet with its POWER or
STANDBY/ON switch not in the ON position.
• The mains plug is used as the disconnect device,
the disconnect device shall remain readily
operable.
• Caution should be taken when using earphones
or headphones with the product because
excessive sound pressure (volume) from
earphones or headphones can cause hearing
loss.
• If you are experiencing problems with this
product, contact TEAC for a service referral. Do
not use the product until it has been repaired.
CAUTION
• Do not expose this apparatus to drips or
splashes.
• Do not place any objects filled with liquids, such
as vases, on the apparatus.
• Do not install this apparatus in a confined space
such as a book case or similar unit.
• The apparatus should be located close enough
to the AC outlet so that you can easily grasp the
power cord plug at any time.
• If the product uses batteries (including a battery
pack or installed batteries), they should not be
exposed to sunshine, fire or excessive heat.
• CAUTION for products that use replaceable
lithium batteries: there is danger of explosion
if a battery is replaced with an incorrect type
of battery. Replace only with the same or
equivalent type.
8
For European Customers
Disposal of electrical and electronic equipment
(a) All electrical and electronic equipment should be
disposed of separately from the municipal waste
stream via designated collection facilities appointed
by the government or the local authorities.
(b) By disposing of the electrical and electronic
equipment correctly, you will help save valuable
resources and prevent any potential negative
effects on human health and the environment.
(c) Improper disposal of waste equipment can have
serious effects on the environment and human
health as a result of the presence of hazardous
substances in electrical and electronic equipment.
(d) The crossed out wheeled dust bin
symbol indicates that electrical and
electronic equipment must be collected
and disposed of separately from
household waste.
(e) The return and collection systems are available to
the end users. For more detailed information about
disposal of old electrical and electronic equipment,
please contact your city office, waste disposal
service or the shop where you purchased the
equipment.
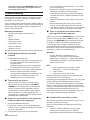
Contents
IMPORTANT SAFETY PRECAUTIONS ..............................3
IMPORTANT SAFETY INSTRUCTIONS .............................3
Introduction ............................................................................5
Note about the Reference Manual. ................................5
Included items .......................................................................5
Precautions for placement and use ...............................5
Beware of condensation ....................................................5
Cleaning the unit ..................................................................5
Names and functions of parts ..........................................6
Front ......................................................................................................6
Rear panel .......................................................................................... 7
Installing the dedicated software ..................................7
Installing the iOS Settings Panel .........................................7
Installing the Windows driver ............................................... 7
Installing the Mac Settings Panel........................................8
Uninstalling the dedicated software ............................9
Uninstalling the iOS Settings Panel ...................................9
Uninstalling the Windows driver ........................................9
Uninstalling the Mac OS Settings Panel ......................... 9
Connecting the power ........................................................9
When using an iOS device ......................................................9
When using a computer (Windows/Mac) .................. 10
Connection illustrations .................................................. 10
Using the USB ports when connecting iOS devices
. 10
Making settings on the Settings Panel screen ....... 10
Adjusting the input sound ............................................. 11
Troubleshooting ................................................................. 12
Specifications ...................................................................... 13
Audio resolution ..........................................................................13
Analog audio input ratings ...................................................13
Analog audio output ratings .............................................. 14
Control input/output ratings ............................................. 14
Audio performance .................................................................. 14
Operation requirements ................................................. 14
iOS devices .....................................................................................14
Windows .......................................................................................... 14
Mac OS ...............................................................................................15
Supported audio/MIDI drivers ............................................15
General................................................................................... 15
Dimensional drawings .....................................................16

TASCAM iXR
5
Introduction
Thank you for your purchase of the iXR USB Audio/
MIDI Interface.
Before using this unit, read this manual carefully so
that you will be able to use it correctly and enjoy
working with it for many years. After you have
finished reading this manual, please keep it in a safe
place for future reference.
You can also download this Owner's Manual from the
TEAC Global Site (http://teac-global.com/).
Should the contents of the memory of a connected
device (including hard disks and optical discs) in
the same system as this unit be lost, our company
will bear no responsibility for repair, including for
compensation.
Before connecting this unit to a computer, you
must download and install dedicated software
on the computer.
This product has a Blackfin® 16/32-bit embedded
processor made by Analog Devices, Inc. This
processor controls digital signal processing.
Inclusion of this Blackfin® processor in the product
increases its performance and reduces its power
consumption.
Note about the Reference Manual.
This Owner's Manual explains the main functions of
this unit. Please see the Reference Manual for infor-
mation about all the unit's functions.
You can download the Reference Manual from the
TEAC Global Site (http://teac-global.com/).
Included items
This product includes the following items.
Keep the packing materials for transportation in the
future.
Please contact TASCAM Customer Support (see back
cover) if any of these items are missing or have been
damaged during transportation.
• Main unit ................................................................... × 1
• USB cable ..................................................................× 1
• Steinberg Cubase LE installation guide ......... × 1
• Owner’s Manual (this document) including
warranty ....................................................................× 1
• Included software (provided by download)
Steinberg Cubase LE
Steinberg Cubasis LE*
* A demo version of Cubasis LE can be
downloaded for free from the App Store.
Connecting the iOS device to this unit will
remove the restrictions of the demo version,
allowing you to use it as a full version of
Cubasis LE.
Precautions for placement and use
• The operating temperature range of this unit is
5–35 °C.
• Do not install this unit in the following types
of locations. Doing so could make the sound
quality worse or cause malfunction.
Places with significant vibrations
Near windows or other places exposed to
direct sunlight
Near heaters or other extremely hot places
Extremely cold places
Places with bad ventilation or high humidity
Very dusty locations
• To enable good heat dissipation, do not place
anything on top of the unit.
• Do not place this unit on top of a power
amplifier or other device that generates heat.
Beware of condensation
Condensation could occur if the unit is moved from
a cold place to a warm place, it is used immediately
after a cold room has been heated or it is otherwise
exposed to a sudden temperature change.
Should this happen, leave the unit for one or two
hours before turning the unit on and using it.
Cleaning the unit
Use a dry soft cloth to wipe the unit clean. Do not
wipe with chemical cleaning cloths, thinner, alcohol
or other chemical agents. Doing so could damage the
surface or cause discoloration.

6
TASCAM iXR
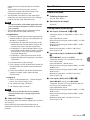
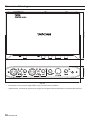
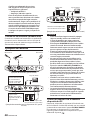
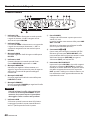
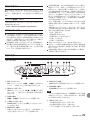
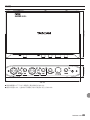
Names and functions of parts
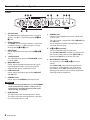
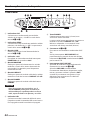
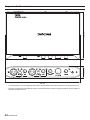
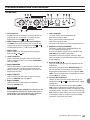
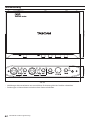
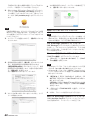
Front
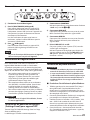
1 SIG indicators
The SIG indicators light green when a signal of
at least −32 dBFS is input through the IN 1/IN
2 jacks.
2 PEAK indicators
The PEAK indicators light red when a signal that
is about to distort (−1 dBFS or higher) is input
through the IN 1/IN 2 jacks.
3 GAIN knobs
Use to adjust the input levels of the IN 1/IN 2
jacks.
4 +48V indicator
This indicator lights when the PHANTOM switch
is set to +48V.
5 MONITOR knob
Use to adjust the balance between the signals
input through the unit's input jacks and the
output of the device connected by USB.
6 LINE OUT knob
Use to adjust the output level of the LINE OUT
1/L-2/R jacks.
7 PHONES knob
Use to adjust the PHONES jack output level.
CAUTION
Before connecting headphones, use the PHONES
knob to minimize the volume. Failure to do so
could result in a sudden loud noise that could
harm hearing, for example.
8 USB indicator
This lights when the USB connection is active.
This blinks when the USB connection is inactive.
It is unlit when the unit is off.
9 PHONES jack
Connect stereo headphones to this stereo mini
(3.5mm) jack.
The same signal is output from the LINE OUT 1/L
and 2/R jacks.
Use an adapter to connect headphones with a
standard (6.3mm) plug.
0 IN 1/IN 2 connectors
These are combo XLR/TRS input jacks.
Use the MIC/LINE INST switches on the front of
the unit to enable balanced line (MIC/LINE) or
unbalanced (INST) input for the TRS jacks.
q MIC/LINE INST switches
Set according to the IN 1/IN 2 jack input
sources.
Set to MIC/LINE when connecting electronic
instruments, audio devices, mics and similar
equipment. Set to INST when connecting an
electric guitar, electric bass or other equipment
with high output impedance.

TASCAM iXR
7
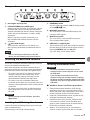
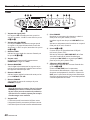
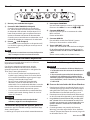
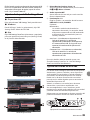
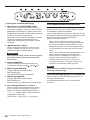
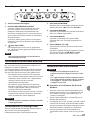
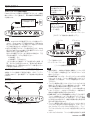
Rear panel
w Kensington Security Slot
e PC/MAC/POWER port (USB B-type)
When using this unit with an iOS device, use the
included USB cable to connect the USB power
adapter included with the iOS device. Doing this
allows this port to function as a power supply
connector.
When using this unit with a computer, use
the included USB cable to connect it to the
computer.
r port (USB-A type)
To connect this unit with an iOS device, use
the Lightning-USB cable included with the iOS
device.
NOTE
This port will not provide power to the iOS
device, nor will it draw power from the device.
t PHANTOM switch
Use this switch to provide +48V phantom power
to the IN 1/IN 2 jacks.
y MIDI OUT connector
This 5-pin DIN is a standard MIDI output jack.
It outputs MIDI signals.
u MIDI IN connector
This 5-pin DIN is a standard MIDI input jack.
Use it to input MIDI signals.
i LINE OUT 1/L and 2/R jacks
These standard TRS jacks are analog line outputs.
Use the Settings Panel to set the signals output
from the LINE OUT 1/L and 2/R jacks.
(Tip: HOT, Ring: COLD, Sleeve: GND)
Installing the dedicated software
To use this unit with a computer, dedicated software
must be installed on the computer.
With some exceptions, the latest software for the
operating system you are using can be downloaded
from the TEAC Global Site (http://teac-global.com/).
• To use this unit with an iOS device, install the
Settings Panel app. The standard iOS driver
will be used. The Settings Panel app can be
downloaded for free from the App Store.
• To use this unit with a Windows computer,
install the driver. When you install the driver, the
Settings Panel application will be installed at the
same time.
• To use this unit with a Mac, install the Settings
Panel application. The standard OS driver will
be used.
CAUTION
Before starting to install software, quit other
applications.
Installing the iOS Settings Panel
Find the TASCAM iXR Settings Panel app on the App
Store and download it.
Downloading it will install it automatically.
Installing the Windows driver
CAUTION
• Complete installation of the driver on the
computer before connecting the unit to it with
the USB cable.
• If you already connected the unit to the
computer using the USB cable before installing
the driver and the Found New Hardware Wizard
launched, close the message and disconnect the
USB cable.
8
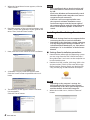
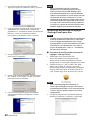
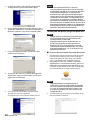
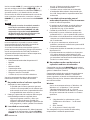
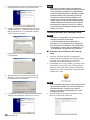
Windows driver installation procedures
1. Download the latest Windows driver for the
operating system you are using from the TEAC
Global Site (http://teac-global.com/) and save it
on the computer to be used with the unit.
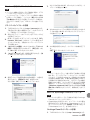
2. Open the saved Windows driver (zip file) on, for
example, the computer desktop.
3. Double-click the “iXR_Installer_XXX.exe” (XXX
is the version number), file in the folder that
appears after uncompression to automatically
launch the installation software.
4. When a “Security Warning” or “User Account
Control” screens appear, click the “Yes” button.

8
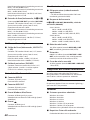
TASCAM iXR
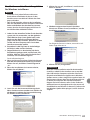
5. When the Setup Wizard screen appears, click the
“Next” button.
6. Read the contents of the License Agreement, and
select “I accept the agreement” if you agree to the
terms. Then, click the “Next” button.
7. Next, click the “Install” button to start installation.
8. A Windows security screen will appear twice.
Click the “Install” button to proceed with instal-
lation.
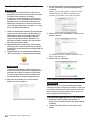
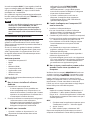
9. The following screen appears when installation
has completed.
Click the “Finish” button.
NOTE
After installing the driver, the device driver will
be installed the first time the unit is connected
by USB.
At this time, Windows will automatically search
Windows Update, and it may take some time to
recognize the unit connection.
If the unit is still not recognized after some
time, open the software installation screen
from the message area at the bottom right of
the computer display, and click "Skip Obtaining
Drivers From Windows Update" to cancel the
search.
Installing the Mac Settings Panel
NOTE
• Install the Settings Panel on the computer before
connecting the unit to it with the USB cable.
• Depending on the Gatekeeper setting, a warning
message might appear during installation. For
information about Gatekeeper, see “Note about
Gatekeeper” in “3–Installation” of the Reference
Manual.
8
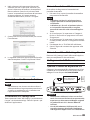
Settings Panel installation procedures
1. Download the software for the operating system
you are using from the TEAC Global Site (http://
teac-global.com/) and save it on the computer to
be used with the unit.
2. Double-click “iXR_Installer_XXX.dmg” (XXX is the
version number), which is the saved disk image
file for the Mac Settings Panel, and double-click
“iXR_Installer.pkg” inside the folder that opens.
NOTE
Depending on the computer’s settings, the
downloaded zip file might not have opened
automatically. In this case, open the zip file first
and then double-click the disk image file.
3. When the installer starts, click the “Continue”
button.

TASCAM iXR
9
4. On the software license agreement screen, click
the “Continue” button to open the software
license agreement confirmation screen.
Click the “Read License” button and check the
contents of the Software License Agreement.
If you agree to the contents of the license, click
“A g r e e”.
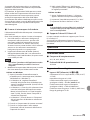
5. Next, click the “Install” button to start installation.
6. The following screen appears when installation
has completed. Click the “Close” button.
Uninstalling the dedicated software
NOTE
Normally, there is no need to uninstall the
dedicated software. Follow these procedures if a
problem occurs or you no longer intend to use the
unit with the computer.
Uninstalling the iOS Settings Panel
Press and hold the “iXR Settings” icon to show the
× mark and enable app deletion. Tap the × mark to
delete the app.
Uninstalling the Windows driver
Uninstalling from the Programs and Features Control
Panel.
1. From the Start menu, open the Control Panel and
launch Programs and Features.
NOTE
• In Windows 10, right-click the Start button and
click Control Panel when it appears.
• In Windows 8.1, right-click the button at the
bottom left of the Start screen and click Control
Panel on the Apps screen.
2. If “View by:” is set to “Category”, click “Uninstall a
program” under the “Program” item.
If “View by:” is set to “Large icons” or “Small icons”,
click “Programs and Features”.
3. Double-click “TASCAM iXR” in the list.
4. Then, follow the instructions that appear on the
screen.
Uninstalling the Mac OS Settings Panel
Delete “iXR_Settings Panel” from the Application
folder to complete uninstallation.
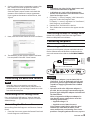
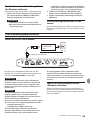
Connecting the power
When using an iOS device
Connect the USB power adapter included with the
iPad or iPhone to the USB cable included with this
unit, and connect the cable to the PC/MAC/POWER
port.
USB power adapter
included with iPad/
iPhone
USB cable included with iXR
CAUTION
• A USB power adapter is not included with an
iPod touch. To use an iPod touch with this unit,
purchase a genuine Apple USB power adapter
(capable of supplying 5V and at least 700mA
current).
• Operation with other USB power adapters is
possible, but we strongly recommend using the
genuine Apple USB power adapter included with
the iPad/iPhone.
When using another USB power adapter, be
sure that the power supply device meets the
following specifications.
• Supplied voltage: 5 V
• Supplied current: 700 mA or more
Using a power supply device when the speci-
fications are other than the above could
cause malfunction, overheating, fire or other
problems. If anything abnormal occurs, stop use

10
TASCAM iXR
and contact the retailer where you purchased
the unit or a TASCAM service center to request
repair.
When using a computer (Windows/Mac)
When this unit is connected to a computer, it will
operate using USB bus power, so connecting a
separate power supply device is not necessary.
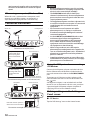
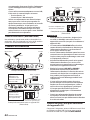
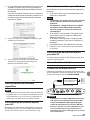
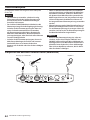
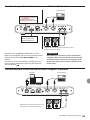
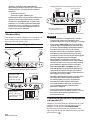
Connection illustrations
Vocal mic
Guitar
Headphones
Connection example (front)
Drum machine
Powered monitor speakers
with balanced connections
USB power adapter
included with iPad/
iPhone (using USB
cable included with
iXR)
iOS device (using
Lightning-USB cable
included with iOS
device)
Connection example with an iOS device (rear)
Drum machine
Powered monitor speakers
with balanced connections
Computer
Connection example with a computer (rear)
CAUTION
• Before making connections, turn this unit and
all connected devices (excluding computers/iOS
devices) to be connected off (standby).
• The PHANTOM switch affects both input
channels simultaneously. Do not turn phantom
power on when connecting a mic that does not
require phantom power.
• Turning phantom power on when a dynamic mic
or other mic that does not require it is connected
could damage this unit and connected
equipment.
• Do not connect or disconnect mics while
phantom power is on. Doing so could cause
a loud noise and might damage this unit and
connected equipment.
• Set the LINE OUT and PHONES knobs to their
minimum values before turning phantom
power on/off. Depending on the connected
mics, sudden loud noises from monitoring
equipment could occur, and this could damage
the equipment or harm hearing.
• When using condenser mics that require
phantom power and dynamic mics together, be
sure to use balanced dynamic mics. Unbalanced
dynamic mics cannot be used when phantom
power is enabled.
• Supplying phantom power to some ribbon mics
will break them. If you are unsure, do not supply
phantom power to a ribbon mic.
Using the USB ports when connecting
iOS devices
Connect the USB power adapter included with the
iPad or iPhone to the USB cable included with this
unit, and connect the cable to the PC/MAC/POWER
port.
To connect an iOS device, use the Lightning-USB
cable included with the iOS device to connect it to
the port.
A USB power adapter is not included with an iPod
touch. To use an iPod touch with this unit, purchase
a genuine Apple USB power adapter (capable of
supplying 5V and at least 700mA current).
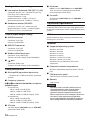
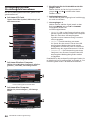
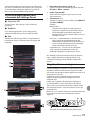
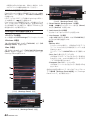
Making settings on the Settings
Panel screen
8
iOS device
Tap the “iXR Settings” icon on the Home Screen.

TASCAM iXR
11
8
Windows
From “All Apps” (All Programs), select “iXR Settings
Panel” under TASCAM.
8
Mac
Select “iXR Settings Panel” from Applications and
launch it to open the Settings Panel on the computer
display.
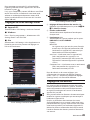
iOS Settings Panel
Windows Settings Panel
Mac Settings Panel
1 Direct Monitor Settings Input 1-2
Set the monitoring signal for the IN 1/IN 2 jacks
to Mono or Stereo.
2 Audio Input On/Off
Turn input on/off for each channel separately.
3 Line Outputs 1-2
Select the signals to be output from the LINE
OUT 1/L-2/R and PHONES jacks.
Options
Monitor Mix
The signals input from all the input ports
and the signals sent by USB from the device
connected by USB (computer or iOS device)
are mixed by this unit and output.
xxxx Out 1-2 (Used with an iOS device)
Only the playback signals sent from the iOS
device connected by USB are output. The
connected iOS device name appears in place
of “xxxx”.
Computer Out 1-2 (Used with a computer)
Only the playback signals sent from the
computer connected by USB are output.
For details about settings other than the above, see
“Settings Panel overview” in “6 – Using the Settings
Panel” of the Reference Manual.
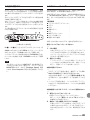
Adjusting the input sound
Analog audio signals input into this device from mics,
guitars, keyboards and other audio equipment can be
converted into digital signals and transmitted to the
computer/iOS device by USB.
You can use the features of this unit to adjust the
digital signals that are sent to the computer/iOS
device.
In addition, by connecting speakers (through an
amplifier) or headphones to this unit, you can
monitor audio signals that are input to this unit and
output from the computer/iOS device.
Use the various controls on the front of the unit as
necessary while listening to the input sound.
Example of operation using this unit
Use the GAIN knobs (3) to adjust the analog input
levels of the IN 1/IN 2 jacks (1) so that the PEAK
indicators (2) above and to the right of the knobs do
not light.
To listen to the monitoring signal using headphones,
connect the headphones to the PHONES jack (4)
and adjust the PHONES knob (5).
NOTE
If you cannot hear the input sound through the
headphones or the LINE OUT 1/L-2/R jacks,

12
TASCAM iXR
check the settings of the MONITOR knob on the
front of the unit and the Line Outputs item on
the Settings Panel screen.
Troubleshooting
Please read this chapter if you are unable to use the
unit properly even after setting it up following the
procedures in this manual.
If you are still unable to resolve your problems please
contact TASCAM customer support with the following
information about the operating environment and
details about the trouble.
Operating environment
• Computer/iOS device manufacturer
• Model
• CPU
• Memory (RAM)
• Operating system
• Applications used
• Antivirus software
• Wireless LAN use
See the end of this document for contact information.
8
The dedicated software cannot be
installed
1. Check the operating system
The operating system you are using might not
be supported by the software that you are
trying to install.
Check the operating systems supported by
the software that you are trying to install.
2. Stop software that is running in the background
Antivirus software and other software
running in the background can interfere with
installation. Quit software running in the
background and try installing again.
8
The unit will not turn on.
• When using an iOS device, a power supply
device must be connected to the PC/MAC/
POWER port. Carefully read “Connecting the
power” on page 9 of this operation manual
and connect a suitable power supply device.
• When using this unit with a computer, the
computer must support USB bus power. Check
the computer specifications.
8
The unit is connected, but the computer/
iOS device does not recognize it.
1. Install the dedicated software
i If you have not done so, install the dedicated
software. See “Installing the dedicated software”
on page 7 for details.
2. Change the USB port (if using a computer)
i This unit will not work with USB 1.1. Use a USB
2.0 or USB 3.0 port.
i Do not use a USB hub. Always connect the unit
directly to a USB port on the computer.
i If the above steps do not resolve the problem,
connect the unit to a different USB port on the
computer.
3. Check the connection cable (when using an iOS
device)
i When connecting this unit to an iOS device,
always use the Lightning-USB cable included
with the iOS device. Operation is not guaranteed
with cables other than Apple genuine cables.
8
There is no sound even when audio is
playing back on the computer.
Confirm that the unit's MONITOR knob is not turned
all the way to the left (toward INPUT). If that is the
case, turn the MONITOR knob to the right of center.
In addition, confirm the following while the unit
is connected to the computer. Moreover, if you
make the following settings, sound will be output
through this unit, but no sound will be output by the
computer’s speakers or headphone jack.
Windows
See the “Windows 10/Windows 8.1” or
“Windows 7” instructions in the “Windows
Media Player” section of “8 – Application guide”
in the Reference Manual, and make settings as
necessary for the OS.
OS X
1. Quit all applications and open “System
Preferences…” from the Apple menu.
2. Open “Sound”.
3. On the Output tab, select “iXR”.
After completing the setting, restart the computer
and check the sound of playback.
Depending on the application that you are using, you
might need to make additional device settings.
In particular, DAW applications operate using audio
engines with settings that are different from the OS
settings, so confirm the DAW driver settings first after
installing the dedicated software for this unit.
Please see the manuals for the applications that you
are using for detailed setting procedures.
8
Sound breaks up or there is noise.
The processing load on the computer causes sound
to break up and noise to occur.
Here are some methods to reduce the load on the
computer.
1. A wireless LAN and software running in the
background, including antivirus software,
regularly put processing loads on the computer,

TASCAM iXR
13
which can cause sound to break up and other
noise.
Stop wireless LAN transmission, antivirus
software and other software running in the
background when using this unit.
2. Set the buffer size (latency) in the audio appli-
cation that you are using or in this unit's Settings
Panel to a larger value. (Windows only)
NOTE
Consult the maker of the audio application that
you are using for methods to reduce its load on
your computer.
3. Change the settings of your computer so that
they are optimal for audio processing.
Using Windows
1 Open the Control Panel using the appropriate
method of the OS you are using (Windows 10/
Windows 8.1/Windows 7).
i In Windows 10, from the Start button at the
bottom left click “Control Panel” to open the
Control Panel. Then, click the System icon.
i In Windows 8.1, right-click the ordinary Start
screen (Metro user interface screen) and then
click “All apps”. Then, right-click “Computer”
and select “Properties”.
i In Windows 7, from the Start button at the
bottom left right-click “Computer” and select
“Properties”.
2 Click “Advanced system settings”.
3 Click “Settings” in the “Performance” section of
the “Advanced” tab of the “System Properties”
window.
4 In the “Visual Effects” tab of the “Performance
Options” window, select “Adjust for best
performance”.
Using OS X
1 Open “System Preferences…” from the Apple
menu, and select “Energy Saver”.
2 Set “Computer sleep” to “Never”.
3 Set “Display sleep” to “Never”.
NOTE
Depending on the Mac OS version and Mac
computer model, these settings might not be
available.
8
Cubase LE/Cubasis LE support
Our company does not provide support for Cubase LE
or Cubasis LE.
Please refer to the corresponding help menu or
operation manual for instructions about using the
product.
Specifications
Audio resolution
8
Sampling frequencies
44.1, 48, 88.2, 96 kHz
8
Quantization bit depth
16/24-bit
Analog audio input ratings
8
Mic inputs (balanced, IN 1/IN 2)
Connector: XLR-3-31 equivalent
(1: GND, 2: HOT,
3: COLD)
Input impedance: 2.2 kΩ
Nominal input level (gain knob at MAX): −65 dBu
(0.0004 Vrms)
Nominal input level (gain knob at MIN): −8 dBu
(0.3090 Vrms)
Maximum input level: +8 dBu (1.9467 Vrms)
Gain range: 57 dB
8
Instrument inputs (unbalanced, IN 1/IN
2)
(MIC/LINE INST switch set to INST)
Connector: 6.3mm (1/4") standard TS jack (Tip:
HOT, Sleeve: GND)
Input impedance: 1 MΩ or more
Nominal input level (gain knob at MAX): −63 dBV
(0.0007 Vrms)
Nominal input level (gain knob at MIN): −6 dBV
(0.5015 Vrms)
Maximum input level: +10 dBV (3.162 Vrms)
Gain range: 57 dB
8
Line inputs (balanced, IN 1/IN 2)
(MIC/LINE INST switch set to MIC/LINE)
Connector: 6.3mm (1/4") standard TRS jack (Tip:
HOT, Ring: COLD, Sleeve: GND)
Input impedance: 10 kΩ
Nominal input level (gain knob at MAX): −53 dBu
(0.0017 Vrms)
Nominal input level (gain knob at MIN): +4 dBu
(1.228 Vrms)
Maximum input level: +20 dBu (7.75 Vrms)
Gain range: 57 dB

14
TASCAM iXR
Analog audio output ratings
8
Line outputs (balanced, LINE OUT 1/L–2/R)
Connector: 6.3mm (1/4") standard TRS jack (Tip:
HOT, Ring: COLD, Sleeve: GND)
Output impedance: 110 Ω
Rated output level: +4 dBu (1.273 Vrms)
Maximum output level: +20 dBu (7.75 Vrms)
8
Headphone output (PHONES)
Connector: 3.5mm (1/8”) stereo mini jack
Maximum output: 18 mW + 18 mW or higher
(THD+N 1% or less, into 32Ω load)
Control input/output ratings
8
MIDI IN connector
Connector: 5-pin DIN
Format: standard MIDI
8
MIDI OUT connector
Connector: 5-pin DIN
Format: standard MIDI
8
Windows/Mac/Power port
Connector: 4-pin USB B-type
Transfer rate: USB 2.0 High Speed (480 Mbps)
8
port
Connector: USB A-type
Transfer rate: USB 2.0 High Speed (480 Mbps)
Audio performance
8
Mic amp EIN (equivalent input noise)
−125 dBu or less (150Ω termination, gain knob
at MAX)
8
Frequency response
IN 1/IN 2 to LINE OUT (BALANCED), headphone
(PHONES) output
At 44.1/48 kHz
20 Hz: +0 dB/−0.4 dB (JEITA)
20 kHz: +0 dB/−0.1 dB (JEITA)
20 kHz: +0 dB/−0.5 dB (HP output, JEITA)
At 88.2/96 kHz
20 Hz: +0 dB/−0.4 dB (JEITA)
40 kHz: +0 dB/−0.25 dB (JEITA)
40 kHz: +0 dB/−2.0 dB (HP output, JEITA)
8
S/N ratio
101 dB or higher (MIC/LINE input to LINE OUT,
gain knob at MIN, JEITA)
8
Distortion
0.0025% or less (MIC/LINE input to LINE OUT,
1kHz sine wave, at nominal input level and
maximum output level, JEITA)
8
Crosstalk
95 dB or more (MIC/LINE input to LINE OUT, 1
kHz, JEITA)
Operation requirements
Check the TEAC Global Site (http://teac-global.com/)
for the latest information about supported operating
systems.
iOS devices
Apple iOS devices with a Lightning connector and
running iOS 8, 9 or later
Windows
8
Supported operating systems
Windows 10 32-bit
Windows 10 64-bit
Windows 8.1 32-bit
Windows 8.1 64-bit
Windows 7 32-bit SP1 or later
Windows 7 64-bit SP1 or later
(Windows Vista and Windows XP are not
supported)
8
Computer hardware requirements
Windows-compatible computer with a USB 2.0
port
8
CPU/processor speed
2 GHz or faster dual core processor (x86)
8
Memory
2 GB or more
CAUTION
Operation of this unit was confirmed using
standard computers that meet the above
requirements. This does not guarantee
operation with all computers that meet the
above requirements. Even computers that meet
the same system requirements might have
processing capabilities that differ according to
their settings and other operating conditions

TASCAM iXR
15
Mac OS
8
Supported operating systems
OS X El Capitan (10.11 or later)
OS X Yosemite (10.10 or later)
OS X Mavericks (10.9.1 or later)
OS X Mountain Lion (10.8.4 or later)
8
Computer hardware requirements
Mac with a USB 2.0 port
8
CPU/processor speed
2 GHz or faster dual core processor
8
Memory
2 GB or more
Supported audio/MIDI drivers
iOS: Core Audio for iPhone
Windows: ASIO 2.0, WDM, MIDI
Mac: Core Audio, Core MIDI
General
8
Power
Used with a computer
USB bus power
Used with an iOS device
USB power adapter (that supplies 5 V and at least
700 mA current)
1
Mobile battery (that supplies 5 V and at least 700
mA current)
TASCAM BP-6AA external battery pack
1
We strongly recommend using the USB power
adapter included with the iPad/iPhone. A USB
power adapter is not included with an iPod
touch. To use an iPod touch with this unit,
purchase a genuine Apple USB power adapter
(capable of supplying 5V and at least 700mA
current).
8
Power consumption
2.5 W
8
External dimensions
210 × 35.3 × 140.7 mm (width × height × depth,
excluding protrusions)
8
Weight
660 g
8
Operating temperature range
5–35 °C (41–95º F)
8
Bundled DAW software (download
editions)
Steinberg Cubase LE
Steinberg Cubasis LE
2
2
A demo version of Cubasis LE can be
downloaded for free from the App Store.
Connecting the iOS device to this unit will
remove the restrictions of the demo version,
allowing you to use it as a full version of
Cubasis LE.

16
TASCAM iXR
Dimensional drawings
210 mm
35.3 mm 140.7 mm
• Illustrations in this manual might differ in part from the actual product.
• Specifications and external appearance might be changed without notification to improve the product.
Page is loading ...
Page is loading ...
Page is loading ...
Page is loading ...
Page is loading ...
Page is loading ...
Page is loading ...
Page is loading ...
Page is loading ...
Page is loading ...
Page is loading ...
Page is loading ...
Page is loading ...
Page is loading ...
Page is loading ...
Page is loading ...
Page is loading ...
Page is loading ...
Page is loading ...
Page is loading ...
Page is loading ...
Page is loading ...
Page is loading ...
Page is loading ...
Page is loading ...
Page is loading ...
Page is loading ...
Page is loading ...
Page is loading ...
Page is loading ...
Page is loading ...
Page is loading ...
Page is loading ...
Page is loading ...
Page is loading ...
Page is loading ...
Page is loading ...
Page is loading ...
Page is loading ...
Page is loading ...
Page is loading ...
Page is loading ...
Page is loading ...
Page is loading ...
Page is loading ...
Page is loading ...

TASCAM iXR
63
Manuale di istruzioni
IMPORTANTI NORME DI SICUREZZA
INFORMATION TO THE USER
This equipment has been tested e found to comply
with the limits for a Class B digital device, pursuant to
Part 15 of the FCC Rules. These limits are designed to
provide reasonable protection against harmful inter-
ference in a residential installation. This equipment
generates, uses, e can radiate radio frequency energy
and, if not installed e used in accordance with
the instruction manual, may cause harmful inter-
ference to radio communications. However, there
is no guarantee that interference will not occur in a
particular installation. If this equipment does cause
harmful interference to radio or television reception,
which can be determined by turning the equipment
off e on, the user is encouraged to try to correct the
interference by one o più of the following measures.
a) Reorient or relocate the receiving antenna.
b) Increase the separation between the equipment e
receiver.
c) Connect the equipment into an outlet on a circuit
different from that to which the receiver is connected.
d) Consult the dealer or an experienced radio/TV
technician for help.
CAUTION
Changes or modifications to this equipment not
expressly approved by TEAC CORPORATION for
compliance could void the user’s authority to operate
this equipment.
For U.S.A.
DICHIARAZIONE DI CONFORMITÀ
Noi, TEAC EUROPE GmbH. Bahnstrasse
12, 65205 Wiesbaden-Erbenheim,
Germania dichiariamo sotto la nostra
responsabilità, che il prodotto TEAC
descritto in questo manuale è conforme ai corrispon-
denti standard tecnici.
Dichiarazione di conformità
Responsabilità: TEAC AMERICA, INC
Indirizzo: 1834 Gage Road,
Montebello, California, USA
Numero di telefono: 1-323-726-0303
Questo dispositivo è conforme alla Parte 15 delle
norme FCC. Il funzionamento è soggetto alle seguenti
due condizioni: (1) questo dispositivo può causare
interferenze e (2) questo dispositivo deve accettare
qualsiasi interferenza ricevuta, comprese quelle che
possono causare un funzionamento indesiderato.
IMPORTANTI ISTRUZIONI DI
SICUREZZA
1 Leggere le seguenti istruzioni.
2 Conservare queste istruzioni.
3 Prestare attenzione agli avvertimenti.
4 Seguire tutte le istruzioni.
5 Non usare l’apparecchio vicino all’acqua.
6 Pulire solo con un panno asciutto.
7 Non bloccare le aperture per la ventilazione.
Installare secondo le istruzioni del costruttore.
8 Non installare l’apparecchio vicino a fonti di calore
come radiatori, regolatori di calore, stufe o altri
apparecchi che producono calore (inclusi gli ampli-
ficatori).
9 Non eliminare la spina polarizzata di sicurezza o la
spina di messa a terra. La spina polarizzata ha due
lame, una più larga dell’altra. Una spina di messa a
terra ha due lame e una terza punta di messa terra.
La lama larga o la terza punta sono fornite per la
vostra sicurezza. Se la spina fornita non è adatta al
tipo di presa, consultate un elettricista per sostituire
la presa obsoleta.
10 Non calpestare o strattonare il cordone di
alimentazione, in modo particolare vicino alla
spina e alla presa a cui è collegato l’apparecchio
e dal punto in cui esce dall’apparecchio.
11 Usare solamente attacchi/accessori specificati
dal costruttore.
12 Usare solo carrello, supporto, .
treppiede, mensola o tavola
specificata dal costruttore o
venduto insieme all’appa-
recchio. Quando viene usato
un carrello, prestare attenzione quando si sposta
la combinazione carrello/apparato per evitare
cadute da sopra.
13 Scollegare questo apparato durante temporali o
quando non viene utilizzato per lunghi periodi di
tempo.
Page is loading ...
Page is loading ...
Page is loading ...
Page is loading ...
Page is loading ...
Page is loading ...
Page is loading ...
Page is loading ...
Page is loading ...
Page is loading ...
Page is loading ...
Page is loading ...
Page is loading ...
Page is loading ...
Page is loading ...
Page is loading ...
Page is loading ...
Page is loading ...
Page is loading ...
Page is loading ...
Page is loading ...
Page is loading ...
Page is loading ...
Page is loading ...
Page is loading ...
Page is loading ...
Page is loading ...

< In the United States >
This warranty gives you specific legal rights and
you may also have other rights which vary from
state to state. This warranty is only valid within
the country the unit was originally purchased.
WHAT IS AND IS NOT COVERED
Except as specified below, this warranty covers
all defects in materials and workmanship in this
product. The following are not covered by the
warranty:
1. Damage to or deterioration of the external cabinet.
2. Damages resulting from accident, misuse, abuse
or neglect.
3. Damage resulting from failure to perform
basic daily maintenance and/or calibration
or otherwise resulting from failure to follow
instructions contained in your owner’s manual.
4. Damage occurring during shipment of the
product. (Claims must be presented to the
carrier)
5. Damage resulting from repair or attempted
repair by anyone other than TEAC or an
authorized TASCAM service station.
6. Damage resulting from causes other than
product defects, including lack of technical skill,
competence, or experience of the user.
7. Damage to any unit which has been altered or
on which the serial number has been defaced,
modied or is missing.
WHO MAY ENFORCE THE WARRANTY
This warranty may be enforced only by the
original purchaser. This warranty is not valid
if the product was purchased through an
unauthorized dealer.
LENGTH OF WARRANTY
All parts except heads and disk drives are
warranted for one (1) year from the date of
original purchase. Heads and disk drives are
warranted to ninety (90) days from date of
original purchase. Labor is warranted for ninety
(90) days from date of original purchase.
WHAT WE WILL PAY FOR
We will pay all labor and material expenses
for items covered by the warranty. Payment
of shipping charges is discussed in the next
section of this warranty.
HOW YOU CAN GET WARRANTY SERVICE
Your unit must be serviced by an authorized
TASCAM service station in the United States.
(This warranty is not enforceable outside the
U.S.) If you are unable to locate an authorized
TASCAM service station in your area, please
contact us. We either will refer you to an
authorized service station or instruct you
to return the unit to the factory. Whenever
warranty service is required, you must
present a copy of the original dated sales
receipt from an Authorized TASCAM Dealer.
You must pay any shipping charges if it is
necessary to ship the product to service.
However, if the necessary repairs are covered by
the warranty, we will pay return surface shipping
charges to any destination within the United
States.
LIMITATION OF IMPLIED WARRANTIES
Any implied warranties, INCLUDING
WARRANTIES OF MERCHANTABILITY AND
FITNESS FOR A PARTICULAR PURPOSE, are
limited in duration to the length of this
warranty.
EXCLUSION OF DAMAGES
TEAC’s liability for any defective product
is limited to repair or replacement of the
product, at TEAC’s option. TEAC shall not be
liable for:
1.
Damages based upon inconvenience, loss of use of
the product,
loss of time interrupted operation
or commercial loss; or
2. Any other damages, whether incidental,
consequential or otherwise.
Some states do not allow limitations on how
long an implied warranty lasts and/or do not
allow the exclusion or limitation of incidental
or consequential damages, so the above
limitations and exclusions may not apply to you.
To locate an Authorized Service Center in
Your Area
CALL 1-800-447-8322
< Europe >
This product is subject to the legal warranty
regulations of the country of purchase. In
case of a defect or a problem, please contact
the dealer where you bought the product.
Ce produit est sujet aux réglementations
concernant la garantie légale dans le pays
d’achat. En cas de défaut ou de problème,
veuillez contacter le revendeur chez qui vous
avez acheté le produit.
Dieses Gerät unterliegt den gesetzlichen
Gewährleistungsbestimmungen des Landes,
in dem es erworben wurde. Bitte wenden Sie
sich im Gewährleistungsfall an den Händler,
bei dem sie das Gerät erworben haben.
Questo apparecchio è conforme alle norme
sulla garanzia vigenti nel rispettivo Paese
in cui esso è stato acquistato. Si prega di
rivolgersi al proprio commerciante, presso
il quale è stato acquistato l’apparecchio,
nel caso in cui si voglia richiedere una
prestazione in garanzia.
Las condiciones de garantía de este aparato
están sujetas a las disposiciones legales
sobre garantía del país en el que ha sido
adquirido. En caso de garantía, debe dirigirse al
establecimiento donde adquirió el aparato.
<日本>
無料修理規定(持ち込み修理)
1.
取扱説明書、本体貼付ラベルなどの注意
書きにしたがった正常な使用状態で保証
期間内に故障が発生した場合には、ティ
アック修理センターが無料修理いたしま
す。
2.
本体の保証期間は、お買い上げ日から1
年です。
3.
保証期間内に故障して無料修理を受ける
場合は、本書をご提示の上、ティアック
修理センターまたはお買い上げの販売店
に修理をご依頼ください。商品を送付し
ていただく場合の送付方法については、
事前にティアック修理センターにお問い
合わせください。
4.
ご転居、ご贈答品などでお買い上げの
販売店に修理をご依頼になれない場合
は、ティアック修理センターにご連絡
ください。
5.
次の場合には、保証期間内でも有料修
理となります。
(1) ご使用上の誤りおよび不当な修理や
改造による故障および損傷
(2) お買い上げ後の輸送・移動・落下
などによる故障および損傷
(3) 火災、地震、水害、落雷、その他の
天災地変、公害や異常電圧による故
障および損傷
(4) 接続している他の機器に起因する故
障および損傷
(5) 業務上の長時間使用など、特に苛酷
な条件下において使用された場合の
故障および損傷
(6)メンテナンス
(7)本書の提示がない場合
(8) 本書にお買い上げ年月日、お客様名、
販売店名(印)の記入のない場合、ある
いは字句を書き換えられた場合
6.
本書(日本語記載部)は日本国内にお
いてのみ有効です。
These warranty provisions in Japanese are
valid only in Japan.
7.
本書は再発行いたしませんので、紛失
しないよう大切に保管してください。
※
この保証書は、本書に明示した期間・
条件のもとにおいて無料修理をお約束
するものです。この保証書によって保
証書を発行しているもの(保証責任
者)、およびそれ以外の事業者に対す
るお客様の法律上の権利を制限するも
のではありません。保証期間経過後
の修理などについてご不明の場合は、
ティアック修理センターにお問い合わ
せください。
※
保証期間経過後の修理、補修用性能部
品の保有期間についての詳細は、取扱
説明書をご覧ください。
< In other countries/areas >
This warranty gives you specific legal rights,
and you may also have other rights that vary
by country, state or province.
If you have a warranty claim or request,
please contact the dealer where you bought
the product.
该保证书赋予了顾客特定的合法权利,并且
因国家,州或省等地域的不同,顾客可能拥
有其他权利。如需申请或要求保修,请与购
买本产品的销售店进行联系。
If you require repair services for your
TASCAM
equipment, please contact the dealer where
the product was purchased from or the
TASCAM
Distributor in your country. A list of
TASCAM
Distributors can be found on our
website at:
http://teac-global.com/
✂
WARRANTY
/保証書

Model / 型名
Serial No. / 機番
Date of purchase / お買い上げ日
http://teac-global.com/
Owner’s name / お名前
Address / ご住所
Dealer’s name / 販売店
Dealer’s address /
住所
✂
iXR
Memo / 修理メモ
WARRANTY /
保証書
Printed in China
〒 206-8530 東京都多摩市落合 1-47
ティアック修理センター
〒 358-0026 埼玉県入間市小谷田 858
電話:0570-000-501 / 04-2901-1033
お客様にご記入いただいた保証書の控えは、保証期間内のサービス活動及びその後の安全点検活
動のために記載内容を利用させていただく場合がございますので、ご了承ください。
-
 1
1
-
 2
2
-
 3
3
-
 4
4
-
 5
5
-
 6
6
-
 7
7
-
 8
8
-
 9
9
-
 10
10
-
 11
11
-
 12
12
-
 13
13
-
 14
14
-
 15
15
-
 16
16
-
 17
17
-
 18
18
-
 19
19
-
 20
20
-
 21
21
-
 22
22
-
 23
23
-
 24
24
-
 25
25
-
 26
26
-
 27
27
-
 28
28
-
 29
29
-
 30
30
-
 31
31
-
 32
32
-
 33
33
-
 34
34
-
 35
35
-
 36
36
-
 37
37
-
 38
38
-
 39
39
-
 40
40
-
 41
41
-
 42
42
-
 43
43
-
 44
44
-
 45
45
-
 46
46
-
 47
47
-
 48
48
-
 49
49
-
 50
50
-
 51
51
-
 52
52
-
 53
53
-
 54
54
-
 55
55
-
 56
56
-
 57
57
-
 58
58
-
 59
59
-
 60
60
-
 61
61
-
 62
62
-
 63
63
-
 64
64
-
 65
65
-
 66
66
-
 67
67
-
 68
68
-
 69
69
-
 70
70
-
 71
71
-
 72
72
-
 73
73
-
 74
74
-
 75
75
-
 76
76
-
 77
77
-
 78
78
-
 79
79
-
 80
80
-
 81
81
-
 82
82
-
 83
83
-
 84
84
-
 85
85
-
 86
86
-
 87
87
-
 88
88
-
 89
89
-
 90
90
-
 91
91
-
 92
92


Ask a question and I''ll find the answer in the document
Finding information in a document is now easier with AI
in other languages
- italiano: Tascam iXR Manuale utente
- français: Tascam iXR Manuel utilisateur
- español: Tascam iXR Manual de usuario
- Deutsch: Tascam iXR Benutzerhandbuch
- 日本語: Tascam iXR ユーザーマニュアル
Related papers
Other documents
-
Zoom U-24 Operating instructions
-
TEAC HA-P5 Owner's manual
-
Renkforce 7 ports USB 3.0 hub wall mount option, Steel casing Owner's manual
-
Zoom iQ6 Owner's manual
-
-
Swissonic MidiConnect 2 Quick start guide
-
Korg plugKEY Owner's manual
-
TEAC HA-P50 Owner's manual
-
Yamaha Audiogram6 Owner's manual
-