Whirlpool AD60LEK0 User manual
- Category
- Dehumidifiers
- Type
- User manual

Contents
Safety information . . . . . . . . . . . . . . . . . . . . . . . . . . . . . . . . . . .2
Electrical requirements . . . . . . . . . . . . . . . . . . . . . . . . . . . . . . . .3
Installing dehumidifier . . . . . . . . . . . . . . . . . . . . . . . . . . . . . . . .4
Operating dehumidifier . . . . . . . . . . . . . . . . . . . . . . . . . . . . . .5-6
Removing and emptying water bucket . . . . . . . . . . . . . . . . . . . . .7
Water level float and automatic shutoff . . . . . . . . . . . . . . . . . . . .8
Caring for your dehumidifier . . . . . . . . . . . . . . . . . . . . . . . . . . . .9
If you need assistance or service . . . . . . . . . . . . . . . . . . . . . .10-11
Dehumidifier
Use & Care Guide
Part No. 1185020 Rev. A

Safety information
2
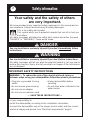
Your safety and the safety of others
are very important.
We have provided many important safety messages in this manual and on
your appliance. Always read and obey all safety messages.
This is the safety alert symbol.
This symbol alerts you to potential hazards that can kill or hurt you
and others.
All safety messages will follow the safety alert symbol and either the word
“DANGER” or ‘“WARNING.”These words mean:
DANGER
WARNING
WARNING — To reduce the risk of fire, electrical shock, injury or
sickness when using your dehumidifier, follow these basic precautions:
• Plug into a grounded 3 prong
outlet.
• Do not remove ground prong.
• Do not use an adapter.
• Do not use an extension cord.
• Unplug dehumidifier before
servicing.
• Do not drink water collected in the
water bucket.
— SAVE THESE INSTRUCTIONS —
It is your responsibility to:
• Install the dehumidifier according to the Installation Instructions.
• Connect the dehumidifier only to the proper kind of outlet, with the correct
electrical supply and ground. See “Electrical requirements,” page 3.
All safety messages will tell you what the potential hazard is, tell you how to
reduce the chance of injury, and tell you what can happen if the instructions
are not followed.
You can be killed or seriously injured if you don’t follow instructions.
You can be killed or seriously injured if you don’t immediatel
y follow
instructions.
IMPORTANT SAFETY INSTRUCTIONS

Electrical requirements
3
WARNING
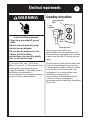
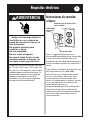
Grounding instructions:
A 115-volt (103.5 min., 126.5 max.),
60-Hz, AC-only, 15- or 20-ampere fused
and properly grounded electrical
supply is required. A time-delay fuse or
time-delay circuit breaker is
recommended. Use a separate circuit to
connect only the dehumidifier.
For your personal safety, this
dehumidifier must be grounded. This
dehumidifier is equipped with a power
supply cord having a 3-prong ground
plug.
To minimize possible shock hazard, the
cord must be plugged into a mating
3-prong ground-type outlet, grounded
in accordance with local codes and
ordinances. If a mating outlet is not
available, it is the personal
responsibility and obligation of the
customer to have the properly
grounded outlet installed by a qualified
electrician.
Electrical Shock Hazard
Plug into a grounded 3 prong
outlet.
Do not remove ground prong.
Do not use an adapter.
Do not use an extension cord.
Failure to follow these
instructions can result in death,
fire, or electrical shock.
3-prong
ground plug
3-prong ground-type
outlet
ground
prong
power supply cord

Safety information
4
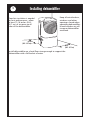
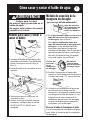
Install dehumidifier on a level floor strong enough to support the
dehumidifier with a full bucket of water.
Good air circulation is needed
for best performance—allow
at least 12-18 inches (30.5 -
45.7 cm) of air space on all
sides of the dehumidifier.
Keep all outside doors,
windows and other
openings closed when
operating dehumidifier.
Humid outdoor air will
increase dehumidifier
workload.
Installing dehumidifier
12-18"
(30.5 - 45.7 cm)
12-18"
(30.5 - 45.7 cm)
4

Safety information
5
Operating dehumidifier
FAN SPEED
HIGH
LOW
DRYNESS CONTROL
EMPTY/ADJUST
BUCKET
N
O
R
M
A
L
D
R
Y
E
S
T
OFF
CONTINUOUS
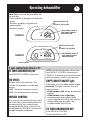
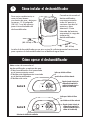
Control A
If your control looks like A or B:
adjusts humidity removal set
point (amount of moisture
removed from room)
indicates the bucket is full
OR
the bucket is not in position
FAN SPEED
HIGH
LOW
DRYNESS CONTROL
EMPTY/ADJUST
BUCKET
N
O
R
M
A
L
D
R
Y
E
S
T
OFF
CONTINUOUS
selects fan speed
Control B
adjusts humidity removal set
point (amount of moisture
removed from room)
indicates the bucket is full
OR
the bucket is not in position
5
Note: Before turning dehumidifier on,
be sure that:
• Dehumidifier is plugged into the wall
outlet
• Bucket is properly inserted into
dehumidifier
• Bucket is empty
TO TURN DEHUMIDIFIER ON:
Turn DRYNESS CONTROL clockwise.
FAN SPEED:
(Models with Control B only): This
controls fan operation. Use desired
setting.
HIGH - for faster moisture removal.
LOW - for slower moisture removal.
DRYNESS CONTROL:
This controls the amount of moisture in
the room.Turn control knob clockwise
for more drying.Turn control knob
counterclockwise for less drying.Turn
control knob to “NORMAL” to maintain
average humidity conditions.
NOTE: For the first few days of use, turn
the DRYNESS CONTROL clockwise to
“DRYEST” to remove extra moisture from
the furnishings as well as the room air.
EMPTY/ADJUST BUCKET light:
If this light is on, the dehumidifier is not
running. This light indicates that you
need to check:
• If the bucket is full, empty bucket and
replace.
• If the bucket is not in position,
remove bucket and replace. Make
sure the bucket fits all the way into the
dehumidifier and the light is off,
or dehumidifier will not run.
TO TURN DEHUMIDIFIER OFF:
Turn DRYNESS CONTROL
counterclockwise to OFF.

Operating dehumidifier
6
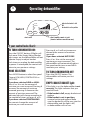
TO TURN DEHUMIDIFIER ON:
Press the ON/OFF button. All lights will
flash once. If the Empty/Adjust Bucket
light comes on, the dehumidifier will not
operate. Empty or adjust bucket.
Each time you unplug the dehumidifier
or power is interrupted, the control will
return to your previous settings.
MODE SELECTION
Press MODE button to select fan speed.
Choose LOW, HIGH, CONTINUOUS or
AUTO DRY.
If you have selected LOW or HIGH:
Pressorto set the amount of
moisture you want removed. Pressing
increases the amount of moisture
removed; pressingdecreases the
amount of moisture removed.The
indicator light will change according to
the number of times you pressor.
If you have selected CONTINUOUS:
You cannot change the amount of
moisture you want removed.
Pressing
orwill not increase or
decrease the amount of moisture
removed.
If you have selected AUTO DRY:
Pressorto set the amount of
moisture you want removed. The
dehumidifier will automatically adjust
fan speed and/or turn on and off to
maintain your setting.
TO TURN DEHUMIDIFIER OFF:
Press the ON/OFF button.The
dehumidifier will retain your last
settings.
EMPTY/ADJUST BUCKET light:
If this light is on, the dehumidifier is not
running. This light indicates that you
need to check:
• If the bucket is full, empty bucket and
replace.
• If the bucket is not in position,
remove bucket and replace. Make
sure the bucket fits all the way into the
dehumidifier and the light is off,
or dehumidifier will not run.
If your control looks like C:
MODE
ON / OFF
CONTINUOUS
HIGH
LOW
EMPTY /ADJUST
BUCKET
AUTO DRY
MOIST
DRY
selects mode
Control C
adjusts humidity removal set point
(amount of moisture removed from room)
indicates the bucket is full
OR
the bucket is not in position

6
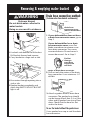
1. Use both side handles to lift bucket.
Pull bucket forward and remove.
3. Pour water through opening into a
sink or tub.
4. Replace bucket completely and
check that EMPTY/ADJUST BUCKET
light is off.
WARNING
Sickness Hazard
Do not drink water collected in
water bucket.
Doing so can result in sickness.
2. Carry bucket to a large sink or tub.
Safety information
Removing & emptying water bucket
7
Drain hose connection method:
(to drain water from bucket continuously)
Do Not
damage
outside or
connection
will leak.
drain hose
connector cover
(not on all models)
center of drain hose connector
3. Attach a garden hose to drain hose
connector. The garden hose should
not be longer than 8 feet (2.4 m). Run
other end of garden hose into a floor
drain. Check that the hose lies flat
and in the drain.
To use the bucket without the garden hose:
Use a garden hose cap to seal the drain
hose connector.
1. If your dehumidifier does not have
a drain hose connector cover, go to
Step 2.
If your dehumidifier has a drain
hose connector cover, use a flat-
blade screwdriver to remove cover
from drain connector. Turn cover
counterclockwise. Discard cover. It
cannot be reused. Go to Step 2.
2. Drill out only the center of the drain
hose connector. Use a minimum 1/4"
drill bit.

Safety information
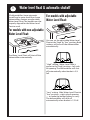
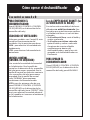
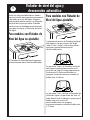
For models with non-adjustable
Water Level Float:
For models with adjustable
Water Level Float:
All dehumidifiers have automatic
shutoff and a water level float. Some
dehumidifiers feature an adjustable
Water Level Float. The bucket must be
properly aligned for the Water Level
Float to work.
The Water Level Float will shut off the
dehumidifier automatically.
You can set the adjustable Water Level
Float at the “high” or “low” position. Both
settings will turn off the dehumidifier
automatically.
“High” setting: Water Level Float is
preset to the “high”position—left side
of opening.The dehumidifier will shut
off automatically when bucket is 3/4
full.
“Low” setting: Slide Water Level Float to
“low”position—right side of opening
— to make the bucket lighter to carry.
The dehumidifier will shut off
automatically when bucket is 1/2 full.
Water level float & automatic shutoff
8

Safety information
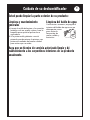
General cleaning and
maintenance
1. Dust the front grille and side panels
with a soft brush or the dusting
attachment of your vacuum.
2. If cabinet paint chips, you can touch
up the paint with a good grade
enamel paint to prevent rust.
Water bucket cleaning
Every few weeks, rinse the inside
of the water bucket with
a mild detergent
to prevent growth
of mold,mildew
and bacteria.
MILD
DETERGENT
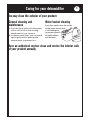
Caring for your dehumidifier
9
You may clean the exterior of your product:
Have an authorized servicer clean and service the interior coils
of your product annually.

Safety information
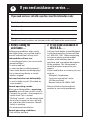
If you need assistance or service…
1. Before calling for
assistance…
Performance problems often result
from little things you can find and fix
yourself without tools of any kind.
Dehumidifier will not run:
• Is unit plugged into a live circuit with
proper voltage?
• Is unit turned on?
• Is water bucket installed properly?
• Does water bucket need emptying?
• Has a house fuse blown or circuit
breaker tripped?
Unit runs but does not dehumidify:
• Is unit in defrost cycle? (Provided on
some models.)
Normal operating sounds:
When your dehumidifier is operating
normally,you will hear sounds such as:
• Compressor sounds—the compressor
can be loud.This is normal.
• “Clicking” sounds—can be heard when
the unit or compressor turns off and
on, and when the Automatic Shutoff
Switch is working.
• Air movement from the fan.
Normal operating conditions:
• Unit will put out heat.
If you need service or call with a question, have this information ready:
Model number
Serial number
Purchase date
Phone number
Store
Model and serial numbers are located on the wall behind the water bucket.
2. If you need assistance in
the U.S.A.…
Call your local dealer or the Whirlpool
Customer Interaction Center toll-free
at 1-800-253-1301. When requesting
assistance, please provide model
number, serial number, date of
purchase, and a complete description
of the problem.This information is
needed to better respond to your
request.
If you need further assistance, you can
write to:
Whirlpool Corporation
Customer Interaction Center
553 Benson Road
Benton Harbor, MI 49022-2692
Please include a daytime phone
number in your correspondence.
10

Safety information
11
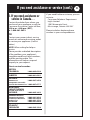
3. If you need assistance or
service in Canada…
Contact the dealer from whom you
purchased your appliance, or call the
Consumer Assistance Centre toll free,
8:30 a.m. - 6:00 p.m. (EST),
at 1-800-461-5681.
OR
Contact your nearest direct service
branch or authorized servicing outlet
to service your appliance. (See list
below.)
NOTE: When asking for help or
service:
Please provide a detailed description
of the problem, your appliance’s
complete model and serial numbers,
and the purchase date.This
information will help us respond
properly to your request.
Direct service branches:
BRITISH
COLUMBIA 1-800-665-6788
ALBERTA 1-800-661-6291
ONTARIO
Ottawa area 1-800-267-3456
(except 807 area code)
Outside the Ottawa area 1-800-807-6777
MANITOBA,
SASKATCHEWAN
and 807 area code in
ONTARIO
1-800-665-1683
QUEBEC Montreal
(except South Shore) 1-800-361-3032
South Shore Montreal 1-800-361-0950
Quebec City 1-800-361-1523
Sherbrooke
1-800-567-6966
AT LANTIC
PROVINCES
1-800-565-1598
If you need further assistance, you can
write to:
Consumer Relations Department
Inglis Limited
1901 Minnesota Court
Mississauga, Ontario L5N 3A7
Please include a daytime phone
number in your correspondence.
If you need assistance or service (cont.)
11

Part No. 1185020 Rev. A 01/02
©2002 All rights reserved Printed in U.S.A.
Page is loading ...
Page is loading ...
Page is loading ...
Page is loading ...
Page is loading ...
Page is loading ...
Page is loading ...
Page is loading ...
Page is loading ...
Page is loading ...
Page is loading ...
Page is loading ...
-
 1
1
-
 2
2
-
 3
3
-
 4
4
-
 5
5
-
 6
6
-
 7
7
-
 8
8
-
 9
9
-
 10
10
-
 11
11
-
 12
12
-
 13
13
-
 14
14
-
 15
15
-
 16
16
-
 17
17
-
 18
18
-
 19
19
-
 20
20
-
 21
21
-
 22
22
-
 23
23
-
 24
24


Whirlpool AD60LEK0 User manual
- Category
- Dehumidifiers
- Type
- User manual
Ask a question and I''ll find the answer in the document
Finding information in a document is now easier with AI
in other languages
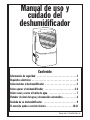
- español: Whirlpool AD60LEK0 Manual de usuario
Related papers
-
Whirlpool AD50DSS0 User manual
-
Whirlpool 1188927 User manual
-
-
-
-
-
-
-
Whirlpool 1188927 User manual
-