Proxima ASA Projector DP1200x User manual
- Category
- Projectors
- Type
- User manual
This manual is also suitable for

DP1200x
Personal projection. Perfected.
User’s Guide
InFocus Corporation
27700B SW Parkway Avenue
Wilsonville, Oregon 97070-9215
1-800-294-6400
•
503-685-8888
Fax: 503-685-8887
http://www.infocus.com
In Europe:
InFocus International B.V.
Strawinskylaan 585
1077 XX Amsterdam,The Netherlands
Phone: +31 20 579 2000
Fax: +31 20 579 2999
In Asia:
238A Thomson Road
#18-01/04 Novena Square
Singapore 307684
Telephone: (65) 6334-9005
Fax: (65) 6333-4525
DP1200x
6160DP1200x_Cover.qxd 5/1/03 11:12 AM Page 1


This entire user’s guide is available on the enclosed CD as an Adobe Acrobat pdf file in the following languages: English, Fren
ch, German, Italian, Norwe-
gian, Portuguese, Spanish, Russian, Japanese, Korean, Traditional Chinese, Simplified Chinese. Before using this projector, ple
ase read these instructions.
Le mode d'emploi complet est disponible sur le CD joint sous forme de fichier pdf d'Adobe Acrobat dans les langues suivantes :
anglais, français,
allemand, italien, norvégien, portugais, espagnol, russe, japonais, coréen, chinois traditionnel, chinois simplifié. Avant d'ut
iliser ce projecteur, veuillez
lire ces instructions.
Die vollständige Benutzeranleitung ist auf der im Lieferumfang enthaltenen CD als Adobe Acrobat PDF-Datei in den folgenden Spra
chen verfügbar:
Englisch, Französisch, Deutsch, Italienisch, Norwegisch, Portugiesisch, Spanisch, Russisch, Japanisch, Koreanisch, Traditionell
es Chinesisch und
Vereinfachtes Chinesisch. Bitte lesen Sie diese Anweisungen vor der Verwendung des Projektors.
La presente guida è disponibile sul CD allegato, come file Adobe Acrobat pdf, nelle seguenti lingue: inglese, francese, tedesco
, italiano, norvegese,
portoghese, spagnolo, russo, giapponese, coreano, cinese tradizionale e cinese semplificato. Prima di usare questo proiettore,
leggere le seguenti istruzioni.
Hele denne brukerhåndboken finnes på den vedlagte CD-en som en Adobe Acrobat pdf-fil på følgende språk: Engelsk, fransk, tysk,
italiensk, norsk,
portugisisk, spansk, russisk, japansk, koreansk, tradisjonell og forenklet kinesisk. Les diss anvisningene før projektoren tas
i bruk.
Este guia do usuário completo está disponível no CD anexo, como um arquivo pdf do Adobe Acrobat nos seguintes idiomas: inglês,
francês, alemão, italiano,
norueguês, português, espanhol, russo, japonês, coreano, chinês tradicional, chinês simplificado. Antes de utilizar este projet
or, leia estas instruções.
Este manual de uso está disponible en su totalidad en el CD incluido, como archivo pdf de Adobe Acrobat, en los siguientes idio
mas: inglés, frances, alemán,
italiano, noruego, português, español, ruso, japonés, coreano, chino tradicional, chino simplificado. Antes de usar el proyecto
r, lea estas instrucciones.
Ⱦɚɧɧɨɟ ɪɭɤɨɜɨɞɫɬɜɨ ɩɨɥɶɡɨɜɚɬɟɥɹ ɜ ɩɨɥɧɨɦ ɨɛɴɟɦɟ ɩɪɟɞɫɬɚɜɥɟɧɨ ɧɚ ɩɪɢɥɚɝɚɟɦɨɦ ɤɨɦɩɚɤɬ-ɞɢɫɤɟ ɜ ɜɢɞɟ pdf-ɮɚɣɥɚ Adobe Acrobat ɧɚ ɫɥɟɞɭɸɳɢɯ
ɹɡɵɤɚɯ: ɚɧɝɥɢɣɫɤɨɦ, ɮɪɚɧɰɭɡɫɤɨɦ, ɧɟɦɟɰɤɨɦ, ɢɬɚɥɶɹɧɫɤɨɦ, ɧɨɪɜɟɠɫɤɨɦ, ɩɨɪɬɭɝɚɥɶɫɤɨɦ, ɢɫɩɚɧɫɤɨɦ, ɪɭɫɫɤɨɦ, ɹɩɨɧɫɤɨɦ, ɤɨɪɟɣɫɤɨɦ,
ɬɪɚɞɢɰɢɨɧɧɨɦ ɢ ɭɩɪɨɳɟɧɧɨɦ ɤɢɬɚɣɫɤɨɦ. ɉɟɪɟɞ ɢɫɩɨɥɶɡɨɜɚɧɢɟɦ ɩɪɨɟɤɬɨɪɚ, ɩɪɨɱɢɬɚɣɬɟ ɞɚɧɧɵɟ ɢɧɫɬɪɭɤɰɢɢ.
ŘųKПП .ŴЕ<R$Ű֞ඤŜūʼnƐ CD Ű Adobe Acrobat ų PDF :P༜ŭŜūऄⲟŚƑūʼnƃŞЖᜑų➸⠰ųKПП
.Ɨřߓ᰻ʼnŤťŖƃŞЖ␣⠰Е:NX⠰Е.)⠰Е$O⠰Е3PП⠰ЕBP-P⠰Е?X⠰ЕR⠰ЕᎣᒍ⠰Е⺩
ઞ⠰Е‱ת
Ԟઞ⠰Е↭תԞઞ⠰ЖŘų<R$Ɨ᰻ŞƐ߰ŰЕKПП .Ɨ྿şŏ⠿ƄŔťŚʼnЖ
&' $GRE H$ FU RE DW S GI
Adobe Acrobat (PDF)
동봉된 CD에는 Adobe Acrobat pdf 파일 형식의 사용 설명서가 영어, 프랑스어, 독일어, 이탈리아어, 노르웨이어, 포르투갈어, 스페인어, 러시아어, 일본어, 한국
어, 중국어(번체 및 간체)로 제공됩니다. 이 프로젝터를 사용하기 전에 다음 지침을 읽으십시오.

2
Declaration of Conformity
Manufacturer: InFocus Corporation, 27500 SW Parkway Ave. Wilsonville, Oregon
97070 USA
European Office: Strawinskylaan 585, 1077 XX Amsterdam, The Netherlands
We declare under our sole responsibility that the projector conforms to the following
directives and norms:
EMC Directive 89/336/EEC, Amended by 93/68/EEC
EMC: EN 55022
EN 55024
EN 61000-3-2
EN 61000-3-3
Low Voltage Directive 73/23/EEC, Amended by 93/68/EEC
Safety: EN 60950: 2000
July, 2002
Trademarks
Apple, Macintosh, and PowerBook are trademarks or registered trademarks of Apple
Computer, Inc. IBM is a trademark or registered trademark of International Business
Machines, Inc. Microsoft, PowerPoint, and Windows are trademarks or registered
trademarks of Microsoft Corporation. Adobe and Acrobat are trademarks or regis-
tered trademarks of Adobe Systems Incorporated. Digital Light Processing is a trade-
mark or registered trademark of Texas Instruments. InFocus and LP are trademarks
or registered trademarks of InFocus Corporation.
FCC Warning
This equipment has been tested and found to comply with the limits for a Class A
digital device, pursuant to part 15 of the FCC Rules. These limits are designed to pro-
vide reasonable protection against harmful interference when the equipment is oper-
ated in a commercial environment. This equipment generates, uses, and can radiate
radio frequency energy and, if not installed and used in accordance with the instruc-
tion manual, may cause harmful interference to radio communications. Operation of
this equipment in a residential area is likely to cause harmful interference in which
case the user will be required to correct the interference at his own expense.
Canada
This Class A digital apparatus complies with Canadian ICES-003.
Cet appareil numérique de la classe A est conforme à la norme NMB-003 du Canada.
Remote Control Warning
Laser radiation class II product; wavelength 650nm; maximum output 1mW. Remote
control complies with applicable requirements of 21 CFR 1040.10 and 1040.11.
Remote control complies with applicable requirements of EN 60 825-1: 1994 +A11.
Do not look into the laser beam emitted
from the top of the remote control.

3
Table of Contents
Introduction 5
Connecting a computer 6
Required computer connections 6
Displaying a computer image 7
First-time projector use with Windows 98 8
Adjusting the image 10
Connecting a video device 11
Displaying a video image 12
Shutting down the projector 14
Troubleshooting your setup 14
Using the keypad buttons 22
Using the remote control 23
Using the audio 24
Optimizing computer images 25
Presentation features 25
Optimizing video images 26
Customizing the projector 26
Using the menus 27
Picture menu 28
Settings menu 31
Maintenance 34
Cleaning the lens 34
Replacing the projection lamp 35
Appendix 37
Accessories 37
Red LED Behavior and Projector Errors 38
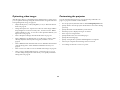
If you are experienced in setting up presentation systems, use the Quick Set
Up card that was included in the box. For complete details on connecting
and operating the projector, refer to this User’s Guide. Electronic versions of
this User’s Guide in multiple languages are available on the included CD
and on our website.
The website also has technical specifications (an interactive image size cal-
culator, laptop activation commands, connector pin outs, a glossary, the
product data sheet), a web store to buy accessories, and a page for online
registration. See the inside of the back cover for a list of all contact numbers
and relevant web addresses.
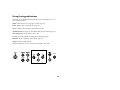
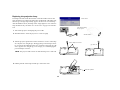
Important Operating Considerations
Do not place the projector on a tablecloth or other soft covering that may
block the vents. Intake vents are placed along the left, front and back sides
of the projector.
Exhaust vents are placed along the right side of the projec-
tor. In the unlikely event that the lamp ruptures, discard any edible items
and thoroughly clean the area along the right side of the projector.
2 ft (.6m)
Do not place objects in the area along the right side of the projector

4

5
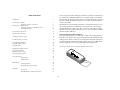
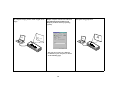
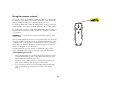
Introduction
Your new digital projector packs great performance into a shape and size
customized for the mobile professional. It fits comfortably in your laptop
bag then transitions easily into your presentation environment. It is easy to
connect, easy to use, and easy to maintain.
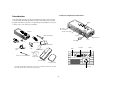
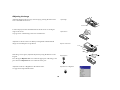
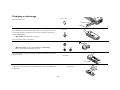
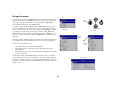
Projector components and features
documentation
remote
computer
cable
projector
power
cable
audio cable adapter
audio cable
S-video cable
S-video to composite adapter
protective sleeve
accessory pouch
lens cap*
* the lens cap with tether ships in the accessory pouch. Insert the tether into the small
hole under the lens when you unpack your projector.
SCART adapter
keypad
connectors
elevator foot release
zoom
focus
lens cap
IR receiver
for remote
computer
s-video
audio
power cord

6
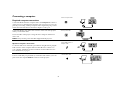
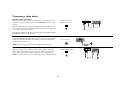
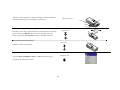
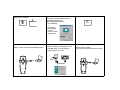
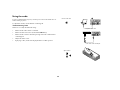
Connecting a computer
Required computer connections
Connect the black end of the computer cable to the Computer in connector
on the projector. Connect the blue end to the video (VGA) port on your com-
puter. If you are using a desktop computer with a single VGA port, you first
need to disconnect the monitor from that computer’s video port.
Connect the black power cable to the connector on the side of the projector
and to your electrical outlet.
The Power LED on the projector’s keypad turns solid green and the fans
start to run.
NOTE: Always use the power cable that shipped with the projector.
Optional computer connections
To advance slides in a PowerPoint™ presentation using the remote, plug the
USB connector on the computer cable into the USB mouse connector on
your computer. USB drivers must be installed to use the USB feature. For
more information, see page 9.
To have sound with your presentation, connect the audio cable to your com-
puter and to the computer Audio In connector on the projector.
connect computer cable
connect power cable
connect USB portion of
computer cable
connect audio cable

7
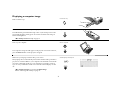
Displaying a computer image
Remove the lens cap.
Press the Power button on the top of the projector.
The LED flashes green. When the lamp comes on, the startup screen is dis-
played and the LED is steady green. It can take a minute for the image to
achieve full brightness.
? No startup screen? Get help on page 15.
Turn on your computer.
The computer’s image should appear on the projection screen. If it doesn’t,
press the Source button on the projector’s keypad.
Make sure your laptop’s external video port is active.
Many laptops do not automatically turn on their external video port when a
projector is connected. Refer to your computer’s documentation to learn the
activation commands specific for your computer. For example, some lap-
tops use a key combination of FN + F5 to turn the external display on and
off.
? No computer image? Try pressing the Auto Image
button on the keypad. Get help on page 16.
remove lens cap
press Power
turn on computer
source
activate laptop’s external port

8
First-time projector use with Windows 98
The first time you connect a computer running Windows 98 to the projector,
the computer recognizes the projector as “new hardware” and the Add
New Hardware Wizard appears. Follow these instructions to use the Wiz-
ard to load the correct driver (which was installed with your Windows
operating system).
If you are running Windows 2000, Windows ME, or Windows XP, skip these
steps and go to “Adjusting the image” on page 10.
a Click Next to begin searching for the driver.
b Make sure “Search for the best driver” is selected, then click Next.
c Uncheck any checked boxes, then click Next. Windows automatically
locates the driver. If this driver has been removed, reload the driver using
your Windows operating system CD.
d When Windows finds the driver, you are ready to install it. Click Next.
a
b
c
d

9
Skip this page if you did not connect the USB portion of the computer
cable. The USB connection enables slide advance during presentations
and projector control software.
For Windows 98:
• If you connected the USB cable, the Add New Hardware Wizard
appears again. Drivers must be installed to use the USB functionality.
• The Wizard launches three times.
The first time it detects a USB Composite Device.
The second time a USB Human Interface Device (for the keyboard).
The third time it detects a USB Human Interface Device (for the
mouse).
For Windows 2000, Windows ME, and Windows XP:
• The USB drivers are automatically installed.

10
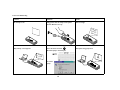
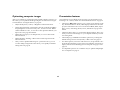
Adjusting the image
Adjust the height of the projector, if necessary, by pressing the release but-
ton to extend the elevator foot.
Position the projector the desired distance from the screen at a 90 degree
angle to the screen.
See page 38 for a table listing screen sizes and distances.
Adjust the zoom tab or the focus dial by rotating them until the desired
image size and sharpness are produced.
If the image is not square, adjust the keystone by using the buttons on the
keypad.
Press the upper Keystone button to reduce the upper part of the image, and
press the lower Keystone button to reduce the lower part.
Adjust the Contrast or Brightness in the Picture menu.
See page 27 for help with the menus.
adjust height
release button
adjust distance
adjust zoom and focus
focus
zoom
adjust keystone
adjust Contrast or Brightness

11
Connecting a video device
Standard video connections
Plug the S-video cable’s connector into the S-video-out connector on the
video device. Plug the other connector into the S-Video connector on the
projector.
Plug the white connector of the audio adapter into the left audio out con-
nector on the video device and plug the red connector into the right audio
out connector on the video device.
Plug the audio cable into the other end of the audio cable adapter and into
the audio in connector on the projector.
Connect the black power cable to the connector on the side of the projector
and to your electrical outlet. The Power LED on the keypad turns solid
green and the fans start to run.
NOTE: Always use the power cable that shipped with the projector.
Optional video connections
If the video device uses a composite video connector, plug a composite
video cable (sold separately) into the composite connector on the video
device and into the S-video adapter. Plug the S-video adapter into the
S-video connector on the projector. Use the audio cables as described above.
connect S-video cable and
audio cable and adapter
connect power cable
connect composite video cable and adapter
and audio cable and adapter

12
Displaying a video image
Remove the lens cap.
Press the Power button on the top of the projector.
The LED flashes green. When the lamp comes on, the startup screen is dis-
played and the LED is steady green. It can take a minute for the image to
achieve full brightness.
? No startup screen? Get help on page 15.
Plug in and turn on the video device.
? No video image? Try pressing the Source or Auto Image
button on the keypad. Get help on page 15.
Adjust the height of the projector by pressing the release button to extend
the elevator foot.
Position the projector the desired distance from the screen at a 90 degree
angle to the screen. See page 38 for a table listing screen sizes and distances
to the screen.
remove lens cap
press Power
turn on video device
source
adjust height
release button
adjust distance

13
Adjust the zoom using the tab or the focus using the dial by rotating them
until the desired image size and sharpness are produced.
If the image is not square, adjust the keystone using the buttons on the key-
pad. Press the upper Keystone button to reduce the upper part of the
image, and press the lower Keystone button to reduce the lower part.
Adjust the volume on the keypad.
Adjust the Contrast, Brightness, Color, or Tint in the Picture menu.
See page 27 for help with the menus.
adjust zoom and focus
focus
zoom
adjust keystone
adjust volume
adjust Picture menu

14
Shutting down the projector
By default, the projector automatically displays a blank screen after no
active source is detected for 30 minutes. This blank screen helps preserve
the life of the projector. The image returns when an active source is detected
or a remote or keypad button is pressed.
Screen Save
You can make the blank screen appear after a different time interval using
the Settings>System menu. See page 32. There are six time options, rang-
ing from five minutes to 30 minutes with five minute intervals.
Power Save
The projector also has a Power Save feature that, when activated, automati-
cally turns the lamp off after no signals are detected for 20 minutes. After 10
additional minutes with no signal, the projector powers down. If an active
signal is received before the projector powers down, the image is displayed.
You must press the Power button to display an image after 30 minutes have
passed. When Power Save is enabled, Screen Save is disabled. See page 31.
Turning off the projector
To turn off the projector, press the power button and verify that you want to
turn the projector off by pressing the power button again within 3 seconds.
You can cancel the shutdown by not pressing the power button a second
time. The lamp turns off and the LED blinks green for 1 minute. When the
lamp has cooled, the LED lights green. Unplug the power cable to com-
pletely power off the projector.
Troubleshooting your setup
If your image appears correctly on the screen, skip to the next section
(page 23). If it does not, troubleshoot the setup.
The LED on top of the projector indicates the state of the projector and can
help you troubleshoot.
The following tables show common problems. In some cases, more than one
possible solution is provided. Try the solutions in the order they are pre-
sented. When the problem is solved, you can skip the additional solutions.
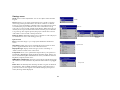
Table 1: LED behavior and meaning
LED color/behavior Meaning
solid green The projector is plugged in, or the projec-
tor has been turned on and the software
has initialized or the projector has been
turned off.
blinking green The power button has been pressed and
the software is initializing, or the projec-
tor is powering down.
blinking red
see page 38 for more information
A fan or lamp failure has occurred. Make
sure the vents aren’t blocked (see
page 20).Turn off the projector and wait
one minute, then turn the projector on
again. If the Change Lamp message
appears, replace the lamp and reset the
lamp timer. Contact Technical Support if
the problem persists
.
solid red An unidentifiable error: please contact
Technical Support.

15
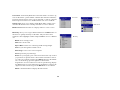
Source Troubleshooting
Problem Solution Result
No startup screen Plug power cable in and press the power
button. Remove lens cap.
Correct image
Only startup screen appears Press the Source button
Activate laptop’s external port
Computer image projected
startup
screen
A
startup
screen
or restart
laptop
so
ur
ce
A
A

16
No computer image, just the words “Signal out of
range”
Adjust computer refresh rate in Control
Panel>Display>Settings>Advanced>
Adapter (location varies by operating
system)
Computer image projected
A
Signal out of
range
You may also need to set a different
resolution on your computer, as shown
on the following page
A
A

17
Image fuzzy or cropped
Set your computer’s display resolution to
the native resolution of the projector
(Start>Settings>Control
Panel>Display>Settings tab,
select1024x768)
Image clear and not cropped
Remote control not advancing PowerPoint slides
Connect computer cable (page 6), then
load USB drivers, if needed (page 8)
Check batteries in remote
Remote advances slides.
See page 23 for information on the remote
A
AA
For a laptop,
disable laptop
monitor
or turn-on dual-
display mode
A
X

18
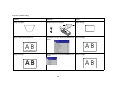
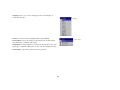
Projector troubleshooting
Problem Solution Result
Image not square Adjust keystone on keypad
Square image
Edges of video image distorted
Turn Overscan on in the Picture>Advanced
menu
Correct image
Image not sharp
Adjust Sharpness in the Picture>Advanced
menu
Correct image
AB
AB
ABAB
AB
Page is loading ...
Page is loading ...
Page is loading ...
Page is loading ...
Page is loading ...
Page is loading ...
Page is loading ...
Page is loading ...
Page is loading ...
Page is loading ...
Page is loading ...
Page is loading ...
Page is loading ...
Page is loading ...
Page is loading ...
Page is loading ...
Page is loading ...
Page is loading ...
Page is loading ...
Page is loading ...
Page is loading ...
Page is loading ...
Page is loading ...
Page is loading ...
Page is loading ...
Page is loading ...
-
 1
1
-
 2
2
-
 3
3
-
 4
4
-
 5
5
-
 6
6
-
 7
7
-
 8
8
-
 9
9
-
 10
10
-
 11
11
-
 12
12
-
 13
13
-
 14
14
-
 15
15
-
 16
16
-
 17
17
-
 18
18
-
 19
19
-
 20
20
-
 21
21
-
 22
22
-
 23
23
-
 24
24
-
 25
25
-
 26
26
-
 27
27
-
 28
28
-
 29
29
-
 30
30
-
 31
31
-
 32
32
-
 33
33
-
 34
34
-
 35
35
-
 36
36
-
 37
37
-
 38
38
-
 39
39
-
 40
40
-
 41
41
-
 42
42
-
 43
43
-
 44
44
-
 45
45
-
 46
46


Proxima ASA Projector DP1200x User manual
- Category
- Projectors
- Type
- User manual
- This manual is also suitable for
Ask a question and I''ll find the answer in the document
Finding information in a document is now easier with AI