Panasonic NVVZ1E Operating instructions
- Category
- Camcorders
- Type
- Operating instructions
This manual is also suitable for
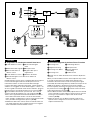
Panasonic NVVZ1EG: Record special moments with ease using this versatile and user-friendly camcorder. Capture stunning videos and photos with its high-quality lens and CCD imager. Enjoy the convenience of digital recording on VHS cassettes for easy sharing and playback.
Panasonic NVVZ1EG: Record special moments with ease using this versatile and user-friendly camcorder. Capture stunning videos and photos with its high-quality lens and CCD imager. Enjoy the convenience of digital recording on VHS cassettes for easy sharing and playback.


-
 1
1
-
 2
2
-
 3
3
-
 4
4
-
 5
5
-
 6
6
-
 7
7
-
 8
8
-
 9
9
-
 10
10
-
 11
11
-
 12
12
-
 13
13


Panasonic NVVZ1E Operating instructions
- Category
- Camcorders
- Type
- Operating instructions
- This manual is also suitable for
Panasonic NVVZ1EG: Record special moments with ease using this versatile and user-friendly camcorder. Capture stunning videos and photos with its high-quality lens and CCD imager. Enjoy the convenience of digital recording on VHS cassettes for easy sharing and playback.
Ask a question and I''ll find the answer in the document
Finding information in a document is now easier with AI
in other languages
- italiano: Panasonic NVVZ1E Istruzioni per l'uso
Related papers
-
Panasonic NVRZ2EG User manual
-
-
-
-
-
-
-
-
-
Other documents
-
Medion MD 85472 Owner's manual
-
Silvercrest DV-5300HD - IAN 55979 User manual
-
Silvercrest HD SCAZ 5.00 B2 User Manual And Service Information
-
-
Sony α NEX 5R User guide
-
-
-
Sony ILCE 7R User manual
-
-
AIPTEK 400442 Owner's manual