WMF PERFECT Owner's manual
- Category
- Pressure cookers
- Type
- Owner's manual
This manual is also suitable for

Perfect
Design Jo. Laubner
WMF AG D-73309 Geislingen
www.wmf.de
64 1062 0790 printed 08/11
Perfect PerfectPerfect Perfect
Käufer Purchaser
Name Name
Straße Street
Land State PLZ Postal code Ort Town
WMF Fachgeschäft WMF Retailer
Verkaufsdatum Date of sale
Stempel WMF Fachgeschäft WMF retailer’s stamp
Perfect
DE Garantieabschnitt
GB Guarantee voucher
ES Cupón de garantía
BG Гаранционна карта
DK Garantibevis
FI Takuukortti
FR Bon de garantie
GR Αποκοччα εγγυηοηζ
IT Tagliando di garanzia
NL Garantiebewijs
NO Garantibevis
PL Dowód gwarancji
PT Cupão de garantia
RU Гарантийный талон
SE Garantisedel
SK Záručný ústrižok
SI Grancijski list
CZ Záruční list
TR Garanti kuponunum
HU Garanciaszelvény
HR Garancijski obrazac
Perfect
WMF AG
Eberhardstrasse
D-73309 Geislingen
www.wmf.de
Perfect
Page is loading ...
Page is loading ...
Page is loading ...
Page is loading ...
Page is loading ...
Page is loading ...
Page is loading ...
Page is loading ...
Page is loading ...
Page is loading ...
Page is loading ...
Page is loading ...
Page is loading ...

15
DEGBESBG
DK
FI
FR
GR
IT
NL
NO
PL
PT
RU
SE
SK
SICZ
TR
HU
HR
Operating instructions
GB
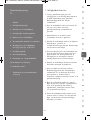
Contents
1. Safety Notes
2. How to use the pressure cooker
3. Notes on operation
4. Cooking using your pressure cooker
5. Four methods for pressure reduction
6. Care and maintenance of the
pressure cooker
Cleaning, storage, maintenance
7. Versatile use
8. Guarantee statement
9. Preclusion of liability
10. Troubleshooting
11. Table of cooking times
Accessories and spare parts
See cover
1. Safety Notes
1. Please carefully read the operating manual
and all the instructions before using the
WMF pressure cooker. Improper use may
result in damage.
2. Do not allow anyone to use the pressure
cooker unless they have first read the
operating manual.
3. Keep children away from the pressure cooker
while it is in use.
4. Never use your pressure cooker in the oven.
The high oven temperatures could damage
handles, valves and safety devices.
5. Move the pressure cooker very carefully
while it is pressurised. Do not touch hot
surfaces. Use the handles and buttons
provided. Use gloves if necessary.
6. Only use the pressure cooker for the purpose
intended.
7. This appliance cooks with the aid of
pressure. Improper use may result in burns.
Take care to ensure that the appliance is
properly closed before heating it up. You will
find information on this in the operating
manual.
8. Never use force to open the pressure cooker.
Never open it before you are sure that the
interior is fully depressurised. You will find
information on this in the operating manual.
9. Never heat the pressure cooker without any
water inside; this would cause serious
damage to the pressure cooker.
Minimum: 1/4 l water.
BAL_PerfectPlus_Perfect_Innenteil_Alle Sprachen 19.07.11 11:17 Seite 15

16
Important note:
Take care to ensure that the liquid never fully
evaporates. This could result in food burning
onto the pot and the pot being damaged by
melting plastic parts. The hob could also be
damaged by the aluminium in the base melt-
ing. If this should occur then switch off the
heat source and do not move the pot until it
has cooled down completely.
10. Never fill the pressure cooker to more than
2/3 of its capacity. If using foodstuffs
which expand during the cooking process,
such as rice or dried vegetables, fill the
pressure cooker to a maximum of half its
capacity and observe any instructions de-
tailed in the operating manual with regards
to this.
11. Never leave your pressure cooker
unattended. Regulate the heat to ensure
that the cooking indicator does not rise
above the corresponding orange ring. If the
heat is not turned down, steam will escape
through the valve. Cooking times may
change and the loss of liquid may result in
function faults.
12. Only use the heat sources listed in the
operating manual.
13. If you have cooked meat with the skin
attached (such as ox-tongue), which may
expand under the influence of pressure,
take care not to pierce the meat while the
skin remains expanded. This could result in
burns.
14. In principle, always shake the pressure
cooker before opening it to avoid pockets
of steam spitting out; this could result in
scalding. This is particularly important
when releasing steam quickly or
depressurising the pressure cooker under
running water.
15. When releasing steam quickly or depressu-
rising under running water, always keep
your hands, head and body away from the
danger area. You could otherwise be inju-
red by escaping steam.
16. Before each use of your pressure cooker,
check that the safety devices, valves and
seals are working properly. Only then can
the safe functioning of your pressure
cooker be guaranteed. You will find
information on this in the operating
manual.
17. Do not use your pressure cooker to fry food
in oil under pressure.
18. Never interfere with the safety systems,
except when carrying out the maintenance
work specified in the operating manual.
19. Replace the wear parts (see warranty
statement) at regular intervals. Parts
showing apparent discolouration, cracks
or other damage, or which no longer sit
correctly, must be replaced with original
WMF spare parts.
20. Only use original WMF spare parts.
In particular, always use pots and lids of
the same model.
21. Do not use the pressure cooker if it or its
parts are damaged or distorted, or if their
functionality does not correspond to that
described in the operating manual. If that
is the case, please consult your nearest
WMF dealer or WMF AG's Customer Service
Department in Geislingen/Steige.
Please keep this operating manual in a safe
place.
BAL_PerfectPlus_Perfect_Innenteil_Alle Sprachen 19.07.11 11:18 Seite 16

17
DEGBESBG
DK
FI
FR
GR
IT
NL
NO
PL
PT
RU
SE
SK
SICZ
TR
HU
HR
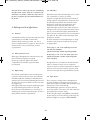
2. How to use the pressure cooker
Before first use
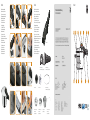
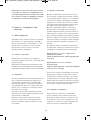
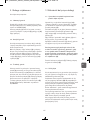
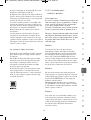
2.1. Open the pot
Move the sliding indicator (7) to the end of
the handle, using both ends. The indicators on
the sliding indicator (7) must be set to
AUF/OPEN (A).
Pivot the lid handle (5) to the right until the
markings on the lid and the pot handle (6) are
facing one another (B). Lift off the lid.
2.2. Cleaning the pot
Before first use, you should remove the labels
and wash all parts of your pressure cooker
(see section on “Cleaning").
Turn the lid over and detach the lid handle (5)
from the lid. For this purpose, pull the orange
slide (4) on the underside of the lid handle (5)
towards the end of the handle as indicated by
the arrow (C), fold down handle, and then de-
tach (D). Remove the sealing ring (10) from
the lid (P).
2.3. Closing the pot
Insert the handle into the lid and move the
orange slide (4) across the lid rim until it audi-
bly engages (E). Insert the sealing ring (10) into
the rim of the lid such that it is located under-
neath the inwardly bent rim of the lid (G).
Replace lid (see marking on lid and pot handle)
and turn lid handle to the left until the stop
position has been reached (B). Move the sliding
indicator (7) exactly to the position
ZU/LOCKED.
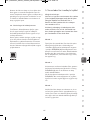
3. Notes on operation
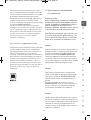
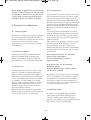
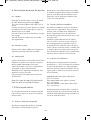
3.1. Checking the safety devices
before each use
Ensure that the sealing ring (10) and lid rim
are clean. Check that the ball is sitting visibly
in the safety valve (9) on the underside of the
lid (G).
If the ball should be located in the upper
chamber of the safety valve / the automatic
cooking system (9), remove the handle (5) and
use your finger to press the ball into the lower
chamber (F).
Remove the handle and check the main valve (3)
for moveability by pressing with your
finger (H).
Inspect the cooking indicator seal (2) visually
to check for fit and damage.
Please note: Do not press down on the coo-
king indicator seal, since this could result in
damage to the residual pressure lock, and the
functionality of your pressure cooker could no
longer be guaranteed (Q).
Insert the handle in the lid (E). Place the lid on
the pot and close it (B).
3.2. Liquid volumes
At least 1/4 l of liquid is required to generate
steam, regardless of whether you are cooking
with or without inserts (12).
To ensure that your pressure cooker’s functio-
nality is not impaired, do not fill it to more
than 2/3 of its capacity (M). When cooking
foodstuffs which foam or expand heavily (e.g.
stock, pulses, innards, compotes), only fill the
pot to half its capacity. See the section on
‘Preparing wholefood’ for further information.
If you want to brown your food before
cooking (e.g. onions, meat pieces etc.), you
can use your WMF pressure cooker as a
conventional pot. In order to complete the
cooking, deglaze the cooker and add the
requisite amount of liquid (at least 1/4 l)
before closing the pressure cooker.
BAL_PerfectPlus_Perfect_Innenteil_Alle Sprachen 19.07.11 11:18 Seite 17

18
Caution! Never cook without sufficient liquid
and take care to ensure that the cooking li-
quid never evaporates fully. Failure to observe
the above may result in food getting burned,
or in damage to the pot or its plastic handles.
4. Cooking using your
pressure cooker
4.1. General
Your pressure cooker cooks food under pres-
sure, i.e. at a temperature above 100 °C. This
reduces cooking times by up to 70 %, a signifi-
cant energy saving. Due to the short cooking
time in steam the food's flavour, taste and vi-
tamins are largely preserved.
4.2. Cooking with inserts
Depending on the size of your pressure cooker,
you can cook with inserts (12) or a trivet (13).
Inserts and trivets are available as accessories
from your specialist dealer (see “Accessories
and Spare Parts” inside the cover).
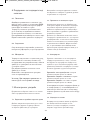
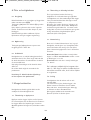
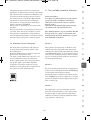
4.3. Heating
Place closed, filled pot onto a source of heat
and set to maximum heat. Via the automatic
heating system (9), which is simultaneously
a safety valve, air escapes during this heating
phase until the valve closes audibly and pres-
sure can build up.
The cooking indicator (1) rises, the yellow pres-
sure ring and the two orange cooking rings be-
come visible (J).
Reduce the heat in good time and sufficiently,
so that the orange cooking ring recommended
in the recipe remains just visible.
4.4. Cooking times
The cooking time only starts once the ring re-
commended in the recipe is fully visible. Take
care to ensure that the ring position remains
stable. Regulate the heat accordingly. If the
cooking indicator (1) falls below the required
orange ring, you will have to turn up the heat
a little.
This will slightly prolong the cooking time.
If the cooking indicator (1) rises above the se-
cond orange ring, excess pressure will result.
This pressure will escape audibly via the main
valve (3) on the lid handle.
Remove the pot from the hob, wait until the
cooking indicator has fallen to the second
orange ring, and turn the heat back on.
Pressure cooking facilitates shorter cooking
times because the steam pressure in the pot re-
sults in higher temperatures.
First ring, approx. 110 °C for delicate foods
such as fish or compote.
(operating pressure 45 kPa, regulating
pressure 90 kPa)
Second ring, approx. 119 °C for all other foods.
(operating pressure 95 kPa, regulating
pressure 130 kPa, max. 150 kPa)
Energy-conscious users will want to turn off
the heat even before the end of the cooking
time, since the heat stored in the pot will suf-
fice to finish the cooking process. Cooking
times may differ for same foodstuffs depending
on quantity, form, and composition of the food.
4.5. Opening the pot
At the end of the cooking time remove the
pressure cooker from the hob. On principle,
the lid should only be opened and removed
from the pot once the pot is depressurised.
This means that the cooking indicator (1) must
have fully disappeared into the handle (I).
BAL_PerfectPlus_Perfect_Innenteil_Alle Sprachen 19.07.11 11:18 Seite 18

19
DEGBESBG
DK
FI
FR
GR
IT
NL
NO
PL
PT
RU
SE
SK
SICZ
TR
HU
HR
The residual pressure lock ensures that the pot
can only be opened once fully depressurised,
i.e. once even the yellow pressure ring is no
longer visible.
If the yellow ring is still visible (K), this means
that the residual pressure lock has reacted. To re-
lease it, shortly move the sliding indicator (7) to
the ZU/LOCKED position.
When all the steam has escaped, briefly shake
the pot.
This will release any pockets of steam from the
food. Such bubbles may form especially when
cooking liquid or viscous foods, and they can
spit out when removing the lid. Now turn the
lid handle to the right as described, and open
the pot.
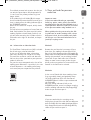
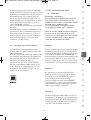
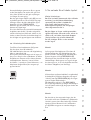
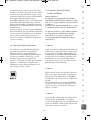
4.6. Information on induction hobs
The TransTherm® universal base (11) is suitable
for all hob types, also for induction.
In the case of induction hobs, a humming
noise may develop if on a high heat setting.
This noise has technical causes and does not
indicate that either your hob or your pressure
cooker is defective.
The pot size must correspond to the size of the
cooking zone. Otherwise – especially in the case
of small diameters – the cooking zone (mag-
netic zone) may not respond to the pot base.
5. Three methods for pressure
reduction
Important note:
If you have cooked foaming or expanding
foods (e.g. pulses, stock, grains), you should
not depressurise the pot using methods 2 or 3.
Jacket potatoes will burst if you let steam out
of the pressure cooker using method 2 or 3.
When quickly releasing steam using the slid-
ing indicator, or under running water, always
keep your hands, head and body away from
the danger area. You could otherwise be in-
jured by escaping steam.
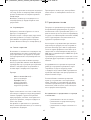
Method 1
Remove the pot from the heat source. After a
short time, the cooking indicator (1) will fall.
Once it has fully disappeared into the handle (I),
slowly move the sliding indicator to AUF/OPEN (A).
During this procedure, any remaining residual
steam will escape from under the lid handle.
When no more steam escapes, shake the pot
briefly so that any pockets of steam which have
formed in the food can be released.
Method 2
In the case of foods with short cooking times
(e.g. vegetables), slowly and gradually move
the sliding indicator (7) in the direction of
AUF/OPEN (A) until steam escapes underneath
the lid handle.
Once the sliding indicator is fully at the
AUF/OPEN position, steam is no longer escaping
and the cooking indicator has fully dropped (I),
shake the pot and then open it.
Method 3
If you are worried by the escaping steam,
simply place the pot in the sink and run cold water
over the lid (L), until the cooking indicator (1) has
fully disappeared into the lid handle (I). Briefly
shake the pot and then open it.
BAL_PerfectPlus_Perfect_Innenteil_Alle Sprachen 19.07.11 11:18 Seite 19

20
6. Care and maintenance of the
pressure cooker
6.1. Cleaning
Unclip the lid handle and rinse off from both
sides under running water (D) (N).
Remove the sealing ring (10) from the lid (P)
and rinse by hand.
The pot, lid and inserts can be washed in the
dishwasher. Food residues should not be
scraped off but soaked in water.
Scald with a vinegar and water solution to
remove lime deposits.
The base of the pot should also be cleaned
regularly.
6.2. Storage
Store the sealing ring (10) separately after
cleaning in order to protect it.
6.3. Maintenance
Your pressure cooker is a technical appliance
and its individual parts may be subject to
wear-and-tear. Therefore, after prolonged use,
you should check all the individual parts in
accordance with the spare parts list.
If any changes are apparent, the parts in
question must be replaced.
Only use original spare parts produced by the
manufacturer.
Note: Any damage to the lid handle (5) will
require a factory repair.
7. Versatile use
The advantages of pressure cooking do not only
apply to standard methods of food preparation:
7.1. Cooking frozen food
Frozen food can be placed in the pot directly
from the freezer. Meat must be defrosted
slightly before browning. Vegetables can be
placed in the insert straight from the packet.
While the heating-up times will be prolonged,
cooking times will remain the same.
7.2. Cooking wholefood
Wholefood often involves grains and pulses.
Grains and pulses need not necessarily be soa-
ked before cooking them in a pressure cooker.
If they are not soaked, cooking times will be
prolonged by about 50 %.
As well as the minimum liquid volume of 1/4 l,
at least 2 parts liquid must be added to 1 part
grain/pulses. The residual heat from the hob
can be used for final swelling. Remember that,
when cooking foaming or expanding foods
(grains, pulses), the pot can only be filled to
half its capacity.
7.3. Making preserves
1 l preserving jars should be cooked in a 6.5 l or
8.5 l pressure cooker, while smaller jars should
be cooked in a 4.5 l pressure cooker. Prepare the
food to be bottled as normal. Pour 1/4 l water
into the pot. Place the preserving jars into the
perforated insert.
Cook vegetables / meat on the second orange
indicator for approximately 20 minutes.
Cook stoned fruit on the first orange indicator
for approximately 5 to 10 minutes.
For releasing steam allow the pot to cool down
slowly (method 1) – do not depressurize by
means of the sliding indicator or under run-
ning water, as otherwise the juice will be spill
out of the jars.
7.4. Juicing
You can use your pressure cooker to juice small
quantities of fruit.
Pour 1/4 l water into the pot. Place the fruit
in the perforated insert on top of the un-
perforated insert; add sugar to taste. Cook
using the second orange ring. The cooking time
BAL_PerfectPlus_Perfect_Innenteil_Alle Sprachen 19.07.11 11:18 Seite 20

21
DEGBESBG
DK
FI
FR
GR
IT
NL
NO
PL
PT
RU
SE
SK
SICZ
TR
HU
HR
will be between 10 and 20 minutes, depending
on the type of fruit.
Depressurise the pot under running water
(method 3). Shake briefly before opening.
7.5. Sterilising
Baby bottles, preserving jars etc. can be quickly
sterilised.
Place them in the perforated insert with the
opening facing downwards. Add 1/4 l water
and sterilise for 20 minutes using the second
orange ring. Allow to cool down slowly (method 1).
7.6. Cooking with inserts
Depending on the size of your pressure cooker,
you can cook with inserts or a trivet. Inserts
and trivets are available as accessories from
your WMF dealer.
You can also cook several foods simultaneously
in your pressure cooker. The inserts are used to
separate the individual foods. First, place the
food requiring the longest cooking time in the
pot (without insert).
Examples
Roasts (20 min) – pot base
Potatoes (8 min) – perforated insert
Vegetables (8 min) – unperforated insert
First cook the roast for around 12 minutes.
Then open the pot according to the instruc-
tions. Place the potatoes in the perforated
insert on the trivet, place the vegetables in
the unperforated insert, close the pot and
cook for a further 8 minutes.
If there is no major difference in cooking
times, all inserts can be placed in the pot at
the same time.
Opening the pot during use allows steam
to escape. Therefore, add a little more liquid
to the pot than required.
8. Guarantee statement
We guarantee the full functionality of the pro-
duct and all its parts during the guarantee pe-
riod. The guarantee period is 3 years. It starts
on the date the product is bought from the
WMF dealer; this must be documented by a gua-
rantee slip fully completed by the WMF dealer.
If the product becomes defective during the
guarantee period, we will remedy the defect
free of charge, replacing the defective parts
with new ones. Defective parts can only be
replaced by a WMF dealer or by the WMF AG
Customer Service Department in
Geislingen/Steige.
The guarantee claim extends exclusively to this
claim. Any further claims deriving from the
guarantee are ruled out.
The guarantee slip must be submitted when
claiming under guarantee. This guarantee slip
must be given to the WMF dealer together
with the WMF pressure cooker. The guarantee
entitlement only exists upon presentation of
the fully completed slip.
Of course, this guarantee statement does not
affect your statutory warranty rights. Within
the warranty period, you have statutory
warranty rights to retrospective performance,
abatement, repudiation and damage compen-
sation to the extent prescribed by law.
The guarantee obligation does not cover the
following:
– Cooking indicator seal
– Seal, residual pressure safety device
– Seal, steam-off aperture
– Safety valve
– Sealing ring
– Batteries
These parts are subject to natural wear-
and-tear. 10-year supply guarantee on the
corresponding spare parts.
BAL_PerfectPlus_Perfect_Innenteil_Alle Sprachen 19.07.11 11:18 Seite 21

22
9. Preclusion of liability
No guarantee is assumed for damage caused
by the following:
– Inappropriate and improper use
– Incorrect or careless handling
– Improperly implemented repairs
– The fitting of spare parts which do not
correspond to the original design
– Chemical or physical effects on the pot
surfaces
– Non-compliance with these operating
instructions
Name and address of the warranty provider
WMF AG
Eberhardstraße
D-73309 Geislingen/Steige
The guarantee claim must be filed either
directly with the guarantee provider or with
an authorised WMF dealer.
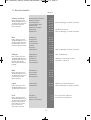
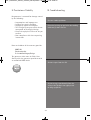
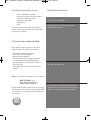
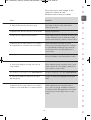
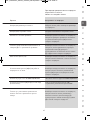
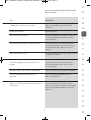
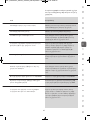
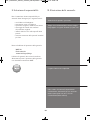
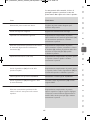
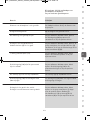
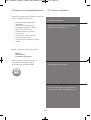
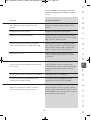
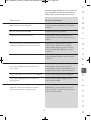
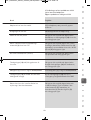
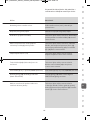
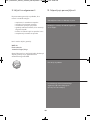
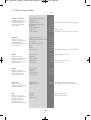
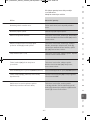
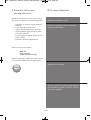
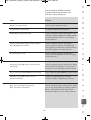
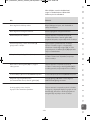
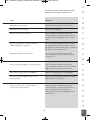
10. Troubleshooting
Pressure cooker problems
Excessive heating-up period or the cooking
indicator (1) does not rise.
Steam escapes from the lid.
Steam emerges continuously from the
safety valve (9) (does not apply to the
heating-up phase).
BAL_PerfectPlus_Perfect_Innenteil_Alle Sprachen 19.07.11 11:18 Seite 22

23
DEGBESBG
DK
FI
FR
GR
IT
NL
NO
PL
PT
RU
SE
SK
SICZ
TR
HU
HR
Cause
Diameter of the hob is unsuitable.
Inappropriate heat level.
Lid incorrectly positioned.
The ball in the safety valve (9) is not
positioned correctly.
Not enough liquid (at least 1/4 l).
Sealing ring (10) and/or pot edge are not clean.
The sliding indicator (7) is not in position ZU/LOCKED.
Sealing ring (10) is damaged or hard
(due to wear).
The ball does not sit correctly in the valve.
The ball was forced into the upper chamber.
If there is a problem, always remove
the pressure cooker from the hob.
Never use force to open!
Rectification
Select hob which is suitable for the
pot diameter.
Set to the highest heat level.
Fully depressurise the pot, open the lid. Check
that the sealing ring (10) is positioned properly
and close the pot again.
Fully depressurize the pot, open, remove handle,
check the safety valve (9), check that the metal
ball is positioned properly in the lid (F) and (G)
close the pot again.
Fully depressurise the pot, open the lid.
Add liquid and close the pot again.
Fully depressurise the pot, open the lid. Clean
sealing ring (10) and pot edge and close the pot
again.
Move the sliding indicator (7) to position ZU/LOCKED.
Correct the seating of the seals or replace with
original WMF spare parts.
Fully depressurise the pot, open the lid and
remove the handle. Force the ball into the
lower chamber (F). Check the main valve (3)
for moveability (G) and close the pot again.
BAL_PerfectPlus_Perfect_Innenteil_Alle Sprachen 19.07.11 11:18 Seite 23

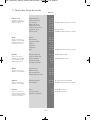
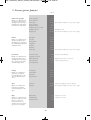
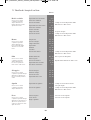
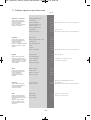
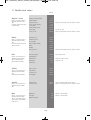
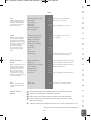
24
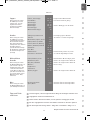
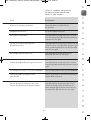
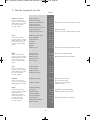
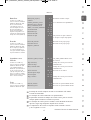
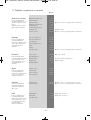
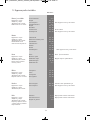
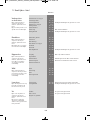
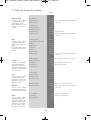
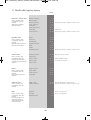
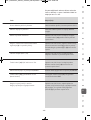
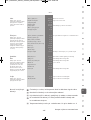
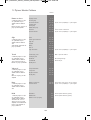
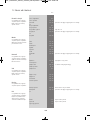
Pork and Veale
C
ooking temperature is at
2nd ring. Make sure there
i
s at least 1/4 l of liquid.
Special insert is not re-
quired with any dish.
Beef
Cooking temperature is at
2nd ring. Make sure there
is at least 1/4 l of liquid.
Perforated insert required
for beef tongue.ötigt.ötigt.
Chicken
Cooking temperature is at
2nd ring and amount of
at least 1/4 l. remain the
same. Perforated insert
needed for boiling fowl.
Game
Cooking temperature is at
2nd ring. Make sure there
is at least 1/4 l of liquid.
No special insert needed.
Lamb
Cooking temperature is at
2nd ring. Make sure there
is at least 1/4 l of liquid.
Fish
Cooking temperature is at
1st ring. Make sure there
is at least 1/4 l of liquid.
No insert needed for
ragout or stew. Otherwise
use solid insert.
Minutes
Pork cut in strips 5-4
Ragout of pork 10-15
Joint of pork 20 -25 Time depends on size and shape
Veal cut in strips 5- 7
Ragout of veal 10-15
Knuckle of veal 25 -30
Veal tongue 15-20 Cover with water
Joint of veal 20 -25 Time depends on size and shape
Meat loaf 10-15
Marinated joint 30 -35
Tongue 45-60
Strips of beef 6- 8
Goulash 15-20
Roulades 15-20
Joint of beef 35 -45 Time depends on size and shape
Boiling fowl 20-25 Max. 1/2 capacity
Chicken pieces 6- 8
Turkey leg 25 -30 Depending on size
Turkey ragout 6-10
Turkey escalope 2-3
Rabbit 15-20
Loin of rabbit 10-12
Venison 25 -30
Venison stew 15-20
Lamb stew 20-25 Mutton requires longer cooking time
Joint of lamb 25 -30 Depends on size and shape
Fillet of fish
2-3 Steamed in own juice
Whole fish 3 -4 Steamed in own juice
Ragout or stew 3-4
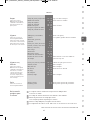
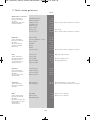
11. Cooking time chart
BAL_PerfectPlus_Perfect_Innenteil_Alle Sprachen 19.07.11 11:18 Seite 24

25
DEGBESBG
DK
FI
FR
GR
IT
NL
NO
PL
PT
RU
SE
SK
SICZ
TR
HU
HR
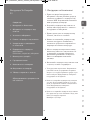
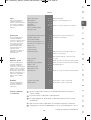
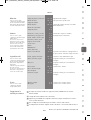
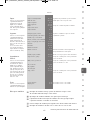
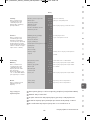
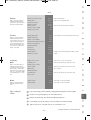
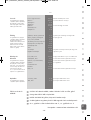
Soups
C
ooking temperature is at
2nd ring. Make sure there
i
s at least 1/4 l to a maxi-
mum of 1/2 capacity of
cooker. Special insert not
r
equired.
Vegetables
Cooking temperature is at
1
s
t
ring. Make sure there
is at least 1/4 l of liquid.
For sauerkraut and beet-
root, no insert required.
For other dishes the per -
forated insert is required.
From the beans onwards
the cooking temperature
increases (2nd ring).
Pulses, Cereals
Cooking temperature is at
2nd ring. Make sure there
is at least 1/4 l to a maxi-
mum of 1/2 capacity of
cooker. Using 2 parts water
to 1 part cereal. Cereal not
soaked in advanced needs
20 – 30 min. longer.
Fruit
Cooking temperature is at
1
st
ring. Make sure there is
at least 1/4 l of liquid.
Cooking tipps
and tricks
Minutes
Peas, lentils 12- 15 Soaked pulses
Beef broth 25-30 Correct for all meats
Vegetable soup 5-8
Goulash soup 10- 15
Chicken soup 20- 25 Cooking time dependent on size
Oxtail soup 35
Potato soup 5 -6
Aubergines, cucumbers, 2 -3 Steamed vegetables keep their colour
tomatoes better
Cauliflower, peppers, leek 3-5
Peas, celeriac, kohlrabi 4-6
Fennel, carrots, 5-8
Savoy cabbage
Beans, curly kale, 7-10
red cabbage
Sauerkraut 10-15
Beetroot 15-25
Potatoes 6-8
Potatoes, cooked 6 -10 Potatoes cooked in their skins burst
in their skins if in their skins steam is released fast
Peas, beans lentils 10- 15 Cook large beans 10 min longer
Buckwheat, millet 7-10 Cooking time for soaked cereal
Maize, spelt grain 6-15 Cooking time for soaked cereal
Pudding rice 20-25 Cooking temperature at 1
st
ring
Long-grain rice 6 -8
Brown rice 12-15
Wheat, rye 10-15 Cooking time for soaked cereal
Cherries, plums 2- 5 It is advisable to use the
perforated insert
Apples, pears 2 -5 It is advisable to use the
perforated insert
Cooking time begins as soon as the required cooking
indicator ring is visible
Times given are guides
Choose preferably shorter times as food can always be cooked longer
Times given result in firmly cooked vegetables
The cooking temperature at 1st ring is 109 °C and at 2
nd
ring is 117 °C
Recipes are to be found at www.wmf.com
BAL_PerfectPlus_Perfect_Innenteil_Alle Sprachen 19.07.11 11:18 Seite 25
Page is loading ...
Page is loading ...
Page is loading ...
Page is loading ...
Page is loading ...
Page is loading ...
Page is loading ...
Page is loading ...
Page is loading ...
Page is loading ...
Page is loading ...
Page is loading ...
Page is loading ...
Page is loading ...
Page is loading ...
Page is loading ...
Page is loading ...
Page is loading ...
Page is loading ...
Page is loading ...
Page is loading ...
Page is loading ...
Page is loading ...
Page is loading ...
Page is loading ...
Page is loading ...
Page is loading ...
Page is loading ...
Page is loading ...
Page is loading ...
Page is loading ...
Page is loading ...
Page is loading ...
Page is loading ...
Page is loading ...
Page is loading ...
Page is loading ...
Page is loading ...
Page is loading ...
Page is loading ...
Page is loading ...
Page is loading ...
Page is loading ...
Page is loading ...
Page is loading ...
Page is loading ...
Page is loading ...
Page is loading ...
Page is loading ...
Page is loading ...
Page is loading ...
Page is loading ...
Page is loading ...
Page is loading ...
Page is loading ...
Page is loading ...
Page is loading ...
Page is loading ...
Page is loading ...
Page is loading ...
Page is loading ...
Page is loading ...
Page is loading ...
Page is loading ...
Page is loading ...
Page is loading ...
Page is loading ...
Page is loading ...
Page is loading ...
Page is loading ...
Page is loading ...
Page is loading ...
Page is loading ...
Page is loading ...
Page is loading ...
Page is loading ...
Page is loading ...
Page is loading ...
Page is loading ...
Page is loading ...
Page is loading ...
Page is loading ...
Page is loading ...
Page is loading ...
Page is loading ...
Page is loading ...
Page is loading ...
Page is loading ...
Page is loading ...
Page is loading ...
Page is loading ...
Page is loading ...
Page is loading ...
Page is loading ...
Page is loading ...
Page is loading ...
Page is loading ...
Page is loading ...
Page is loading ...
Page is loading ...
Page is loading ...
Page is loading ...
Page is loading ...
Page is loading ...
Page is loading ...
Page is loading ...
Page is loading ...
Page is loading ...
Page is loading ...
Page is loading ...
Page is loading ...
Page is loading ...
Page is loading ...
Page is loading ...
Page is loading ...
Page is loading ...
Page is loading ...
Page is loading ...
Page is loading ...
Page is loading ...
Page is loading ...
Page is loading ...
Page is loading ...
Page is loading ...
Page is loading ...
Page is loading ...
Page is loading ...
Page is loading ...
Page is loading ...
Page is loading ...
Page is loading ...
Page is loading ...
Page is loading ...
Page is loading ...
Page is loading ...
Page is loading ...
Page is loading ...
Page is loading ...
Page is loading ...
Page is loading ...
Page is loading ...
Page is loading ...
Page is loading ...
Page is loading ...
Page is loading ...
Page is loading ...
Page is loading ...
Page is loading ...
Page is loading ...
Page is loading ...
Page is loading ...
Page is loading ...
Page is loading ...
Page is loading ...
Page is loading ...
Page is loading ...
Page is loading ...
Page is loading ...
Page is loading ...
Page is loading ...
Page is loading ...
Page is loading ...
Page is loading ...
Page is loading ...
Page is loading ...
Page is loading ...
Page is loading ...
Page is loading ...
Page is loading ...
Page is loading ...
Page is loading ...
Page is loading ...
Page is loading ...
Page is loading ...
Page is loading ...
Page is loading ...
Page is loading ...
Page is loading ...
Page is loading ...
Page is loading ...
Page is loading ...
Page is loading ...
Page is loading ...
Page is loading ...
Page is loading ...
Page is loading ...
Page is loading ...
Page is loading ...
Page is loading ...
Page is loading ...
Page is loading ...
Page is loading ...
Page is loading ...
Page is loading ...
Page is loading ...
Page is loading ...
Page is loading ...
Page is loading ...
Page is loading ...
Page is loading ...
Page is loading ...
Page is loading ...
Page is loading ...
Page is loading ...
Page is loading ...
Page is loading ...
Page is loading ...
Page is loading ...
Page is loading ...
Page is loading ...
Page is loading ...
Page is loading ...
Page is loading ...
Page is loading ...
Page is loading ...
Page is loading ...
Page is loading ...
Page is loading ...
Page is loading ...
Page is loading ...
Page is loading ...
Page is loading ...
Page is loading ...
Page is loading ...
Page is loading ...
Page is loading ...
Page is loading ...
Page is loading ...
-
 1
1
-
 2
2
-
 3
3
-
 4
4
-
 5
5
-
 6
6
-
 7
7
-
 8
8
-
 9
9
-
 10
10
-
 11
11
-
 12
12
-
 13
13
-
 14
14
-
 15
15
-
 16
16
-
 17
17
-
 18
18
-
 19
19
-
 20
20
-
 21
21
-
 22
22
-
 23
23
-
 24
24
-
 25
25
-
 26
26
-
 27
27
-
 28
28
-
 29
29
-
 30
30
-
 31
31
-
 32
32
-
 33
33
-
 34
34
-
 35
35
-
 36
36
-
 37
37
-
 38
38
-
 39
39
-
 40
40
-
 41
41
-
 42
42
-
 43
43
-
 44
44
-
 45
45
-
 46
46
-
 47
47
-
 48
48
-
 49
49
-
 50
50
-
 51
51
-
 52
52
-
 53
53
-
 54
54
-
 55
55
-
 56
56
-
 57
57
-
 58
58
-
 59
59
-
 60
60
-
 61
61
-
 62
62
-
 63
63
-
 64
64
-
 65
65
-
 66
66
-
 67
67
-
 68
68
-
 69
69
-
 70
70
-
 71
71
-
 72
72
-
 73
73
-
 74
74
-
 75
75
-
 76
76
-
 77
77
-
 78
78
-
 79
79
-
 80
80
-
 81
81
-
 82
82
-
 83
83
-
 84
84
-
 85
85
-
 86
86
-
 87
87
-
 88
88
-
 89
89
-
 90
90
-
 91
91
-
 92
92
-
 93
93
-
 94
94
-
 95
95
-
 96
96
-
 97
97
-
 98
98
-
 99
99
-
 100
100
-
 101
101
-
 102
102
-
 103
103
-
 104
104
-
 105
105
-
 106
106
-
 107
107
-
 108
108
-
 109
109
-
 110
110
-
 111
111
-
 112
112
-
 113
113
-
 114
114
-
 115
115
-
 116
116
-
 117
117
-
 118
118
-
 119
119
-
 120
120
-
 121
121
-
 122
122
-
 123
123
-
 124
124
-
 125
125
-
 126
126
-
 127
127
-
 128
128
-
 129
129
-
 130
130
-
 131
131
-
 132
132
-
 133
133
-
 134
134
-
 135
135
-
 136
136
-
 137
137
-
 138
138
-
 139
139
-
 140
140
-
 141
141
-
 142
142
-
 143
143
-
 144
144
-
 145
145
-
 146
146
-
 147
147
-
 148
148
-
 149
149
-
 150
150
-
 151
151
-
 152
152
-
 153
153
-
 154
154
-
 155
155
-
 156
156
-
 157
157
-
 158
158
-
 159
159
-
 160
160
-
 161
161
-
 162
162
-
 163
163
-
 164
164
-
 165
165
-
 166
166
-
 167
167
-
 168
168
-
 169
169
-
 170
170
-
 171
171
-
 172
172
-
 173
173
-
 174
174
-
 175
175
-
 176
176
-
 177
177
-
 178
178
-
 179
179
-
 180
180
-
 181
181
-
 182
182
-
 183
183
-
 184
184
-
 185
185
-
 186
186
-
 187
187
-
 188
188
-
 189
189
-
 190
190
-
 191
191
-
 192
192
-
 193
193
-
 194
194
-
 195
195
-
 196
196
-
 197
197
-
 198
198
-
 199
199
-
 200
200
-
 201
201
-
 202
202
-
 203
203
-
 204
204
-
 205
205
-
 206
206
-
 207
207
-
 208
208
-
 209
209
-
 210
210
-
 211
211
-
 212
212
-
 213
213
-
 214
214
-
 215
215
-
 216
216
-
 217
217
-
 218
218
-
 219
219
-
 220
220
-
 221
221
-
 222
222
-
 223
223
-
 224
224
-
 225
225
-
 226
226
-
 227
227
-
 228
228
-
 229
229
-
 230
230
-
 231
231
-
 232
232
-
 233
233
-
 234
234
-
 235
235
-
 236
236
-
 237
237
-
 238
238
-
 239
239
-
 240
240
-
 241
241
-
 242
242
-
 243
243
-
 244
244
-
 245
245
-
 246
246
-
 247
247
-
 248
248
-
 249
249
-
 250
250
-
 251
251
-
 252
252
-
 253
253


WMF PERFECT Owner's manual
- Category
- Pressure cookers
- Type
- Owner's manual
- This manual is also suitable for
Ask a question and I''ll find the answer in the document
Finding information in a document is now easier with AI
in other languages
- italiano: WMF PERFECT Manuale del proprietario
- français: WMF PERFECT Le manuel du propriétaire
- español: WMF PERFECT El manual del propietario
- Deutsch: WMF PERFECT Bedienungsanleitung
- русский: WMF PERFECT Инструкция по применению
- Nederlands: WMF PERFECT de handleiding
- português: WMF PERFECT Manual do proprietário
- slovenčina: WMF PERFECT Návod na obsluhu
- dansk: WMF PERFECT Brugervejledning
- polski: WMF PERFECT Instrukcja obsługi
- čeština: WMF PERFECT Návod k obsluze
- Türkçe: WMF PERFECT El kitabı
- svenska: WMF PERFECT Bruksanvisning
- suomi: WMF PERFECT Omistajan opas
Related papers
-
WMF Schnellkochtopf PerfectPlus Safety instructions & instructions for use
-
-
-
-
-
-
-
WMF 05 7001 4291 Operating instructions
-
-
Other documents
-
Fagor innova series Instructions For Use Manual
-
izzy Multi Set 8Lt & 4Lt Owner's manual
-
HAEGER PC-10S.016A User manual
-
-
Fagor Combi Chef 8+4 User manual
-
Groupe Brandt CLASSIC8D Owner's manual
-
Tefal P2530731 User manual
-
Bravetti PC107B User manual
-
Tefal P0541655 User manual
-