Craftsman 917.28033 User manual
- Category
- Lawnmowers
- Type
- User manual

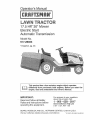
Operator's Manual
CR FT M No
LAWN TRACTOR
17.5 HP,*30" Mower
Electric Start
Automatic Transmission
Model No.
917.28033
oEspaSol, pg. 35
This product has a low emission engine which operates
differently from previously built engine s. Before you start the
engine, read and understand this Owner,s Manual.
IMPORTANT:
............Read and follow all Safety
Rules and Instructions before
operating this equipment.
For answers to your questions
about this. product, Call:
1 =800 -659 =5917
Sears Craftsman Help Line
5 am - 5 pro, Mon- Sat
SEARS, ROEBUCK AND CO. HOFFMAN ESTATES, IL 60179 U.S.A.
Visit our Craftsman website:wwwosears,com/craftsman *Ae rated by the engine manufaclurer

Warranty ................................................... 2
Safety Rules ............................................... 3
Product Specifications ................................. 6
Assembly/Pre - Operation ....................... 8
Operation ............................................... 13
Maintenance Schedule .............................. 19
Maintenance ............................................ 19
Service and Adjustments ....................... 23
Storage .................................................. 29
Troubleshooting ...................................... 30
Sears Service ........................... Back Cover
CRAFTSMAN LIMITED WARRANTY
TWO YEARS ON TRACTOR
When operated and maintained according to all supplied instructions, if this tractor fails
due to a defect in material or workmanship within two years from the date or purchase,
call 1-800-4-MY-HOME® to arrange for free repair_
During the first year of purchase, there will be no charge for warranty service in your home.
For your convenience, in-home warranty service will still be available after the first year
of purchase, but a trip charge will apply. This charge will be waived if you transport the
tractor to an authorized Craftsman drop-off location. For the nearest authorized location,
call !-800-4-MY-HOME®.
90 DAYS ON BATTERY
For ninety (90) days from date of purchase, if the battery included with this tractor is
defective in material or workmanship (our testing proves it will not hold a charge), it wilt be
replaced free of charge in your home.
This warranty covers ONFY defects in material and workmanship. Sears will NOT pay for:
. Expendable items that become worn during normal use, including but not limited to
blades, spark plugs, air cleaners, belts, and oi! filters.
• Standard maintenance servicing, oil changes, or tune-ups.
. Tire replacement or repair caused by punctures from outside objects, such as nails,
thorns, stumps, or glass.
• Tire or wheel replacement or repair resulting from normal wear, accident, or improper
operation or maintenance,
• Repairs necessary because of operator abuse, including but not limited to damage
caused by towing objects beyond the capability of the tractor, impacting objects that
bend the frame or crankshaft, or over-speeding the engine°
• Repairs necessary because of operator negligence, including but not limited to, electrical
and mechanical damage caused by improper storage, failure to use the proper grade
and amount of engine oil, failure to keep the deck clear of flammable debris, or failure
to maintain the equipment according to the instructions contained in the operator's
manual.
• Engine (fuel system) cleaning or repairs caused by fuel determined to be contaminated or
oxidized (stale). In general, fuel should be used within 30 days of its purchase date°
. Normal deterioration and wear of the exterior finishes, or product label replacement,
All tractor and battery warranty coverage is void if this product is ever used for
commercial or rental purposes.
This warranty applies only while this product is within the United States.
This warranty gives you specific legal rights, and you may also have other rights which
vary from state to state°
Sears, Roebuck and Co., Hoffman Estates, IL 60179
2

l!l _ t !HI
_DANGER: This cutting machine is capable of ampLItating hands and feet and
throwing objects. Failure to observe the fol!owing safety ,instructions could result
in serious injury or death.
_WARNING: In order to prevent accidental
starting when setting up, transporting, adjust-
ing or making repairs, always disconnect
spark plug wire and place wire where it
cannot contact spark plug.
_WARN1NG: Do not coast down a hill in
neutral, you may lose control of the tractor. "
_WARNING: Tow only the attachments
that are recommended by and comply with ,
specifications of the manufacturer of your ,
tractor. Use common sense when towing. :
Operate only at the lowest possible speed
when on a slope_ Too heavy of a load, while
on a slope, is dangerous° Tires can lose ,
traction with the ground and cause you to
lose control of your tractor.
,_WARNING: Engine exhaust, some of its
constituents, and certain vehicle components
contain or emit chemicals known tothe State •
ofCaliforniatocause cancerand birth defects ,
or other reproductive harm.
_WARNING: Battery posts, terminals and
related accessories contain lead and lead °
compounds, chemicals known to the State of
California to cause cancer and birth defects "
or other reproductive harm. Wash hands
after handling.
I. GENERAL OPERATION
, Read, understand, and follow all instruc-
tions on the machine and in the manual
before starting.
• De not put hands or feet near rotating !
parts or under the machine. Keep clear
of the discharge opening at all times.
, Only allow responsible adults, who are °
familiar with the instructions, to operate
the machine°
, Clearthe area of objects such as rocks, '
toys, wire, etc., which could be picked
up and thrown by the blades
, Be sure the area is clear of bystanders
before operating. Stop machine if anyone
enters the area°
• Never carry passengers.
, Do not mow in reverse unless absolutely
necessary° Always look down and behind
before and while backing°
INever dire_tldischaroed material toward
!anyone. /_oid discharging material
tagainst a _iall or obstruction_ Material
Imay ricochet back toward the operator.
!Stop the'i_lades when crossing gravel
isurfaces., i !i!
Do not operate machine without the entire
grass catcher, or other safety devices in
place and working°
Slow down before turning°
Never leave a running machine unat-
tended. Always turn off blades, set park-
ing brake, stop engine, and remove keys
before dismounting.
Disengage blades when not mowing.
Shut off engine and wait for all parts to
come to a complete stop before cleaning
the machine, removing the grass catcher,
or unclogging the discharge guard.
Operate machine only in daylight or good
artificial light,.
Do not operate the machine while under
the influence of alcohol or drugs°
Watch for traffic when operating near or
crossing roadways.
Use extra care when loading or unloading
the machine into a trailer or truck.
Always wear eye p rotectio nwhen o perat-
ing machine:
Data indicates that operators, age 60
years and above, are involved in a large
percentag e of riding mower - related in-
juries, These operators should evaluate
!their abilitytto operate the riding mower
safely enough to protect themselves and
others from serious injury,
Follow the manufacturer's recommem
dation for wheel weights or counter-
weights.
Keep machine free of grass , leaves
or other debris build - up which can
touch hot exhaust / engine parts and
burn. Do not allow the mower to plow
leaves or other debris which can cause
build - up to occur, Clean any oil or fue!
spillage before operating or storing the
machine. Allow machine to cool before
storage,
3

!t, SLOPE OPERATION
Slopes are a major factor related to loss of
control and tip - over accidents, which can
result in severe injury or death° Operation
on all slopes requires extra caution, if you
cannot back up the slope or ifyou feel uneasy
on it, do not mow iL
• Mow up and down slopes, not across,
, Never carry children, even with the
blades shut off. They may fall off and be
seriously injured or interfere with safe
machine operation. Children who have
been given rides in the past may suddenly
appear in the mowing area for another
ride and be run over or backed over by
the machine,,
Watch for holes, ruts, bumps, rocks, or " Never allow children to operate the me-
............other hidden objects.
Uneven terrain ........... chine.
could overturn the machine. Tall grass " Use extra care when approaching blind
can hide obstacles.
. Choose a low ground speed so that you
wilt not have to stop or shift while on the
slope.
. Do not mow on wet grass, Tires may lose
traction.
Always keep the machine in gear when
going down slopes., Do not shift to neutral
and coast downhill.
. Avoid starting, stopping, or turning on a
slope. If the tires lose traction, disengage
the blades and proceed slowly straight
down the slope_
, Keep all movement on the slopes slow
and gradual. Do not make sudden
changes in speed or direction, which
could cause the machine to roll over,
, Use extra care while operating machine
with grass catchers or other attach ments;
they can affect the stability of the ma-
chine° Do no use on steep slopes,
. Do not try to stabilize the machine by
putting your foot on the ground.
o Do not mow near drop - offs, ditches,
or embankments. The machine could
suddenly roll over if a wheel is over the
edge or if the edge caves in.,
Iii. CHILDREN
Tragic accidents can occur if the operator
is not alert to the presence of children.
Children are often attracted to the machine
and the mowing activity. Never assume
that children will remain where you last
saw them.
• Keep children out of the mowing area
and in the watchful care of a responsible
adult other than the operator,,
• Be alert and turn machine off if a child
enters the area.
• Before and while backing, look behind
and down for small children.
corners, shrubs, trees, or other objects
that may block your view of a child,
IV. TOWING
• Tow only with a machine that has a hitch
designed for towing. Do not attach towed
equipment except at the hitch point.
• Followthemanufacturer'srecommenda-
tion forweight limits for towed equipment
and towing on slopes.
• Never allow children or others in or on
towed equipment.
• On slopes, theweight ofthe towed equip-
ment may cause loss of traction and loss
of control.
- Travel slowly and allow extra distance to
stop.
V, SERVICE
SAFE HANDLING OF GASOLINE
To avoid personal injury or property dam-
age, use extreme care in handling gasoline.
Gasoline is extremely flammable and the
vapors are explosive,
. Extinguish all cigarettes, cigars, pipes,
and other sources of ignition.
° Use only approved gasoline container_
. Never remove gas cap or add fuel with
the engine running, Allow engine to cool
before refueling
• Neverfuel the machine indoors.
° Neverstorethe machine orfuel container
where there is an open flame, spark, or
pilot light such as on a water heater or
other appliances_
• Never fill containers inside a vehicle or
on a truck or trailer bed with plastic liner.
Always place containers on the ground
away from your vehicle when filling.
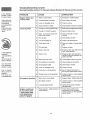
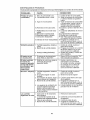
IDENTIFICA
Yea la seccil
PROBLEI_
P#rdida de
continuadc
Vibraci6n e
Et tractor st
en marcha
El motor co
funcionan c
cuando el e
se baja det
con el embl
del accesor
enganchadt
Ma corte - c
Las cuchill_
segadoras

_rvicioSears.
combustible,
AREL
,nde
santesde
bie la bateria.
de aire.
mbustibleo
, combustible
a a llenar el
a nueva
nbustibleo
"ado,
rburador"
_ioy Ajustes.
con un
_,rs O 00[1 url
) cualificado.
de aire.
ie la bateria.
mbustible.
_combustible
n gasolina
,ado,
_arburador"
o y Ajustes.
COn un
_rs o con uR
3 cualificado.
freno,,
rague del
bie la bateria
de la bateria.
rado,
rruptor de la
.moide o
con uP,
9.rs o OOl3 u13
cualificado.
bie la bateria.
Je tabated&
rado.
.moide o
_e,
aceleraci6n.
,r de fa caja
de aire.
._ite!cambie el
star la
bujfa,
o Remove gas- powered equipment from .
the truck or trailer and refuel it on the
ground, if this is not possible, then refuel
such equipment with a portable container,
rather than from a gasoline dispenser •
nozzle.
• Keep the nozzle in contact with the rim
of the fuel tank or container opening at .
all times until fueling is complete. Do not
use a nozzle lock - open device.
• If fuel is spilled on clothing, change cloth-
ing immediately.
o [--]ever overfill fuel tank_ Replace gas cap
and tighten securely. •
GENERAL SERVICE
. Never operate machine in a closed area.
• Keepallnutsandboltstighttobesurethe "
equipment is in safe working condition,
• NevertamperwithsafetydevicesoCheck "
their proper operation regularly°
Keep maclfine4_free of grass, leaves, or
other debris build - up. Clean oit or fue!
spillage and remove anyfuel- soaked de-
bris. Allow machine to cool before storing.
If you strike a foreign object, stop and
inspect themachine. Repair, ifnecessary,
before restarting,
Never make any adjustments or repairs
with the engine running,
Check grass catcher components and the
discharge guard frequently and replace
with manufacturer's recommended parts,
when necessary,
Mower blades are sharp. Wrap the blade
or wear gloves, and use extra caution
when servicing them.
Check brake operation frequently, Adjust
and service as required,
Maintain or replace safety and instruction
labels, as necessary,
. Be sure the area is clear of bystanders
before operating. Stop machine if anyone
enters the area.
• Never carry passengers.
• Do not mowin reverse unless absolutely
necessary, Always look down and behind
before and while backing.
- Never carry children, even with the
blades shut off. They may fall off and
be seriously injured or interfere with
safe machine operatiom Children who
have been given rides in the past may
suddenly appear in the mowing area for
another ride and be run over or backed
over by the machine.
. Keep children out of the mowing area
and in the watchful care of a responsible
adult other than the operator.
° Be alert and turn machine off i-fa child
enters the area,
Before and while backing, look behind
and down for small children.
• Mow up and down slopes (15 ° Max), not
across.
• Choose a low ground speed so that you
will not have to stop or shift while on the
slope_ : ,
• Avoid starting, stopping, or turning on a
slope, If the tires lose traction, disengage
the blades and proceed slowly straight
down the slope°
, If machine stops while going uphill, dis-
engage blades, shift into reverse and
back down SlOWly.
• Do nottum on slopes unless necessary,
and then, turn slowly and gradually down ....................
hill, if possible.
5

PRODUCT SPECIFICATIONS
Gasoline Capacity 1o50 Gallons
and ]_jpe: Unleaded Regular
Oil Type SAE 30 (above 32°F)
API - SG - SL): SAE 5W30 (below 32°F
Oil Capacity: Wi Filter: 56 oz,.
..................... W/O Filter: 48 ozo
Spark Plug: Champion RC12YC
(Gap: .030")
Ground Speed Forward: 0- 5.5
.................................. Reverse: 0- 2.4
Charging System: 3 Amps Battery
5 Amps Headlights
Battery: Amp/Hr: 28
Min. CCA: 230
Case size: UIR
Blade Bolt Torque: 45 - 55 Ft.. Lbs.
CONGRATULATIONS on your purchase of
a new tractor. It has been designed, engi-
neered and man ufactured to give you the best
possible dependability and performance.
Should you experience any problem you can-
not easily remedy, please contact a Sears or
other qualified service center. We have com-
petent, well-trained representatives and the
proper tools to service or repair this tractor.
Please read and retain this manual, The
instructions will enable you to assemble
and maintain your tractor properly. Always
observe the "SAFETY RULES"°
CUSTOMER RESPONSIBILITIES
• Read and observe the safety rules
• Follow a regular schedule in maintaining,
caring for and using your tractor.
. Follow the instructions under "Mainte-
nance" and "Storage" sections of this
owner's manual.
,_WARNING: This tractor is equipped with
an internal combustion engine and should
not be used on or near any unimproved
forest - covered, brush - covered or grass
- covered land unless the engine's exhaust
system is equipped with a spark arrester
meeting applicable local or state laws (if
any). If a spark arrester is used, it should
be maintained in effective working order by
the operator.
Inthe state of California the above is required
by law (Section 4442 ofthe California Public
Resources Code). Other states may have
similar laws. Federal laws apply on federal
lands. A spark attester for the muffler is
available through your nearest Sears service
center (See REPAIR PARTS manual).
REPAIR PROTECTION
AGREEMENTS
Congratulations on making asmart purchase.
Your new Craftsman@ product is designed
and manufactured for years of dependable
operation. But like all products, it may require
repair from time to time. That's when having
a Repair Protection Agreement can save you
money and aggravation.
Purchase a Repair Protection Agreement
now and protect yourself from unexpected
hassle and expense..
Here's what's included in the Agreement:
Expert service by our 12,000 profesional
repair specialists.
Unlimited service and no charge for parts
and labor on all covered repairs°
Product replacement if your covered
product can't be fixed,
Discount of 10% from regular price of
service and service - related parts not
covered by the agreement; also, 10% off
regular price of preventive maintenance
check.
Fast help by phone- phone support from
a Sears representative on products re-
quiring in - home repair, plus convenient
repair scheduling,
Once you purchase the Agreement, a
simple phone call is all that it takes for you
to schedule service., You can call anytime
day or night, or schedule a service appoint-
ment online°
Sears has over 12,000 professional repair
specialists, who have access to over 4,5
million quality parts and accessories. That's
the kind of professionalism you can count on
to help prolong the life of your new purchase
for years to come. Purchase your Repair
Protection Agreement today!
Some limitations and exclusions apply.
For prices and additional information call
1 - 800 - 827 - 6655.
SEARS INSTALLATION SERVICE
For Sears professional installation of home
appliances, garage door openers, water
heaters, and other major home items, in the
U.S.A. call 1 - 800 - 4 - MY. HOME®
lnmediatame
macenamien
tractor no se
_ADVERTE
con gasolina
en d0nde los
expuesta o u
enfrie antes c
privado,
TRACTOR
Cuando el tr_
peri0do de t
quite toda la
Gu&rdela en
1. Limpieto
secci6n d
2_ Inspeccio
esario (w
de ]as cc
Ajustes d
3. Lubriquel
de Mante
4 Aseg_res
los tornillc
tnspeccio
si hay dat
es neces_
5 Retoque 1
o picadaE
BATERiA
• Cargue la
guardarla,
• Despu_s
almacenar
volver a ca
• Para ayud[
potencia d
namiento, I
la bateria
(vea "PAR/
MINALES"
este manu
• Despu6s
desconec
puedan en
de la bater
• Si se remt
almacenar
sobre con(
MOTOR
SISTEMA D[
IMPORTAN'I
man deposit,
tales del siste
carburador, e
del combustil
tide oomo ,
metanol) pu_
duce a la sep
durante elaln
puede daSar
motor durant_
6

i I
hufable de 30
:lor del fusible
O DEL CAPO
dambre de las
arre el cap6 en
_cia el motor y
asegerese de
Jel alambre de
Conector deI
alambre de
las Luces
Delanteras
._ser removida
_=set purgada
_=sde operar el
}MISlON" en la
manual
CONTROL DE
preajustado en
_justes. Revise
:inuaci6n, antes
necesario, yea
DE
ido preajustado
ar ajustes.
DOR
Io en la f_,brica
in embargo, se
!or importancia
sen el combus-
-_iel carburador
de motor.
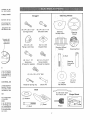
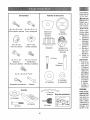
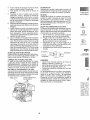
Bagger
%
(8) t/4 x 20 x 1.25"
Carriage Bolts
(10) 114x 20
Flange Lock Nuts
%
(2)1/4x 1,15"
Bosscrew
(Thread for plastic)
(6) 1/4 x 20 x 1,15
Shoulder Bolts
i
............... i .......
Steering Wheel
Steering
Wheel Insert Wheel
i i
i ,
(5) 114x 20
Square Nuts
Steering Wheel
i Adapter Steering Boot
(2) 1/4x 15 x 0.5"
Screw (Gold)
(Thread for plastic)
,r
(1) Bolt
i
Steering
t Extension
I i Shaft
i'
t '
(3) t/4 x 20 x 0,75" Bolt
Retainer Spring clip Clevis Pin
Seat
(1) Washer 'k___
_ (I) Seat
(1) Bolt
(1) Large
Flat Washer
(1) Lock
Washer
(1) Oil Drain Tube
For Future Use Slope Sheet
.......

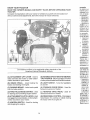
Your new tractor has been assembled at the factory with the exception of those parts left
unassembled for shipping purposes° To ensure safe and proper operation of your tractor
al! parts and hardware you assemble must be tightened securely. Use the correct tools as
necessary to ensure proper tightness°
TOOLS REQUIRED FOR ASSEMBEY"
....A socket wrench set will make assembly
easier. Standard wrench sizes are listed.
(t) 5/I6" wrench Utility knife
(2) 7/i 6" wrenches Tire pressure gauge
(2) 1/2" wrenches Pliers
(1) 9/16" wrench
When right or left hand is mentioned in this
manual, itmeanswhenyou are inthe operating
position (seated behind the steering wheel),
TO REMOVE TRACTOR FROM
CARTON
UNPACK CARTON
1. Remove all accessible loose parts and
parts boxes from carton,,
2. Cutalong dashed lines on allfour panels
of carton. Remove end panels and lay
side panels flat.
3. Check for any additional loose parts or
cartons and remove.
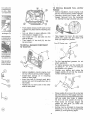
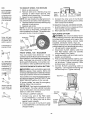
BEFORE REMOVING TRACTOR
FROM SKID
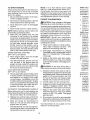
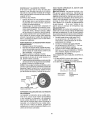
CHECK BATTERY
1, Lift seat pan to raised position.
NOTE: If this battery is put into service after
month and year indicated on label (label lo-
cated between terminals) charge battery for
minimum of one hour at 6 - 10 amps. (See
"BATTERY" in Maintenance section of this
manual for charging instructions),
Seat
Terminal
Terminal
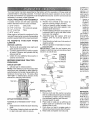
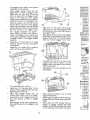
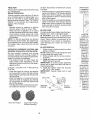
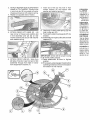
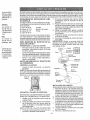
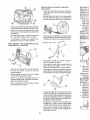
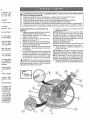
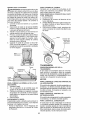
ATTACH STEERING WHEEL
ASSEMBLE EXTENSION SHAFT AND
BOOT
1. Slide extension shaft onto lower steering
shaft.
2. Place tabs of steering boot overtab slots
in dash and push down to secure.
INSTALL STEERING WHEEL
3. Position front wheels of the tractor so
they are pointing straight forward,
4o Remove steering wheel adapter from
steering wheel and slide adapter onto
..... steering shaft extension,
5. Position steeringwheelso cross bars are
horizontal (left to right) and slide inside
boot and onto adapter_
6. Assemble large flat washer, 5/16 lock
washer, 5/16 hex bolt and tighten se-
curely.
7, Snap steering wheel insert into center of
steering wheel°
8. Remove protective materials from tractor
hood and grill.
IMPORTANT: Check for and remove any
staples in skid that may puncture tires where
tractor is to roll off skid°
L°lnsert
ck
Bolt -_}_ Washer
_c_---_Large Fla! Washer
._.__.Steering
Wheel
Steering
Boot
Adapter---_____,(_
_ Extension
_.___-_Shaft
Lower \_( .....
Steering _'P" ........
Shaft ____., k '""---.-°",,
I ./5_,;1_-'% ',
Tab {_P--'':_"'_ 1'\
Stot--"t_ [ _i./ }
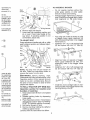
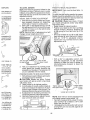
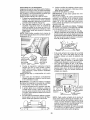
INSTALL SEAT
t. Remove bolt and flat washer securing
seat to cardboard packing and set aside
for assembly of seat to tractor. Remove
the cardboard packing and discar&
2, Connect switch to seat.
3_ Place seat on seat pan so all three (3)
bottom pads are positioned over large
slotted holes in pan.
4, Push down on seat to engage pads in
slots and pull seat towards rear of tractor,
5. Raise seat and tighten bolt securely,
B
CONTROLAI
Si el tractor _
pararse a un_
mAs alto en u
seco o pavirn_
y ajustar eFfr(
CONTROL D
1_ Aparcar e
de hormic
el pedal c
el freno d
2. Desembn
mando de
misi6n de
rueda libr
asi se col
Las ruedas tr
tinar cuando
el tractor man
freno o contac
de servicio CL
PARA REMO
REPARAClO
1.. Bloquee
2. Remueva
ci6n y las
de ias rue
llave cuac
3. Repare la
AVISO: En la.,
las ranuras el
ejeo inserte la
4o Vuelvaac_
de retencid
5. Vuefva a c(
AVISO: Pare
prevenir que t
pequefias fuc
Sears yutilizer
que las Ilanta.,
Anillc
Rete_
Cubierta '
del eje
Llave Cuadrada
trasera solamer
IMPRESION 1
DELANTERA
La impresi6n
teras de sun
y son normal
rJe las ruedas
caso que se F
impresi6n o I_
teras tel corn(
contacto con {
centro de sen

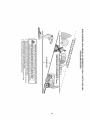
ransmisi6n y la
rdacorreas.
acionario (A) y
tral (C).,
oia la parte de
cuidado, retire
da de la trans-
)a y pas_,ndola
ventilador (D).
_1motor movi6-
te de atr&s del
direcci6n (F) y
®
parte de atr&s
.-tor,pas&ndoia
._cciSn(F) y del
ue t freno (G)o
le adelante del
._adel motor (E)_
a de atr&s del
7ueva la correa
,rdel ventilador
de la polea de
e la correa est6
Fee,
_6ncentral (C).
6n estacionario
(B),
calce en todas
_entrode todas
'ARA MONTAR
Jlodel manual).
Seat
switch
Slot
Seat
P
6_
7.
Wiring harness
Remove tape and discard.
Lower seat into operating position and
sit on seat° Press brake pedal all the
way down. If operating position is not
comfortable, adjust seat.
TO ADJUST SEAT
Grasp adjustment handle and pull up, slide
seat to desired position and release adjust-
ment handle.
Slot Tape
Flat
washer
Seat
pan Adjustment
Bolt Tab handle
NOTE: "You may now roll your tractor off
the skid. Follow the instructions below to
remove the tractor from the skid.
,_kWARNING: Before starting, read,
understand and follow all instructions in the
Operation section of this manual. Be sure
tractor is in a well - ventilated area. Be sure
the area in front of tractor is clear of other
people and objects_
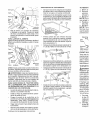
TO ROLL TRACTOR OFF SKID (See
Operation section for location and
function of controls)
1. Raise attachment lift lever to its highest
position,
2. Release parking brake by depressing
brake pedal.
3 Place freewheel control in "transmission
disengaged" position" (See "TO TRANS-
PORT" in Operation section of manual),
4. Roll tractor forward off skid.,
5. Remove banding holding the deflector
shield up against tractor,.
Continue with the instructions that follow.
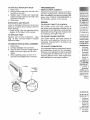
TO ASSEMBLE BAGGER
. Do not operate machine without the
entire grass catcher, or other safety
devices in place and working.
• Feed top bagger frame tube (1)through
loop (2) atthetop of bagger fabric (leave
loop segments on the ends loose).
• First, align two holes as shown on side
of bagger frame upper weldment (4)
with corresponding holes in top bagger
frame tube (1).
• Install two 1/4" - 20 x 125 carriage bolts
(5) and secure with two 1/4" nuts (6).
• Align two holes on opposite of bagger
frame upper weldment (4) with corr-
esponding holes in top bagger frame
tube (1).
• Install two 1/4" - 20 x 1.25 carriage bolts
(5) and secure with two 1/4" nuts (6).
Install two more carriage bolts (7) rear-
ward on sides of top bagger frame tube,
hand tightening nuts (8).
9

• Lay bagger cover upside - down (leave
protective covering intact),.
. Slide bagger handle insert (9) into
depression on inside of bagger cover,.
Make sure the two tabs at the top
lock into place with the bagger cover.
Teeth at the bottom of the bagger'
......................handle insert should slide into place in
between the teeth on the bagger cover,
. Slide two square nuts (10) into the two
square slots at the front of the bagger
cover and two square nuts into the two
square slots (one slot on each side) at
..........................the- rear-, handle of the- bagger cove[:
. Turn bagger assembly (3) upside
down, lining up holes in the frame to
holes in the bagger cover, making sure
frame upper weldment tubing is seated
in plastic cradle in the bagger handle
insert (9).
• Install four 1/4" hex bolts (!1) in holes
with four square nuts (10) and tighten
until seated°
• Install two 1/4" screws (12) in holes at
center of frame upper weldment.
, Turn assembly right- side up.
° Install two 1\4" carriage bolts (13) at
bottom of front bagger frame (I4), hand
tightening lock nuts (15).
. Feed front bagger frame (14) up
through fabric loops at front of bagger.
• Snap bottom of front bagger frame (14)
into snap feature at front of bagger
bottom.
• Slide bagger fabric loop segments at
the ends of bag onto top bagger frame
tubing.
• Slide two 1\4" hex bolts (16) through
holes at top of the front bagger frame
and thread into nuts inside the tubing of
top bagger frame..
• Slide plastic clip (17) down into bagger
fabric loop on right side and snap to front
bagger frame (I4) 101 mm (4 inches)
from top of front bagger frame tube.
° Uninstall lock nuts (21) at rear of top
bagger frame and at bottom of front
bagger frame and attach cross braces
(22) on each side.
• Reinstall lock nuts (21) and tighten until
fully seated.
• Slide rubber seal (23) to top of metal
bagger handle (24).
• Slide bagger handle (24) down through
bagger cover and frame upper weldment
holes.
• Slide clevis pin (25) through hole at
bottom of bagger handle and slide
retainer spring (26) into hole at the end
of the clevis pin until it locks into place
PARA NIVEL
Aseg_rese de
ta PSI que se i
inflados o poc
bien cortado,
la SEGADOR
REGULACIO
1. Sitodoslc
inflados y
codado dq
cortadora
2. Con una
regulabte
tuerca de
para bajaJ
h&gala gil
para subi_
NOTA: Cada
ajuste her& va
madamente 3
Haga girar la
tuerca f_acia!
la derecha
paresubir4a
segadora_
3. Pruebe I_
c6sped q_
vando co
case nec,
satisfact#_
REGULAClOI
A LADO
1. Con todo
inflados, e
o en la en
CUIDADO:
las manos co_
con tela grue.,
2o Suba la S
3. A ambos
cuchilla h_
que hay e
y el suelo.
a ambos I
4,. En caso q_
lea los pa_
laci6n Vis_
10

Jela piezade
encuentraen
_ra(H),yfijelo
' unresortede
_.iiI
embrague (Q)
3ntrae!soporteo
_rencima de la
e la correa (G).
rea encaje bien
:te lacortadora.
la posici6n de
. Push plastic closeout (27) back so that
it snaps into place behind retaining ribs
(28).
• Line up holes in grass deflector (29)
with bosses in bagger cover°
• First install 1/4" hex bolt (30) into the
side as shown.
, Then install 1/4" hex bolt (31) into the
top as shown.
TO INSTALL BAGGER COMPONENT
TO TRACTOR
TO INSTALL BAGGER FULL LEVER/
PADD_LE i
" Before installation, tractor engine must
be shut off and parking brake engaged.
• Standing behind the tractor with the
bagger removed from the backplate
(I), identify the bag full switch (2) area..
_.. _'L. _"
Take bagger full lever (3) and insert
tab(4) into upper slot and rotate until
lever (3) snaps into position.
Front Qf Tractor
:liras del calibre
_iento la corta-
itulo de Manejo
, Before installation, tractor engine must
be shut off and parking brake engaged.
' Install latch springs (1) in mounting
holes on back plate,
, Insert hex bolt (2) through each latch
spring hole and corresponding hole in
back plate.
, Fasten lock nut (3) to bolt on the other
side of back plate.
. For the heaviest/wet grasses, do not
attach paddle (5),,
• For lighter grasses use the paddle (5)
on setting "1 ", "2", or "3" ("3" being for
the lightest or dry grass)°
• Choose your setting and rotate the
bagger paddle (5) so that the desired
number (setting) faces you°
@
• Place paddle (5) on lever (3) so that tab
(6) at the bottom of the bagger full lever
(3) goes through appropriate rectangular
slot and make sure holes in bagger
........ full lever (3) and paddle (5) line up.
• Feed screw (7) through bagger full
--- paddle (5) and lever (3) holes and
............. fasten using nut (8). ....................................
• Setting may be changed by loosening
fasteners (7 and 8), removing!rotating
paddle (5), and tightening again.
11

CHECK TIRE PRESSURE
The tires on your tractor were overinflated
at the factory for shipping purposes. Correct
tire pressure is important for best cutting
performance,
• Reduce tire pressure to PSI shown on
..........i ill-tires ..................... i..................
CHECK DECK LEVELNESS
For best cutting results, mower housing
should be properly leveled. See "TO LEVEL
MOWER" in the Service and Adjustments
section of this manual.
CHECK FOR PROPER POSITION OF
ALL BELTS
See the figures that are shown for replacing
motion and mower blade drive belts in the
Service and Adjustments section ofthis man-
ual. Verify that the belts are ['outed correctly.
CHECK BRAKE SYSTEM
After you learn how to operate your tractor,
check to see that the brake is operating prop-
erly. See"TO CHECK BRAKE" inthe Service
and Adjustments section of this manual.
_#fCHECKLIST
Before you operate your new tractor, we
wish to assure that you receive the best
performance and satisfaction from this
Quality Product.
Please review the following checklist:
_/All assembly instructions have been
completed.
_/No remaining loose parts in carton.
J'Battery is properly prepared and
..... charged,_
v/ Seat is adjusted comfortably and tight-
ened securely,,
_/f All tires are properly inflated. (For ship-
ping purposes, the tires were overinflated
at the factory).,
_if Be sure mower deck is properly leveled
side - to - side/front - to - rear for best
cutting results. (Tires must be properly
inflated for leveling)°
Check mower and drive belts, Be sure
they are routed properly around pulleys
and inside all belt keepers.
vf Check wiring. See that all connections
are still secure and wires are properly
clamped.
_if Before driving tractor, be sure freewheel
control is in "transmission engaged"
position (see "TO TRANSPORT" in the
Operation section of this manual).
While learning how to use your tractor, pay ex
-tra attention to the fotlowing important items:
Engine oil is at proper level.
Jf Fuel tank is filled with fresh, clean, regular
unleaded gasoline.
J Become familiar with all controls, their
location and function. Operate them
before you start the engine.
_/ Be sure brake system is in safe operating
condition.
Be sure Operator Presence System and
Reverse Operation System (ROS) are
working properly (See the Operation and
Maintenance sections in this manual),.
_/ It is important to purge the transmission
before operating your tractor for the first
time° Follow proper starting and transmis-
sion purging instructions (See "TO START
ENGINE and PURGETRANSMISSION
in the Operation section of this manual).
12
ADVER'I
ClO O D
1, Presion_
2, Ponga ia
3, Ponga e
4, Ponga fa
5. AsegOre_
6, Descone
PARA DI=SM,
ClaSPED
1, Suelte elE
"DISENGJ
2, Baje la p_
posici6n c
3, Ruede la
fijadors dE
4 Paraquital
5o Retire elr
dei brazo
6_ Desconec
la cortado
y la arand
7, Porunode
el brazo c
del chasis
la barra p,
los resort_
,_ CUIDAD(
piezas de unid
funcionar_, a r_
elevadora al c
(
J

or corroido y el
aquipado) pues
dio y!o dafios.
, de cada tem-
ada 100 horas
tero. El tipo de
arecen en "ES-
JCTO" secci6n
LINEA
biarse una vez
-ombustible se
"nbustiblehacia
iarlo_
Efiltro y tapone
_ombustibleo
e nuevo ell SU
bustible con la
burador.
_nfugas en la
s grapas est6n
a,
a gasolina der-
i Abrazadera
, del motor, la
:C,
asy tas ruedas
te, etc..
s con cera tipo
,_una mangue-
_ara limpiar el
la transmisi6n
los del agua.
si6n acortan la
_mprimido o un
hierba, hojas y
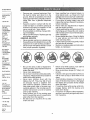
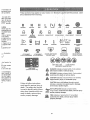
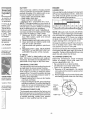
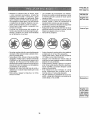
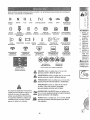
These symbols may appear on your tractor or in literature supplied with the product, Learn
and understand their meaning.
R N H L IXi
REVERSE NEUTRAL HIGH LOW CHOKE
Q # 8 8
ENGINE OFF REVERSE ENGINE ON ENGINE START
OPERATION
SYSTEM (ROS)
LIGHTS ON FUEL BATTERY REVERSE
i'@,
FAST'
@,
I
PARKING BRAKE!
i
FORWARD
@
SLOW IGNITION SWITCH
@
fltOWER HEIGHT
I' f
CRUISE CONTROL
MOWER LIFT
CLUTCHIBRAKE
PEDAL
ATTACHMENT ATTACHMENT
CLUTCH DISENGAGED CLUTCH ENGAGED
DANGER, KEEP HANDS
ANDFEETAWA¥
OPERATE ONLY
WITH BAGGER
DO NOT OPERATE
WITHOUT BAGGER
FREE WHEEL &
(Automatic Models only)
&
Failure to follow instructions
could result in serious injury or
death.. The safety alert symbol
is used to identify safety inform-
ation about hazards which can ,,,,tf_,_,_,,,,,
result in death, serious injury .......
and/or property damage. /_,
@@®®®
KEEP AREA CLEAR i , SLOPE HAZARDS
(SEE SAFETY RULES SECTION)
DANGER indicates a hazard which, if not avoided,
will result in death or serious injury.
WARNING indicates a hazard which, if not avoided,
could result in death or serious injury.
• ,j
CAUTION indicates a hazard which, if not avoided,
might result in minor or moderate injury.
q i
CAUTION when usedwithout the alert symbol,
indicates a situation that could result in damage
to the tractor and/ol"engineo
;
HOT SURFACES indicates a hazard which,
if not avoided, could result in death, serious injury
and/or property damage.
FIRE indicates a hazard which, if not avoided,
could result in death, serious injury and/or
....... property damage.
13

KNOW YOUR TRACTOR
READ THIS OWNER'S MANUAL AND SAFETY RULES BEFORE OPERATING YOUR
TRACTOR
Compare the illustrations with your tractor to familiarize yourself with the locations of
various controls and adjustments. Save this manual for future reference,
Our tractors conform to the applicable safety standards of the
American National Standards Instituter
(A) ATTACHMENT LIFT LEVER - Used to
raise and lower the mower or other attach-
ments mounted to your tractor,
(B) BRAKE PEDAL - Used braking the
tractor and starting the engine.,
(C) PARKING BRAKE - Locks brake pedal
into the brake position.
(D) THROTTLE/CHOKE CONTROL- Used
for starting and controlling engine speed°
(E) ATTACH MENT CLUTCH LEVER -Used
to engage the mower blades, or other attach-
ments mounted to your tractor_
(F) IGNITION SWITCH _ Used for starting
and stopping the engine,
(G) REVERSEOP ERATIO NSYSTEM (ROS)
"ON" POSITION -Allows operation of mower
or other powered attach merit while in reverse°
(H) LIGHT SWITCH - qqJrns the headlights
on and off.
(K) FORWARD DRIVE PEDAL - Used for
forward movement of tractor,
(L) REVERSE DRIVE PEDAL- Used for
reverse movement of tractor.
(M) FREEWHEELCONTROL- Disengages
transmission for pushing or slowly towing
the tractor with the engine off,
BATERiA
Su tractor cue
bateria que e_
embargo, si s_
con un carga(
su duraci6n.
• Mantenga I
• Mantenga I
• Mantenga I
flos abieflo
• Vuelva a ca
AVlSO: La b
tractor no be(
remover las t_
a_,adir o verifi,
PARAL1MPIAI
La corrosi6n
terminales pu,
cia en la batel
1, Desconec
primero y
y remuev_
2, Enjuague
s6quelao
3. Limpie los
de la batel
que qued_
4. Cubra los
5, Reinstale
Baleria" e
de este m
CORREAS V
Revise las c_
deterioro y d_
operaci6n y c
reas no son
empiezan a d
ENFRIAMIEI_
Las afetas de
transmisi6n Ii_
asegurar el el
No trate de lit
cuando el mo
transmisi6n e
• Inspeccion_
asegurarse
intactas y li
• lnspeccion,
verificar si
otros mate
juntas, no u
o de alta I:
enfriamient
NiVEL DEL F
Et transeje h
mantenimient
vida del trans
se filtrase onc
ponerse en c
Sears o con uJ
14

,]IENTOATR,&,S
"ha con et inte-
motor "ON" y el
:tado, cualquier
r marcha atr_.s,
"ha con e! inte-
Funcionamiento
"y el embrague
lquier tentativa
atrb,s, NO apa-
las cuchillas de
Reemplace las
_daso daSadas.
_ente la hojas
bricante de su
tprobada por el
etigroso, puede
Jgarantia.
sici6n m_s alta
cuchiilas.
_luantesy/o en-
uesa.
Jchilla dandole
al de tas agujas
el estampado
ion de la sega-
riL
instalacion ap-
ral de la cuchilla
_andrii.
cuchi!la firme-
;).
._1de la cuchilta
_,onjunto del
Vfandril
The operation of any tractor can result in foreign objects thrown into
the eyes, which can result in severe eye damage. Always wear safety
glasses or eye shields while operating your tractor or performing any
adjustments or repairs. We recommend standard safety glasses or a
wide vision safety mask worn over spectacles.
HOW TO USE YOUR TRACTOR
TO SET PARKING BRAKE
Your tractor is equipped with an operator
presence sensing switch. When engine is
running, any attempt bythe operator to leave
the seat without first setting the parking brake
will shut off the engine.
1_ Depress brake pedal (B) allthe way down
and hold.
2. Pull parking brake lever (C) up and hold,
release pressure from brake pedal (B),
then release parking brake lever. Pedal
should remain in brake position, Make
sure parking brake will hold tractor secu re.
STOPPING
MOWER BLADES -
• To stop mower blades, move attachment
clutch lever to disengaged position (r_),
, Turn ignition key (F) to "STOP" position
and remove key.Always remove keywhen
leaving tractor to prevent unauthorized use.
. Never use the choke to stop the engine.
IMPORTANT: Leaving the ignition switch in
any position other than "STOP" will cause
the battery to discharge and go dead.
NOTE: Under certain conditions when tractor
is standing idle with the engine running, hot
engine exhaust gases may cause "brown-
ing" of grass. To eliminate this possibility,
always stop engine when stopping tractor
on grass areas.
CAUTION: Always stop tractor com-
pletely, as described above, and set parking
brake before leaving the operator's position,
TO USE THROTTLE CONTROL (D)
Always operate engine at full speed (fast)_
• Operating engine at less than full speed
(fast) reduces engine's operating efficiency_
. Full speed (fast) offers the best mower
performance,
(,_r_'3)Attachment
Clutch Lever
"Engaged"
(r_'l)Attachment
Clutch Lever
"Disengaged"
GROUND DRIVE-
, To stop ground drive, depress brake pedal
into full "BRAKE" position.
IMPORTANT: FORWARD AND REVERSE
DRIVE PEDALS RETURN TO NEUTRAL POSI-
TION WHEN NOT DEPRESSED.
ENGINE -
• Move throttle control (D) between half and
full speed (fast) position.
NOTE: Failure to move throttle control be-
tween half and full speed (fast) position, be-
fore stopping, may cause engine to "backfire".
TO MOVE FORWARD AND BACKWARD
The direction and speed of movement is
controlled by the forward and reverse drive
pedals,
1. Start tractor and release parking brake
2, Slowly depress forward(K) or reverse (L)
drive pedal to begin movement. Ground
speed increases the further down the
pedal is depressed,
I5

TO ADJUST MOWER CUTTING HEIGHT
The position of the attachment lift lever (A)
determines the cutting height+
o Put attachment lift lever in desired cutting
' height sloto
The cutting height range is approximately 1"
to 4'L The heights are measured from the
ground to the blade tip with the engine not run-
ning, These heights are approximate and may
vary depending upon soil conditions, height
of grass and types of grass being mowed,,
• The average lawn should be cut to ap-
proximately 2-1/2 " during the cool sea-
son and to over 3 " during hot months,,
For healthier and better looking lawns,
mow often and after moderate growth°
. For best cutting performance, grass over
6" in height should be mowed twice, Make
the first cut relatively high; the second to
desired height.
TO OPERATE MOWER
Your tractor is equipped with an operator
presence sensing switch° Any attempt by the
operator to leave the seat with the engine
running and the attachment clutch engaged
will shut off the engine. You must remain
fully and centrally positioned in the seat to
prevent the engine from hesitating or cutting
offwhen operating your equipment on rough,
rolling terrain or hills.
1, Select desired height of cut with attach-
ment lift iever_
2. Start mower blade by engaging attach+
ment clutch control,
TO STOP MOWER BLADE
1. Disengage attachment clutch control.
CAUTION: Do not operate machine
without the entire grass catcher, or other
safety devices in place and working
REVERSE OPERATION SYSTEM (ROS)
Your tractor is equipped with a Reverse
Operation System (ROS). Any attempt by
the operator to travel in the reverse direction
with the attachment clutch engaged will shut
off the engine unless ignition key is placed
in the ROS "ON" position.
_, WARNING: Backing up with the at-
tachment clutch engaged while mowing is
strongly discourage& Turning the ROS "ON",
to allow reverse operation with the attach-
ment clutch engaged, should only be done
when the operator decides it is necessary to
reposition the machine with the attachment
engaged. Do not mow in reverse unless
absolutely necessary..
USING THE REVERSE OPERATION
SYSTEM -
Only use if you are certain no children or
other bystanders will enter the mowing area.
1+ Depress brake pedal all the way down,
2. With engine running, turn ignition key
counterclockwise to RQS "ON" position,,
3. Look down and behind before and while
backing.
4° Slowly depress reverse drive pedal to
start movement.
5. When use of the ROS is no longer
needed, turn the ignition key clockwise
to engine "ON" position.
ROS "ON" Position Engine "ON" Position
(Normal Operating)
TO OPERATE ON HILLS
WARNING: Do not drive up or down
hills with slopes greater than I5 ° and do not
drive across any slope. Use the slope guide
provided at the back of this manual.
, Choose the slowest speed before starting
up or down hills.
, Avoid stopping or changing speed on hills.
• If stopping is absolutely necessary, push
brake pedal quickly to brake position and
engage parking brake.
• To restart movement, slowly release park-
ing brake and brake pedal.
, Slowly depress appropriate drive pedal to
slowest setting°
, Make all turns slowly.
16
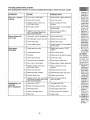
PRO(;.
MANTI
Revisar la oper;
Revisar I_ presi,
A I Revi_r s} b.a_"
C I Alilaricambiar 1_
0 I Revisar el nivel
RILimpi_r la baler
Revisar el en|ri_
Gc.t'npruobe L_ t_
fnspeccbne ta_
Revisar el nivef
Carnbtar el ac_l
M ,'Cambia[elUt_!
|Llmp{ar e! liltru+
0
r"
T iLimpi+r t. rej+lla
Or tnsp_.cCionar el
t amorlir_uado, [Jr
R I Cambiar el fill_o
Llmpiar las _1_11
Cambt_r la bulf_
!Carnb_tr el fill_
I- Cambiar m_._ a r
arnblont_s con a_
2+Dar servicie rn,_s
o potvotosas
RECOMENI
La garant[a dt
que han esta¢
cia del opera
la garantia, e
segadora se_
este manual,
Hay algunos
forms peri6di,
adecuadame{
Ai menos un
si es necesal
en las seccio
manual,,
• Unavezal
bie etfiltro
correas est
un filtro de +
aire- comb
su motor fL
ANTES DE
1. Revise el
2. Revise la
3. Revise la
4 Verifique
operado
adecuata_
5 Revise si

TO TRANSPORT
When pushing or towing your tractor, be
sure to disengage transmission by placing
freewheel control in freewheeling position°
Freewheel control is located atthe of tractor,
1. Raiseattachmentlifttoitshighestposition.
2. Pull freewheel control out and into the slot
and release so it is held in the disengaged
position.
, Do not push or tow tractor at more than
two (2) MPH.
, To re-engage transmission, reverse
above procedure,
TRANSMISSION ENGAGED
TRANSMISSION DISENGAGED
NOTE: To protect hood from damage when
transporting your tractor on a truck or a trailer,
be sure hood is closed and secured to tractoro
Use an appropriate means of tying hood to
tractor (rope, cord, etc..)
TOWING CARTS AND OTHER ATTACH-
MENTS
Tow only the attachments that are recom-
mended by and comply with specifications
of the manufacturer of your tractor. Use
common sense when towing Too heavy of
a load, while on a slope, is dangerous. Tires
can lose traction with the ground and cause
you to lose control of your tractor.
f
BEFORE STARTING THE ENGINE
CHECK ENGINE OIL LEVEL
The engine in your tractor has been shipped,
from the factory, already filled with summer
weight oil.
1. Check engine oil with tractor on level
ground°
2o Remove oil fill cap/dipstick and wipe
clean, reinsertthe dipstick and screw cap
tight, wait for a few seconds, remove and
read oil level. If necessary, add oil until
"FULL'.' mark on dipstick is reached° Do
not overfill, t
• For cold weather operation you should
change oil for easier starting (See the oil
viscosity chart in the Maintenance section
of this manual),
• To change engine oil, see the Maintenance
section in this manual.
ADD GASOLINE
• Fill fuel tank to bottom of filler neck. Do not
overfill. Use flesh, clean, regular unleaded
gasoline with a minimum of 87 octane.
(Use of leaded gasoline will increase car-
bon and lead oxide deposits and reduce
valve life). Do not mix oil with gasoline, Pur-
chase fuel in quantities that can be used
within 30 days to ensure fuel freshness,
_,CAUTION: Wipe off any spilled oil or fuel,
Do,not store, spill or use gasoline near an
open flame. :
IMPORTANT: When operating in tempera-
tures below 32°F (0°C), use fresh, clean
winter grade gasoline to help ensure good
cold weather starting.
CAUTION: Alcohol blended fuels (called
gasohol or using ethanol or methanol) can
attract moisture which leads to separation
and formation of acids during storage. Acidic
gas can damage the fuel system of an engine
while in storage. To avoid engine problems,
the fuel system 'should be emptied before
storage of 30 days or longer. Drain the gas
tank, start the engine and let it run until the
• fue! lines and carburetorare empty. Use fresh
fuel next season° See Storage Instructions
....... for additional information. Never use engine
or'carburetor cleaner products in the fuel tank
or permanent damage may occur°
k:i .............................. •
17

TO START ENGINE
When starting the engine for the first time or
if the engine has run out of fuel, it will take
extra cranking time to move fuel from the
tank to the engine.
1. Be sure freewheel control is in the trans-
mission engaged position_
2. Sit on seat in operating position, depress
brake pedal and set parking brake.
3. Move attachment clutch to disengaged
position_
4. Move throttle control to choke position.
NOTE: Before starting, read the warm and
cold starting procedures below.
5.. Insert key into ignition and turn key
clockwise to start position and release
key as soon as engine starts. Do not run
starter continuously for more than fifteen
seconds per minute. If the engine does
not start after several attempts, move
throttle control to fast position, wait a
few minutes and try again. If engine still
does not start, move the throttle control
back to the choke position and retry
WARM WEATHER STARTING
(50°F (10 ° C) and above)
6. When engine starts, move the throttle
control to the fast position.
• The attachments and ground drive can
now be used. If the engine does not
accept the load, restart the engine and
allow it to warm up for one minute using
the choke as described above_
COLD WEATHER STARTING
(50°F (10 ° C) and below)
6. When engine starts, leave throttle control
in choke position until engine warms up
and begins to run roughly. Once rough
running begins, immediately move the
throttle control to the fast position. Engine
warm-up may take from several seconds
to several minutes (the colder the tem-
perature, the longer the warm-up).
AUTOMATIC TRANSMISSION WARM UP
Before driving the unit in cold weather, the
transmission should be warmed up as follows:
1. Be sure the tractor is on level ground,
2. Release the parking brake and let the
brake slowly return to operating position.
3. Allow one minute for transmission to
warm uF This can be done during the
engine warm up period.
. The attachments can also be used dur-
ing the engine warm-up period after the
transmission has been warmed up,,
NOTE: If at a high altitude (above 3000
feet) or in cold temperatures (below 32 F)
the carburetor fuel mixture may need to be
adjusted for best engine performance (see
"TO ADJUST CARBURETOR" in the Service
and Adjustments section of this manual),
PURGE TRANSMISSION
_CAUTION: Never engage or disengage
freewheel lever while the engine is running.
To ensure proper operation and performance,
it is recommended that the transmission be
purged before operating tractor for the first
time. This procedure will remove any trapped
air inside the transmission which may have
developed during shipping of your tractor,
IMPORTANT: Should your transmission
require removal for service or replacement.
it should be purged after reinstallation before
operating the tractor.
I. Place tractor safely on a level surface -
that is clear of objects and open - with
engine off and parking brake set°
2. Disengage transmission by placing
freewheel control in disengaged position
(See "TO TRANSPORT' in this section
of manual).
3. Sitting in the tractor seat, start engine.
After the engine is running, move throttle
control to stow position. Disengage park-
ing brake.
&CAUTION: At any time, during step 4,
there may be movement of the drive wheels.
4. Depress forward drive pedal to full for-
ward position and hold forfive (5) seconds
and release pedal. Depress reverse drive
pedal to full reverse position and hold
for five (5) seconds and release pedal.
Repeat this procedure three (3) times,
5. Shutoff engine and set parking brake.
6. Engagetransmissionby pfacingfreewheel
control in engaged position (See "TO
TRANSPORT" in this section of manual),
7. Sitting in the tractor seat, start engine,
After the engine is running, move throttle
control to half (1/2) speed. Disengage
parking brake.
8. Drive tractor forward for approximately
five feet then backwards for five feet. Re-
peat this driving procedure three times.
Your transmission is now purged and now
ready for normal operation_
18
PARA HACI
AI hacer arran
se ha acabadc
itar&tiempo p_
combustible c
1, AsegOres_
en la post,
2o Si6ntase
aci6n, su{
freno de e
3, Mueva e
posici6n o
4, Mueva la
a ia posici
AVlSO: Antes
guientes para_
5_ Insertelai
el sentido
posici6n d
pronto cot
cionar el
dequince
arranca dE
el control
r&pido, es
de nuevo
mueva el
posici6n d,
ARRANQUE !
(50°F(I0°C)
6, Cuando a
de ]a acel,
• Los accesc
set utilizadc
vuelva a arl
se caliente
gulador cor
ARRANQUE I
(50°F(10°C) "_
6, AI hacer
control de
trangulaci
empieze ft
a funcion_
control de
El calenta
partir de \
(cuanto m
es el calel

CAR EL MO-
DE[. MOTOR
tviado desde la
d para verano,,
3n el tractor en
dora de nivel de
,uelva a inserter
atornille la tape
spere por unos
ray lea el nivet
agregue aceite
) la marca lleno
de niveL No to
,,debe cambiar
m&s f#,cilmente
,_IAceite" en la
_ste manual)°
r,vea la secci6n
_uat,
][e.,Llene hasta
relleno del es-
lemasiado, Use
,=vay limpia con
tso de gasolina
6sites de 6xido
la duraci6n de
con la gasolina,,
a utilizada sea
cuales puedan
_eros 30 dias,,
teo el combus-
derrame o use
cesta,,
•e en tempera-
tse gasoline de
_dara asegurar
nezctados con
ol, o el uso de
;r la humedad,
y formaci6n de
to. La gasoline
Jelcombustible
tamienta. Para
se debe vaciar
leguardarlo por
cie el estanque
motor y h_,galo
_ombustible y el
_xima tempora-
;slnstrucciones
&sinformaci6n,
pare el motor o
del combustible
; permanenteso
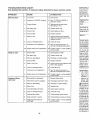
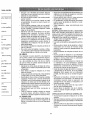
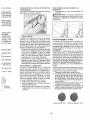
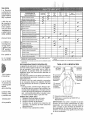
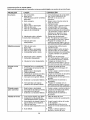
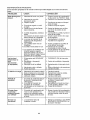
EVERY EVERY EVERY EVERY BEFORE
25 50 t00 SEASON STORAGE
HOURS HOURS HOURS
C
T
0
R
MAINTENANCE BEFORE EVERY
SCHEDULE EACH 8
USE HOURS
Check Brake Operation
6/
T Check Tire Pressure ./6/
Check.Operail:)_" PresRnce & ROS Syslemfl
R
Check for Loose Fasteners
A
Chec!'JReplace Mower Blades 6/'_
Lubrication Chart .....................
Check Battery Level
Clean Battery and Terminals
Cheek Transaxle Cooling
Check Mower Levelness
Cheek V-Belts
C,h,eck Engine Oil Level
Chancle Engine Otl (with oli filter)
e,"
j,,
v' ..................... v"
v'
............ ....
El Change Engine Ott (wtlhout oil filter) 6'f_,a
N Clean Air Filter _ .................................
el Clean Air Screen ............................................ V_'_ .............................
i inspect Mu![ler!Spa;kAr[e2!er 6/
N:_Replace Oil Filter (If equipped)
E iClean Engine Cooling Fins _ 2
ReplaeD Spa rk P!ug ..................... _ : 6/ .......
Replace Air Filler Paper Cartridge I [t,_z
Replace Fuel Filler 6/'
1 - Change, mere otlen when o{:_eratlng under a heavy lead or
in high ambient lemperalures
2 - Service more olfen when operating in dirty or dusty conditions
3 - Replace blades more often when mowing in sandy soil
4 - Not required i! equipped wilh matntenance-lree batlery
GENERAL RECOMMENDATIONS
The warranty on this tractor does not cover
items that have been subjected to operator
abuse or negligence. To receive full value
from the warranty, operator must maintain
tractor as instructed in this manual.
Some adjustments will need to be made pe-
riodically to properly maintain your tractor.
At least once a season, check to see if
you should make any of the adjustments
described in the Service and Adjustments
section of this manual.
At least once a year you should replace
the spark plug, clean or replace air filter,
and check blades and belts for wear. A
new spark plug and clean air filter ensure
proper air-fuel mixture and help your en-
gine run better and last longer.
BEFORE EACt4 USE
1, Check engine oil level.
2_ Check brake operation,
3. Check tire pressure.
4. Check operator presence and ROS
systems for proper operation,
5. Check for loose fasteners_
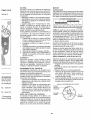
LUBRICATION CHART
(_ Spindle Zerk---]f-----_r----_ _) Spindle Zerk
® ront .
...... === Front"_-'i_[., -
w. o, ..4..... i hee,
Bearing _- ...... _ Bearing
@ Steering / _- ... _'_'"i\_
Sector i @ Engin
Gear Teeth i ii i i ii i -
:" *,: :" Ft',
(bGeneral Purpose Grease
@Refer to Maintenance "ENGINE" Section
IMPORTANT: Do not oil or grease the pivot
points which have special nylon bearings,
Viscous lubricants will attract dust and dirt
that wilt shorten the life of the self-lubricating
bearings, ifyou feel they must be lubricated,
use only a dry, powdered graphite type
lubricant sparingly.
19

TRACTOR
Always observe safety rules when performing
any maintenance,.
BRAKE OPERATION
if tractor requires more than five (5) feet to
stop at highest speed in highest gear on a
level, dry concrete or paved surface, then
brake must be serviced., (See "TO CHECK
.......... BRAKE" in the Service and Adjustments
section of this manual).
TIRES
. Maintain proper air pressure in all tires
(See the sides of tires for proper PSI).
• Keep tires free of gasoline, oil, or insect
control chemicals which can harm rubber.
• Avoid stumps, stones, deep ruts, sharp
objects and other hazards that may cause
tire damage.
NOTE: To seal tire punctures and prevent
fiat tires due to slow leaks, tire sealant may
be purchased from your local parts dealer.
Tire sealant also prevents tire dry rot and
corrosion.
OPERATOR PRESENCE SYSTEM AND
REVERSE OPERATION SYSTEM (ROS)
Be sure operator presence and reverse
operation systems are working properly. If
your tractor does not function as described,
repair the problem immediately_
. The engine should not start unless the
brake pedal is fully depressed, and the
attachment clutch control is in the disen-
gaged position.
CHECK OPERATOR PRESENCE
SYSTEM
. When the engine is running, any attempt
by the operator to leave the seat without
first setting the parking brake should shut
off the engine.
• When the engine is running and the at-
tachment clutch is engaged, any attempt
by the operator to leave the seat should
shut off the engine.
• The attachment clutch should never oper-
ate unless the operator is in the seat.
@
ROS "ON" Position
Engine "ON" Position
(Normal Operating)
CHECK REVERSE OPERATION (ROS)
SYSTEM
" Whentheengineis runningwiththe ignition
switch in the engine "ON" position and the
attachment clutch engaged, any attempt
by the operator to drive in reverse should
shut off the engine,
• When the engine is running with the ignition
switch in the ROS "ON" position and the
attachment clutch engaged, any attempt
by the operator to drive in reverse should
. NOT shut off the engine°
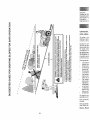
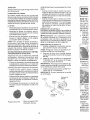
BLADE CARE
For best results mower blades must be sharp,.
eplace worn, bent or damaged blades.
CAUTION: Use only a replacement
blade approved by the manufacturer of your
tractor. Using a blade not approved by the
manufacturer of your tractor is hazardous,
could damage your tractor and void your
warranty.
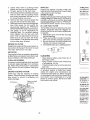
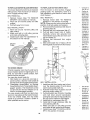
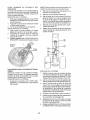
BLADE REMOVAL
1o Raise mowerto highest position to allow
access to blades.
NOTE: Protect your hands with gloves and/
or wrap blade with heavy cloth.
2. Remove blade bolt by turning counter-
clockwise_
3, Install new blade with stamped "GRASS
SIDE" facing the ground°
IMPORTANT: To ensure proper assembly,
center hole in blade must align with star on
mandrel assembly_
4. Install and tighten blade bolt securely
(45 - 55 Ft. Lbso torque).
IMPORTANT: Special blade bolt iS heat
treated.
Slar
Center Hole
Blade Bolt Mandrel
(Special) "_-_),_"" Assembly
Blade
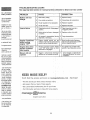
PARA AJUS'f
LA SEGADOI
La posiciSn de
a qu6 altura s,
::;;:_!i!_i!!!:i
• Coloque la
la altura de,.
La gama de I;
damente 1 a
desde el sue!{
el motor no e_
aproximadas
condiciones d
del tipo del c6
• El c6sped p_
mente a 2 -
fria y sobn
calurosos_ f
able y de rr
y despu6s
, Para obten_
c6sped que
debe segars
ativamente
PARA OPERt
Su tractor vie
sensor que el
el motor estb.t
cesorio est& e
bajarse del as
que mantene
mente en et
vacile o se ap
en terreno dis
t. Seleccion,
2_ Baje la s_
tamiento c
3. Haga arra
engancha
accesorio_
20
Page is loading ...
Page is loading ...
Page is loading ...
Page is loading ...
Page is loading ...
Page is loading ...
Page is loading ...
Page is loading ...
Page is loading ...
Page is loading ...
Page is loading ...
Page is loading ...
Page is loading ...
Page is loading ...
Page is loading ...
Page is loading ...
Page is loading ...
Page is loading ...
Page is loading ...
Page is loading ...
Page is loading ...
Page is loading ...
Page is loading ...
Page is loading ...
Page is loading ...
Page is loading ...
Page is loading ...
Page is loading ...
Page is loading ...
Page is loading ...
Page is loading ...
Page is loading ...
Page is loading ...
Page is loading ...
Page is loading ...
Page is loading ...
Page is loading ...
Page is loading ...
Page is loading ...
Page is loading ...
Page is loading ...
Page is loading ...
Page is loading ...
Page is loading ...
Page is loading ...
Page is loading ...
Page is loading ...
Page is loading ...
-
 1
1
-
 2
2
-
 3
3
-
 4
4
-
 5
5
-
 6
6
-
 7
7
-
 8
8
-
 9
9
-
 10
10
-
 11
11
-
 12
12
-
 13
13
-
 14
14
-
 15
15
-
 16
16
-
 17
17
-
 18
18
-
 19
19
-
 20
20
-
 21
21
-
 22
22
-
 23
23
-
 24
24
-
 25
25
-
 26
26
-
 27
27
-
 28
28
-
 29
29
-
 30
30
-
 31
31
-
 32
32
-
 33
33
-
 34
34
-
 35
35
-
 36
36
-
 37
37
-
 38
38
-
 39
39
-
 40
40
-
 41
41
-
 42
42
-
 43
43
-
 44
44
-
 45
45
-
 46
46
-
 47
47
-
 48
48
-
 49
49
-
 50
50
-
 51
51
-
 52
52
-
 53
53
-
 54
54
-
 55
55
-
 56
56
-
 57
57
-
 58
58
-
 59
59
-
 60
60
-
 61
61
-
 62
62
-
 63
63
-
 64
64
-
 65
65
-
 66
66
-
 67
67
-
 68
68


Craftsman 917.28033 User manual
- Category
- Lawnmowers
- Type
- User manual
Ask a question and I''ll find the answer in the document
Finding information in a document is now easier with AI
in other languages
Related papers
-
Craftsman 917.28810 User manual
-
-
-
-
-
-
-
-
-
Sears 917.28907 User manual
Other documents
-
Simplicity 7800672 User manual
-
Husqvarna CTH151 XP User manual
-
-
-
-
-
Poulan PP16H36RB User manual
-
-
-
 EMAK RIDING MOWER Owner's manual
