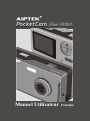
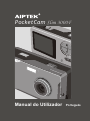
AIPTEK POCKETCAM SLIM 3000 User manual
- Category
- Action sports cameras
- Type
- User manual
Page is loading ...

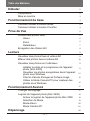
Getting started
The parts
Hook up the power
Basic operation
How to use mode button
How to use control button
Snapshot
Taking Still Pictures
Recording AVI Movies
Play
Play the still pictures and AVI Movies
View the pictures on PC
Picture's positions and picture files
Advanced operation
Troubleshooting
Change setup
Camera program (Slim 3000)
Use PC camera to capture pictures on Windows
View the pictures saved in Camera through
Windows
Install the driver and camera program (Slim 3000)
Delete the still pictures and AVI Movies
Viewfinder
Zoom
Self-Timer
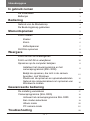
Table of contents
~ 1 ~
Activate Slim 3000
Mode selection
2
3
4
5
6
7
8
9
10
11
15
16
17
18
18
19
28
Album mode
PC camera mode
4
6
11
16
20
25
2
4
5
9
17

1
2
3
4
5
6
7
8
9
11
12
13
14
15
16
17
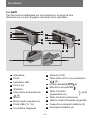
Getting started
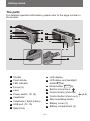
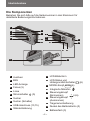
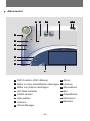
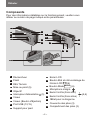
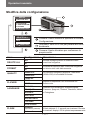
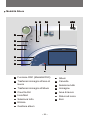
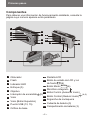
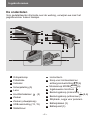
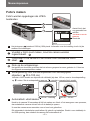
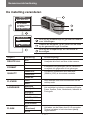
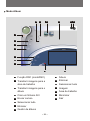
The parts
For detailed operation information, please refer to the page number in
the bracket.
Shutter
LCD display
Battery compartment (3)
Mode button (6)
Control button (Zoom-in)
Control button (Zoom-out)
LCD status and backlight
button (6)
Power switch (5)
Lens
Focus (5)
Viewfinder ( Eject button)
Viewfinder
USB port (13, 15)
Stand hole
Strip hookStrap holder
Battery cover (3)
Built-in microphone
LED Indicator
~ 2 ~
(4,6)
MODE
10
Flash strobe
18
19
1
3
4
6
7
8
9
10
11
12
13
14
15
16
17
18
2
5
19

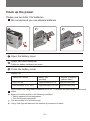
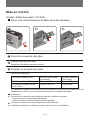
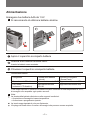
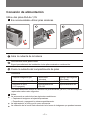
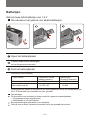
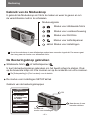
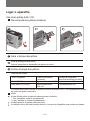
Hook up the power
Please use two AAA 1.5V batteries
We recommend you use alkaline batteries
Open the battery cover
Insert two AAA batteries
Follow the battery installation as shown.
Close the battery cover
Battery Life
Taking Still Pictures
Use LCD ON
Use viewfinder (LCD OFF)
Battery Life
(minutes)
Number of pictures
(without flash)
*Above data is for using alkaline batteries and in 25/C, pictures are taken every four seconds.
Notes:
Battery life will be shorter in the following conditions.
~ Taking snapshot at low temperature.
~ Turn on/off power repeatedly.
The above table is for reference only.
!
!
Approximately 60-70
Approximately 650
Approximately 100-120
~ 3 ~
Approximately 950
Using flash light will decrease the number of pictures to be taken.

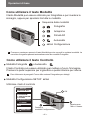
Basic operation
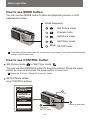
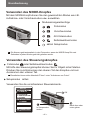
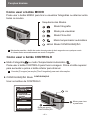
How to use MODE button
You can use the MODE button to take and playback pictures or shift
between all modes.
Still Picture mode or Self-Timer mode
You can use the CONTROL button to focus the picture. Press the upper
button to zoom in and press the lower button to zoom out.
Please see [Focus] in [Taking Sill Picture] for details.
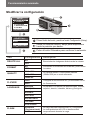
SETUP Mode
Use CONTROL buttons
SETUP
SETUP
Still Picture mode
Preview mode
Self-Timer mode
SETUP mode
AVI Movie mode
Mode Sequence
Press and hold the mode button for two seconds in any mode. Your camera will automatically
change to Still Picture mode.
!
!
FORMAT
OK SHUTTER
NO
YES
Move up and down
OK
Change to
SETUP mode
~ 4 ~
SETUP
OK SHUTTER
DELETE ALL
FORMAT
QUALITY
FLICKER
LANGUAGE
FLASH
How to use CONTROL button

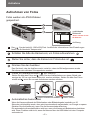
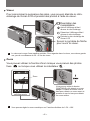
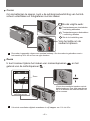
Snapshot
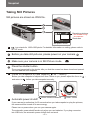
Taking Still Pictures
Still pictures are stored as JPEG file.
Before you take still pictures, please power on your camera.
Make sure your camera is in Still Picture mode.
Press the shutter button.
The sound generated by the shutter tells you that the screen has been closed and opened.
You can take the next snapshot.
Automatic power shutoff
If your camera is motionless for 60 seconds when you take snapshot or play the pictures,
the camera will be turned off to save energy.
Please turn on power when you use your camera again.
The automatic power shutoff works only when you use batteries. If you plug connector
into USB hole, the automatic power shutoff does not work.
41
x1.0
Still picture mode
!
!
!
icon stands for 1600x1200 pixels. For detailed information on setting, please refer to
SETUP mode.
Resolution
Remaining pictures
Focus for snapshot of near objects ( 30 - 100cm)
Before you take snapshot of objects less than 100cm to you, please adjust the focus to ;
and return to before you take snapshot normally.
100cm~infinitive distance
30cm~100cm
~ 5 ~
* The number is only
for reference.

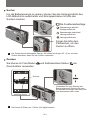
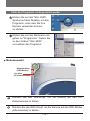
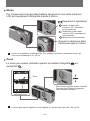
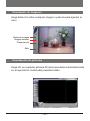
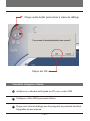
Viewfinder
To save the energy of batteries, you can turn off the backlight of LCD and
take snapshot through viewfinder.
Zoom
You can use the zoom when you take still pictures and self-timer .s
You can adjust the zoom digitally in 5 sections ranging from 1.0X - 4.0X.
The sequence of motions:
Activate status display / turn on
backlight
Inactivate status display / turn
on backlight
Turn off LCD backlight
Follow the arrow sign to
open the viewfinder
Your viewfinder is designed in a special manner. To watch the viewfinder, you should keep
your eyes 30 - 45 cm to the viewfinder.
!
!
01
01
x1.0
x1.0
Still picture /
self-timer mode
Zoom
You can adjust the CONTROL button
for zoom. Press upward for zoom-in,
and downward for zoom-out.
~ 6 ~

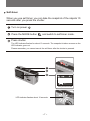
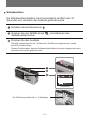
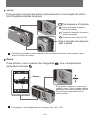
Self-timer
When you use self-timer, you can take the snapshot of the objects 10
seconds after you press the shutter.
Turn on power.
Press the MODE button and switch to self-timer mode.
Press shutter.
The LED indicator flashes for about 10 seconds. The snapshot is taken as soon as the
LED indicator goes out.
Please remember, you cannot cancel the self-timer after the shutter is pressed.
41
x1.0
Still picture mode
LED Indicator flashes about 10 seconds.
~ 7 ~

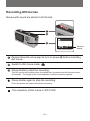
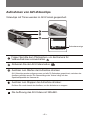
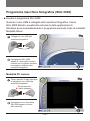
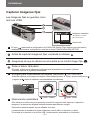
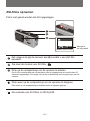
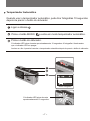
Recording AVI movies
Movies with sound are stored in AVI format.
Please follow the arrow sign to turn on power before recording
AVI movie.
Switch to AVI movie mode.
Press shutter to start the recording:
The AVI movies will be taken when the shutter key is pressed and will be saved every
30 seconds. The length of the movie depends on camera memory capacity.
AVI movie mode
00:30
Seconds
display
The resolution of AVI movie is 320 X 240.
!
~ 8 ~
Press shutter again to stop the recording:
Press the shutter key again will stop the recording.

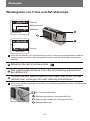
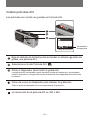
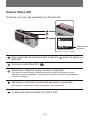
Play the still pictures and AVI Movies
Play
Switch to preview mode.
The last taken still picture or AVI movie appears on the screen.
Press Up (Down) button to preview the still picture or AVI Movies
forwardly (or reversibly).
AVI-0002
00:00
Still picture
AVI movies
File No.
No. of pictures
taken
Counter
Battery status
JPG-0001
01
Switch from preview to AVI movies, your camera starts playing if you do not press other
button in 1 second.
Sequence of motions:
Activate status display / turn on backlight
Inactivate status display / turn on backlight
Turn off LCD backlight
1. When AVI Movies are downloaded to PC, the sounds of the movie will be played.
2. When AVI Movies are played on the camera, the sound will not be played.
!
!
!
You can turn off the status display to increase the size of visible area on the LCD.
~ 9 ~

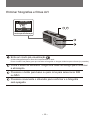
Delete the still pictures and AVI movies
Switch to the preview mode
The last taken still picture or AVI movie appears on the screen.
Press Up (Down) button to preview the still picture or dynamic picture forwardly (or reversibly).
Press shutter, you will see the dialogue box for confirmation of deletion
on the screen.
Press Down (Up) button to select YES or NO.
Press shutter again to confirm and the picture will be deleted.
Dialogue box for
confirmation of deletion
01
ERASE?
NO
YES
~ 10 ~
JPG-0001

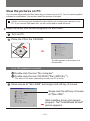
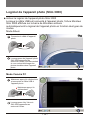
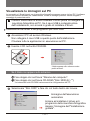
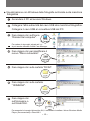
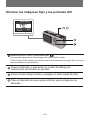
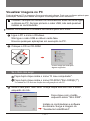
View the pictures on PC
You can view the pictures and films taken by your camera on your PC. You can use the applied
software for modification. You can also attach the pictures to e-mails.
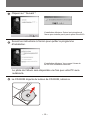
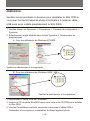
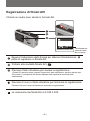
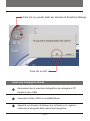
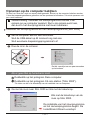
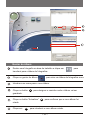
Install the driver and camera programs for Slim 3000.
Turn on PC.
Place the CD in the CD-ROM.
The title appears on the screen in a
few seconds.
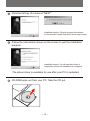
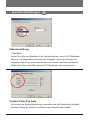
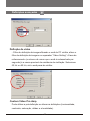
If no title appears on screen
Double-click the icon "My computer".
Double-click the icon CD-ROM ("Slim 3000 (E:)*")
*The drive of CD varies, depending on how your PC is set up.
Move mouse to "Slim 3000” and single-click left key of mouse.
!
Caution: be sure you have installed the driver before you connect your camera to your
PC. If you connect USB cable first, you will not be able to install the driver.
~ 11 ~
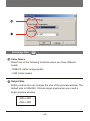
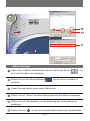
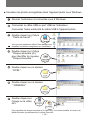
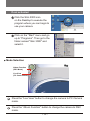
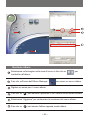
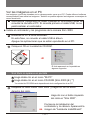
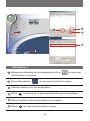
Single-click the left key of mouse
at "Slim 3000 ".
Start installing driver and camera
program. The "InstallShield Wizard"
picture appears.

Click the left key of mouse at "NEXT"
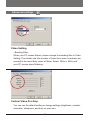
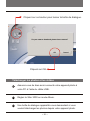
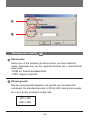
CD-ROM pops out from your PC. Take the CD out.
Follow the instructions shown on the screen to quit the installation
program.
Installation begins. Follow the instructions shown
on the picture to install DirectX8.0 driver step by step.
Installation begins. You will see the picture of
completion as soon as installation is completed.
The album driver is available for use after your PC is restarted.
~ 12 ~

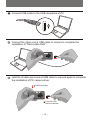
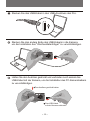
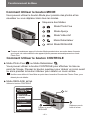
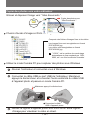
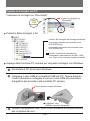
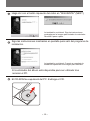
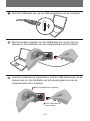
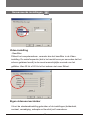
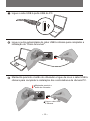
Connect USB cable to the USB receptacle of PC.
Connect the other end of USB cable to camera to complete the
installation of "Removable Disk".
Hold the shutter and connect USB cable to camera again to complete
the installation of PC camera driver.
Hold the shutter.
Connect USB
cable to camera.
~ 13 ~

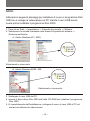
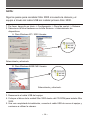
NOTICE:
Please follow the steps to reinstall Slim 3000 if you connect the
camera and PC via USB cable without installing Slim 3000 first.
1. Please click Start -> Setting -> Control Panel -> System.
2. Select Hardware tab under System list -> Device Manager.
A. For Windows XP / 2000 User:
Please select the icon Slim 3000 and remove it.
B. For Windows 98SE / ME User:
Please select ?! Slim 3000 and remove.
3. Unplug the USB cable from PC.
4. Place the Slim 3000 drive disk into your CD-ROM to install Slim
3000.
5. After the installation is completed, connect the USB cable to PC
again and start to use the camera.
~ 14 ~

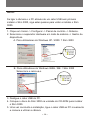
Turn on PC and activate Windows.
Connect the other end of USB cable to the camera.
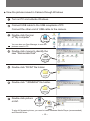
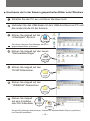
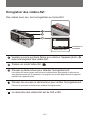
View the pictures saved in Camera through Windows
Connect USB cable to the USB receptacle of PC.
Double-click the icon
of "My computer".
Double-click mouse to identify the
new "Removable Disk".
Double-click "DCIM" file holder.
Double-click "100MEDIA" file holder.
Double-click picture
or AVI.
To play AVI dynamic picture, you need to install Windows Media Player (recommended)
and DirectX8 driver.
You can also use Cam Manager to view the
pictures saved in PC.
!
~ 15 ~

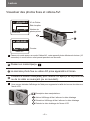
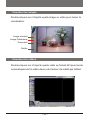
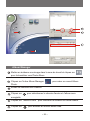
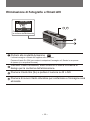
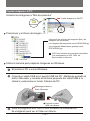
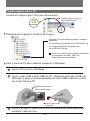
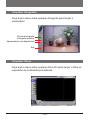
Use PC camera to capture pictures on Windows
Turn on PC and activate Windows.
Connect USB cable to the USB receptacle of PC. Hold the shutter
and connect the other end of USB cable to the camera and enter
into PC Camera mode.
1. Hold the shutter
Connect USB cable
to the camera
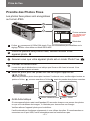
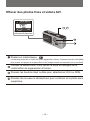
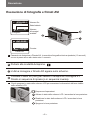
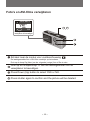
Picture's positions and picture files
Copy pictures to your PC
Including the files of still pictures and dynamic
pictures
Static pictures are recorded as DSCWXXXX.jpg.
Dynamic pictures are recorded as
DSCWXXXX.jpg.
XXXX is the automatic numbering system;
and will be replaced by 0001, 0002, etc.
After the memory is formatted.
!
Drag the picture to "My Documents"
Copy pictures
to "My Documents"
~ 16 ~
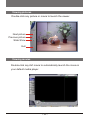
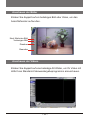
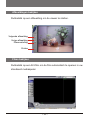
Activate Slim 3000 or other visual software to view Live Video.

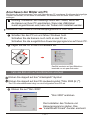
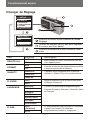
Advanced operation
Change the setup
DELETE ALL
OK SHUTTER
NO
YES
Use the up & down button to move the mouse
to the desirable item.
Press shutter to confirm your choice.
Press the mode button and switch to Setup mode.
Item
Setup
SETUP
OK SHUTTER
DELETE ALL
FORMAT
QUALITY
FLICKER
LANGUAGE
~ 17 ~
FLASH
NO
YES
NO
YES
2048x1536
1600x1200
1024x768
50HZ
60HZ
ENGLISH
FRANCIAS
ESPANOL
DEUTSCH
NEDERLANDS
ITALIANO
PORTUGUES
OFF (Default)
AUTO
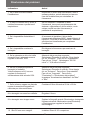
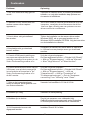
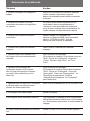
DELETE ALL
FORMAT
QUALITY
FLICKER
LANGUAGE
FLASH
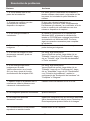
Description
Delete all still and dynamic pictures from your
camera.
Format the memory of camera and clear all
data from the memory.
The camera supports 3 resolutions
2048x1536 is enhanced mode.
Set up AC frequency and synchronize with
fluorescent.
Multi-lingual LCD supports English, French,
Spanish, German, Dutch, Italian and Portuguese.
Charging the flash requires 3-5 seconds. The LCD
preview will be temporarily shut off during charging.

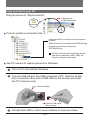
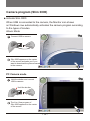
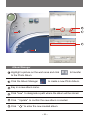
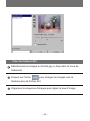
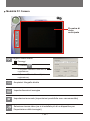
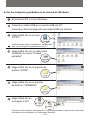
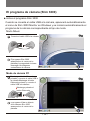
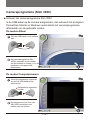
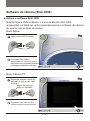
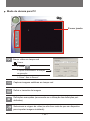
Camera program (Slim 3000)
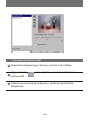
Activate Slim 3000
When USB is connected to the camera, the Monitor icon shown
on Windows row automatically activates the camera program according
to the types of modes.
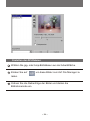
Slim 3000 appears on the center
of the screen and asks you if you
want to download the pictures saved
in the camera.
The Live View program of
Slim 3000 appears on the center
of the screen.
Connect USB to camera.
Hold the shutter and connect
USB to camera.
Album Mode
PC Camera mode
Hold the shutter.
~ 18 ~

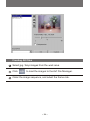
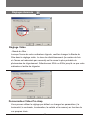
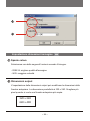
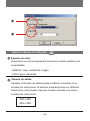
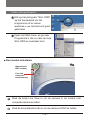
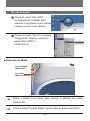
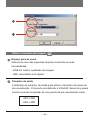
If not activated
Click the Slim 3000 icon
on the Desktop to execute the
program where you can begin to
use your camera.
Click on the "Start" menu and go
up to "Programs". Then go to the
folder named "Slim 3000" and
select it.
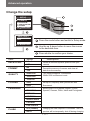
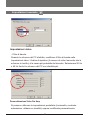
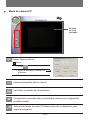
Mode Selection
Live View
(PC Camera Mode)
Album Function
(DSC Mode)
~ 19 ~
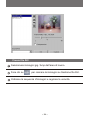
Press the "Album Function" button to change the camera to DSC
mode.
Press the "Live View" button to change the camera to PC Camera
mode.

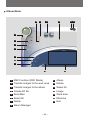
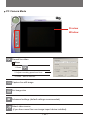
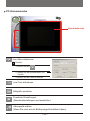
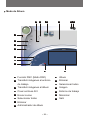
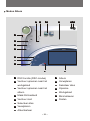
Album Mode
1
2
3
4
5
6
7
8
9
10
11
12
13
14
15
DSC Function (DSC Mode)
Transfer images to the work area
Transfer images to the album
Create AVI file
Send Mail
Select All
Delete
Album Manager
Album
Delete
Select All
Image
Work area
Minimize
Exit
1
2
3
4
5
6
7
8
9
10
11
12
13
14
15
~ 20 ~
Page is loading ...
Page is loading ...
Page is loading ...
Page is loading ...
Page is loading ...
Page is loading ...
Page is loading ...
Page is loading ...
Page is loading ...
Page is loading ...
Page is loading ...
Page is loading ...
Page is loading ...
Page is loading ...
Page is loading ...
Page is loading ...
Page is loading ...
Page is loading ...
Page is loading ...
Page is loading ...
Page is loading ...
Page is loading ...
Page is loading ...
Page is loading ...
Page is loading ...
Page is loading ...
Page is loading ...
Page is loading ...
Page is loading ...
Page is loading ...
Page is loading ...
Page is loading ...
Page is loading ...
Page is loading ...
Page is loading ...
Page is loading ...
Page is loading ...
Page is loading ...
Page is loading ...
Page is loading ...
Page is loading ...
Page is loading ...
Page is loading ...
Page is loading ...
Page is loading ...
Page is loading ...
Page is loading ...
Page is loading ...
Page is loading ...
Page is loading ...
Page is loading ...
Page is loading ...
Page is loading ...
Page is loading ...
Page is loading ...
Page is loading ...
Page is loading ...
Page is loading ...
Page is loading ...
Page is loading ...
Page is loading ...
Page is loading ...
Page is loading ...
Page is loading ...
Page is loading ...
Page is loading ...
Page is loading ...
Page is loading ...
Page is loading ...
Page is loading ...
Page is loading ...
Page is loading ...
Page is loading ...
Page is loading ...
Page is loading ...
Page is loading ...
Page is loading ...
Page is loading ...
Page is loading ...
Page is loading ...
Page is loading ...
Page is loading ...
Page is loading ...
Page is loading ...
Page is loading ...
Page is loading ...
Page is loading ...
Page is loading ...
Page is loading ...
Page is loading ...
Page is loading ...
Page is loading ...
Page is loading ...
Page is loading ...
Page is loading ...
Page is loading ...
Page is loading ...
Page is loading ...
Page is loading ...
Page is loading ...
Page is loading ...
Page is loading ...
Page is loading ...
Page is loading ...
Page is loading ...
Page is loading ...
Page is loading ...
Page is loading ...
Page is loading ...
Page is loading ...
Page is loading ...
Page is loading ...
Page is loading ...
Page is loading ...
Page is loading ...
Page is loading ...
Page is loading ...
Page is loading ...
Page is loading ...
Page is loading ...
Page is loading ...
Page is loading ...
Page is loading ...
Page is loading ...
Page is loading ...
Page is loading ...
Page is loading ...
Page is loading ...
Page is loading ...
Page is loading ...
Page is loading ...
Page is loading ...
Page is loading ...
Page is loading ...
Page is loading ...
Page is loading ...
Page is loading ...
Page is loading ...
Page is loading ...
Page is loading ...
Page is loading ...
Page is loading ...
Page is loading ...
Page is loading ...
Page is loading ...
Page is loading ...
Page is loading ...
Page is loading ...
Page is loading ...
Page is loading ...
Page is loading ...
Page is loading ...
Page is loading ...
Page is loading ...
Page is loading ...
Page is loading ...
Page is loading ...
Page is loading ...
Page is loading ...
Page is loading ...
Page is loading ...
Page is loading ...
Page is loading ...
Page is loading ...
Page is loading ...
Page is loading ...
Page is loading ...
Page is loading ...
Page is loading ...
Page is loading ...
Page is loading ...
Page is loading ...
Page is loading ...
Page is loading ...
Page is loading ...
Page is loading ...
Page is loading ...
Page is loading ...
Page is loading ...
Page is loading ...
Page is loading ...
Page is loading ...
Page is loading ...
-
 1
1
-
 2
2
-
 3
3
-
 4
4
-
 5
5
-
 6
6
-
 7
7
-
 8
8
-
 9
9
-
 10
10
-
 11
11
-
 12
12
-
 13
13
-
 14
14
-
 15
15
-
 16
16
-
 17
17
-
 18
18
-
 19
19
-
 20
20
-
 21
21
-
 22
22
-
 23
23
-
 24
24
-
 25
25
-
 26
26
-
 27
27
-
 28
28
-
 29
29
-
 30
30
-
 31
31
-
 32
32
-
 33
33
-
 34
34
-
 35
35
-
 36
36
-
 37
37
-
 38
38
-
 39
39
-
 40
40
-
 41
41
-
 42
42
-
 43
43
-
 44
44
-
 45
45
-
 46
46
-
 47
47
-
 48
48
-
 49
49
-
 50
50
-
 51
51
-
 52
52
-
 53
53
-
 54
54
-
 55
55
-
 56
56
-
 57
57
-
 58
58
-
 59
59
-
 60
60
-
 61
61
-
 62
62
-
 63
63
-
 64
64
-
 65
65
-
 66
66
-
 67
67
-
 68
68
-
 69
69
-
 70
70
-
 71
71
-
 72
72
-
 73
73
-
 74
74
-
 75
75
-
 76
76
-
 77
77
-
 78
78
-
 79
79
-
 80
80
-
 81
81
-
 82
82
-
 83
83
-
 84
84
-
 85
85
-
 86
86
-
 87
87
-
 88
88
-
 89
89
-
 90
90
-
 91
91
-
 92
92
-
 93
93
-
 94
94
-
 95
95
-
 96
96
-
 97
97
-
 98
98
-
 99
99
-
 100
100
-
 101
101
-
 102
102
-
 103
103
-
 104
104
-
 105
105
-
 106
106
-
 107
107
-
 108
108
-
 109
109
-
 110
110
-
 111
111
-
 112
112
-
 113
113
-
 114
114
-
 115
115
-
 116
116
-
 117
117
-
 118
118
-
 119
119
-
 120
120
-
 121
121
-
 122
122
-
 123
123
-
 124
124
-
 125
125
-
 126
126
-
 127
127
-
 128
128
-
 129
129
-
 130
130
-
 131
131
-
 132
132
-
 133
133
-
 134
134
-
 135
135
-
 136
136
-
 137
137
-
 138
138
-
 139
139
-
 140
140
-
 141
141
-
 142
142
-
 143
143
-
 144
144
-
 145
145
-
 146
146
-
 147
147
-
 148
148
-
 149
149
-
 150
150
-
 151
151
-
 152
152
-
 153
153
-
 154
154
-
 155
155
-
 156
156
-
 157
157
-
 158
158
-
 159
159
-
 160
160
-
 161
161
-
 162
162
-
 163
163
-
 164
164
-
 165
165
-
 166
166
-
 167
167
-
 168
168
-
 169
169
-
 170
170
-
 171
171
-
 172
172
-
 173
173
-
 174
174
-
 175
175
-
 176
176
-
 177
177
-
 178
178
-
 179
179
-
 180
180
-
 181
181
-
 182
182
-
 183
183
-
 184
184
-
 185
185
-
 186
186
-
 187
187
-
 188
188
-
 189
189
-
 190
190
-
 191
191
-
 192
192
-
 193
193
-
 194
194
-
 195
195
-
 196
196
-
 197
197
-
 198
198
-
 199
199
-
 200
200
-
 201
201
-
 202
202
-
 203
203
-
 204
204


AIPTEK POCKETCAM SLIM 3000 User manual
- Category
- Action sports cameras
- Type
- User manual
Ask a question and I''ll find the answer in the document
Finding information in a document is now easier with AI
in other languages
- italiano: AIPTEK POCKETCAM SLIM 3000 Manuale utente
- français: AIPTEK POCKETCAM SLIM 3000 Manuel utilisateur
- español: AIPTEK POCKETCAM SLIM 3000 Manual de usuario
- Deutsch: AIPTEK POCKETCAM SLIM 3000 Benutzerhandbuch
- Nederlands: AIPTEK POCKETCAM SLIM 3000 Handleiding
- português: AIPTEK POCKETCAM SLIM 3000 Manual do usuário


