SINGER 9980 Owner's manual
- Category
- Sewing machines
- Type
- Owner's manual
This manual is also suitable for

INSTRUCTION MANUAL
MANUEL D'INSTRUCTIONS
MANUAL DE INSTRUCCIONES
9980

2
INSTRUCTION MANUAL
This sewing machine is intended for household use.
This sewing machine is not intended for use by young children or infirmed persons without
supervision.
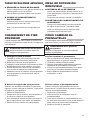
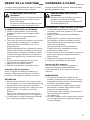
IMPORTANT SAFETY INSTRUCTIONS
When using a sewing machine, basic safety precautions should always be followed,
including the following.
Read all instructions before using.
DANGER - To reduce the risk of electric shock:
Never leave unattended when plugged in. Always unplug this machine from the electric
outlet immediately after using and before cleaning.
- To reduce the risk of burns, fire, electric shock,
or injury to persons:
WARNING
1. Do not allow to be used as a toy. Close attention is necessary when this sewing
machine is used by or near children.
2. Use this sewing machine only for its intended use as described in this manual. Use only
attachments recommended by the manufacturer as contained in this manual.
3. Never operate this sewing machine if it has a damaged cord or plug, if it is not working
properly, if it has been dropped or damaged, or dropped into water. Return the sewing
machine to the nearest authorized dealer or service center for examination, repair,
electrical or mechanical adjustment.
4. Never operate the sewing machine with any air openings blocked. Keep ventilation
openings of the sewing machine and foot controller free from the accumulation of lint,
dust, and loose cloth.
5. Never drop or insert any object into any opening.
6. Do not use outdoors.
7. Do not operate where aerosol (spray) products are being used or where oxygen is being
administered.
8. To disconnect, turn the power switch to the off position (symbol “O”), then remove plug
from outlet.
9. Do not unplug by pulling on cord. To unplug, grasp the plug, not the cord.
10. Keep fingers away from all moving parts. Special care is required around the sewing
machine needle.
11. Always use the proper needle plate. The wrong plate can cause the needle to break.
12. Do not use bent needles.
13. Do not pull or push fabric while stitching. It may deflect the needle causing it to break.
14. Switch the sewing machine off (symbol “O”) when making any adjustments in the
needle area, such as threading needle, changing needle, threading bobbin, or changing
presser foot.
15. Always unplug sewing machine from the electrical outlet when removing covers,
lubricating, or when making any other user servicing adjustments mentioned in the
instruction manual.
16. Handle the foot controller with care and avoid dropping it on the floor. Be sure not to
place anything on top of it.
17. Use only the handle to lift and move the machine.
18. Do not expose the machine or machine case to sunlight directly. Also, do not keep it in a
very warm or damp place.
SAVE THESE INSTRUCTIONS
Servicing should be performed by an authorized service representative.
SINGER is the exclusive trademark of The Singer Company Limited S.à.r.l. or its Affiliates.
©2013 The Singer Company Limited S.à.r.l. or its Affiliates. All rights reserved.

3
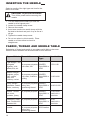
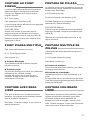
CONTENTS
IMPORTANT SAFETY
INSTRUCTIONS .................... 2
MODEL 9980 ............................ 8
FOR EUROPEAN AND SIMILAR
TERRITORIES: ........................... 8
MAIN PARTS .......................... 10
ACCESSORIES ...................... 12
DUST COVER ........................ 12
REMOVABLE EXTENSION
TABLE ................................. 14
A. REMOVING THE EXTENSION TABLE 14
B. OPENING THE ACCESSORY CASE .. 14
CHANGING THE PRESSER
FOOT ................................... 14
A. CHANGING THE PRESSER FOOT ..... 14
B. REMOVING THE PRESSER FOOT
HOLDER ............................................... 14
INSERTING THE NEEDLE ..... 16
FABRIC, THREAD AND NEEDLE
TABLE ................................. 16
CONNECTING THE MACHINE18
FOOT CONTROLLER ............ 18
FUNCTION OF EACH PART .. 20
A. START/STOP BUTTON ....................... 20
B. REVERSE STITCH BUTTON ............... 20
C. NEEDLE UP-DOWN / SLOW BUTTON20
D. SPEED CONTROL BUTTON ............... 20
E. PRESSER FOOT LIFTER .................... 20
F. THREAD CUTTER BUTTON ............... 22
G.DROP FEED LEVER ............................ 22
H. THREAD CUTTER ............................... 22
I. PRESSURE REGULATOR .................. 22
J. TOP COVER ........................................ 22
K. HAND WHEEL ...................................... 22
CONTROL PANEL .................. 24
A. LCD DISPLAY ...................................... 24
B. PATTERN CHART ............................... 24
C. UTILITY STITCH BUTTON .................. 24
D. DECORATIVE & LETTER STITCH
BUTTON ............................................... 24
E. FUNCTION BUTTONS ......................... 24
F. EDIT BUTTON ...................................... 24
G.SCROLL BUTTONS ............................. 24
H. CURSOR BUTTONS ............................ 24
ADJUSTING CONTRAST OF
LCD; TURNING OFF AUDIBLE
BEEP ................................... 26
BOBBIN SETTING .................. 28
A. REMOVING THE BOBBIN ................... 28
B. SETTING SPOOL OF THREAD ON
SPOOL PIN .......................................... 28
C. WINDING THE BOBBIN ....................... 28
D. INSERTING THE BOBBIN ................... 30
THREADING THE MACHINE . 32
A. PREPARING TO THREAD MACHINE . 32
B. SETTING SPOOL OF THREAD ON
SPOOL PIN .......................................... 32
C. THREADING THE UPPER THREAD ... 32
D. THREADING THE NEEDLE EYE ......... 34
DRAWING UP THE BOBBIN THREAD .... 34
STARTING TO SEW ................................. 36
A. START AND END OF SEAM ............... 36
B. REVERSE STITCHING ........................ 38
C. AUTO TACK STITCH ........................... 38
D. TURNING CORNERS .......................... 40
E. SEWING HEAVY FABRIC .................... 40
F. SEWING OVER OVERLAPPED
AREAS ................................................. 40
G.WIDTH OF SEAM ALLOWANCE ......... 40
THREAD TENSION ................ 42
SELECTING UTILITY STITCH
PATTERN ............................ 44
A. SELECTING UTILITY STITCH
PATTERNS .......................................... 44
B. SETTING (Mirror/reverse, elongation) .. 44
C. SETTING STITCH WIDTH AND
LENGTH ............................................... 46
WHERE TO USE EACH
STITCH ................................ 48
STRAIGHT STITCH SEWING 50
A. Straight Stitch ....................................... 50
B. Straight Stitch With Auto-lock Stitch
(Pattern No. 3, 4) .................................. 50
BASTING ................................ 52
A. ATTACHING THE DARING/
EMBROIDERY FOOT .......................... 52
B. BASTING .............................................. 52
ELASTIC STITCH SEWING ... 54
QUILTING ............................... 54
A. JOINING THE PIECES OF FABRIC .... 54
B. QUILTING ............................................. 54
C. HAND LOOK QUILTING
STITCH (NO. 8) .................................... 54
ZIGZAG STITCH SEWING ..... 56
MULTI-STITCH ZIGZAG ......... 56
FREE ARM SEWING .............. 56
OVERCASTING-
OVERLOCKING .................. 58
A. USING THE OVERCASTING FOOT .... 58
B. USING THE GENERAL PURPOSE
FOOT .................................................... 58
BLIND HEM STITCHING ........ 60
CRAZY PATCH ....................... 62
APPLIQUE .............................. 62
INSERTING ZIPPERS
CENTERED INSERTION ........ 64
LAPPED INSERTION ............. 66
BUTTONHOLE SEWING ........ 68
BOUND BUTTONHOLE ......... 72
EYELET .................................. 74
AUTOMATIC BAR-TACK AND
DARNING ............................ 76
SEWING ON BUTTONS ......... 78
A. THREAD SHANK ................................. 78
NARROW HEMMING ............. 80
CORDING ............................... 80
A. SINGLE CORDING .............................. 80
B. TRIPLE CORDING ............................... 80
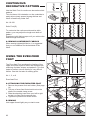
CONTINUOUS DECORATIVE
PATTERN ............................ 82
A. SEWING LIGHTWEIGHT FABRICS .... 82
USING THE EVEN-FEED
FOOT ................................... 82
A. ATTACHING THE EVEN-FEED FOOT 82
B. SEWING ............................................... 82
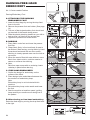
DARNING/FREE-HAND
EMBROIDERY ..................... 84
A. ATTACHING THE DARING/
EMBROIDERY FOOT .......................... 84
B. DARING ................................................ 84
C. FREE-HAND EMBROIDERY ............... 84
D. After darning or free-hand embroidery . 84
TWIN NEEDLE SEWING ........ 86
DECORATIVE & LETTER
STITCH SEWING ................ 88
A. SELECTING DECORATIVE & LETTER
STITCH (selecting mode) ..................... 88
B. SHIFTING THE CURSOR .................... 88
C. TO CHECK SELECTED PATTERNS ... 90
D. INSERTING PATTERN ........................ 90
E. TO DELETE PATTERN ........................ 90
F. EDITING OF EACH PATTERN ............ 92
G.TO RECALL THE SELECTED
PATTERNS .......................................... 94
H. SEWING THE SELECTED PATTERNS 96
I. TO SEW PATTERN FROM
BEGINNING ......................................... 96
DECORATIVE AND LETTER
STITCH CHART .................. 98
ADJUSTING THE BALANCE OF THE
STITCHES .......................................
98
MAINTENANCE .................... 100
CLEANING .............................................. 100
MESSAGES ON LCD ........... 102
HELPFUL HINTS .................. 104
CAUTION: To
prevent acceidents.
Do not pull out the front
cover from the machine.
Page is loading ...

5
TABLE DES MATIÈRES
CONSIGNES DE SÉCURITÉ
IMPORTANTES ..................... 4
MODÈLE 9980 .......................... 9
POUR LES TERRITOIRES EUROPÉENS
ET ASSIMILÉS : ................................. 9
PIÈCES PRINCIPALES .......... 11
ACCESSOIRES ...................... 13
HOUSSE DE PROTECTION
SOUPLE .............................. 13
TABLE DE RALLONGE
AMOVIBLE .......................... 15
A. DÉGAGER LE TABLE
DE RALLONGE .................................... 15
B. OUVRIR LE COMPARTIMENT À
ACCESSOIRES .................................... 15
CHANGEMENT DE PIED
PRESSEUR ......................... 15
A. Changer de pied presseur .................... 15
B. Retirer le support du pied presseur ...... 15
MISE EN PLACE DE
L’AIGUILLE .......................... 17
TABLEAU DES TISSUS, FILS ET
AIGUILLES .......................... 17
BRANCHEMENT DE LA
MACHINE ............................ 19
PEDALE DE CONTRÔLE ....... 19
FONCTION DES PIÈCES ET
TOUCHES ........................... 21
A. TOUCHE MARCHE / ARRÊT ............... 21
B. TOUCHE COUTURE ARRIERE ........... 21
C. TOUCHE AIGUILLE POSITION HAUTE -
BASSE / COUTURE LENTE ................ 21
D. TOUCHE CONTRÔLE DE VITESSE ... 21
E. RELEVEUR DE PIED PRESSEUR ...... 21
F. TOUCHE COUPE-FIL .......................... 23
G.LEVIER DES GRIFFES ........................ 23
H. COUPE-FIL .......................................... 23
I. RÉGULATEUR DE PRESSION ........... 21
J. COUVERCLE SUPERIEUR ................. 23
K. VOLANT ............................................... 23
ÉCRAN D’AFFICHAGE .......... 25
A. ÉCRAN ECL ......................................... 25
B. TABLEAU DES POINTS ...................... 25
C. TOUCHE POINTS UTILITAIRES ......... 25
D. TOUCHE POINTS DECORATIFS ET
LETTRES ............................................. 25
E. TOUCHES FONCTIONS ...................... 25
F. TOUCHE EDIT .................................... 25
G.TOUCHE DE DEFILEMENT ................. 25
H. TOUCHES DE CURSEUR ................... 25
AJUSTEMENT DU CONTRASTE
DU ECL; ETEINDRE LE
TIMBRE SONORE ............... 27
CANETTE ............................... 29
A. RETIRER LA CANETTE ....................... 29
B. MISE EN PLACE DE LA BOBINE SUR LA
TIGE À BOBINE ................................... 29
C. BOBINAGE DE LA CANETTE .............. 29
D. MISE EN PLACE DE LA CANETTE ..... 31
ENFILAGE DE LA MACHINE . 33
A. PRÉPARATION EN VUE DE
L’ENFILAGE ......................................... 33
B. MISE EN PLACE DE LA BOBINE SUR LA
TIGE À BOBINE ................................... 33
C. ENFILAGE DU FIL D’AIGUILLE ........... 33
D. ENFILAGE DU FIL DANS LE CHAS DE
L’AIGUILLE ........................................... 35
REMONTER LE FIL DE CANETTE .......... 35
DÉBUT DE LA COUTURE ...... 37
A. DÉBUT ET FIN DE LA COUTURE ....... 37
B. COUTURE ARRIERE ........................... 39
C. POINT D’ARRÊT AUTOMATIQUE ....... 39
D. COUTURE DES COINS ....................... 41
E. COUTURE DE TISSUS ÉPAIS ............ 41
F. COUTURE DES SURÉPAISSEURS .... 41
G.LARGEUR DES RABATS .................... 41
TENSION DU FIL .................... 43
SÉLECTION DES POINTS
UTILITAIRES ....................... 45
A. SELECTIONER LES MOTIFS DE POINTS
UTILITAIRES ........................................ 45
B. RÉGLAGE (Miroir/ Inverse, Allongement)
45
C. REGLER LA LONGUEUR ET LA
LARGEUR DE POINT .......................... 47
DESCRIPTION DES POINTS . 49
COUTURE AU POINT DROIT 51
A. Point droit ............................................. 51
B. Point droit avec point d’arrêt automatique
(Motifs No. 3, 4) .................................... 51
FAUFILAGE ............................ 53
A. MISE EN PLACE DU PIED BRODERIE
ET REPRISAGE ................................... 53
B. FAUFILAGE .......................................... 53
COUTURE DE POINTS
EXTENSIBLES .................... 55
QUILTING ............................... 55
A. Assemblage des morceaux de tissu ..... 55
B. Quilting ................................................. 55
C. Point de quilting, apparence fait main
(n°8) ...................................................... 55
COUTURE AU POINT ZIGZAG57
POINT ZIGZAG MULTIPLE .... 57
COUTURE AVEC BRAS
LIBRE .................................. 57
SURJET - SURFILAGE .......... 59
A. AVEC LE PIED DE SURJET ................ 59
B. AVEC LE PIED UNIVERSEL ................ 59
COUTURE D’OURLETS
INVISIBLES ......................... 61
PATCHWORK FOLLI .............. 63
APPLIQUE .............................. 63
FERMETURE À GLISSIÈRE
- POSE BORD À BORD .......... 65
- POSE SOUS PATTE ............ 67
COUTURE DE
BOUTONNIÈRES ................ 69
BOUTONNIERE
PASSEPOILEE .................... 73
OEILLET ................................. 75
ARRÊT ET REPRISAGE
AUTOMATIQUES ................ 77
COUTURE DE BOUTONS ..... 79
A. TIGE DE FIL ......................................... 79
OURLET ROULOTTÉ ............. 81
CORDONNETS ...................... 81
A. CORDONNETS SIMPLES ................... 81
B. CORDONNETS TRIPLES .................... 81
SÉQUENCE DE MOTIFS
DÉCORATIFS ...................... 83
A. COUTURE DE TISSU LEGER ............. 83
UTILISATION DU PIED POUR
ENTRAÎNEMENT
SYNCHRONISÉ .................. 83
A.
MISE EN PLACE DU PIED POUR ENTRAÎNEMENT
SYNCHRONISÉ ...................................................
83
B. COUTURE ............................................ 83
REPRISAGE / BRODERIE ..... 85
A. MISE EN PLACE DU PIED BRODERIE
ET REPRISAGE ................................... 85
B. REPRISAGE ......................................... 85
C. BRODERIE ........................................... 85
D. APRÈS LE REPRISAGE ET LA
BRODERIE ........................................... 85
COUTURE AVEC AIGUILLE
JUMELÉE ............................ 87
COUTURE DE LETTRES ET POINTS
DÉCORATIFS ..............................
89
A. SELECTION POINT DECORATIFS ET
LETTRES ............................................. 89
B. FAIRE DEFILER LE CURSEUR ........... 89
C.
VERIFIER LES MOTIFS SELECTIONNES .
91
D. INSERER DES MOTIFS ....................... 91
E. SUPPRIMER UN MOTIF ...................... 91
F. EDITER CHAQU’UN DES MOTIFS ..... 93
G.RETROUVER LES MOTIFS
SELECTIONNES .................................. 95
H.
COUDRE LES MOTIFS SELECTIONNES
97
I. POUR COUDRE LES MOTIFS AU
DEBUT ................................................. 97
TABLEAU DES LETTRES ET POINTS
DÉCORATIFS ..............................
99
L’ÉQUILIBRATION DES POINTS .
99
ENTRETIEN .......................... 101
NETTOYAGE .......................................... 101
Messages sur écran LCD ..... 103
SOLUTION AUX PROBLÈMES
COURANTS ....................... 105
ATTENTION! Pour éviter
les incidents :
N’ouvrez pas le panneau
frontal.
Page is loading ...

7
ÍNDICE
NORMAS DE SEGURIDAD
IMPORTANTES ..................... 6
MODELO 9980 ......................... 9
PARA EUROPA Y TERRITORIOS
EQUIPARABLES: ........................
9
PARTES PRINCIPALES ......... 11
ACCESORIOS ........................ 13
CUBIERTA .............................. 13
MESA DE EXTENSIÓN
REMOVIBLE ........................ 15
A. RETIRADA DE LA EXTENSION .......... 15
B. APERTURA DEL COMPARTIMENTO DE
ACCESORIOS ...................................... 15
CÓMO CAMBIAR EL
PRENSATELAS ................... 15
A. Cómo cambiar el prensatelas ............... 15
B. Cómo retirar el portaprensatelas .......... 15
INSERCION DE LA AGUJA .... 17
TABLA DE TEJIDOS, HILOS Y
AGUJAS .............................. 17
CONEXIÓN DE LA MAQUINA 19
PEDAL DE CONTROL ............ 19
FUNCIÓN DE CADA UNA DE
LAS PARTES ....................... 21
A. BOTÓN INICIO / PARO ........................ 21
B. BOTÓN DE PUNTADA REVERSA ...... 21
C. BOTÓN AGUJA ARRIBA / LENTO ...... 21
D. BOTÓN DE CONTROL DE
VELOCIDAD ......................................... 21
E. PALANCA ALZAPRENSATELAS ......... 21
F. BOTÓN CORTADOR DE HILO ............ 23
G.PALANCA DE ARRASTRE .................. 23
H. CORTADOR DE HILO .......................... 23
I. REGULADOR DE PRESIÓN ................ 23
J. CUBIERTA SUPERIOR ........................ 23
K. VOLANTE MANUAL ............................. 23
PANEL DE CONTROL ............ 25
A. PANTALLA LCD ................................... 25
B. TABLA DE PUNTADAS ........................ 25
C. BOTÓN DE PUNTADA UTILITARIA .... 25
D. BOTÓN DE PUNTADA DECORATIVA Y
DE LETRAS .......................................... 25
E. BOTONES DE FUNCIÓN ..................... 25
F. BOTÓN DE EDICIÓN ........................... 25
G.BOTONES DE PAGINACIÓN .............. 27
H. BOTONES DE CURSOR ..................... 27
AJUSTANDO EL CONTRASTE
DEL LCD; APAGANDO LA
SEÑAL AUDIBLE ................. 27
AJUSTE DE LA CANILLA ....... 29
A. CÓMO SACAR LA CANILLA ................ 29
B.
COLOCACIÓN DEL CARRETE DE HILO EN EL
PORTACARRETES .........................................
29
C. DEVANADO DE LA CANILLA .............. 29
D. COLOCACIÓN DE LA CANILLA .......... 31
ENHEBRADO DE LA
MÁQUINA ............................ 33
A. PREPARACIÓN PARA ENHEBRAR LA
MÁQUINA ............................................. 33
B.
COLOCACIÓN DEL CARRETE DE HILO EN EL
PORTACARRETES .........................................
33
C. ENHEBRADO DEL HILO SUPERIOR .. 33
D. ENHEBRADO DEL OJO DE LA AGUJA35
EXTRACCIÓN DEL HILO DE LA CANILLA35
COMENZAR A COSER .......... 37
A. PRINCIPIO Y FINAL DE UNA
COSTURA ............................................ 37
B. PUNTADA REVERSA .......................... 39
C. PUNTADA DE REFUERZO
AUTOMATICA ...................................... 39
D. CÓMO GIRAR EN LAS ESQUINAS ..... 41
E. CÓMO COSER TEJIDOS FUERTES ... 41
F. CÓMO COSER SOBRE ÁREAS
SOLAPADAS ........................................ 41
G.ANCHO DEL MARGEN DE COSTURA 41
TENSIÓN DEL HILO ............... 43
SELECCIÓN DE PUNTADAS
UTILITARIAS ....................... 45
A. SELECCIONANDO PATRONES DE
COSTURA DE UTILERIA ..................... 45
B. AJUSTE (Espejor/reversa, elongación) 45
C. AJUSTE DE ANCHO Y LARGO DE
PUNTADA ............................................ 47
DÓNDE UTILIZAR CADA TIPO
DE PUNTADA ...................... 49
PUNTADA RECTA .................. 51
A. Puntada Recta ...................................... 51
B. Puntada Recta con Puntada Auto Lock
(Patrón No. 3, 4) ................................... 51
HILVANADO ........................... 53
A.
CÓMO COLOCAR EL PRENSATELAS PARA
ZURCIDO Y BORDADO ..................................
53
B. HILVANADO ......................................... 53
PUNTADA ELÁSTICA ............ 55
ACOLCHADO ......................... 55
A. Cómo unir las piezas de tejido ............. 55
B. Cómo coser acolchados ....................... 55
C. Puntada de acolchado con aspecto
artesanal (nº 8) ..................................... 55
PUNTADA DE ZIG-ZAG ......... 57
PUNTADA MÚLTIPLE DE ZIG-
ZAG ..................................... 57
COSTURA CON BRAZO
LIBRE .................................. 57
SOBREHILADO-REMALLADO 59
A. CON EL PRENSATELAS PARA
SOBREHILADO .................................... 59
B. CON EL PRENSATELAS UNIVERSAL 59
DOBLADILLO DE PUNTADA
INVISIBLE ............................ 61
CRAZY PATCH ....................... 63
APLICACIONES ..................... 63
INSERCIÓN DE CREMALLERAS
INSERCIÓN CENTRADA ....... 65
INSERCIÓN SOLAPADA ........ 67
CÓMO COSER OJALES ........ 69
OJAL REFORZADO ............... 73
OJAL BORDADO .................... 75
PRESILLAS Y ZURCIDOS
AUTOMÁTICOS .................. 77
CÓMO COSER BOTONES .... 79
A. Zanco Hilo ............................................ 79
DOBLADILLOS
ARROLLADOS .................... 81
CORDONCILLO ...................... 81
A. CORDONCILLO SIMPLE ..................... 81
B. CORDONCILLO TRIPLE ...................... 81
PUNTADAS DECORATIVAS
CONTINUAS ........................ 83
A. COSIENDO TELAS LIGERAS ............. 83
USO DEL PRENSATELAS DE
TRANSPORTE UNIFORME ............
83
A.
CÓMO COLOCAR EL PRENSATELAS DE
TRANSPORTE UNIFORME .................................
83
B. CÓMO COSER ..................................... 83
ZURCIDO Y BORDADO A MANO
LIBRE .................................. 85
A.
CÓMO COLOCAR EL PRENSATELAS PARA
ZURCIDO Y BORDADO ..................................
85
B. ZURCIDO ............................................. 85
C. BORDADO A MANO LIBRE ................. 85
D. Después del zurcido o bordado a mano
libre ....................................................... 85
CÓMO COSER CON AGUJA
DOBLE ................................. 87
PUNTADAS DECORATIVAS Y
LETRAS ............................... 89
A. SELECCIONANDO LA PUNTADA
DECORATIVA Y DE LETRAS (modo de
selección) ............................................. 89
B. CAMBIANDO EL CURSOR .................. 89
C. PARA REVISAR LOS PATRONES
SELECCIONADOS ............................... 91
D. INSERTANDO UN PATRÓN ................ 91
E. PARA BORRAR UN PATRÓN ............. 91
F. EDITANDO CADA PATRÓN ................ 93
G.PARA RECORDAR LOS PATRONES
SELECCIONADOS ............................... 95
H. COSIENDO CON LOS PATRONES
SELECCIONADOS ............................... 97
I. PARA COSER UN PATRÓN DESDE EL
PRINCIPIO ........................................... 97
TABLA DE PUNTADAS
DECORATIVAS Y LETRAS ......
99
AJUSTANDO EL BALANCE DE LAS
PUNTADAS ......................... 99
MANTENIMIENTO ................ 101
LIMPIEZA ............................................... 101
Mensajes en pantalla LCD .... 103
RECOMENDACIONES
ÚTILES .............................. 106
PRECAUCIÓN: Para
prevenir accidentes
No abra la tapa delantera
de la máquina.

8
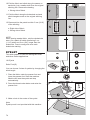
MODEL 9980
PREFACE
Thank you for your purchase of this sewing
machine.
This machine intended for household use will
provide you with excellent performance in sewing
from light to heavy material.
Please refer to this booklet for proper use and
optimum service. To get the most out of your
sewing machine, read the entire instruction
manual before attempting to operate the machine.
Then familiarize yourself with the machine by
following the instruction manual page by page.
To ensure that you are always provided with the
most modern sewing capabilities, the
manufacturer reserves the right to change the
appearance, design or accessories of this sewing
machine when considered necessary without
notification or obligation.
FOR EUROPEAN AND
SIMILAR TERRITORIES:
This product is suppressed for radio and television
interference with the International Electrotechnical
Commission requirements of the CISPR.
The wires in this mains lead are colored in
accordance with the following code.
Blue: neutral (N) Brown: live (L)
As the colors of the wires in the mains lead of this
appliance may not correspond with the colored
markings identifying the terminals in your plug,
proceed as follows:
The wire which is colored blue must be connected
to the terminal which is marked with the letter N or
colored black. The wire which is colored brown
must be connected to the terminal which is
marked with letter L or colored red. If a 13 Amp.
(BS 1363) plug is used, a 3 Amp. Fuse must be
fitted, or if any other type of plug is used, a 5 Amp.
fuse must be fitted either in the plug or adaptor or
at the distribution board.
1. This appliance can be used by children
aged from 8 years and above and persons
with reduced physical, sensory or mental
capabilities or lack of experience and
knowledge if they have been given
supervision or instruction concerning use
of the appliance in a safe way and
understand the hazards involved.
2. Children shall not play with the appliance.
3. Cleaning and user maintenance shall not
be made by children without supervision.
4. Switch off or unplug the machine when
leaving it unattended.
5. Unplug the appliance before carrying out
maintenance.
1. Cet appareil peut être utilisé par un enfant
âgé de 8 ans ou plus ou personnes sans
expérience, s’ils ont une stricte
surveillance et qu’ils comprennent que
cette machine doit être utilisée avec des
mesures de sécurités.
2. Cet appareil ne doit pas entre utiliser
comme un jouet par les enfants.
3. Le nettoyage et l’entretiens ne peut se
faire par un enfant sans surveillance.
4. Éteindre ou débrancher la machine après
chaque utilisation.
5. Débrancher l’appareil.
1. Este producto puede ser utilizado por
niños de 8 años en adelante y personas
con capacidades físicas, sensoriales o
mentales reducidas o diferentes, o con
falta de experiencia y conocimiento si han
sido provistas de supervisión o instrucción
en relación al uso del producto en forma
segura y entendiendo los riesgos que
implica.
2. Los niños no deberán jugar con este
producto.
3. El mantenimiento y limpieza por parte del
usuario no deberá llevarse a cabo por un
niño sin supervisión.
4. Apague o desconecte la máquina cuando
se deje sin atención.
5. Desconecte el aparato antes de dar
cualquier mantenimiento.
Neither cord is to be
connected to the
earth terminal of a
three-pin plug.
EU only
EU seulement
Sólo para Estados Unidos
Page is loading ...

10
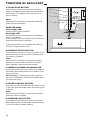
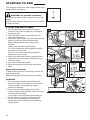
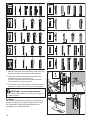
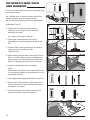
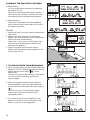
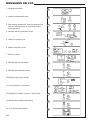
MAIN PARTS
1.Face Plate
2.Thread Take-Up Lever (Inside)
3.Pressure Regulator
4.Removable Extension Table (Accessories)
5.Handle
6.Hand Wheel
7.Presser Foot Lifter
8.Stitch Balance Adjusting Screw (underneath
machine)
9.Thread Cutter
10.Buttonhole Lever
11.Needle Threader
12.Needle Threader Lever
13.Presser Foot Release Lever
14.Presser Foot Thumb Screw
15.Presser Foot Holder
16.Presser Foot
17.Feed Dogs
18.Needle Clamp Screw
19.Needle Thread Guide
20.Needle
21.Needle Plate
22.Bobbin Cover
23.Bobbin Cover Latch
24.Top Cover
25.Pattern Chart
26.Thread Guides
27.Spool Pin
28.Bobbin Winder Thread Guide
29.Felt Washer
30.Extra Spool Holder
31.Bobbin Winder Shaft
32.Bobbin Winder Stop
33.Speed Control Button
34.Reverse Stitch Button
35.Start/Stop Button
36.Needle Up/Down Slow Button
37.Thread Cutter Button
38.Function Buttons
39.Liquid Crystal Display (LCD)
40.Scroll Up Button
41.Cursor Left Button
42.Cursor Right Button
43.Scroll Down Button
44.Decorative & Letter Stitch Button
45.Utility Stitch Button
46.Edit Button
47.Drop Feed Lever
48.Power Switch
49.Terminal Box
50.Controller Jack
51.Foot Controller
52.Power Line Cord
1
2
7
5
6
4
3
9
10
12
11
18
20
19
13
14
15
16
21
22
23
24 25 26 27 28 29 30 31 32
43
42
35 36
40
37 38 39
44
45
46
47
48
41
49
50
51
52
8
33
34
17
Page is loading ...

12
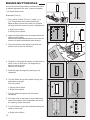
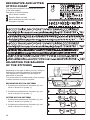
ACCESSORIES
Accessories are provided in the accessory case.
(See next page, [REMOVABLE EXTENSION
TABLE])
1. Needle Pack
2. 4 SINGER Class 15 bobbins ( 1 is in the
machine)
3. Seam Ripper
4. Brush
5. Auxiliary Spool Pin with Felt Washer
6. Screw Driver
7. Screwdriver for Needle Plate
8. Thread Cap (On the machine when delivered)
9. Small Thread Cap
10. Seam Guide and Screw
11. Overcasting Foot (C)
12. Blind Hem Foot (D)
13. Zipper Foot (E)
14. Rolled Hem Foot
15. Button Sewing Foot
16. Satin Foot (B)
17. Quilting Bar
18. Open Toe Foot
19. Cording Foot
20. Straight Stitch / Patchwork Foot
21. Darning Embroidery Foot
22. Even-feed Foot
23. Buttonhole Foot (F) and Under Plate
24. General Purpose Foot (On machine when
delivered) (A)
DUST COVER
Cover the machine with dust cover when it is not
being used.
123456
78 9
10 11 12
13 14 15
16
17
18 19 20
21 22 23 24
Page is loading ...

14
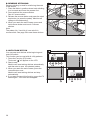
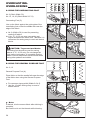
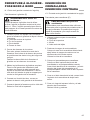
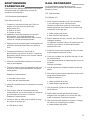
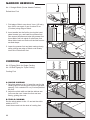
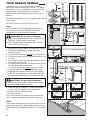
REMOVABLE EXTENSION
TABLE
A.REMOVING THE EXTENSION TABLE
Hook your finger under the left bottom side of
the removable extension table and slide it to the
left.
To attach, push the table to the right.
B.OPENING THE ACCESSORY CASE
Hook your finger under the left side of the
accessory drawer cover and pull toward you.
Note: Your machines accessories are stored
inside this drawer.
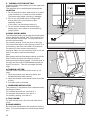
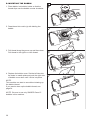
CHANGING THE PRESSER
FOOT
The presser foot must be changed according to
the stitch you sew, or work you do.
A.CHANGING THE PRESSER FOOT
1. Turn the hand wheel toward you until the
needle is at its highest point.
2. Raise the presser foot lifter.
3. Remove the presser foot by pushing the
presser foot release lever toward you.
4. Place desired foot with its pin directly under the
slot in presser foot holder.
5. Lower the presser foot lifting lever and the
presser foot will snap into place.
CAUTION: To prevent accidents.
Turn off the power switch before you change
the presser foot.
B.REMOVING THE PRESSER FOOT
HOLDER
When attaching presser feet that have their own
shank, or when cleaning the machine, you should
remove the presser foot holder.
1. Remove the presser foot.
2. Loosen the presser foot thumb screw and
remove the presser foot holder.
3. To replace the holder, pull up the holder as far
as it will go from bottom of presser bar.
4. Tighten the thumb screw.
Page is loading ...

16
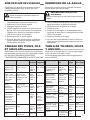
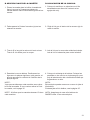
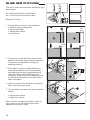
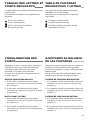
INSERTING THE NEEDLE
Select a needle of the right type and size for the
fabric to be sewn.
FABRIC, THREAD AND NEEDLE TABLE
Select size of thread and needle in accordance with fabric to be sewn.
SINGER brand needles are recommended for this machine.
Type of Fabric
Light Weight - thin
georgette,
organdy, voile,
taffeta, silk, etc.
Medium Weight -
gingham, pique,
linen, cotton,
satin, thin
corduroy, velvet
Heavy Weight -
gabardine, tweed,
denim, corduroy
Stretch - double
knit, tricot,
spandex, jersey
Sweatshirt, Swim-
wear, Double Knit,
Sweater Knit
Leather
Thread Size
All-purpose polyester,
fine cotton, silk
All-purpose polyester,
fine cotton, machine
quilting
All-purpose polyester,
heavy duty,
topstitching thread
All purpose polyester
All purpose polyester
All purpose polyester,
heavy duty,
topstitching thread
Needle Size
9/70-11/80
11/80-14/90
14/90-16/100
11/80-14/90
Needle for knit or
stretch fabrics
14/90
Needle for knit or
stretch fabrics
Needle
Type
SINGER
Style 2000 or
2020
SINGER
Style 2000 or
2020
SINGER
Style 2000 or
2020
SINGER
Style 2001 or
2045
SINGER
Style 2001 or
2045
2032 Leather
CAUTION: To prevent accidents.
Turn off the power before removing the
needle.
1. Turn the hand wheel toward you until the
needle is at its highest point.
2. Loosen the needle clamp screw.
3. Remove the needle.
4. Insert new needle into needle clamp with the
flat side to the back and push it up as far as it
will go.
5. Tighten the needle clamp screw.
a. Do not use a bent or blunt needle. Place
needle on a flat surface to check its
straightness.
Page is loading ...

18
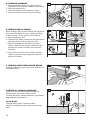
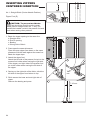
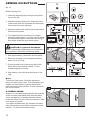
CONNECTING THE
MACHINE
DANGER: To reduce the risk of
electric shock.
Never leave unattended when plugged in. Always
unplug this machine from the electric outlet
immediately after using and before maintenance.
WARNING: To reduce the risk of
burns, fire, electric shock, or injury
to persons.
Do not unplug by pulling on cord. To unplug, grasp
the plug, not the cord.
1. Place machine on stable table.
2. Connect the power line cord to the machine by
inserting the 2-hole plug into the terminal box.
3. Connect the power line plug to the electric outlet.
4. Turn on the power switch.
5. A lamp will light up when switch is turned on.
6. To disconnect, turn the power switch to the off
position (symbol O), then remove plug from
outlet.
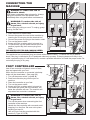
FOOT CONTROLLER
Use of foot controller will permit control of start,
stop and speed with your foot.
When the foot controller is connected, start/stop
button will be deactivated. (See page 20)
1. Turn off the power switch. (symbol O)
2. Push foot controller plug into the jack on
machine.
3. Place foot controller at your feet.
4. Turn on the power switch.
5. A lamp will light up when switch is turned on.
6. The harder you press the foot controller, the
faster the machine will sew. The machine will
stop when foot controller is released.
WARNING: To reduce the risk of
burns, fire, electric shock, or injury
to persons.
1. Turn off the power when connecting the foot
controller to the machine.
2. Handle the foot controller with care and avoid
dropping it on the floor. Be sure not to place
anything on top of it.
3. Use only foot controller provided with this
machine. (Type 4C-337B)
FOR UNITED STATES AND CANADA USERS:
POLARIZED PLUG INFORMATION
This appliance has a polarized plug (one blade wider than the other). To reduce the risk of electric
shock, this plug is intended to fit in a polarized outlet only one way. If the plug does not fit fully in the
outlet, reverse the plug. If it still does not fit, contact a qualified electrician to install the proper outlet. Do
not modify the plug in any way.
Page is loading ...

20
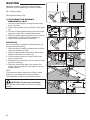
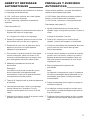
FUNCTION OF EACH PART
A.START/STOP BUTTON
The machine will start running when start/stop
button is pressed and will stop when pressed the
second time. The machine will rotate slowly at
start of sewing.
Note:
When the foot controller is connected, start/stop
button will be deactivated.
MONITOR LAMP
Green Light “ON”
Ready to sew or wind a bobbin.
Red Light “ON”
Presser foot is not in down position or buttonhole
lever is not lowered.
If the red light is on, the machine will not start even
when start/stop button is pressed.
If the upper thread is not threaded, the machine
will stop. (Upper thread sensor)
B.REVERSE STITCH BUTTON
The machine will continue to sew in reverse at low
speed while this button is pressed and stop when
this button is released.
Note:
When the foot controller is connected, machine
will sew in reverse while this button is pressed.
When released, machine will sew forward.
C.NEEDLE UP-DOWN / SLOW BUTTON
Pressing this button when the machine is stopped,
will change the needle position from down to up or
from up to down.
While sewing, by pressing this button, machine
will sew in slow speed. Pressing this button again,
the speed will return.
D.SPEED CONTROL BUTTON
The machine will sew faster when the button is slid
to the right, and sew slower when the button is slid
to the left.
Note:
When the foot controller is connected, this button
limits the maximum speed.
E. PRESSER FOOT LIFTER
The presser foot is lifed up or down by this lever.
Note: Machine will not start when the presser foot
is lifted. (Except for bobbin winding)
Page is loading ...

22
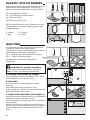
F. THREAD CUTTER BUTTON
Press this button after sewing to cut the upper and
bobbin threads.
The machine will cut both threads automatically.
CAUTION
1. Do not press this button when there is no fabric
in the machine or no need to cut the threads.
The thread may tangle, resulting in damage.
2. Do not use this button when cutting thread
thicker than #30, nylon thread or other
speciality threads.
In this case, use the thread cutter (H).
3. Do not use the thread cutter button when
sewing with a twin needle or a hemstitching
(wing) needle.
G.DROP FEED LEVER
The feed dogs project up through the needle plate,
directly below the presser foot. Their function is to
move the fabric being sewn. The drop feed lever
controls the feed dogs.
For ordinary sewing, move the lever to the right.
This raises feed dogs to their highest position. For
most sewing, the lever should be in this position.
For darning or free motion embroidery or
whenever fabric is to be moved by hand, move the
lever to the left to lower the feed dogs.
Note:
After sewing with the feed dogs lowered, push the
Drop Feed Lever back to the right to resume
sewing with feed dogs engaged. Push the lever to
the right and then turn the handwheel toward you
one full revolution. This will re-engage the feed
dogs.
H.THREAD CUTTER
Use this cutter if the thread cutter button is not
used.
1. Raise the presser foot and bring fabric and
threads backward after sewing.
2. Hook the threads to the thread cutter from back
to front.
3. Pull fabric and cut threads.
I. PRESSURE REGULATOR
The pressure on the presser foot is determined by
the weight of fabric.
To increase the pressure, turn dial to 3.
To decrease the pressure, turn dial to 1.
For ordinary sewing, turn dial to 2.
J. TOP COVER
To open the top cover, lift up the left side of the
cover.
K.HAND WHEEL
By turning the hand wheel, the needle will raise or
lower. You should always turn hand wheel toward
you.
Page is loading ...

24
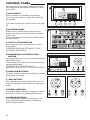
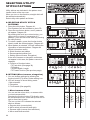
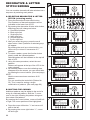
CONTROL PANEL
When you turn on the power, machine will select
the straight stitch and indicate information of stitch
on the LCD.
A.LCD DISPLAY
Stitch information is indicated on this display.
According to the pattern or mode, information will
be changed.
If you want to adjust the contrast of LCD, see page
26.
B.PATTERN CHART
Pattern chart is located inside of the top cover.
Patterns and letters of this machine are indicated
on this chart.
They are separated: Utility stitches and Decorative
& Letter stitches.
C.UTILITY STITCH BUTTON
By pressing this button, you may select a utility
stitch pattern.
FOR SELECTING AND SETTING OF UTILITY
STITCHES, SEE PAGE 44.
D.DECORATIVE & LETTER STITCH
BUTTON
By pressing this button, you can select decorative &
letter stitch patterns.
These patterns and letters are combined easily by
selecting each pattern.
FOR SELECTING AND SETTING OF
DECORATIVE & LETTER STITCH, SEE PAGE 88.
E. FUNCTION BUTTONS
Functions of these buttons are changed by selected
stitch pattern and mode.
F. EDIT BUTTON
When selecting decorative & letter stitch, you can
change the setting of each pattern by pressing this
button.
G.SCROLL BUTTONS
During stitch pattern selection, 5 patterns or letters
will scroll up or down by pressing these buttons.
H.CURSOR BUTTONS
When decorative & letter stitch sewing, you can
check and edit combined patterns or letters by
pressing these buttons.
Page is loading ...

26
ADJUSTING CONTRAST OF
LCD; TURNING OFF
AUDIBLE BEEP
You can adjust the contrast of the LCD and turn
off the audible beep by following these
procedures.
1. Turn off the power switch.
2. Turn on the power switch while pressing the
Edit button.
Adjust screen will turn on.
3. Adjust the contrast and beep sound as follows.
a. To turn off the beep, press the F2.
To turn on the beep, press the F3.
b. Press F4 or F5 to adjust the contrast of LCD.
4. Press the F1 to go stitch information mode.
This function is kept until you change them.
This function turns off the single beep only.
Multiple beeps will not turn off.
F1 F3F2 F4 F5
Page is loading ...

28
BOBBIN SETTING
Be sure to use only SINGER Class 15 bobbins in
this machine.
A.REMOVING THE BOBBIN
1. Pull the bobbin cover latch to the right and
remove the bobbin cover.
2. Lift up the bobbin from the machine.
B.SETTING SPOOL OF THREAD ON
SPOOL PIN
1. Pull up the left end of spool pin and set the spool
of thread on spool pin so that the thread unrolls
from the front of the spool.
2. Set the spool cap on spool pin as far as it will go.
a: Reverse spool cap direction according to the
size of spool.
b. Use the small spool cap when you use cross
wound thread. Leave small opening between
cap and spool as illustrated.
C.WINDING THE BOBBIN
1.Hold thread in both hands and hook thread to
the guide from front opening.
2.Bring thread towards the rear of the machine
and pass through the thread guide from left to
right.
3.Bring thread to the right and pass thread
through the thread guide from rear side. Pass
thread under tension disc in counter clockwise
direction.
4.Insert thread through hole in bobbin and place
the bobbin on bobbin winder spindle. Push
bobbin to the right to engage bobbin winder.
LCD will indicate the bobbin winding mode.
5.Hold the end of the thread and start the
machine by pressing the start/stop button or
pressing the foot controller pedal.
6.After the bobbin winds a few turns, stop the
machine by pressing the start/stop button or
releasing the foot controller pedal. Cut the
thread near hole.
7.Start the machine again.
8.The bobbin winding will stop automatically when
bobbin is full. Release the foot controller pedal.
9.Push the bobbin and spindle to the left.
10.Remove the bobbin from the spindle and cut the
thread.
Page is loading ...

30
D.INSERTING THE BOBBIN
1. Place bobbin into bobbin holder so that the
thread slips over the bobbin counter clockwise.
2. Draw thread into notch (a) with holding the
bobbin.
3. Pull thread along the groove up and then down.
Pull thread to the right to cut the thread.
4. Replace the bobbin cover. Set the left tabs into
the holes in needle plate and push the right side
of bobbin cover down until it clicks into place.
NOTE:
This machine can start to sew without drawing up
the bobbin thread.
If you want to draw up the bobbin thread, see
page 34.
NOTE: Be sure to use only SINGER Class 15
bobbins in this machine.
a
Page is loading ...

32
THREADING THE MACHINE
A.PREPARING TO THREAD MACHINE
1. RAISE THE PRESSER FOOT LIFTER. It is
very important to raise the presser foot lifter
before you proceed to thread the machine.
2. Press the needle up/down button and set the
needle in up position.
(Keep this position for threading the eye of the
needle.)
B.SETTING SPOOL OF THREAD ON
SPOOL PIN
1. Pull up the left end of spool pin and set the
spool of thread on spool pin so that the thread
unrolls from the front of the spool.
2. Set the spool cap on spool pin as far as it will
go.
a: Reverse spool cap direction according to the
size of spool.
b. Use the small spool cap when you use cross
wound thread. Leave small opening between
cap and spool as illustrated.
Note:
It is very important to raise the presser foot lifter
before you thread the machine. Not doing so will
likely result in poor stitch quality, or excessive
thread loops on the underside of the fabric.
Always raise the presser foot lifter before you
begin threading the machine.
C.THREADING THE UPPER THREAD
1. Hold thread in both hands and pass thread into
the guide from front opening.
2. Bring thread backward and pass through the slit
from right to left.
3. Bring thread to the left and pull thread down
toward you along the slit.
4. Pull the thread around the U-turn, then bring it
back up.
5. To thread the take-up lever, draw thread up and
bring thread back down again from right to left
along the slit.
6. Pull thread downward along the slit.
7. Draw thread through thread guide from right
side opening.
8. Pass through needle eye from front to back.
Refer to next page for instructions on how to
use needle threader.
Page is loading ...

34
D.THREADING THE NEEDLE EYE
DRAWING UP THE BOBBIN THREAD
This machine can start to sew without drawing up
the bobbin thread.
If you want to start sewing with longer bobbin
thread, draw up the bobbin thread as follows.
1. Insert the bobbin into the bobbin holder and
pass thread as page 30. But do not cut the
thread.
2. Raise the presser foot.
3. Hold thread loosely and press needle up-down
button twice from up position.
The hand wheel will turn one complete turn.
4. Pull upper thread lightly. Bobbin thread will
come up in a loop.
5. Pull both upper and bobbin threads about 10
cm toward the back of presser foot.
6. Replace the bobbin cover. (See page 30)
CAUTION: To prevent accidents.
1. Keep fingers away from all moving parts.
Special care is required around the needle.
2. Do not lower the threader lever while machine
is operating.
Note:The needle threader is used for needle sizes
11/80, 14/90, and 16/100.
1. Lower the presser foot.
2. Check that the needle is raised.
If it is not so, raise needle by pressing needle
up/down button.
3. Lower the threader slowly and draw thread
through thread guide (a) and pull toward the
right.
4. Lower the lever as far as it will go. The threader
will turn and the hook pin will go through the
needle eye.
5. Draw thread into the guide.
6. Hold thread loosely and release the lever.
Hook will turn and pass thread through needle
eye while making a loop.
7. Pull thread out about 10 cm (4 inches) through
the needle eye.
Page is loading ...

36
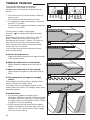
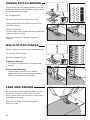
STARTING TO SEW
The machine will be set to sew straight stitch when
power switch is turned on.
CAUTION: To prevent accidents.
While sewing, special care is required around the
needle.
Machine automatically feeds the fabric, do not pull
or push the fabric.
A.START AND END OF SEAM
1. Check the presser foot (General Purpose
Presser Foot). Refer to page 14 for changing
the presser foot.
2. Place the fabric under the presser foot and
lower the presser foot.
3. Hold back upper thread and press the start/stop
button or press the foot controller pedal.
Keep holding threads after sewing a few
stitches.
Lightly guide the fabric while sewing.
You can regulate the sewing speed by sliding
the speed control button.
Also, you can reduce the sewing speed by
pressing the slow button.
4. When you reach end of seam, press the start/
stop button to stop sewing or release the foot
controller pedal.
5. Press the thread cutter button.
6. Raise the presser foot lifter and remove the
fabric.
Upper Thread Sensor
If upper thread is broken or missing, machine will
stop automatically.
Rethread the upper thread and resume sewing.
CAUTION
1. Do not press the thread cutter button when
there is no fabric in the machine or no need to
cut the threads. The thread may tangle,
resulting in damage.
2. Do not use the thread cutter button when
cutting thread thicker than #30, nylon thread or
other speciality threads.
In this case, use the thread cutter located on
the left side of the machine. (See page 22)
3. Do not use the thread cutter button when
sewing with a twin needle or a hemstitching
(wing) needle.
Page is loading ...
Page is loading ...
Page is loading ...
Page is loading ...
Page is loading ...
Page is loading ...
Page is loading ...
Page is loading ...
Page is loading ...
Page is loading ...
Page is loading ...
Page is loading ...
Page is loading ...
Page is loading ...
Page is loading ...
Page is loading ...
Page is loading ...
Page is loading ...
Page is loading ...
Page is loading ...
Page is loading ...
Page is loading ...
Page is loading ...
Page is loading ...
Page is loading ...
Page is loading ...
Page is loading ...
Page is loading ...
Page is loading ...
Page is loading ...
Page is loading ...
Page is loading ...
Page is loading ...
Page is loading ...
Page is loading ...
Page is loading ...
Page is loading ...
Page is loading ...
Page is loading ...
Page is loading ...
Page is loading ...
Page is loading ...
Page is loading ...
Page is loading ...
Page is loading ...
Page is loading ...
Page is loading ...
Page is loading ...
Page is loading ...
Page is loading ...
Page is loading ...
Page is loading ...
Page is loading ...
Page is loading ...
Page is loading ...
Page is loading ...
Page is loading ...
Page is loading ...
Page is loading ...
Page is loading ...
Page is loading ...
Page is loading ...
Page is loading ...
Page is loading ...
Page is loading ...
Page is loading ...
Page is loading ...
Page is loading ...
Page is loading ...
Page is loading ...
Page is loading ...
Page is loading ...
-
 1
1
-
 2
2
-
 3
3
-
 4
4
-
 5
5
-
 6
6
-
 7
7
-
 8
8
-
 9
9
-
 10
10
-
 11
11
-
 12
12
-
 13
13
-
 14
14
-
 15
15
-
 16
16
-
 17
17
-
 18
18
-
 19
19
-
 20
20
-
 21
21
-
 22
22
-
 23
23
-
 24
24
-
 25
25
-
 26
26
-
 27
27
-
 28
28
-
 29
29
-
 30
30
-
 31
31
-
 32
32
-
 33
33
-
 34
34
-
 35
35
-
 36
36
-
 37
37
-
 38
38
-
 39
39
-
 40
40
-
 41
41
-
 42
42
-
 43
43
-
 44
44
-
 45
45
-
 46
46
-
 47
47
-
 48
48
-
 49
49
-
 50
50
-
 51
51
-
 52
52
-
 53
53
-
 54
54
-
 55
55
-
 56
56
-
 57
57
-
 58
58
-
 59
59
-
 60
60
-
 61
61
-
 62
62
-
 63
63
-
 64
64
-
 65
65
-
 66
66
-
 67
67
-
 68
68
-
 69
69
-
 70
70
-
 71
71
-
 72
72
-
 73
73
-
 74
74
-
 75
75
-
 76
76
-
 77
77
-
 78
78
-
 79
79
-
 80
80
-
 81
81
-
 82
82
-
 83
83
-
 84
84
-
 85
85
-
 86
86
-
 87
87
-
 88
88
-
 89
89
-
 90
90
-
 91
91
-
 92
92
-
 93
93
-
 94
94
-
 95
95
-
 96
96
-
 97
97
-
 98
98
-
 99
99
-
 100
100
-
 101
101
-
 102
102
-
 103
103
-
 104
104
-
 105
105
-
 106
106
-
 107
107
-
 108
108


SINGER 9980 Owner's manual
- Category
- Sewing machines
- Type
- Owner's manual
- This manual is also suitable for
Ask a question and I''ll find the answer in the document
Finding information in a document is now easier with AI
in other languages
- français: SINGER 9980 Le manuel du propriétaire
- español: SINGER 9980 El manual del propietario
Related papers
-
SINGER 5625 STYLIST II Owner's manual
-
-
SINGER 9960 | QUANTUM STYLIST User manual
-
SINGER 7258 Owner's manual
-
-
-
-
-
-
Other documents
-
JANOME TB30 User manual
-
JANOME DC4030P User manual
-
-
 Toysrus Totally me Instructions For Use Manual
-
-
-
JANOME Hello Kitty 18750 Owner's manual
-
-
-
