Philips FC9200 User manual
- Category
- Vacuum cleaners
- Type
- User manual
This manual is also suitable for
Page is loading ...
Page is loading ...
Page is loading ...
Page is loading ...
Page is loading ...

6
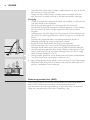
Introduction
Congratulations on your purchase and welcome to Philips! To fully benet
from the support that Philips offers, register your product at www.philips.
com/welcome.
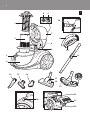
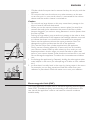
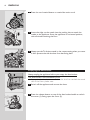
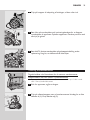
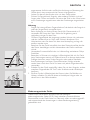
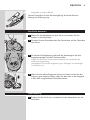
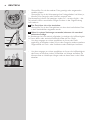
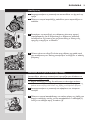
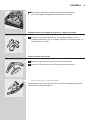
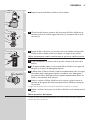
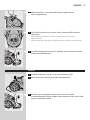
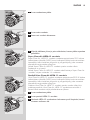
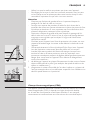
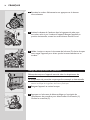
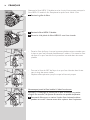
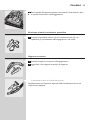
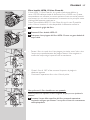
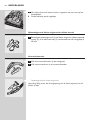
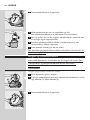
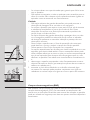
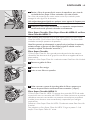
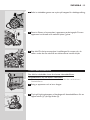
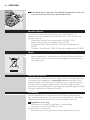
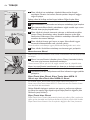
General description (Fig. 1)
1 Filter cylinder
2 Filter cylinder case
3 Dust bucket release button
4 Dust bucket
5 Motor protection lter
6 Cleaning brush
7 Cover
8 On/off button
9 Suction power knob
10 Hose connector
11 Handgrip
12 Accessory holder
13 Telescopic tube
14 Crevice tool
15 Small nozzle (specic types only)
16 Small brush
17 Combination nozzle (specic types only)
18 Rocker switch for carpet/hard oor settings
19 Tri-Active nozzle (specic types only)
20 Cord rewind button
21 Super Clean Air Filter, Super Clean Air HEPA 12 lter or Ultra Clean
Air HEPA 13 lter
22 Filter grille
23 Parking slot
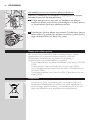
Important
Read this user manual carefully before you use the appliance and save it for
future reference.
Danger
- Never suck up water or any other liquid. Never suck up ammable
substances and do not suck up ashes until they are cold.
Warning
- Check if the voltage indicated on the appliance corresponds to the
local mains voltage before you connect the appliance.
- Do not use the appliance if the plug, the mains cord or the appliance
itself is damaged.
- If the mains cord is damaged, you must have it replaced by Philips, a
service centre authorised by Philips or similarly qualied persons in
order to avoid a hazard.
- This appliance is not intended for use by persons (including children)
with reduced physical, sensory or mental capabilities, or lack of
experience and knowledge, unless they have been given supervision or
instruction concerning use of the appliance by a person responsible for
their safety.
ENGLISH

- Children should be supervised to ensure that they do not play with the
appliance.
- Do not point the hose, the tube or any other accessory at the eyes
or ears nor put it in your mouth when it is connected to the vacuum
cleaner and the vacuum cleaner is switched on.
Caution
- Do not suck up large objects, as this may cause the air passage in the
tube or hose to become obstructed.
- When you use the vacuum cleaner to vacuum ashes, ne sand, lime,
cement dust and similar substances, the pores of the lter cylinder
become clogged. If you notice a strong decrease in suction power, clean
the lter cylinder.
- Sucking up large objects may cause the air passage in the tube or hose
to become obstructed. If this happens, the blockage indicator turns red
to indicate that there is an obstruction that needs to be removed.
- Never use the appliance without the motor protection lter. This
damages the motor and shortens the life of the appliance.
- Only use the Philips lter cylinder supplied with the appliance.
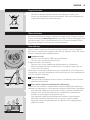
- During vacuum cleaning, especially in rooms with low air humidity,
your vacuum cleaner builds up static electricity. As a result you can
experience electric shocks when you touch the tube or other steel
parts of your vacuum cleaner. These shocks are not harmful to you and
do not damage the appliance. To reduce this inconvenience we advise
you:
1 to discharge the appliance by frequently holding the tube against other
metal objects in the room (for example legs of a table or chair, radiator
etc.);
2 to raise the air humidity level in the room by placing water in the room.
For example, you can hang containers lled with water from your
radiators or place bowls lled with water on or near your radiators.
This Philips appliance complies with all standards regarding electromagnetic
elds (EMF). If handled properly and according to the instructions in this
user manual, the appliance is safe to use based on scientic evidence
available today.
ENGLISH 7

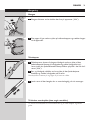
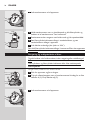
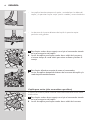
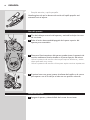
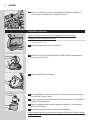
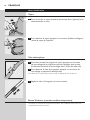
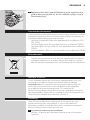
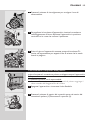
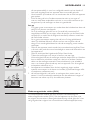
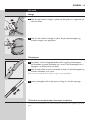
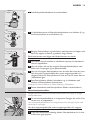
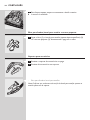
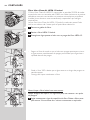
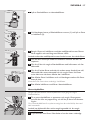
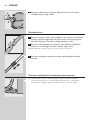
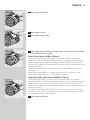
Preparing for use
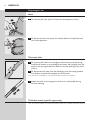
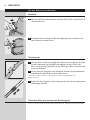
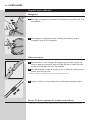
Hose
1 Toconnectthehose,pushitrmlyintotheappliance(‘click’).
2 Todisconnectthehose,pressthereleasebuttonandpullthehose
outoftheappliance.
Telescopic tube
1 Toconnectthetubetothehandgripofthehose,pressthespring-
loadedlockbuttononthehandgripandinsertthehandgripintothe
tube.Fitthespring-loadedlockbuttonintotheopeninginthetube
(‘click’).
2 Todisconnectthetubefromthehandgrip,pressthespring-loaded
lockbuttonandpullthehandgripoutofthetube.
Use the same method to connect and disconnect the nozzles.
3 Adjustthetubetothelengthyoundmostcomfortableduring
vacuumcleaning.
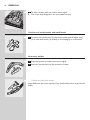
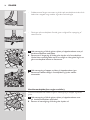
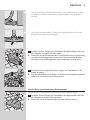
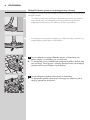
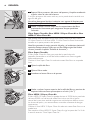
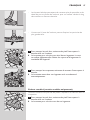
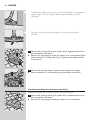
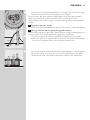
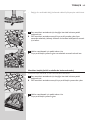
The Tri-Active nozzle is a multi-purpose nozzle for carpets and hard oors.
ENGLISH8

- The side brushes catch more dust and dirt at the sides of the nozzle
and allow you to clean better along furniture and other obstacles.
- The opening at the front of the nozzle allows you to suck up larger
particles.
1 Tocleanhardoors,pushtherockerswitchontopofthenozzle
withyourfoot.
, Thebrushstripforcleaninghardoorscomesoutofthehousing.
Atthesametime,thewheelisliftedtopreventscratchingandto
increasemanoeuvrability.
2 Tocleancarpets,pushtherockerswitchagain.
, Thebrushstripdisappearsintothenozzlehousingandthewheelis
loweredautomatically.
The combination nozzle can be used on either carpets or hard oors.
1 Tocleanhardoors,pushtherockerswitchontopofthenozzle
withyourfoot.
, Thebrushstripforcleaninghardoorscomesoutofthenozzle
housing.
ENGLISH 9

2 Tocleancarpets,pushtherockerswitchagain.
, Thebrushstripdisappearsintothenozzlehousing.
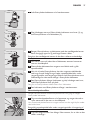
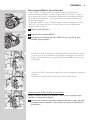
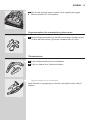
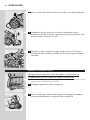
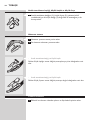
Crevice tool, small nozzle and small brush
1 Connectthecrevicetool(1),thesmallnozzle(specictypesonly)
(2)orthesmallbrush(3)directlytothehandgriportothetube.
1 Snaptheaccessoryholderontothehandgrip.
2 Snaptwoaccessoriesintotheaccessoryholder:
- Crevice tool and small nozzle.
Note: Make sure the suction opening of the small nozzle points away from the
holder.
ENGLISH10

- Crevice tool and small brush.
Note: Make sure the suction opening of the small brush points towards the
holder.
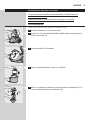
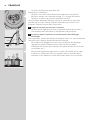
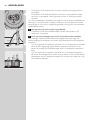
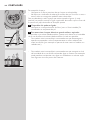
Using the appliance
1 Pullthecordoutoftheapplianceandputthemainspluginthewall
socket.
2 Presstheon/offbuttonontopoftheappliancetoswitchonthe
appliance.
3 Duringvacuumcleaning,youcanadjustthesuctionpowerwiththe
knobontopoftheappliance.
- Use maximum suction power to vacuum very dirty carpets and hard
oors.
- Use minimum suction power to vacuum curtains, table carpets, etc.
4 Ifyouwanttopauseforamoment,inserttheridgeonthenozzle
intotheparkingslottoparkthetubeinaconvenientposition.
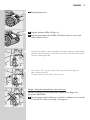
Storage
1 Switchofftheapplianceandremovethemainsplugfromthewall
socket.
ENGLISH 11

2 Pressthecordrewindbuttontorewindthemainscord.
3 Inserttheridgeonthenozzleintotheparkingslottoattachthe
nozzletotheappliance.Storetheapplianceinhorizontalposition,
withallwheelstouchingtheoor.
4 AlwaysputtheTri-Activenozzleinthecarpetsettingwhenyoustore
it.Alsopreventthesidebrushesfrombecomingbent.
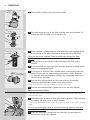
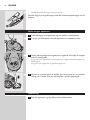
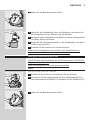
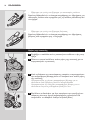
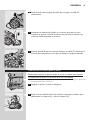
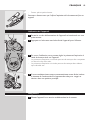
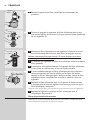
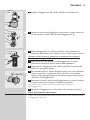
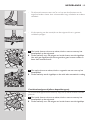
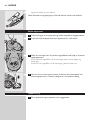
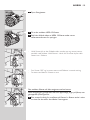
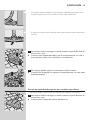
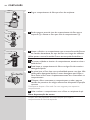
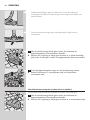
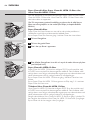
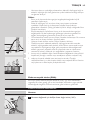
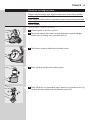
Alwaysunplugtheappliancebeforeyouemptythedustbucket.
Thedustbucketisnotdishwasher-proof.
- Empty the dust bucket as soon as the dust level has reached the round
disc of the lter cylinder case.
1 Switchofftheapplianceandremovethehose.
2 Pressthereleasebuttonontopofthedustbuckethandletounlock
thecover(1).Swingopenthecover(2).
ENGLISH12

3 Liftthedustbucketoutoftheappliance.
4 Holdthedustbucketoveradustbinandlifttheltercylindercase
outofthebucket.Emptythebucket.
5 Ifyouwish,youcancleanthedustbucketwithcoldtapwaterand
somewashing-upliquid.
6 Puttheltercylindercasebackintothedustbucketandputthe
bucketbackintotheappliance.
7 Closethecoverrmly(‘click’).
Alwaysputtheltercylindercasebackintothebucket,otherwisethe
appliancecannotbeswitchedon.
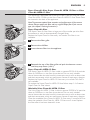
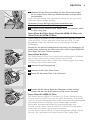
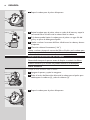
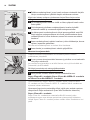
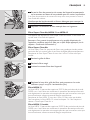
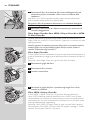
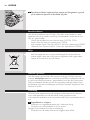
Alwaysunplugtheappliancebeforeyoucleanorreplacethelters.
Theltercylinderandtheltercylindercasearenotdishwasher-proof.
Clean the lter cylinder every 2 months.
1 Switchofftheapplianceandremovethehose.
2 Pressthereleasebuttonontopofthedustbuckethandletounlock
thecover(1).Swingopenthecover(2).
3 Liftthedustbucketoutoftheappliance.
ENGLISH 13

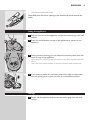
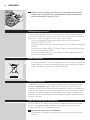
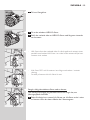
4 Lifttheltercylindercaseoutofthebucket.
5 Turnthehandleontopoftheltercylindercaseanticlockwise(1)
andlifttheltercylinderoutofthecase(2).
6 Cleantheltercylinderandthecasewiththebrushsupplied.Brush
fromthetopofthelterdownwardsalongtheribsofthelter.
Onlyusethebrushsupplied.Otherbrushesmaydamagethelter
cylinder.
7 Ifthereisdirtontheinsideofthecase,emptythecaseovera
dustbin.
8 Ifyouwish,youcancleantheltercylindercasewithcoldtapwater
andsomewashing-upliquid.
9 Ifyouwanttowashtheltercylinder,washitthoroughlywithonly
water.Donotuseanysoap,washing-upliquidorotherdetergent
tocleanthelter.Lettheltercylinderdrycompletelybeforeyou
reinsertitintothecase.
10 Puttheltercylinderbackintothecaseandturnthehandle
clockwiseuntiltheltercylinderlocksintoposition.
Make sure the lter cylinder is securely xed in the case.
11 Putthecasewiththeltercylinderbackintothedustbucket.
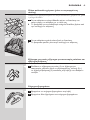
Clean the permanent motor protection lter every time you clean the
lter cylinder case.
1 Takethemotorprotectionlteroutoftheappliance.Cleanthelter
bytappingthedustoutofitoveradustbin.
If the motor protection lter is very dirty, you can also rinse it with cold tap
water.
Donotusewashing-upliquidoranyothercleaningagenttocleanthe
motorprotectionlter.
2 Pressthecleanlterrmlybackintotheltercompartmentto
ensurethatitisproperlyplaced.
ENGLISH14

This appliance is equipped with either the Super Clean Air lter, the Super
Clean Air HEPA 12 lter or the Ultra Clean Air HEPA 13 lter. These lters
are located in the back of the appliance.
Note: To guarantee optimal dust retention and performance of the vacuum
cleaner, always replace the lter with an original Philips lter of the correct
type (see chapter ‘Ordering accessories’).
The Super Clean Air lter lters a large part of the smaller particles from
the exhaust air with its electrostatically charged bres.
Replace the Super Clean Air lter every six months. This lter is not
washable.
1 Removetheltergrille.
2 Removetheoldlter.
3 Insertthenewlterintotheappliance.
4 Reattachthetopoftheltergrilleandpushthebottomcorners
untiltheysnaphome(‘click’).
The Super Clean Air HEPA 12 lter is able to remove 99.5% of all particles
down to 0.0003mm in size from the outlet air. This not only includes
normal house dust, but also harmful microscopic vermin such as dust mites
and their excrements, which are well-known causes of respiratory allergies.
Replace the Super Clean Air HEPA 12 lter every six months. This lter is
not washable.
To replace the Super Clean Air HEPA 12 lter, follow steps 1-4 of section
‘Super Clean Air lter’ above.
The Ultra Clean Air HEPA 13 lter is able to remove 99.95% of all particles
down to 0.0003mm in size from the outlet air. This not only includes
normal house dust, but also harmful microscopic vermin such as dust mites
and their excrements, which are well-known causes of respiratory allergies.
Clean the washable Ultra Clean Air HEPA 13 lter every 6 months. You can
clean the washable Ultra Clean Air HEPA 13 lter max. 4 times. Replace
the lter after it has been cleaned 4 times.
ENGLISH 15

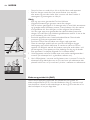
1 Removetheltergrille.
2 TakeoutthewashableHEPA13lter.
3 RinsethepleatedsideoftheHEPA13lterunderahotslow-
runningtap.
- Hold the lter in such a way that the pleated side points upwards and
the water ows parallel to the pleats. Hold the lter at an angle so that
the water washes away the dirt inside the pleats.
- Turn the lter 180° and let the water ow along the pleats in opposite
direction.
- Continue this process until the lter is clean.
Nevercleanthewashablelterwithabrush.
Note: Cleaning does not restore the original colour of the lter, but does restore
its ltration power.
4 Carefullyshakethewaterfromthesurfaceofthelter.Letthelter
dryatleast2hoursbeforeyouputitbackintothevacuumcleaner.
ENGLISH16

5 Putthelterbackintotheappliance.Reattachthetopofthelter
grilleandpushthebottomcornersuntiltheysnaphome(‘click’).
Ordering accessories
If you have any difculties obtaining lters or other accessories for this
appliance, please contact the Philips Customer Care Centre in your
country or consult the worldwide guarantee leaet.
- Philips lter cylinders are available under service number 4322 005
17520.
- Super Clean Air lters are available under type number FC8030.
- Non-washable Super Clean Air HEPA 12 lters are available under
type number FC8031.
- Washable Ultra Clean Air HEPA 13 lters are available under type
number FC8038.
Environment
- Do not throw the appliance away with the normal household waste
at the end of its life, but hand it in at an ofcial collection point for
recycling. By doing this, you help to preserve the environment.
Guarantee & service
If you need information or if you have a problem, please visit the Philips
website at www.philips.com or contact the Philips Customer Care Centre
in your country (you nd its phone number in the worldwide guarantee
leaet). If there is no Customer Care Centre in your country, go to your
local Philips dealer or contact the Service Department of Philips Domestic
Appliances and Personal Care BV.
Troubleshooting
This chapter summarises the most common problems you could
encounter with the appliance. If you are unable to solve the problem with
the information below, contact the Customer Care Centre in your country.
1 Thesuctionpowerisinsufcient.
- Check if the suction power knob is in maximum position.
- Check if the lter cylinder is lled with dirt.
If necessary, clean the lter cylinder.
- Check if the other lters need to be cleaned or replaced.
ENGLISH 17

- Check if the blockage indicator has changed colour. If it has changed
colour, the nozzle, tube or hose may be blocked up.
To remove the obstruction, disconnect the blocked-up item and connect it
(as far as possible) the other way around. Switch on the vacuum cleaner to
force the air through the blocked-up item in opposite direction.
2 Theappliancecannotbeswitchedon.
- Check if the lter cylinder case with the lter cylinder in it has been
inserted into the dust bucket.
3 WhenIusemyvacuumcleanerIsometimesfeelelectricshocks.
Your vacuum cleaner has built up static electricity. The lower the air
humidity in the rooms, the more static electricity the appliance builds up.
- To reduce this inconvenience, we advise you to discharge the appliance
by frequently holding the tube against other metal objects in the room
(for example legs of a table or chair, radiator etc.).
- To reduce this inconvenience, we advise you to raise the air humidity
level in the room by placing water in the room. For example, you can
hang containers lled with water from your radiators or place bowls
lled with water on or near your radiators.
ENGLISH18
Page is loading ...
Page is loading ...
Page is loading ...
Page is loading ...
Page is loading ...
Page is loading ...
Page is loading ...
Page is loading ...
Page is loading ...
Page is loading ...
Page is loading ...
Page is loading ...
Page is loading ...
Page is loading ...
Page is loading ...
Page is loading ...
Page is loading ...
Page is loading ...
Page is loading ...
Page is loading ...
Page is loading ...
Page is loading ...
Page is loading ...
Page is loading ...
Page is loading ...
Page is loading ...
Page is loading ...
Page is loading ...
Page is loading ...
Page is loading ...
Page is loading ...
Page is loading ...
Page is loading ...
Page is loading ...
Page is loading ...
Page is loading ...
Page is loading ...
Page is loading ...
Page is loading ...
Page is loading ...
Page is loading ...
Page is loading ...
Page is loading ...
Page is loading ...
Page is loading ...
Page is loading ...
Page is loading ...
Page is loading ...
Page is loading ...
Page is loading ...
Page is loading ...
Page is loading ...
Page is loading ...
Page is loading ...
Page is loading ...
Page is loading ...
Page is loading ...
Page is loading ...
Page is loading ...
Page is loading ...
Page is loading ...
Page is loading ...
Page is loading ...
Page is loading ...
Page is loading ...
Page is loading ...
Page is loading ...
Page is loading ...
Page is loading ...
Page is loading ...
Page is loading ...
Page is loading ...
Page is loading ...
Page is loading ...
Page is loading ...
Page is loading ...
Page is loading ...
Page is loading ...
Page is loading ...
Page is loading ...
Page is loading ...
Page is loading ...
Page is loading ...
Page is loading ...
Page is loading ...
Page is loading ...
Page is loading ...
Page is loading ...
Page is loading ...
Page is loading ...
Page is loading ...
Page is loading ...
Page is loading ...
Page is loading ...
Page is loading ...
Page is loading ...
Page is loading ...
Page is loading ...
Page is loading ...
Page is loading ...
Page is loading ...
Page is loading ...
Page is loading ...
Page is loading ...
Page is loading ...
Page is loading ...
Page is loading ...
Page is loading ...
Page is loading ...
Page is loading ...
Page is loading ...
Page is loading ...
Page is loading ...
Page is loading ...
Page is loading ...
Page is loading ...
Page is loading ...
Page is loading ...
Page is loading ...
Page is loading ...
Page is loading ...
Page is loading ...
Page is loading ...
Page is loading ...
Page is loading ...
Page is loading ...
Page is loading ...
Page is loading ...
Page is loading ...
Page is loading ...
Page is loading ...
Page is loading ...
Page is loading ...
Page is loading ...
Page is loading ...
Page is loading ...
Page is loading ...
Page is loading ...
Page is loading ...
Page is loading ...
Page is loading ...
Page is loading ...
Page is loading ...
Page is loading ...
Page is loading ...
Page is loading ...
Page is loading ...
Page is loading ...
Page is loading ...
Page is loading ...
Page is loading ...
Page is loading ...
Page is loading ...
Page is loading ...
Page is loading ...
Page is loading ...
Page is loading ...
Page is loading ...
Page is loading ...
Page is loading ...
-
 1
1
-
 2
2
-
 3
3
-
 4
4
-
 5
5
-
 6
6
-
 7
7
-
 8
8
-
 9
9
-
 10
10
-
 11
11
-
 12
12
-
 13
13
-
 14
14
-
 15
15
-
 16
16
-
 17
17
-
 18
18
-
 19
19
-
 20
20
-
 21
21
-
 22
22
-
 23
23
-
 24
24
-
 25
25
-
 26
26
-
 27
27
-
 28
28
-
 29
29
-
 30
30
-
 31
31
-
 32
32
-
 33
33
-
 34
34
-
 35
35
-
 36
36
-
 37
37
-
 38
38
-
 39
39
-
 40
40
-
 41
41
-
 42
42
-
 43
43
-
 44
44
-
 45
45
-
 46
46
-
 47
47
-
 48
48
-
 49
49
-
 50
50
-
 51
51
-
 52
52
-
 53
53
-
 54
54
-
 55
55
-
 56
56
-
 57
57
-
 58
58
-
 59
59
-
 60
60
-
 61
61
-
 62
62
-
 63
63
-
 64
64
-
 65
65
-
 66
66
-
 67
67
-
 68
68
-
 69
69
-
 70
70
-
 71
71
-
 72
72
-
 73
73
-
 74
74
-
 75
75
-
 76
76
-
 77
77
-
 78
78
-
 79
79
-
 80
80
-
 81
81
-
 82
82
-
 83
83
-
 84
84
-
 85
85
-
 86
86
-
 87
87
-
 88
88
-
 89
89
-
 90
90
-
 91
91
-
 92
92
-
 93
93
-
 94
94
-
 95
95
-
 96
96
-
 97
97
-
 98
98
-
 99
99
-
 100
100
-
 101
101
-
 102
102
-
 103
103
-
 104
104
-
 105
105
-
 106
106
-
 107
107
-
 108
108
-
 109
109
-
 110
110
-
 111
111
-
 112
112
-
 113
113
-
 114
114
-
 115
115
-
 116
116
-
 117
117
-
 118
118
-
 119
119
-
 120
120
-
 121
121
-
 122
122
-
 123
123
-
 124
124
-
 125
125
-
 126
126
-
 127
127
-
 128
128
-
 129
129
-
 130
130
-
 131
131
-
 132
132
-
 133
133
-
 134
134
-
 135
135
-
 136
136
-
 137
137
-
 138
138
-
 139
139
-
 140
140
-
 141
141
-
 142
142
-
 143
143
-
 144
144
-
 145
145
-
 146
146
-
 147
147
-
 148
148
-
 149
149
-
 150
150
-
 151
151
-
 152
152
-
 153
153
-
 154
154
-
 155
155
-
 156
156
-
 157
157
-
 158
158
-
 159
159
-
 160
160
-
 161
161
-
 162
162
-
 163
163
-
 164
164
-
 165
165
-
 166
166
-
 167
167
-
 168
168
-
 169
169
-
 170
170
-
 171
171
-
 172
172
-
 173
173
-
 174
174
-
 175
175
-
 176
176
-
 177
177
-
 178
178


Philips FC9200 User manual
- Category
- Vacuum cleaners
- Type
- User manual
- This manual is also suitable for
Ask a question and I''ll find the answer in the document
Finding information in a document is now easier with AI
in other languages
- italiano: Philips FC9200 Manuale utente
- français: Philips FC9200 Manuel utilisateur
- español: Philips FC9200 Manual de usuario
- Deutsch: Philips FC9200 Benutzerhandbuch
- Nederlands: Philips FC9200 Handleiding
- português: Philips FC9200 Manual do usuário
- dansk: Philips FC9200 Brugermanual
- Türkçe: Philips FC9200 Kullanım kılavuzu
- svenska: Philips FC9200 Användarmanual
- suomi: Philips FC9200 Ohjekirja
Related papers
-
Philips FC9226/01 User manual
-
Philips FC9202/01 User manual
-
Philips FC9222 AutoClean ParquetCare User manual
-
-
Philips FC8724/01 User manual
-
Philips fc 8261 01 User manual
-
-
-
-
Other documents
-
HQ W7-54904-HQN Datasheet
-
AEG AVQ2120 User manual
-
Princess 332835 Owner's manual
-
Samsung SC8680 Owner's manual
-
Samsung SC9674 Owner's manual
-
Schumacher SA874U Owner's manual
-
Samsung SC8790 User manual
-
AEG Electrolux ASC6920 User manual
-
Aeg-Electrolux AJG6700 User manual
-