Page is loading ...

1200 W 120V~ 60 Hz
1200 W 220V
~ 50/60 Hz
®
SAVE THIS USE AND CARE BOOK
LEASE ESTE INSTRUCTIVO ANTES DE USAR EL PRODUCTO
Advanced System & ProXpress
™
Irons / Planchas
?
U.S.A/CANADA 1-800-231-9786
MEXICO 01-800-714-2503
®
POLARIZED PLUG
(North and Central American Models Only)
This appliance has a polarized plug (one blade is wider
than the other). As a safety feature, this plug will fit into a polarized
outlet only one way. If the plug does not fit fully into the outlet, reverse
the plug. If it still does not fit, contact a qualified electrician. Do not
attempt to defeat this safety feature.
ENCHUFE POLARIZADO
(Solamente para los modelos Norte y Centro americanos)
Se emplean enchufes polarizados con un contacto más ancho que el otro
para reducir los riesgos de choque eléctrico. Cuando el cable tiene este tipo
de enchufe, entra únicamente a un contacto polarizado. Si el enchufe no
entra en su contacto, inviértalo. Si aún así no entra, busque la ayuda de un
electricista calificado para que instale un contacto polarizado apropiado.
Por ningún motivo trate de modificar o hacerle cambios al enchufe.
Models F505S,
F550S, F605S,
F612, F650S

®
BEFORE FIRST USE
IMPORTANT: Follow this procedure before first
use.
1. Remove any labels, stickers, or tags which
may be attached to the body or soleplate of
the iron. NOTE: Do Not Remove the
Mercury warning label from the cordset
(Certain Models Only).
2. Fill the Water Tank about 1/3 full with water.
(See “Filling With Water.”)
3. Plug the iron into a standard electrical outlet.
4. Set the Temperature Selector Dial to the
Cotton or Linen settings (6 or 7) and preheat
for about 2 minutes. (See “Starting The Iron”)
5. While ironing on an old cotton terry cloth
towel for about 2 minutes, try using the
iron’s spray feature by pumping the SPRAY
“ ” button and different steam settings by
turning the Adjustable Steam Dial. For irons
with Surge of Steam, turn the Spray/Surge
button so that the word SURGE or the steam
PUFF “ ” is toward the front of the iron.
For model F612 only, you must flip the
Surge/Spray Switch at the side of the iron
up to SURGE. Pump theSPRAY/SURGE
button a few times.
ANTES DE USAR LA PLANCHA POR
PRIMERA VEZ:
IMPORTANTE: Siga el proceso a continuación.
1. Retire cualquier etiqueta o calcomanía
adherida al cuerpo o a la suela de la plancha.
NOTA: No retire la etiqueta en el cable
referente al mercurio (en ciertos modelos
únicamente).
2. Llene 1/3 del tanque con agua. Consulte la
sección de llenado.
3. Enchufe la plancha a una toma de corriente
estándar.
4. Ajuste el control de temperatura para
algodón o lino entre el 6-7 y permita que se
caliente unos 2 minutos. Consulte la sección
en como encender la plancha.
5. Mientras plancha sobre un paño de algodón
o una toalla por 2 minutos, trate de bombear
el botón SPRAY (rocío) “ ” girando el
control hacia diferentes niveles. Para las
planchas que emiten un impacto de vapor,
gire el botón de vapor y rocio de modo que la
palabra SURGE o PUFF (emisión de vapor)
“ ” queden hacia el frente de la plancha.
Para el modelo F612 únicamente, deberá
subir el interruptor para rocío y vapor en el
costado de la plancha a la posición SURGE.
Bombee el botón SPRAY/SURGE unas
cuantas veces.
A
B
®
C
®
D
HOW TO USE YOUR IRON
COMO USAR LA PLANCHA
2

FILLING WITH WATER
1. Be sure the iron is OFF and unplugged and the Adjustable Steam Dial is
at DRY. Use ordinary tap water – do not use water processed through a
home softening system.
2. With a clean measuring cup (or the Fill Cup provided with certain mod-
els), pour water into the Water Fill Hole until the level reaches the FULL
Mark on the Water Window (A). Do not overfill. Refill as necessary.
3. In extremely hard water areas (over 180 parts per million) consider using
distilled or demineralized water. If using distilled or demineralized water,
tap water should be used the first time you use the iron and once per
month thereafter to maintain steam performance.
USING THE IRON
1. Plug in the iron and push the ON Button (B).
2. Use the Heat Fabric Guide on the body of the iron to help you select the
setting for the fabric to be ironed (such as Nylon, Cotton, etc.).
3. Turn the Temperature Selector Dial to the appropriate setting (such as #6
for Cotton) and allow to preheat for approximately 1-2 minutes before
ironing.
4. NOTE: For Model 550S Only: The Cycle Light will come on until the iron
reaches the desired temperature setting; it will then go off. It is normal
for the Light to cycle on and off during ironing. For Model 650S Only:
The Red Temperature Wait Light will come on while the iron preheats.
When it reaches the desired temperature setting, the Red Light will go
out and the Green Temperature Ready Light will come on.
5. Automatic Shut Off - For Models F605S and F612: These models are
designed to shut off after an hour whether or not they are in use. The
“On” light will blink for several minutes as a warning that the iron will
COMO LLENAR EL TANQUE CON AGUA
1. Asegúrese que la plancha esté en la posición OFF (apagada), desconectada,
y que el control ajustable de vapor esté en DRY (seco). Use agua ordinaria
de la llave, y no agua procesada en casa.
2. Con una taza limpia o con la taza (provista en algunos modelos), vierta
agua dentro del orificio del llenado de agua hasta alcanzar la marca del
nivel FULL (lleno) en la ventana de agua (A). No llene demasiado. Llene
de nuevo conforme sea necesario.
3. En las áreas donde el agua es extremadamente dura (sobre 180 partes por
millón) considérese el uso de agua destilada o sin minerales. Si se usa
agua destilada o sin minerales, úsese agua de la llave la primera vez que
planche, y una vez por mes después para mantener en buen fucionamiento
la emisión de vapor.
COMO USAR LA PLANCHA
1. Enchufe la plancha y oprima el botón ON (B).
2. Use la guía de tejidos en el cuerpo de la plancha para que pueda determinar
la temperatura apropiada para la tela que va a planchar (tal como nailon,
algodón, etc.).
3. Gire el control de temperatura al nivel apropiado (por ejemplo el #6
para algodón) y permita que la plancha se caliente de 1-2 minutos antes d
e planchar.
4. NOTA: Para el modelo 550S únicamente: La luz indicadora del ciclo se
iluminará hasta que la plancha haya alcanzado la temperatura deseada;
y después se apagará. Es normal que mientras se plancha, la luz
permanezca intermitente. Para el modelo 650S únicamente: La luz roja de
la temperatura se ilumina para indicarle que espere mientras la plancha
se calienta. Una vez que la plancha alcanza la temperatura deseada, se
ilumina una luz verde para indicarle que puede comenzar a planchar.
5. Apagado automático para los modelos F605 y F612: Estos dos modelos se
3

shut off soon. The iron will automatically shut off after one hour.
To continue ironing, push the “On” button. For Model F650S: This model
is designed to shut off if the iron hasn’t been moved for 10 minutes. The
Green Temperature Ready Light will blink as a warning before the iron
shuts itself off. For all other models, turn the Temperature Selector Dial to
“Off” or “O/Fill” (depending on the model) and unplug the iron when done.
6. In all cases, allow the iron to cool before wrapping the cord and storing
the iron upright on its Heel Rest (C) (to prevent water from leaking from
the soleplate). It is not necessary to empty the water if the iron is used
frequently.
ADJUSTABLE STEAM, SURGE OF STEAM & DRY
1. Turn the Adjustable Steam/Dry Dial to the “ ” (light), “ ” (medium),
or “ ” (heavy) steam setting as indicated next to the Heat Fabric
Guide on the body of the iron. Adjust the steam to match the selected
temperature setting.
2. Steam and Surge of Steam should only be used in the steam area of the
Temperature Selector Dial. If water spotting occurs, reduce the steam
level and/or increase the heat setting on the Temperature Selector Dial.
3. For irons with Surge of Steam, turn the Spray/Surge button so that the
word SURGE or the steam PUFF “ ” is toward the front of the iron.
For model F612 only, you must flip the Surge/Spray Switch at the side of
the iron up to SURGE. Pump the SPRAY/SURGE button a few times to
get a blast of steam.
4. Turn the Adjustable Steam/Dry Dial to DRY to iron without steam.
SPRAY
Use SPRAY at any temperature setting by pumping the SPRAY button. For
irons with Surge of Steam, you must turn the Spray/Surge button so that the
han diseñado para que se apaguen al cabo de una hora ya sea que se
estén usando o no. La luz de encendido ON parpadea por varios minutos
como aviso que la plancha se apagará pronto. La plancha se apagará
automáticamente después de una hora. Para continuar planchando, o
prima el botón ON.
Para los modelos F650S: Este modelo está diseñado para apagarse al
cabo de 10 minutos si no se tiene contacto con la plancha. La luz verde
que indica cuando la plancha está caliente, parpadea como aviso que l
a plancha se va a apagar. Para todos los modelos, gire el selector de
temperatura a la posicion OFF o a O/FILL (conforme al respectivo modelo)
y desconecte la plancha una vez que termine de usarla.
6. En todos los casos, asegúrese que la plancha se enfríe por completo
antes de enrollar el cable para almacenarla sobre su talón de descanso (C)
(con el fin de evitar que gotee agua de la suela). No es necesario vaciar el
agua si la plancha se usa con frecuencia.
EMISION AJUSTABLE DE VAPOR, IMPACTO DE VAPOR Y SECO
1. Gire el control de STEAM/DRY (vapor/seco) a la posición (ligero) “ ”,
(medio) “ ”, o (fuerte) “ ” conforme la indicación contiguo a
la guía de tejidos en el cuerpo de la plancha. Ajuste el grado de vapor
para que sea igual al de la temperatura.
2. El vapor y el impacto de vapor deberán usarse únicamente en el área del
selector de vapor. Reduzca la cantidad de agua, o aumente la temperatura
del control si el agua comienza a manchar.
3. Para las planchas con emisión de vapor, gire el control SPRAY/SURGE
(rocío/vapor) de modo que las palabras SURGE o PUFF “ ” queden hacia
el frente de la plancha. Para el modelo F612 únicamente, se deberá subir
el interruptor al costado de la plancha a SURGE. Bombee el botón
SPRAY/SURGE unas cuantas veces para una emisión fuerte de vapor.
4. Gire el control ajustable hacia DRY (seco) para planchar sin vapor.
4

word SPRAY or the SPRITZ “ ”is toward the front of the iron. For model
F612 only, you must flip the Surge/Spray Switch at the side of the iron down
to SPRAY. Then pump the SPRAY/SURGE button a few times.
EMPTYING THE IRON
1. Turn the Temperature Selector Dial to “Off” or “O/Fill,” depending on the
model.
2. Turn the Adjustable Steam/Dry Dial to the DRY position, and unplug the
iron.
3. Empty the water by holding the iron over a sink with the tip pointing
downward (D). Water will empty out the Water Fill Hole.
4. If all the water hasn’t drained, repeat the emptying process.
SURGECLEAN & SELF CLEAN
Models with Surge, have a built-in SURGECLEAN feature. Occasionally, set
the iron on Surge (by turning the dial or flipping the switch at the side of the
iron to SURGE, depending on your model) and rapidly pump the iron 5-6
times over an old cloth to clean residue form the soleplate.
For Models with Self Clean (F505S & F650S): Use this feature about once a
month to flush minerals and lint from the iron to help avoid scorching or
brown spotting. It is normal for the iron to hiss or spit during this procedure.
1. Sit the iron on its Heel Rest, fill to just below the FULL Mark on the Water
Window, then turn the Temperature Selector Dial to the highest setting.
2. Plug in the iron, press “On,” and let it preheat about 2 minutes.
3. Unplug the iron and turn the Temperature Selector Dial to “O/Fill.” Hold
the iron with its soleplate down over a sink or basin, then press and hold
the Self Clean button down until all the water has drained. Stay clear of
any splashing water as it is hot.
ROCIO
Use el rocío a cualquier temperatura, simplemente oprimiendo el botón
SPRAY. Para las planchas con emisión de vapor, se debe girar el control
Spray/Surge (rocío/vapor) de modo que la palabra SPRAY o SPRITZ “ ”
queden hacia el frente de la plancha. Para el modelo F612 únicamente, se
deberá bajar el interruptor al costado de la plancha a SPRAY. Después
bombee el botón SPRAY/SURGE unas cuantas veces.
COMO VACIAR EL AGUA DE LA PLANCHA
1. Gire el control de temperatura a la posicion OFF o a O/FILL, conforme al
modelo de la plancha.
2. Gire el control a la posicion DRY (seco), y desconecte la plancha.
3. Vierta el agua, sujetando la plancha sobre un lavadero con la punta hacia
abajo (D). El agua saldrá del orificio.
4. Si no sale toda el agua, repita el mismo proceso.
AUTO LIMPIEZA Y LIMPIEZA A VAPOR
Los modelos con vapor tienen la característica SURGECLEAN (limpieza a
vapor). Ocasionalmente, ajuste la plancha a SURGE (girando la perilla o
subiendo el interruptor al costado de la plancha a la posición SURGE,
conforme su modelo) y rápidamente bombee la plancha de 5-6 veces sobre
un paño viejo para limpiar los residuos de la suela.
Para los modelos de auto limpieza (F505 & F650S): Use esta característica
una vez al mes para eliminar los minerales y la pelusa de la plancha y así
evitar las manchas cafés sobre las prendas. Durante este proceso de
limpieza es normal que la plancha produzca un siseo y escupa.
1. Coloque la plancha sobre su talón de descanso, llene el tanque casi
hasta la marca FULL (lleno) en la ventana del agua, y gire el control a
la temperatura más alta.
5
CUIDADO DE LA PLANCHA
CARE & CLEANING

4. Sit the iron on its Heel Rest, plug it in, and let it preheat for about 2 min-
utes. Iron over an old cloth, then unplug and let the iron cool.
CLEANING THE OUTSIDE SURFACES
1. Allow the iron to cool completely.
2. Wipe the outer shell and soleplate with a cloth dampened in water and
a mild dish detergent. Never use abrasive, heavy-duty cleansers or
scouring pads.
PROPER DISPOSAL TO PROTECT THE ENVIRONMENT
Automatic shut-off models have a switch which contains a small amount of
mercury. These irons must not be placed in the garbage until the mercury
switch has been removed for recycling. Help us protect the environment by
returning this iron to a Black & Decker Company-Owned or Authorized
Service Center for
proper disposal after the life of the iron. For more information, call the
appropriate “800” number on the cover of this book.
IRON WON’T HEAT?
1. Is the iron plugged in and Power Light on? Press the “On” Button.
2. If the Light is not on, will a lamp plugged into the outlet turn on?
3. Is the Temperature Selector turned to a fabric setting?
IRON WON’T START STEAMING?
1. Check to see if there is enough water in the Water Tank.
2. Is the Adjustable Steam Dial set at “ ”, “ ” or “ ”?
Adjust the Dial to Dry and back to the desired steam level several times.
3. If steaming doesn’t start, gently tap the Soleplate on the ironing board
once or twice.
2. Enchufe la plancha, oprima ON (encendida) y permita que se caliente por 2
minutos.
3. Apague la plancha y gire el control a OFF o a O/FILL. Sujete la plancha
sobre un lavadero con la punta hacia abajo y oprima el botón de auto
limpieza hasta que haya salido toda el agua. Aléjese del agua que emite la
plancha ya que está caliente.
4. Coloque la plancha sobre su talón de descanso, enchúfela, permita que se
caliente por 2 minutos, planche sobre un paño viejo y desconéctela para
que se enfríe.
LIMPIEZA DE LAS SUPERFICIES EXTERIORES
1. Permita que la plancha se enfríe por completo.
2. Limpie el cuerpo y la suela con un paño humedecido con agua y un
detergente suave. Nunca use limpiadores abrasivos ni de fibras metálicas.
COMO DESECHAR LA PLANCHA PARA PROTEGER EL MEDIO AMBIENTE
Los modelos con apagado automático tienen un interruptor que contiene un
poco de mercurio. Estas planchas no deben desecharse en la basura hasta
no habérseles retirado el interruptor de mercurio para reciclarlo. Ayúdenos a
proteger el medio ambiente devolviendo esta plancha, una vez inservible, a
cualquier centro de servicio autorizado o propio de Black & Decker para que
la desechen apropiadamente. Para más información, llame al número “800”
que aparece en la portada de este manual.
IRON WON’T HEAT?
1. ¿Está conectada la plancha y está encendida la luz indicadora? Oprima el
botón ON (encendida).
2. Si la luz no se enciende, ¿funciona una lámpara al enchufarla a la misma
toma de corriente?
3. ¿Está el selector de tejidos ajustado a determinado tejido?
6
NEED HELP? (Call the “800” number on the cover.)
¿NECESITA AYUDA? (Llame al No. 800 de la portada)

WATER DROPLETS COMING FROM STEAM VENTS?
Is the Temperature Selector Dial set in a steam area and is the Adjustable
Steam Dial set at the corresponding “ ”, “ ” or “ ”
steam setting?
SERVICE OR REPAIR
Service, if necessary, must be performed by a Black & Decker, Household
Appliance Company-Owned or Authorized Service Center. The Service
Center nearest you can usually be found in the yellow pages of your phone
book under “Appliances-Small.”
Before shipping/mailing your iron, empty all water from the iron. Plug in the
cord and heat the iron at the maximum temperature setting. Iron continu-
ously over an all cotton cloth for about 5 minutes. Place the iron on its heel
rest and leave it operating for 7-8 minutes. These steps will help dry the
inside of the iron.
Turn the iron off, move the Adjustable Steam Dial to DRY and be sure the
iron is cool before packing for shipment. Pack it carefully into a sturdy car-
ton with enough packing material to prevent damage. The original carton is
not suitable for mailing. Include a note describing the problem to our
Service Center and be sure to give your return address. We also suggest
that you insure the package for your protection.
¿NO EMITE VAPOR LA PLANCHA?
1. Verifique que haya suficiente agua en el tanque de agua.
2. ¿Está ajustado el control de vapor a “ ”, “ ” o “ ”?
Gire le control varias veces hacia DRY (seco) y nuevamente al nivel de
vapor deseado.
3. Si no hay emisión de vapor, golpee levemente la suela de la plancha en
la tabla de planchar un par de veces.
¿GOTEAN LOS ORIFICIOS DE VAPOR?
¿Está el selector de vapor ajustado en el área de vapor y está el control de
vapor ajustado al nivel de vapor correspondiente “ ”, “ ” o “
”?
SERVICIO O REPARACIONES
Si necesita ayuda, acuda a un centro de servicio autorizado o propio de
Black & Decker. Puede encontrar uno en su cercanía buscando en las
páginas amarillas de la guía telefónica bajo, “Reparación de enseres
menores”. Antes de enviar por correo la plancha, vacíe toda el agua de la
plancha. Enchufe el cable y permita que la plancha se caliente a una
temperatura máxima. Planche continuamente por unos 5 minutos sobre un
paño todo de algodón. Coloque la plancha sobre su talón de descanso y
déjela encendida de 7-8 minutos. Estos paso ayudarán a secar el interior
de la plancha.
Apague la plancha y mueva el control a la posición DRY y asegúrese que la
plancha esté fría antes de empacarla para enviarla. Empáquela con cuida-
do en un cartón resistente con suficiente material
de empaque para evitar cualquier daño. Por favor incluya una nota para
nuestro centro de servicio describiendo el problema. No se olvide de
anotar su dirección y su número telefónico. Para su propia protección le
sugerimos enviar el paquete asegurado.
7

IMPORTANT SAFEGUARDS
When using your iron, basic safety precautions should always
be followed, including the following:
READ ALL INSTRUCTIONS.
■
Use iron only for its intended use.
■
To protect against a risk of electric shock, do not immerse
the iron in water or other liquid.
■
The iron should always be turned to Off (or to O/Fill depending
on the model) before plugging into or unplugging from an
outlet. Never yank cord to disconnect from outlet; instead
grasp plug and pull to disconnect.
■
Do not allow cord to touch hot surfaces. Let iron cool
completely before putting away. Loop cord loosely around
cordwrap when storing.
■
Always disconnect iron from electrical outlet when filling
with or emptying of water and when not in use. Be careful
to avoid spilling water over iron when filling.
■
For models with Self Clean, do not press the Self Clean
button while ironing.
■
Do not operate iron with a damaged cord or plug or if the
iron has been dropped or damaged.
8
INSTRUCCIONES DE SEGURIDAD
Cuando se usan aparatos electrónicos, deben tomarse algunas
precauciones incluyendo las siguientes:
POR FAVOR LEA TODAS LAS INSTRUCCIONES
■
Use la plancha únicamente para lo que ha sido diseñada
■
Con el fin de protegerse contra el riesgo de un choque
eléctrico, no sumerja la plancha en agua ni en ningún
otro líquido.
■
Conforme el modelo, el control de la plancha debe estar
siempre en OFF (apagada) o en O/FILL antes de enchufarla
o desenchufarla de una toma de corriente. Nunca tire del
cable para desconectarla de la toma de corriente, en vez,
sujete el enchufe y jale para desconectar.
■
No permita que el cable entre en contacto con superficies
calientes. Asegúrese que la plancha se enfríe por completo
antes de guardarla. Enrolle el cable holgadamente para
guardar la plancha.
■
Siempre desconecte la plancha de la toma de corriente antes
de llenarla con agua o antes de vaciarla y cuando no esté
en uso. Tenga cuidado de no vaciar agua sobre la plancha
mientras la llena.
ESPA
Ñ
OL
ENGLISH

■
To avoid the risk of electric shock, do not disassemble the
iron; instead, take it to an authorized service center for
examination and repair. Incorrect reassembly can cause
a risk of electric shock when the iron is used.
■
Close supervision is necessary for any appliance being
used by or near children. Do not leave iron unattended
while connected or on an ironing board. Always position
iron carefully to prevent it from falling if ironing board is
accidentally moved or cord is pulled. Always use Heel Rest.
■
Burns can occur from touching hot metal parts, hot water,
or steam. Use caution when you turn a steam iron upside
down – there may be hot water in the water tank. Avoid
rapid movement of iron to minimize hot water spillage.
■
Do not operate in the presence of explosive and/or flammable
fumes.
■
Do not use iron outdoors.
■ T
his product is for household use only.
■
Para los modelos con auto limpieza, no oprima el botón de
auto limpieza mientras esté planchando.
■
No use la plancha si tiene dañado el cable o el enchufe,
si se ha dejado caer o ha sufrido un daño de cualquier
naturaleza.
■
Con el fin de evitar el riesgo de un choque eléctrico, no
desarme la plancha; en vez, llévela a un centro de servicio
autorizado para que la examinen y la reparen. Si la plancha
se llegara a armar incorrectamente, existe el peligro de un
choque eléctrico al planchar.
■
Se requiere una supervisión de cerca cuando cualquier unidad
elctrónica esté siendo usada por un niño. No desatienda la
plancha mientras esté conectada o cuando esté sobre la tabla
de planchar. Coloque siempre la plancha con cuidado para
evitar que se caiga al moverse la tabla o al tirar del cable.
Siempre use el talón de descanso.
■
Pueden ocurrir quemaduras si se tocan las partes metálicas,
el agua caliente, o el vapor. Tome precaución al invertir
una plancha de vapor ya que puede haber agua caliente
dentro del tanque. Evite los movimientos bruscos para que
no derramar agua caliente.
9

SPECIAL INSTRUCTIONS
■
To avoid a circuit overload, do not operate another
high-wattage appliance on the same circuit.
■
If an extension cord is necessary, a 10-ampere rated
cord with a polarized plug and Underwriter’s Laboratories
(UL)-listing should be used. Cords rated for less amperage
may overheat. Care should be taken to arrange the cord so
that it cannot be pulled on or tripped over.
SAVE THESE INSTRUCTIONS
TAMPER-RESISTANT SCREW
This appliance is equipped with a tamper-resistant screw to
prevent removal of the outer cover. To reduce the risk of fire
or electric shock, do not attempt to remove the outer cover.
There are no user serviceable parts inside. Repair should be
done only by authorized service personnel.
■
No use la plancha en presencia de gases explosivos y/o
inflamables.
■
No use la plancha a la intemperie.
■
Esta plancha es para uso doméstico únicamente.
INSTRUCCIONES ESPECIALES
■
Con el fin de evitar una sobrecarga eléctrica, no opere
ningún otro aparato de alto consumo en el mismo circuito.
■
En caso de ser necesaria una extensión, deberá estar
calificada para 10 amperes con un enchufe polarizado
y enlistada por Underwriter’s Laboratories (UL).
Las extensiones calificadas con menos amperaje pueden
sobre calentarse. Tómese cuidado para que nadie se
enrede ni se tropiece en el cable.
CONSERVE ESTAS INSTRUCCIONES
10

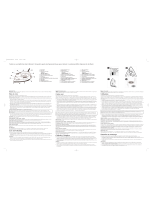
1. Water Fill Hole
2. Spray Nozzle
3. Temperature Selector Dial
4. Adjustable Steam/Dry Dial
5. Spray Button
6. Push ON/OFF Button and Power
On Light (Model F650S:
Ready/Wait Lights; Model 550S:
Thermostat Cycle Light)
7. Pivoting Cord
8. Cord Wrap/Stable Heel Rest
9. Large Water Windows with
Water Fill Mark
10. *SilverStone
®
Non-Stick
Soleplate (Certain Models Only)
11. Heat Fabric Guide
12. Full-Length Button Grooves
*SilverStone
®
is a trademark of
E.I. DuPont de Nemours & Co.
®
1. Orificio de llenado
2. Rociador de agua
3. Control de temperatura
4. Control ajustable de
vapor/seco
5. Boton para rociar
6. Boton ON/OFF (encendido/
apagado) y luz indicadora
(Modelo F650S: luces
READY/WAIT (lista/espere);
Modelo 550S: luz del termostato
7. Cable maniobrable
8. Enrollado para el cable/talón
de descanso estable
9. Ventanas grandes con marcas
de niveles de agua
10. *Suela SilverStone
™
antiadherente (En ciertos
modelos únicamente)
11. Guía de tejidos
12. Carril completo para los
botones
*SilverStone
™
es una marca
registrada de E.I. DuPont de
Nemours & Co.
F650S Shown / Ilustrada
For Household Use Only
Solamente para uso doméstico
11
TORNILLO DE SEGURIDAD
Esta unidad está equipada con un tornillo de seguridad con el
fin de prevenir que se le retire la cubierta exterior. Para
reducir el riesgo de incendio o de choque, no trate de remover
esta cubierta. La unidad no contiene partes de mantenimiento
por dentro. Cualquier reparación debe ser efectuada única-
mente por personal autorizado.

Listed by Underwriters Laboratories Inc.
Copyright
© 1992-1998 Black & Decker
Printed in Mexico
Pub. #175075-00-RV00
FULL TWO-YEAR WARRANTY
Black & Decker Inc. warrants this product against any defects that are due to
faulty material or workmanship for a two-year period after the original date of
consumer purchase or receipt as a gift. This warranty does not include damage
to the product resulting from accident or misuse.
If the product should become defective within the warranty period, we will
repair it or elect to replace it free of charge, including free return transportation,
provided it is delivered prepaid to any Black & Decker Inc., Household
Appliance Company-Owned or Authorized Service Center. This warranty gives
you specific legal rights, and you may also have other rights which vary from
state to state.
Answers to any questions regarding warranty or service locations may be
obtained by calling toll free 1-800-231-9786.
DOS AÑOS COMPLETOS DE GARANTIA
Black & Decker, Inc. garantiza este producto contra cualquier defecto
originado por fallas en los materiales o en la mano de obra por un
período de dos años a partir de la fecha original de compra. Esta
garantía no incluye daños al producto ocasionados por accidentes,
mal uso o reparaciones efectuadas por talleres no autorizados. Si el
producto resulta con defectos dentro del período de garantía lo
repararemos o reemplazaremos conforme sea necesario, sin cargo
alguno. Para que esta garantía sea válida debe presentar el producto
con su recibo de compra y/o la tarjeta de registro correspondiente.
Esta garantía le otorga derechos específicos, y usted podría tener
otros que pueden variar en su país. Si tiene alguna pregunta,
comuníquese con una sucursal o centro de servicio Black & Decker
más cercano.
/