
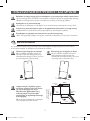
OWNER’S INSTRUCTIONS
DA99-01220M REV(0.7)
ENGLISH
Register your product at www.samsung.com/register
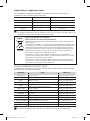
CONTENTS
SAFETY INSTRUCTIONS ................................................................
2
INSTALLING THE FRIDGE / FREEZER ..........................................
5
PREPARING THE FRIDGE / FREEZER .........................................
6
USING THE CONTROL FEATURES ...............................................
6
STORING FOOD IN THE REFRIGERATOR OR FREEZER ...........
10
MAKING ICE ....................................................................................
11
USING THE WATER DISPENSER (Only available on some models)
.....
12
CLEANING THE WATER DISPENSER ..........................................
13
REPLACING THE INTERIOR LIGHT
.................................................
14
REVERSING THE DOOR SWING ..................................................
15
PROBLEMS AND SOLUTIONS ......................................................
18
VIEW OF YOUR FRIDGE / FREEZER ...........................................
19
Free Standing Appliance
DA99-01220M(0.7).indb 1 2010.6.21 11:21:47 AM

2
These operating instructions cover various models. The characteristics of your appliance
may differ slightly from those described in this instructions.
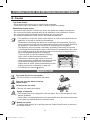
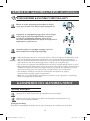
SAFETY INSTRUCTIONS
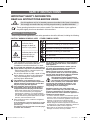
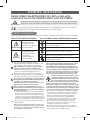
CAUTION / WARNING SYMBOLS USED
Indicates that a
danger of death or
serious injury exists.
Indicates that a risk of
personal injury or
material damage
exists.
WARNING
CAUTION
• When using electrical appliances, basic safety precautions should be followed, including the following:
This appliance contains a small amount
of isobutane refrigerant (R600a), a natural
gas with high environ mental compatibility
that is, however, also combustible. When
transporting and installing the appliance, care
should be taken to ensure that no parts of the
refrigerating circuit are damaged.
Refrigerant squirting out of the pipes could
ignite or cause an eye injury. If a leak is detected,
avoid any naked flames or potential sources of
ignition and air the room in which the appliance is
standing for‑several minutes.
• In order to avoid the creation of a flammable gas-air
mixture if a leak in the refrigerating circuit occurs, the
size of the room in which the appliance may be sited
depends on the amount of refrigerant used.
The room must be 1m
3
in size for every 8 g of
R600a refrigerant inside the appliance. The amount
of refrigerant in your particular appliance is shown on
the identification plate inside the appliance.
• Never start up an appliance showing any signs of
damage. If in doubt, consult your dealer.
Do not place this refrigerator in direct sunlight or
expose to the heat from stoves, room heaters or
other appliance.
If you smell pharmaceutical or smoke, pull out
the power plug immediately and contact your
Samsung Electronics service center.
R600a or R134a is used as a refrigerant. Check
the Compressor label on the rear of the appliance
and the rating label inside the fridge to see which
refrigerator is used for your refrigerator.
IMPORTANT SAFETY INFORMATION.
READ ALL INSTRUCTIONS BEFORE USING.
SAFETY PRECAUTIONS
This refrigerator must be properly installed
and located in accordance with the
Installation Instructions before it is used.
Do not install the refrigerator in a damp place or
a place where it may come in contact with water
.
• Deteriorated insulation of electrical parts may
cause an electric shock or fire.
Do not allow children to climb, stand or hang
on the shelves or doors in the refrigerator.
They could damage the refrigerator and
seriously injure themsleves.
The appliance is not intended for use by
children or infirm persons without supervision.
Children should be supervised to ensure that
they do not play with the appliance.
If the refrigerator will not be used for vacation or
a long period of time, ensure the refrigerator is
empty and disconnect the plug from the mains.
• Most power failures that are corrected in an
hour or two will not affect your refrigerator
temperatures. However, you should minimize
the number of door openings whilst the power is
off. But Should the power failure last more than
24hours, remove all frozen food.
Allow sufficient space to install the refrigerator
on a flat surface.
Do not disassemble or repair the refrigerator by yourself.
You run the risk of causing a fire, malfunctions and/or
personal injury.
The appliance must be positioned so that the plug is
accessible after installation.
OTHER SYMBOLS USED
Represents something you must NOT disassemble.
Represents something you must NOT touch.
Represents something you must follow.
Indicates that you must disconnect the power plug
from the socket.
Represents a ground is needed to prevent electric shock.
Represents something you must NOT do.
WARNING
•
Use this appliance only for its intended purpose as described in this Owner's Instructions.
We strongly recommend that any servicing be performed by a qualified individual.
Note
DA99-01220M(0.7).indb 2 2010.6.21 11:21:48 AM

3
SAFETY INSTRUCTIONS
PROPER DISPOSAL OF THE REFRIGERATOR
Before you throw away your old refrigerator or freezer
When disposing of this or other
refrigerators, remove the door/door seals,
door latch so that small children or animals
cannot get trapped inside.
Leave the shelves in place so that children
may not easily climb inside.
When this product contains flammable
gas (Refrigerant R600a) contact your local
authority with regard to safe disposal of this
product.
Cyclopentane used as a insulation
blowing gas.
The gases in the insulation material require
special disposal procedure. Please dispose
of the packaging material for this product in
an environmentally friendly manner. Please
contact your local authorities in regard to the
environmentally safe disposal of this product.
This product contains flammable insulation
blowing gas.
Please dispose of the packaging
material for this product in an
environmentally friendly way.
CAUTIONS
•
The refrigerant used in the refrigerator/freezer and the gases in the insulation
material require special disposal procedures. Ensure that none of the pipes
on the back of the appliance are damaged prior to disposal.
WARNING
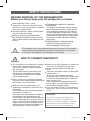
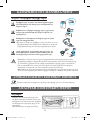
HOW TO CONNECT ELECTRICITY
When moving the refrigerator, be careful not
to roll over or damage the power cord.
Do not insert the power cord with wet
hands.
Unplug the refrigerator before cleaning and
making repairs.
Do not use a wet or damp cloth when
cleaning the plug. Remove any foreign matter
or dust from the power plug pins. Otherwise
there is a risk of fire.
If the refrigerator is disconnected from the
power supply, you should wait for at least five
minutes before plugging it back.
If the wall socket is loose, do not insert the
power plug. There is a risk of electric shock
or fire.
The refrigerator should always be plugged
into its own individual electrical outlet
which has a voltage rating that matches
the rating plate.
This provides the best performance and
also prevents overloading house wiring
circuits, which could cause a fire hazard
from overheated wires.
Never unplug your refrigerator by pulling
the power cord. Always grip plug firmly and
pull straight out from the outlet.
Make sure that the power plug is not
squashed or damaged by the back of the
refrigerator.
Do not bend the power cord excessively or
place heavy articles on it.
Have the power code repaired or replaced
immediately by the manufacturer or its
service agent if the power cord has become
frayed or damaged. Do not use a cord that
shows cracks or abrasion damage along its
length or at either end. If the power cord is
damaged, have it replaced immediately by
the manufacturer or its service agent.
CE Notice
This product has been determined to be in
compliance with the Low Voltage Directive
(2006/95/EC), the Electromagnetic Compatibility
Directive (2004/108/EC) and Energy efficiency
Directive (96/57/EC) of the European Union.
DA99-01220M(0.7).indb 3 2010.6.21 11:21:49 AM

4
SAFETY INSTRUCTIONS
FOOD KEEPING & TREATMENT CAUTION
Do not overfill the refrigerator with food.
• When you open the door, an item may
fall out and cause personal injury or
material damage.
Do not put bottles or glass containers in
the freezer.
• When the contents freeze, the glass
may break and cause personal injury.
•
Bottle should be stored tightly together in
the refrigerator so that they do not fall out.
Do not spray inflammable gas near the
refrigerator.
• There is a risk of explosion or fire.
Do not directly spray water inside or
outside the refrigerator.
• There is a risk of fire or electric shock.
Do not touch the inside walls of the
freezer or products stored in the freezer
with wet hands.
• This may cause frostbite.
Do not store volatile or flammable
substances in the refrigerator.
• The storage of benzene, thinner, alcohol,
ether, LP gas and other such products
may cause explosions.
Do not refreeze frozen foods that have
thawed completely.
Do not store pharmaceuticals products,
scientific materials or temperature-
sensitive products in the refrigerator.
• Products that require strict temperature
controls must not be stored in the
refrigerator.
Do not put a container filled with water on
the refrigerator.
• If spilled, there is a risk of fire or electric
shock.
This product is intended only for the storage
of food in a domestic environment.
GROUNDING CAUTION
The refrigerator must be grounded.
• You must ground the refrigerator to
prevent any power one word or electric
shocks caused by current leakage from
the refrigerator.
Never use gas pipes, telephone lines or
other potential lightening rods as ground.
• Improper use of the ground plug can
result in electric shock.
CLEANING CAUTION
Do not insert your hands into the bottom
area under the appliance.
• Any sharp edges may cause personal
injury.
Never put fingers or other objects into the
dispenser hole. It may cause personal
injury or material damage.
INSTALLATION CAUTION
Do not store articles on the top of the appliance.
• When you open or close the door, the
articles may fall and cause personal injury
and/or material damage.
WARNING
• Keep ventilation openings in the appliance
enclosure or mounting structure clear of
obstruction.
• Do not use mechanical devices or any other
means to accelerate the defrosting process,
other than those recommended by the
manufacturer.
• Do not damage the refrigerant circuit.
•
Do not place or use electrical appliances
inside the refrigerator/ freezer, unless they are
of a type recommended by the manufacturer.
Before operating the appliance,
please read this manual
throughly and retain it for your
reference.
• This appliance is not intended for use by
persons (including children) with reduced
physical, sensory or mental capabilities,
or lack of experience and knowledge,
unless they have been given supervision
or instruction concerning use of the
appliance by a person responsible for
their safety.
• Children should be supervised to ensure
that they do not play with the appliance.
DA99-01220M(0.7).indb 4 2010.6.21 11:21:49 AM

5
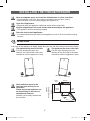
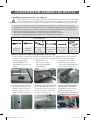
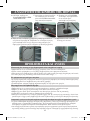
Allow an adequate space and install the fridge/freezer on a firm, level floor.
• If the appliance is not level, there may be unusual noises and poor cooling.
• Wait for at least one hour before plugging the appliance in.
Clean the fridge/freezer.
• Wipe and clean the appliance inside and outside with a damp cloth.
Plug the fridge/freezer into a wall socket used exclusively by this appliance.
• This appliance must be properly grounded.
If the front of the appliance is slightly higher than the rear, the door can be closed more easily.
Place the food in the fridge/freezer.
• It is recommended that you wait for the appliance to cool for 2-3 hours before storing
food in it.
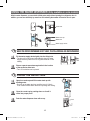
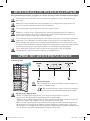
INSTALLING THE FRIDGE/FREEZER
LEVELLING
The appliance tilts down to the left.
Turn the left adjusting leg in the
direction of the arrow with a flat head
screwdriver until the appliance is level.
950mm
595mm
1050mm
600mm
at least
50mm
Allow sufficient space to the
right, left, back and top for air
circulation.
Please ensure that appliance can
be moved freely in the event of
maintenance & service.
Drawers can be easily opened with
this condition.
depth with doors
opened
at least
50mm
The appliance tilts down to the right.
Turn the right adjusting leg in the
direction of the arrow with a flat head
screwdriver until the appliance is level.
at least
50mm
DA99-01220M(0.7).indb 5 2010.6.21 11:21:51 AM

6
PREPARING THE FRIDGE/FREEZER
Install all shelves and compartments removed during transport in the correct positions.
Clean the fridge/freezer and accessories to remove any dust that accumulated during packing and
shipping.
The interior light of the appliance will light up when fridge door is open.
Your fridge/freezer is operated by a compressor which switches “Operation” to maintain the internal
temperature. For the first five minutes after initial start-up, it may be slightly noisy. This is quite
normal and does not represent a fault.
Store food once the temperature in the refrigerator is sufficiently low. It takes a few hours after
starting the refrigerator to reach the proper temperature.
If the appliance does not operate correctly, check the electricity supply. If the problem persists,
contact your dealer.
To prepare your appliance for use and to check that it is running correctly, take the following steps.
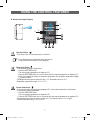
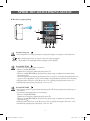
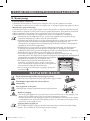
USING THE CONTROL FEATURES
A. Basic Model
Operation Button
• If you want to turn off, keep pressing for 3 seconds.
Temp. Control button
• Press the Temp. Control button to control the refrigerator temperature.
• Initially, the mid-point temperature setting is selected.
• There are five temperature settings, represented by five indicator lights (
➀
).
When all lights are on, the temperature is at its coldest.
• Press the Temp. Control button one or more times until the required temperature is set.
• The freezer temperature will be adjusted automatically according to the refrigerator temperature.
• If you need to freeze large amount of food stuff, set the temperature of freezer compartment as
the coldest temperature at least 24 hours before.
➀
Do not disassemble the refrigerator with unit turned on.
- It may cause electric shocks or other damages.
Note
Set the temperature control to the coldest temperature and let the refrigerator operate for
one hour.
The freezer should get slightly chilled and the motor should run smoothly with soft hum.
DA99-01220M(0.7).indb 6 2010.6.21 11:21:52 AM

7
➀
➁
➂
➄
➃
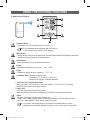
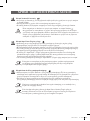
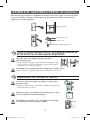
USING THE CONTROL FEATURES
Operation Button
• If you want to turn off, keep pressing for 3 seconds.
Freezer temp Button
• In the normal model, the temperature displayed (
➁
) is the setting temperature of the freezer.
• To change the freezer temperature:
– Press the FRE.TEMP button.
The current setting temperature is displayed (
➁
).
– Press the FRE.TEMP button one or more times until the required temperature is displayed (
➁
).
• The temperature changes in sequence. After -25°C, the display returns to -14°C again.
• Freezer temperature range: -14°C to -25°C.
Fridge temp Button
• To change the refrigerator temperature:
– Press the REF.TEMP button.
The current setting temperature is displayed (
➀
).
– Press the REF.TEMP button one or more times until the required temperature is displayed (
➀
).
– When you complete the setting of refrigerator temperature, the refrigerator temperature display
(
➀
) flashes 5 times.
• The temperature changes in sequence. After +7°C, the display returns to +1°C.
• Refrigerator temperature range: +1°C to +7°C.
Do not disassemble the refrigerator with unit turned on.
- It may cause electric shocks or other damages.
Note
B. Model with Digital Display
DA99-01220M(0.7).indb 7 2010.6.21 11:21:53 AM

8
USING THE CONTROL FEATURES
- You must empty the refrigerator before pressing the Vacation button (
➂
).
- There is no need to disconnect the refrigerator from the power supply if you will be
away for less than three weeks. But remove all the food if you are going away for three
weeks or more, unplug the refrigerator and clean, rinse and dry it.
Super Freeze Button
• Switch for the fast freeze function on or off.
• Use when you wish to freeze foods quickly.
• The Super Freeze indicator (
➃
) remains on while the fast freeze function is running.
• While this function is selected, the refrigerating device remains switched on continuously and
produces a very low temperature inside the freezer.
• The super freeze function switches off automatically. When the fast freeze process is completed,
the Super Freeze indicator (
➃
) switches off and the freezer switches back to the previous setting
temperature.
• To release Super freezer function, press the button again.
Alarm On Button
• When you press the Alarm on button, it's activated and displayed (
➄
).
Alarm will go off after a certain period of time when the refrigerator door is kept open.
• If you want to turn off the Alarm when it is set to Alarm On, press the button one more time to
cancel the alarm.
Vacation Button
• If you are going on a long vacation or business trip or you do not need to use the refrigerator,
press the Vacation button.
• The refrigerator is switched off but the freezer remains on.
• The Vacation indicator (
➂
) remains on while the Vacation function is operating.
Caution
If the Super Freeze, Vacation mode is already selected and you press one of the other
buttons, the current mode is cancelled and the mode corresponding to the button pressed
is selected.
The freezer door does not have an alarm function to indicate that the door is open or
closed.
Note
Note
• If you need to freeze large amount of food stuff, set the temperature of freezer
compartment as the coldest temperature before you turn on the Super Freeze Button.
Note
DA99-01220M(0.7).indb 8 2010.6.21 11:21:53 AM

9
USING THE CONTROL FEATURES
C. Model with LCD Display
Operation Button
• If you want to turn off, keep pressing for 3 seconds.
Menu Button
• Display the sub functions of the main menu (Freezer/Fridge/Coolselect Zone/Option) and option
so that they can be selected in clockwise direction.
Freezer
• Temperature setting range for freezer ➝ -14°C ~ -25°C
Select Button
• Select the details of the zone with the menu button.
CoolSelect Zone : Temperature setting range
Soft freeze (-5°C), 0 zone (0°C), Cool (3°C),
Quick cool (60 minutes, continuous operation)
Fridge
• Temperature setting range for refrigerator ➝ 7°C ~ 1°C
Option
• Vacation - Refrigerator off (Operate the freezer only)
• Super Freeze - Super freezing function (Continuous operation for 2 hours and 30 minutes)
• Alarm On - Alarm ON/OFF control function when door is open
Do not disassemble the refrigerator with unit turned on.
- It may cause electric shocks or other damages.
Note
If you need to freeze large amount of food stuff, set the temperature of freezer
compartment as the coldest temperature before you turn on the Super Freeze Button.
Note
1. Cool, Zero Zone, Soft Freeze function
• When you select Cool, Zero Zone or Soft Freeze function, 3°C, 0°C and -5°C is selected.
• Set by the Select button with the Menu button.
2. Quick Cool
• Set by the Select button with the Menu button.
• When the Quick Cool function is completed, the CoolSelect Zone drawer comes to cool.
DA99-01220M(0.7).indb 9 2010.6.21 11:21:54 AM

10
STORING FOOD IN THE FRIDGE OR FREEZER
A. Fridge
Transparent, safety glass shelf (Only available on some models)
• Place food in storage containers and lay the items out at suitable intervals.
• The storage shelf is of an unbreakable, transparent material, so that you can use it safely.
Fresh safe drawer (Only available on some models)
• Vegetable and fruit can be stored in this compartment.
• If you require more space to store fruit and vegetables, it is possible to remove the drawers.
• A declared storage volume of fresh food storage compartment is calculated when the fresh
safe drawers are removed.
Only available on some models
CoolSelect Zone Drawer
• Help to preserve the taste of food and prolong its freshness. Use this to store cheese,
meat, poultry fish or any other foods.
Chiller Compartment
• Ideal for storing fish, meat and sausage.
• Temperature in this compartment are lower than in the refrigerator compartment.
Temperatures below 0 °C may also occur.
• A declared storage volume of fresh food compartment is calculated with Chiller
Compartment removed.
Dairy and Variety guard
• Store fatty foods, like butter and cheese.
• Store small, packed foods, like milk, yogurt and beverages.
Bottle guard
• Store small bottles and cartons (1 litre) of beer, milk, juice in the upper part and large
bottles and cartons (1.5 litres) in the lower part.
When storing food in the appliance, follow
the recommendations below.
• Allow warm food and beverages to cool down
before storing them in the appliance.
• Ensure that food is well-wrapped or covered
with airtight containers before it is stored.
This will prevent food from dehydrating,
deteriorating in colour or losing flavor and will
help maintain freshness. It will also prevent
cross-flavouring.
• Never let any oil or grease come into contact
with the plastic fittings or door seals, as these
materials easily become porous.
• Never store any explosive substances inside
the appliance. High-proof alcohol should only
be stored upright in tightly sealed containers.
Not suitable for lettuce, vegetables or produce sensitive to cold.
Note
DA99-01220M(0.7).indb 10 2010.6.21 11:21:55 AM

11
MAKING ICE
Pour water into the ice cube maker.
• Fill the ice maker up to about 80% with water.
Place the ice cube maker in the top
freezer drawer.
To take out the ice cubes:
• Twist the ice cube maker slightly.
Making ice quickly
To make a large quantity of ice quickly, press the “Super Freeze” button to select the
fast freeze function.
Danger of explosion
• The coldest parts of the refrigerator is the rear panel. This is the best place to store
delicate foodstuffs.
• Glass bottles containing liquids that can freeze should never be stored in the freezer
as the glass can explode when the contents freeze.
Warning
Note
STORING FOOD IN THE REFRIGERATOR OR FREEZER
Top freezer drawer
• Store packed frozen foods, like ice cream, bacon and pizza.
• Place the ice tray in this drawer in order to achieve optimal ice freezing.
Middle/lower freezer drawer
• Store fresh meat and fish or dried foods, which are divided into suitably sized portions.
• Do not store food which goes bad easily at low temerature, such as bananas, melons.
• Do not put any newly introduced food for freezing near to frozen food.
• Do not place carbonated or fizzy drinks in the freezer compartment.
B. Freezer
Note
• Your appliance is frost free, which means there is no need to manually defrost your
appliance, as this will be carried out automatically.
• Temperature rising during the defrost can comply with ISO requirement, But if you
want to prevent on undue rise in the temperature of the frozen food while defrosting
the appliance. Please wrap the frozen food in several layers of newspaper.
• The appliance may not operate consistently (possibility of defrosting the contents
or the temperature becoming too warm in the frozen food compartment) when sited
for an extended period of time below the cold end of the range of temperatures for
which the refrigerating appliance is designed.
•
To get more space, you can remove drawers as following
picture. It does not affect thermal and mechanical
characteristics. A declared storage volume of frozen food
storage compartment is calculated with these drawers removed.
• To get the best energy efficiency of this product,
please leave all selves, drawers and baskets on their
original position like as illustration in page (19.)
• For freezing test, remove
1
drawer.
1
DA99-01220M(0.7).indb 11 2010.6.21 11:21:55 AM

12
USING THE WATER DISPENSER (Only available on some models)
With the water dispenser, you can obtain chilled water easily without opening the refrigerator door. In
addition, you can save electricity by more than 30% reducing the number of times the door is open.
WHEN THE WATER DISPENSER IS NOT USED, THE FOLLOWINGS ARE RECOMMENDED
Fix the water supply device tightly into the fixing hole.
• The door will not be closed automatically when the water
supply device is pulled out for a long time because of cold
leaking.
Place a separate spare beverage bottle in the location
of the exclusive water tank.
• Two 1.5 litre bottles can be placed.
Push lever
Water tank
Water tank cap
Water supply device
FILLING THE WATER TANK
Open the round cap and fill the water tank up with
drinking water.
• Don't fill up the water tank too much(just over 4.2 litres).
It can cause overflow when the door is opening and closing.
Close the round cap by pushing down on it until it
clicks into proper place.
Push the water dispenser lever with a cup.
Push
DA99-01220M(0.7).indb 12 2010.6.21 11:21:56 AM

USING THE WATER DISPENSER (Only available on some models)
13
INSTALLING A REGULAR BOTTLE
Press the fixing lever, lift the exclusive water tank
upwards, then remove it.
Remove the water supply device from the
exclusive water tank, then set the inner groove
of the water supply device in a regular mineral
water bottle and fix‑it in position by turning it.
Turn the water supply device over, then fix‑it in
position in the fixing hole.
• Gurgling sounds may be heard when air enters the water bottle from regular mineral
water or beverage bottles.
• Some regular mineral water or beverage bottles may not fit the water supply device,
depending on their size.
• If water does not come out satisfactorily when you press the “push” lever, press it again.
• Do not use carbonated drinks, such as coke, cider or sodas. When you press the button,
the beverage may spurt out due to the pressure of carbonic gas accumulated in the upper
part of beverage bottle.
• For better hygiene, beverages with a high sugar content (juice, soft drinks) are not
recommended.
• You can use bottled mineral water or boiled tap water unless it does contain any particles.
Note
CLEANING THE WATER DISPENSER
Connection path
Wipe out the connection path and surrounding area with a clean damp cloth.
Dispenser Tray
Pull out the tray with fingers.
Empty the water in the dispenser tray, then clean it using warm water and detergent.
WHEN THE WATER DISPENSER IS NOT USED, THE FOLLOWINGS ARE RECOMMENDED
FILLING THE WATER TANK
DA99-01220M(0.7).indb 13 2010.6.21 11:21:57 AM

14
CLEANING THE WATER DISPENSER
Water Tank / Supply Device
Pull upward and disassemble the hooks on both
sides of the large‑sized cap.
Loosen the water supply device by turning it in
the direction of the arrow and removing it.
• Clean the water tank frequently if it used to dispense tea or other such beverages.
Only use filtered tea. For better hygiene, beverages with a high sugar content (juice,
soft drinks) are not recommended.
•
Deposits can be cleaned by wiping the tank with a cloth dampened in vinegar or salt water.
• Check that the rubber seal on the water supply device has not slipped off or is not
damaged by-a sharp-edged object. Otherwise, it may leak.
Caution
Wipe the large‑sized cap and the exclusive
water tank with warm water and detergent.
• Hold the cap and pull it upwards to remove it.
Clean the cap.
After cleaning the water supply device with a soft
brush, press the water supply device operation
lever, then wash it in running water.
REPLACING THE INTERIOR LIGHT
Please contact service engineer to replace it.
Note
Press the locking device on the rear left
and right side of the drawer cover and
pull the drawer cover to remove it.
(Only available on some models)
REMOVING THE INTERIOR PARTS
Drawers
DA99-01220M(0.7).indb 14 2010.6.21 11:21:58 AM

15
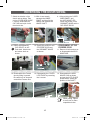
REVERSING THE DOOR SWING
• Before reversing the door, ensure first that the refrigerator is disconnect by the plug
from the mains. You should take out contents and accessories like door guard from
the doors. Be careful not to drop the doors during dissembling or assembling.
Warning
‑ Read these instructions completely and carefully
1. Handle parts carefully to avoid scratching the paint.
2. Lay out all the screws by their related parts to avoid using them in the wrong places.
3. Provide a non-scratching work surface for the doors. (ex:blanket)
4. During door reversing, refrigerator should not be stained with oil.
5. We recommend to use tools descrided below. (Possible to use simliar size of socket
wrench & wrench)
Not provided
Additional part
Phillips Head
Driver (+)
Flat Head
Driver (-)
10mm
Socket Wrench
(for bolts)
11mm
Wrench
(for hinge shaft)
Allen Wrench
(3/16inch)
(for Mid hinge)
Cover Wire
Hinge L
(In Top Cover)
These operating instructions cover various models.
The characteristics of your appliance may differ slightly from those described in this instructions.
‑
DISASSEMBLY OF THE FRIDGE DOOR
3. Remove 3 bolts on the top
of the refrigerator with 10mm
socket wrench. Make sure the
door is firmly closed.
4. Disassemble the Fridge door
by lifting it upward.
Be careful not to drop and
scratch the face of the
Fridge door.
5. Disassemble the COVER
WIRE DOOR on the top of
the fridge door with a flat-
head screw driver by putting it
into the indicated position
(∆).
6. Disjoin the COVER WIRE
HINGE R from the ASSY
HINGE UPP as shown. Take
out the electric wire from the
COVER WIRE HINGE R.
ASSY HINGE UPP
COVER WIRE HINGE R
COVER WIRE DOOR
1. Disassemble the CAP CABI
after removing 2 screws.
2. Disconnect electric wires
inside of the CAP CABI.
CAP CABI
DA99-01220M(0.7).indb 15 2010.6.21 11:21:59 AM

16
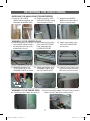
‑
DISASSEMBLY OF THE
FREEZER DOOR
REVERSING THE DOOR SWING
SHAFT
GROMMET HINGE
8. With 11mm wrench,
separate the HINGE
SHAFT and then flip the
HINGE and reattach the
HINGE SHAFT.
9-1. After rejoining the COVER
WIRE HINGE L and
the ASSY HINGE UPP,
Switch the position of the
GROMMET HINGE and the
CAP SPACE DOOR.
10. Switch the position of the
STOPPER DOOR and
the GROMMET HINGE
as shown.
11. Remove 2 bolts and screw
to disassemble the ASSY
HINGE MID.
14. Disassemble the ASSY
HINGE LOW as shown
and put the AUTO GUIDE
upside down, switch the
position of the SHAFT.
12. Disassemble the Freezer
door by lifting it upward.
Be careful not to drop and
scratch the Freezer door.
13. Disassemble the COVER
LEG FRONT by removing
the 2 screws.
ASSY HINGE
LOW
AUTO GUIDE
COVER LEG
FRONT
When joining, tighten
a screw not to make
unpredicted noise.
STOPPER
GROMMET
7. Switch the direction of the
electric wire as below. Take
out the COVER WIRE HINGE
L from the underneath the
CAP CABI and rejoin it with
the electric wire.
9-2. When disassembling
CAP SPACE, do not
Push both side hooks
but bottom hook as
shown.
Note
DA99-01220M(0.7).indb 16 2010.6.21 11:22:2 AM

17
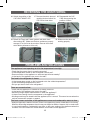
‑
ASSEMBLY OF THE FREEZER DOOR
REVERSING THE DOOR SWING
‑
REVERSING THE HANDLE BAR [FRIDGE/FREEZER]
15. Detach the CAP SCREW
HANDLE with flat screwdriver and
disassemble the HANDLE BARs.
16. Switch the position of the
CAP HOLE DOORs, pulling
out and pushing them in.
17. Reattach the HANDLE
BARs on the other side of
doors in reverse order.
18. Exchange the positions of a bolt and
the assy HINGE LOW after making a
hole with phillips head driver on the
left bottom side of the unit.
19. After switching the position
of the CAP HOLE HINGE
LOW, reassemble the
COVER LEG FRONT.
20. Switch the position of the
CAP HOLE HINGE MID
and a screw.
21. Switch the position of the
STOPPER DOOR and the
GROMMET HINGE as shown.
22. Switch the position of the
GROMMET HINGE and
the CAP HINGE HOLE.
23. Carefully put the Freezer door
back on and assemble HINGE
MID with 2 bolts and a screw.
24. Carefully put the Fridge door back on.
25. Secure the ASSY HINGE UPP with 3 bolts as shown.
Make sure the Fridge Door is firmly closed.
‑
ASSEMBLY OF THE FRIDGE DOOR
STOPPER
GROMMET
DA99-01220M(0.7).indb 17 2010.6.21 11:22:3 AM

18
• Check that the power plug is correctly connected.
• Is the temperature control on the front panel correctly set?
• Does sun shine on the appliance or are there heat sources nearby?
• Is the back of the appliance too near to the wall?
The appliance is not operating at all or the temperature is too high
• Is the temperature control on the front panel set to the coldest temperature?
• Is the surrounding temperature too low?
• Did you put the hot food in the refrigerator?
The food in the refrigerator is frozen
• Check that the appliance is installed on a stable, level floor.
• Is the back of the appliance too near to the wall?
• Have any foreign objects fallen behind or under the appliance?
• Is there noise coming from the compressor in the appliance?
• A ticking sound may be heard inside the appliance; this is normal. This sound occurs when the
various accessories contract or expand.
•
Heat-proof pipes are installed in the front corners of the appliance to prevent condensation from forming.
When the surrounding temperature rises, this may not always be effective. However, this is not abnormal.
• In very humid weather, condensation may form on the outer surface of the appliance when the
moisture in the air comes into contact with the cool surface of the appliance.
The front corners and sides of the appliance are warm and condensation starts to form
PROBLEMS AND SOLUTIONS
There are unusual noises
REVERSING THE DOOR SWING
29. Detach the Fridge and Freezer gaskets and attach them
after rotating 180˚. (Make sure the door gaskets are properly
arranged. If not, there can be a noise or dew can be formed
which affects perfomance of the unit.)
26. Switch the position of the
CAP HOLE HINGE UPP.
30. Make sure the doors are
working properly.
27. Reconnect the electric wires and
reposition the wires inside of the
CAP CABI as shown below.
28. Reassemble the CAP
CABI after assuring the
position of Wires.
CAP HOLE HINGE
DA99-01220M(0.7).indb 18 2010.6.21 11:22:4 AM

19
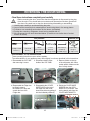
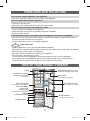
VIEW OF YOUR FRIDGE / FREEZER
PROBLEMS AND SOLUTIONS
Power Saving Tips
• Install the appliance in a cool, dry room with adequate ventilation.
Ensure that it is not exposed to direct sunlight and never put it near a direct source of heat (radiator, for example).
• Never block any vents or grilles on the appliance.
• Allow warm food to cool down before placing it in the appliance.
• Put frozen food in the refrigerator to thaw.
You can then use the low temperatures of the frozen products to cool food in the refrigerator.
• Do not keep the door of the appliance open for too long when putting food in or taking food out.
The shorter time for which the door is open, the less ice will form in the freezer.
Tips
• This is the refrigerant, which cools the inside of the appliance.
You can hear a liquid babbling in the appliance
• You did not seal the food.
• Check food are covered and ensure the cold inlet is clean.
There is a bad smell inside the appliance
• Is the air outlet on the appliance plugged up?
• Space the food out as much as possible to improve ventilation.
• Is the door fully closed?
There is a layer of frost on the appliance’s walls
• Can occur if food with a high water content is stored uncovered with a high humidity level or
the door has been left open for a-long time.
• Store the food with a cover or in sealed containers.
If condensation forms on the inside wall of the appliance and around vegetables
WATER DISPENSER
(Only available on some models)
REFRIGERATOR LIGHT (LED Lamp or
incandescent, depending on the model)
FRIDGE
REFRIGERATOR SHELVES
(tempered glass, depending
on the model)
FRESH SAFE DRAWER
(ONLY AVAILABLE ON SOME MODELS)
FRESH SAFE DRAWER /
CHILLED ROOM /
COOLSELECT ZONE
(ONLY AVAILABLE ON SOME MODELS)
FREEZER
TOP FREEZER DRAWER
FREEZER DRAWER
DAIRY GUARD
(Only available on some models)
MULTI-PURPOSE GUARD
(Only available on some models)
DA99-01220M(0.7).indb 19 2010.6.21 11:22:5 AM

Contact SAMSUNG WORLD WIDE
If you have any questions or comments relating to Samsung products, please contact
the SAMSUNG customer care center.
COUNTRY CALL Web site
AUSTRALIA
1300 362 603 www.samsung.com/au
COLOMBIA
01-8000112112 www.samsung.com.co
EIRE
0818 717 100 www.samsung.com/ie
HONG KONG
(852) 3698-4698 www.samsung.com/hk
INDIA
3030 8282, 1800 110011,
1-800-3000-8282,1800 266 8282
www.samsung.com/in
MALAYSIA
1800-88-9999 www.samsung.com/my
NEW ZEALAND
0800 SAMSUNG (726-7864) www.samsung.com/nz
PANAMA
800-7267 www.samsung.com/latin
PHILIPPINES
1800-10-SAMSUNG (726-7864) www.samsung.com/ph
SINGAPORE
1800-SAMSUNG (726-7864) www.samsung.com
SOUTH AFRICA
0860-SAMSUNG (726-7864 ) www.samsung.com
U.K
0845 SAMSUNG (7267864) www.samsung.com
VIETNAM
1 800 588 889 www.samsung.com
In an effort to promote recycling this user manual is printed on recycled paper.
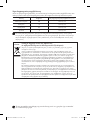
Ambient Room Temperature Limits
This refrigerator is designed to operate in ambient temperatures specified by its
temperature class marked on the rating plate.
Class Symbol Ambient Temperature range (°C)
Extended Temperate SN +10 to +32
Temperate N +16 to +32
Subtropical ST +16 to +38
Tropical T +16 to +43
Internal temperatures may be affected by such factors as the location of the refrigera-
tor, ambient temperature and the frequency with which you open the door. Adjust the
temperature as required to compensate for these factors.
Correct Disposal of This Product
(Waste Electrical & Electronic Equipment)
(Applicable in the European Union and other European countries with separate col-
lection systems)
This marking on the product, accessories or literature indicates that the product and
its electronic accessories (e.g. charger, headset, USB cable) should not be disposed
of with other household waste at the end of their working life. To prevent possible
harm to the environment or human health from uncontrolled waste disposal, please
separate these items from other types of waste and recycle them responsibly to
promote the sustainable reuse of material resources.
Household users should contact either the retailer where they purchased this
product, or their local government office, for details of where and how they can take
these items for environmentally safe recycling.
Business users should contact their supplier and check the terms and conditions
of the purchase contract. This product and its electronic accessories should not be
mixed with other commercial wastes for disposal.
English
DA99-01220M(0.7).indb 20 2010.6.21 11:22:5 AM
Page is loading ...
Page is loading ...
Page is loading ...
Page is loading ...
Page is loading ...
Page is loading ...
Page is loading ...
Page is loading ...
Page is loading ...
Page is loading ...
Page is loading ...
Page is loading ...
Page is loading ...
Page is loading ...
Page is loading ...
Page is loading ...
Page is loading ...
Page is loading ...
Page is loading ...
Page is loading ...
-
 1
1
-
 2
2
-
 3
3
-
 4
4
-
 5
5
-
 6
6
-
 7
7
-
 8
8
-
 9
9
-
 10
10
-
 11
11
-
 12
12
-
 13
13
-
 14
14
-
 15
15
-
 16
16
-
 17
17
-
 18
18
-
 19
19
-
 20
20
-
 21
21
-
 22
22
-
 23
23
-
 24
24
-
 25
25
-
 26
26
-
 27
27
-
 28
28
-
 29
29
-
 30
30
-
 31
31
-
 32
32
-
 33
33
-
 34
34
-
 35
35
-
 36
36
-
 37
37
-
 38
38
-
 39
39
-
 40
40


Ask a question and I''ll find the answer in the document
Finding information in a document is now easier with AI
Related papers
Other documents
-
Morris S71520NFD Owner's manual
-
 Inventor DP1442S Double Door Refrigerator User manual
-
 Inventor DP1442S refrigerator Double Door User manual
-
Whirlpool BQ9 B2L User guide
-
Beko RSNE445E33WN Owner's manual
-
-
LG GR-H762HEHZ Owner's manual
-
LG GR-H802HXHU Owner's manual
-
Bosch B26FT70SNS/04 Owner's manual
-

