Geovision GV-POE0811-V2 Installation guide
- Category
- Network switches
- Type
- Installation guide

December 13, 2017
1
GV-POE0811-V2 8-Port Gigabit 802.3at Web Management
PoE Switch
Packing List
1. GV-POE0811-V2 x 1
2. AC Power Cord x 1
3. Screw x 8
4. Rack Mount Kit x 1
5. Download Guide x 1
6. GV-POE0811-V2 Installation Guide x 1
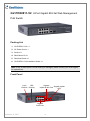
Front Panel
Load
Default
LED
Display
Gigabit
Uplink RJ45 Port
Gigabit Uplink
SFP
Gigabit
POE Port
Note: If any of these items is found missing or damaged, please contact your local supplier
for replacement.

December 13, 2017
2
LED Indicators on the switch
LED Color/Status Description
Power Amber On Power on
Link / ACT
Green On Link Up
Green Blinking Data activating
PoE
Amber On Port is linked to Power Device
Off No Power Device is connected
Connecting up to 8 GV-IP Cameras and 1 GV-NVR/DVR System
Through twisted pair cables, this switch can be connected to up to 8 GV-IP Cameras and 1
GV-NVR/DVR System. You can also extend the connections by connecting to other switches.
GV-NVR/DVR System
Switch
GV-IP Camera x 8
Note: The maximum cable length for Gigabit RJ-45 is 100 meters. For connection that
exceeds 100 meters, you can use the Gigabit SFP ports.
Accessing Web Interface
Users can log in the Web interface to manage and set up the switch. Follow the below steps
to log in the Web interface.
Note: The device has a default IP \\192.168.0.250. The default Password to log in is admin.

December 13, 2017
3
1. To access the Web user interface, type the default IP \\192.168.0.250
into your Web
browser.
2. On the User Log In page, type the default Password admin and click Apply. When
When you successfully log in, the message “Password Successfully Entered” appears.
3. To configure the GV-POE Switch, select desired functions from the left menu.
Loading Default Setting
You can load the default value with the Reset button or with the Web interface.
Hardware
1. Turn on the switch.
2. Press and hold the Reset button on the front panel of the switch for 5 seconds until all
the LED start blinking.
3. Release the button. The switch is restored to its default settings.
Note: After restoring default settings, you will need to configure IP address and Password
again.
Web Interface
1. On the Web interface, select Factory Default. This page appears.

December 13, 2017
4
2. Click Yes to restore the switch to the original configuration.
Note: Loading default from the Web interface will not change the user name, password and
IP configuration. If you want to restore the default setting of IP address, user name and
password, press the Reset button on the front panel of the switch.
Updating Firmware
1. On the Web interface, select Software Upload. This page appears.
2. Click Browse to select the latest firmware file (.bin) for update.
3. Click Upload. The uploading process is started.
4. After the firmware is successfully uploaded, click Logout from the left menu and re-login
the switch.

December 13, 2017
5
Specifications
Ports
Number of Ports
10 ports, including:
8-port 10/100/1000BaseT(X) with RJ-45 Connectors, PoE+
1-port Gigabit SFP Uplink Port
1-port Gigabit RJ-45 Uplink Port
Performance
MAC Address 8 K
Buffer Memory 4 M bits
Jumbo Frames 9.6 KB
Transmission Method Store and Forward
Transmission Media
10/100BaseT(X) Cat. 5 UTP/STP
1000BaseT Cat. 5e, 6 UTP/STP
Filtering / Forwarding
Rates
10 Mbps port - 14,880 pps
100 Mbps port - 148,800 pps
1000 Mbps port - 1,488,000 pps
Backplane Capacity 20 Gbps
Smart Features
Port Based VLAN 16
Tag Based VLAN 16, VID 1~4094
IGMP Snooping V1 & V2
Link Aggregation up to 8 groups
Quality of Service (QoS) up to 8 queues, 802.1p
Port Management
Port State, Speed, Flow Control Configuration, Port Mirroring,
PoE
Administrator
Management
Web Management, Password Protection, Configuration,
Backup / Restore, Firmware Upgrade

December 13, 2017
6
Mechanical Characteristics
LED Indicators
Per Port: Link/Act
PoE Act/Status
Power
Electrical Characteristics
PoE
Power
Input 100 ~ 240 V/AC, 50 ~ 60 Hz
Output
IEEE 802.3at Compliant Voltage, Per Port Max. 30 watts
(8 Ports at Full 15.4 W / 4 Ports at Full 30 W)
Max. Power
Consumption
130 W
General
Dimensions
(H x W x D)
44 x 266 x 161 mm (1.73” x 10.47” x 6.33”)
Weight 1.8 kg (3.96 lb)
Operating Temperature 0°C ~ 50°C (32°F ~ 122°F)
Storage Temperature -20°C ~ 85°C (-4°F ~ 185°F)
Humidity 10 to 90% RH (non-condensing)
Standards and Regulatory
Standards
IEEE 802.3 10BaseT, IEEE 802.3u 100BaseTX, IEEE 802.3ab
1000BaseT, IEEE 802.3z 1000BaseSX/LX
IEEE 802.3x Flow Control
IEEE 802.1Q VLAN
IEEE 802.1p Class of Service
IEEE 802.3af Power Over Ethernet (PoE)
IEEE 802.3at Power Over Ethernet (PoE+)
Regulatory CE, Commercial FCC Part 15 Class B
Note:
1. GV-POE0811-V2 does not support Spanning Tree function.
2. Specifications are subject to change without prior notice.
-
 1
1
-
 2
2
-
 3
3
-
 4
4
-
 5
5
-
 6
6


Geovision GV-POE0811-V2 Installation guide
- Category
- Network switches
- Type
- Installation guide
Ask a question and I''ll find the answer in the document
Finding information in a document is now easier with AI
Related papers
-
Geovision GV-PoE1611-V2 Installation guide
-
-
-
-
-
-
-
-
-
Other documents
-
Intellinet 24-Port Gigabit Ethernet PoE Web-Managed Switch with 4 SFP Combo Ports User manual
-
Messoa POE008 User manual
-
EverFocus EPOE 08 Owner's manual
-
-
-
-
-
Trendnet RB-TPE-3012LS User guide
-
NET GENERATION ES-5816PHG User manual
-