Samsung MW1150WA/XAA Owner's manual

Category
Microwaves
Type
Owner's manual
Microwave Oven
Owner's Manual
ME1060WB/BB/SB
ME1260WB/BB/SB
ME1460WB/BB/SB
MW1030WA/BA/SB
MW1060WA/BA
MWl 150WA/BA
MW1230WA/BA
MW1235WA/BA
MW1250WA/BA
MW1255WA/BA
MW1260WA/BA
MW1430WA/BA
MW1455WA/BA
MW1460WA/BA
MW1660WA/BA
Safety
PRECAUTIONSTOAVOID
POSSIBLEEXPOSURETO
EXCESSIVEMICROWAVE
ENERGY:
(a) Do notattempt to operate this oven with the door open "
since open-door operation can result in harmful exposure to
microwave energy. It is important not to defeat ortamper
with the safety interlocks.
(b) Do not placeany object between the oven front face and the
door or allow soil or cleaner residue to accumulate on
sealing surfaces.
(c) Do notoperate the oven if it is damaged. It is particularly
important that the oven door close properly and that there is
no damage to the "
1) Door (bent ordented),
2) Hinges and latches (broken or loosened),
3) Door seals and sealing surfaces.
(d) The oven should not be adjusted or repaired by anyone
except properly qualified service personnel.
WARNING
Always observe Safety Precautions when using your
oven. Never try to repair the oven on your own - there
is dangerous voltage inside. If the oven needs to be
repaired, call 1-800-SAMSUNG for the name of an
authorized service center near you.
IMPORTANTSAFETY INSTRUCTIONS
When using any electrical appliance, basic safety precautions
should be followed, including the following:
WARNING
To reduce risk of burns, electric shock, fire, personal
injury or exposure to excessive microwave energy:
Readall safetyinstructions before using the appliance.
Readandfollow thespecific"PRECAUTIONS TOAVOID POSSIBLE
EXPOSURETO EXCESSIVE MICROWAVE ENERGY"on this page.
This appliance must be grounded.Connect onlyto properly grounded
outlets. See "IMPORTANT GROUNDING INSTRUCTIONS"on page
4 of this manual.
Installor placethis appliance only in accordancewith the installation
instructionsprovided.
Some items, likewhole eggs andfood in sealed containers, may
explode if heated in this oven.
Use this appliance only for its intended use asdescribed in the
manual. Do not use corrosive chemicals or vapors in this appliance.
This type of oven isspecifically designed to heat,cook, ordry food. It
isnot designed for industrial or laboratory use.
As with any appliance, close supervision is necessary when used by
children.
Donot operate this appliance if it has a damaged cord or plug,if it is
notworking properly, or if it hasbeen damaged.
This appliance should be serviced only by qualified service
personnel. Contact the nearest authorized servicefacility for
examination, repair,or adjustment.
Donot cover or block anyof the openings on this appliance.
SAVE THESE INSTRUCTIONS
2
Safety
Important Safety Instructions, continued
Do not store this appliance outdoors. Do not use near water- for
example, near a kitchen sink, in a wet basement, or near a swimming
pool, etc.
Keep the insideof the oven clean. Food particlesor spattered oils
stuck to the oven walls orfloor can cause paint damage and reduce
the efficiency ofthe oven.
Do not immerse cord or plug in water.
Keep cord away from heatedsurfaces. "
Do not let cord hang over edge of table or counter.
When cleaning door and oven surfaces, use only mild, nonabrasive
soaps or detergents appliedwith a sponge or soft cloth.
To reduce the risk of fire in the oven:
a. Do not overcook food. Watch appliance carefully if paper, plastic,
or other combustible materials are inside.
b. Remove wire twist-ties from plastic cookingbags beforeplacing
bags inoven.
c. If materials insidethe oven ignite, keep the ovendoor closed, turn
®
the oven off, disconnect the power cord, or shut off the powerat
the fuse or circuit breaker panel.
d. Do not use the oven compartment for storage purposes. Do not
leave paper products, cooking utensils, or food in the ovenwhen
not in use.
Do not try to preheat oven or operatewhile empty.
Do notcook without theglass tray inplaceon the ovenfloor. Foodwill
not cook properly without the tray.
Do not defrostfrozen beverages in narrow-neckedbottles. The
containers can break.
Dishes and containers can become hot. Handle with care. "
Carefully remove container coverings, directing steam away from
hands and face.
Remove lids from baby food before heating. After heating baby food,
stir well and test temperature by tasting beforeserving.
A short power-supply cord is providedto reducethe risk of becoming
entangled in or tripping over a longercord. Longer cord sets or
extension cords are available and may be usedwith caution.
Donot operate any other heating or cooking appliance beneath this
appliance.
Donot mount unitover or near any portionof a heating orcooking
appliance.
Donot mount over a sink.
Donot store anything directly on top of the appliancewhen it is in
operation.
If materialsinside ovenshould ignite, keep the ovendoor closed,turn
the oven off and disconnect the power cord, or shut off power atthe
fuse or circuit breaker panel. Ifthe door is opened, thefire may
spread.
Pre-cautionfor safe use to avoid possible exposure to excessive
micro oven energy :
Donot attempt to pull any part of the door by handto open the door.
Open thedoor only utilizing the push button located atfront-right-
bottom side.
SAVE THESE INSTRUCTIONS
3
Safety
IMPORTANTGROUNDING
INSTRUCTIONS
This appliance must be grounded. In the event of an electrical
short circuit, grounding reduces the risk of electric shock by
providing an escape wire for the electrical current. This
appliance isequipped with a cord that includes a grounding wire
and a grounding plug. The plug must be plugged into an outlet
that is properly installed and grounded. Plug the three-prong
power cord into a properly grounded outlet of standard 115-120
voltage, 60 Hz. Your oven should bethe only appliance on this
circuit.
WARNING
Improper use of the grounding plug can result in a risk
of electric shock. Consult a qualified electrician or
servicer if you do not understand the grounding
instructions or if you are not sure ifthe appliance is
properly grounded.
Use of Extension Cords
A short power-supply cord is provided to reduce the risk of
becoming entangled in or tripping over a longer cord. Longer
cord sets or extension cords are available and may be used if
care isexercised in their use. If a long cord or extension cord is
used:
1. The marked electrical rating ofthe cord set or extension cord
should be at least as great as the electrical rating of the
appliance.
2. The extension cord must be a grounding-type 3-wire cord
and it must be plugged into a 3-slot outlet.
3. The longer cord should be arranged so that itwill not drape
over the counter top or tabletop where it can be pulled on by
children or tripped over accidentally. Ifyou use an extension
cord, the interior light may flicker and the blower mayvary
when the microwave oven is on. Cooking times may be
longer, too.
WARNING
Do not cut or remove the third (ground) prong from the
power cord under any circumstances.
Note
Connect the oven to a 20A circuit.
When connecting the oven to a 15A circuit, make
sure that circuit breaker is operable.
SAVE THESE INSTRUCTIONS
Your New Microwave oven
Table of Contents
Safety ........................................................................................... 2
Your New Microwave oven ......................................................... 5
Table of Contents ...................................................................... 5
Checking Parts .......................................................................... 5
Warranty and Service Information ............................................. 6
Setting Up Your Microwave Oven ............................................. 6
Control Panel Buttons ............................................................... 7
Operation ................................................................................... 12
e
Turning on the Power and Selecting a Weight ........................ 12
Setting the Clock ..................................................................... 12
Using the Pause/Cancel Button .............................................. 12
Using the Instant Cook Buttons ............................................... 13
Using the Handy Helper Button ............................................... 14
Using the Kids Meals Button ................................................... 15
Using the Snack Bar Button .................................................... 15
Using the One Minute + Button ............................................... 16
Reheating Automatically(Option Item) ..................................... 16
Defrosting Automatically .......................................................... 17
Setting Cooking Times & Power Levels .................................. 17
One-stage Cooking ................................................................. 17
Multi-stage Cooking ................................................................. 18 e
Using the More/Less Buttons .................................................. 18
Switching the Beeper On/Off ................................................... 18
Using the Kitchen Timer .......................................................... 19
Demonstration Mode ............................................................... 19
Setting the Child Protection Lock ............................................ 19
Cooking Instructions ................................................................ 20
Cooking Utensils ..................................................................... 20
Testing Utensils ....................................................................... 20
Cooking Techniques ................................................................ 21
General Tips ............................................................................ 21
Cooking Guide ......................................................................... 22
Auto Defrosting Guide ............................................................. 24
o
Recipes ................................................................................... 25
Appendix .................................................................................... 27
Troubleshooting Guide ............................................................ 27
Care and Cleaning .................................................................. 27
Specifications .......................................................................... 28
Warranty .................................................................................... 31
Warranty Information ............................................................... 31
Guia Rapida(Spanish) ............................................................... 35
Quick Reference(English) ........................................ Back Cover
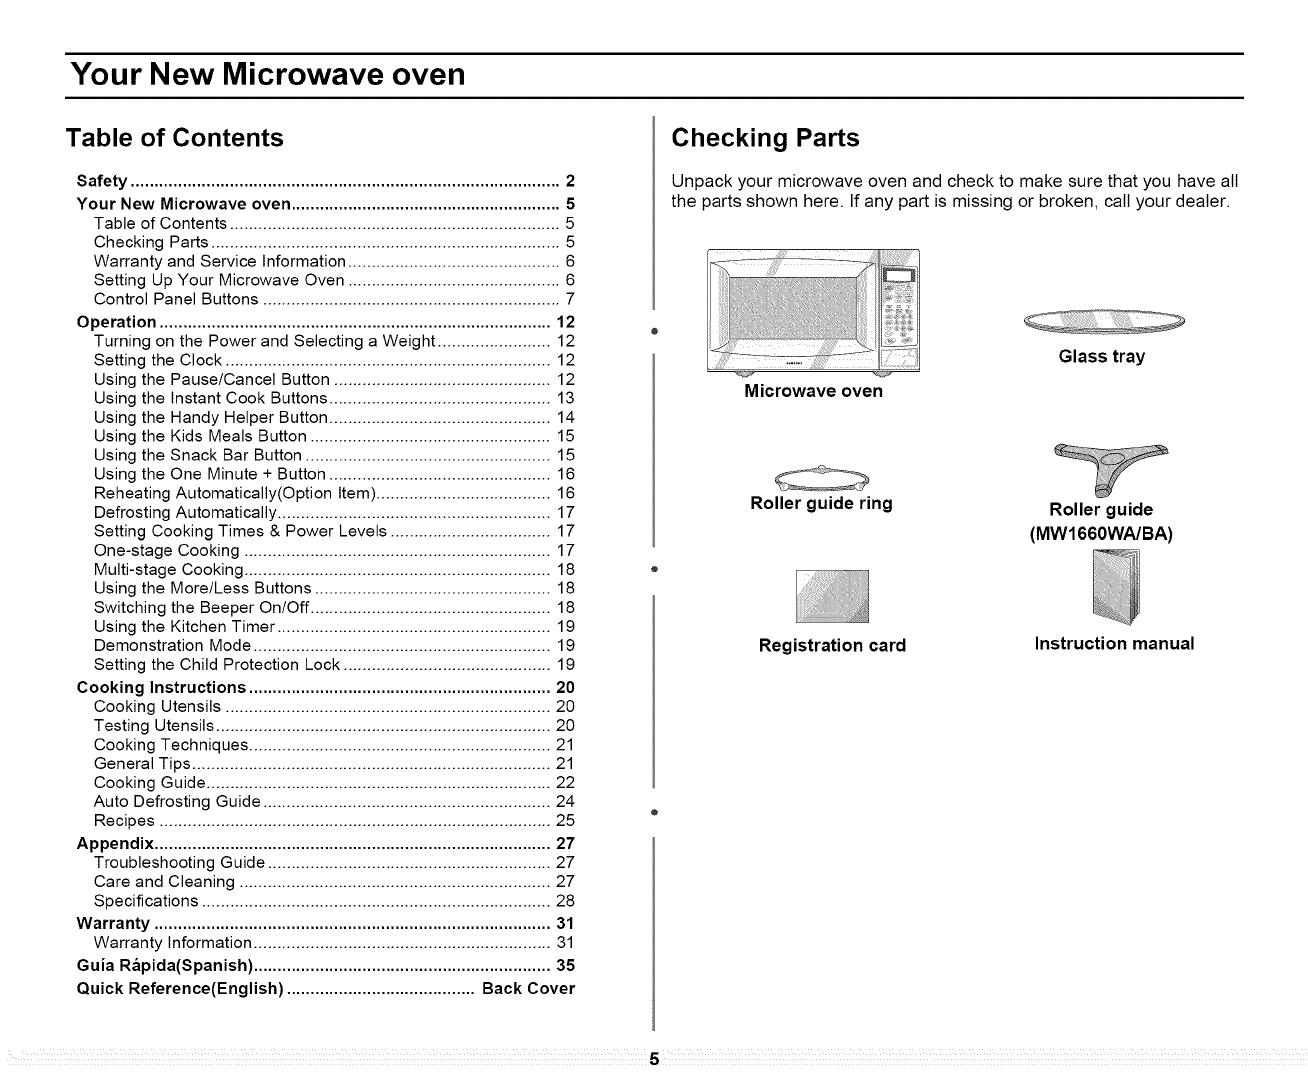
Checking Parts
Unpack your microwave oven and check to make sure that you have all
the parts shown here. If any part is missing or broken, call your dealer.
Microwave oven
Glass tray
Roller guide ring
Roller guide
(MW1660WA/BA)
Registration card
Instruction manual
Your New Microwave oven
Warranty and Service Information
To help us better serve you, please complete the enclosed registration
card and promptly return it by mail. If the registration card is missing, you
can call Samsung Electronics America, Inc., at 1-800- SAMSUNG
(1-800-726-7864), or register on-line at WWW.SAMSUNGUSA.COM
When contacting Samsung, please provide the specific model and serial
number information which is usually located on the back or bottom of the
product. Please record these numbers below, along with the other
requested information. Keep this information in a safe place as a
permanent record of your purchase to aid in identification in case of theft
or toss, and a copy of your sales receipt as a proof of purchase if
warranty service is needed.
MODEL NUMBER
SERIAL NUMBER
DATE PURCHASED
PURCHASED FROM
Warranty service can only be performed by a Samsung Authorized
Service Center. If you should require warranty service, provide the
above information with a copy of your sales receipt to the Samsung
Authorized Service Center.
For service assistance and the location of the nearest service center,
please call 1-800-SAMSUNG (1-800-726-7864), or go on-line to
WWW.SAMSUNGSUPPORT.COM
Setting Up Your Microwave Oven
,4
| Place the oven on a flat, sturdy surface and plug the cord into a
grounded outlet. Once plugged in, the display on your oven will
show:
2
3
4
Make sure there is adequate ventilation for your oven by leaving at
least four inches of space behind, above, and to the side of the
oven.
Open the oven door by pressing the button below the control panel.
Wipe the inside of the oven with a damp cloth.
Place the pre-assembled ring in the indentation inthe center of the
oven.
Place the pre-assembled roller guide in the indentation inthe
center of the oven.(MW1660WA/BA
5
Place the glass tray on top of the ring so that the three glass tabs in
the center of the tray fit securely into the tabs on the floor of the
oven.
Place the glass tray secerely in the center of the pre-assembled
roller guide.(MW1660WA/BA
Your New Microwave oven
Control Panel Buttons
ME1060WB/BB/SB
ME1260WB/BB/SB, ME1460WB/BB/SB
MW1060WA/BA, MW1260WA/BA
MW1460WA/BA, MW1660WA/BA
.................................
13--
__
.................................
9
11
C,ockBoun_M'O.tO
+
Popcorn Potato Beverage B°ll
_!_3ter
Fresh Frozen Frozen Frozen
vegetables vegetables Breakfast Dinner
Pizza Bacon Babx ,Soften
Reheat FooJ Ice Cream
f Handy Kids snack
Helper Meals Bar
l Melt Choco/ate l Ch cken Nuggets l Na ho_
2often (tean_ deese 2 Hot Dogs 2 (hfcken Wng_
3Melt Bu_ter 3 Frer_ch :rie_ .?Potato Skin_
4 Frozen Sar'dw ch 4 Chee_e _ J k_
.... Auto _Pl_te Auto
Defrost 2Casserole
3Pasta Reheat Reheat
Power
Level
Kitchen
Timer
6
8
10
12
1. One Minute+ p.16
Press once for every minute of cooking at High Power
2. Clock p.12
Sets current time.
3. Sound Button p.18
Sets sound on or off.
4. Instant Cook Buttons p.13
Instant settings to cook popular foods.
5. Auto Defrost p.17
Sets weight of food to be defrosted.
6. Auto Reheat p.16
Selects type of dish to be reheated.
7. Number Buttons
Sets cooking times or amounts and power levels other than high.
8. More/Less p.18
Increase or decrease cooking time.
9. Power Level p.17
Press this pad to set a power level other than high.
10. Kitchen Timer p.19
Sets kitchen or convenience timer.
11. Pause/Cancel p.12
Press to pause oven or correct a mistake.
12. Start
Press to start cooking.
13. Handy Helper, Kids Meals, Snack Bar p.14
Selects type of dish to be reheated.
7
Your New Microwave oven
Control Panel Buttons
MW1255WA/BA, MW1455WA/BA
2
ram
12 mm
ram
6
8
10
Auto One
Defrost Minute +
Fresh Frozen Frozen Frozen
Handy Kids Snack
Helper Meals Bar
l Melt O_ocoJate l Chicke¢;Nugge#_ 7 N_ ho5
2S_ffe_Oe_m_eese 2HotDogs 2Chi_ke_ngs
3Me/_ Bu_ter 3French Fries 3Potato Skin5
4 Frozen_ndwich 4Check, Stick5
¸¸¸2¸¸¸¸¸
Power Kitchen
Level Timer
Clock Sound
Pause Start
5
7
9
11
1. One Minute+ p.16
Press once for every minute of cooking at High Power
2, Auto Defrost p,17
Sets weight of food to be defrosted.
3, Instant Cook Buttons p,13
Instant settings to cook popular foods.
4, Number Buttons
Sets cooking times or amounts and power levels other than high.
5. More/Less p.18
Increase or decrease cooking time.
6, Power Level p,17
Press this pad to set a power level other than high.
7. Kitchen Timer p.19
Sets kitchen or convenience timer.
8. Clock p.12
Sets current time.
9, Sound Button p,18
Sets sound on or off.
10. Pause/Cancel p.12
Press to pause oven or correct a mistake.
11. Start
Press to start cooking.
12. Handy Helper, Kids Meals, Snack Bar p.14
Selects type of dish to be reheated.
8
Your New Microwave oven
Control Panel Buttons
MW1150WA/BA, MW1250WA/BA
I I
12--
__
6
8
10
Defros_
Po_to Bevep_: j_ Water
Fresh FFozen Pfzza
VO_OT_DI©_ DJDD_,,F Nelle_
L_;JD_ bOl _ttn
B_con [_9od Ice Cream
Handy Kids _nack
Helper Meals Bar
1 M_lt Chc_ ola_e I Ch_cl_, fvugg_r_ 1Nahes
Sot[an haa._ [_e _ Hot Do_ls 2 Choker, VCng_
3 #_eh Ructer 3 _renh Fnes 3 f'u_a_o _k_n_
# hoz_, 5al,dwJ(h # Cheese _t_k
Po wet
Level
Kitchen
77met --
Clock Sound
F_ause
Cancel
5
--11
°4.
_8.
° 12.
1. One Minute+ p.16
Press once for every minute of cooking at High Power
2. Auto Defrost p.17
Sets weight of food to be defrosted.
3. Instant Cook Buttons p.13
Instant settings to cook popular foods.
Number Buttons
Sets cooking times or amounts and power levels other than high.
5. More/Less p.18
Increase or decrease cooking time.
6. Power Level p.17
Press this pad to set a power level other than high.
7. Kitchen Timer p.19
Sets kitchen or convenience timer.
Clock p.12
Sets current time.
9. Sound Button p.18
Sets sound on or off.
10. Pause/Cancel p.12
Press to pause oven or correct a mistake.
11. Start
Press to start cooking.
Handy Helper, Kids Meals, Snack Bar p.14
Selects type of dish to be reheated.
9
Your New Microwave oven
Control Panel Buttons
MW1030WA/BA/SB
2
12 m
m
7
8
9--
10
One
Minute +
Auto
Defrost
Popcorn Boil
Water
Potato Beverage
Pizza Fresh
Reheat Vegetables
Bacon Frozen
Dinner
Handy Kids Snack
Helper Mea/s Bar
l Mel_ Cho olate l @_@en Nugget_ 1Nachos
25often Croat1 Cheese 2Hot Dogs 2.Chicken Wing_
3Melt Buzter d.French Fries 3 Potato Sklr,s
4 Frozen _andw_ch 4 Chee_e _t_ck_
Power
Level
,4 2 3
7 8 9 :,o
Kitchen
Timer
Clock
--3
Sound
Pause Start
Cancel
4
5
11
,
o
"8.
° 12.
1. One Minute+ p.16
Press once for every minute of cooking at High Power
2. Auto Defrost p.17
Sets weight of food to be defrosted.
3. Instant Cook Buttons p.13
Instant settings to cook popular foods.
Number Buttons
Sets cooking times or amounts and power levels other than high.
5. More/Less p.18
Increase or decrease cooking time.
6. Power Level p.17
Press this pad to set a power level other than high.
7. Kitchen Timer p.19
Sets kitchen or convenience timer.
Clock p.12
Sets current time.
9, Sound Button p,18
Sets sound on or off.
10. Pause/Cancel p.12
Press to pause oven or correct a mistake.
11. Start
Press to start cooking.
Handy Helper, Kids Meals, Snack Bar p.14
Selects type of dish to be reheated.
10
Your New Microwave oven
Control Panel Buttons
MW1230WA/BA, MW1235WA/BA
MW1430WA/BA
m
12m
5
6
7
8
9
10
One
Minute +
Popcorn Boil
Water
Potato Beverage
Fresh Pizza Baby
Vegetables Reheat Food
Frozen Bacon Soften
Dinner Ice Cream
Handy Kids Snack
Helper Meals Bar
l Melt ChocolatF, l ChickenNugget l Nachos
2 Soft_ Cream Chics,, 2Hot Dogs 2.Chicken Wing_
3Melt Butter .?,French Fti s 3 Potalo Sk_n_
4 Frozen %andwich 4 Chee_e gticks
Clock Sound
Pa USe
Cancel
-11
.4.
"8.
° 12.
1. One Minute+ p.16
Press once for every minute of cooking at High Power
2. Instant Cook Buttons p.13
Instant settings to cook popular foods.
3. Number Buttons
Sets cooking times or amounts and power levels other than high.
More/Less p. 18
Increase or decrease cooking time.
5. Auto Defrost p.17
Sets weight of food to be defrosted.
6. Power Level p.17
Press this pad to set a power level other than high.
7. Kitchen Timer p.19
Sets kitchen or convenience timer.
Clock p.12
Sets current time.
9. Sound Button p.18
Sets sound on or off.
10. Pause/Cancel p.12
Press to pause oven or correct a mistake.
11. Start
Press to start cooking.
Handy Helper, Kids Meals, Snack Bar p.14
Selects type of dish to be reheated.
11
Operation
Turning on the Power and Selecting a Weight
The first time you plug the power cord into an outlet, or after there has
been an interruption in power, the display shows " B_:B_ "At this point,
you can select the weight system for the display. You can choose
between pounds (LBS) or kilograms (KG). To do so,
A
| Press 0 immediately after plugging in your microwave. The display
will show:
2
If the display does not shows "Kg", you wilt need to unplug the
microwave and then plug it in again in order to change to the weight
selection.
Press 0 repeatedly to select the weight system you wish to use:
Setting the Clock
1 Press the Clock button. The "ENTER" and "TIME" indicators flash.
/ Use the number buttons to enter the current time. You must press
at least three numbers to set the clock. If the current time is 5:00
enter, 5,0,0.
3 When 5 seconds has elapsed, "ENTER" indicator flash and "Cloc"
will be displayed.
When you have selected the weight system you want to use, press
the PAUSE/CANCEL button to end this procedure.
4
Press Clock again. A colon will blink, indicating that the time is set.
If there is a power interruption, you will need to reset the clock.
You can check the current time while cooking is in progress by
pressing the Clock button.
Using the Pause/Cancel Button
The Pause/Cancel button allows you to clear instructions you have
entered. It also allows you to pause the oven's cooking cycle, so that
you can check the food.
To pause the oven during cooking: press Pause/Cancel once. To
restart, press Start.
To stop cooking, erase instructions, and return the oven display to
the time of day: press Pause/Cancel twice.
To correct a mistake you have just entered: press Pause/Cancel
once, then re-enter the instructions.
12
Operation
Using the Instant Cook Buttons
1 Press the Instant Cook button corresponding to the food you are
cooking (Popcorn, for example). The display shows the first
serving size. ("ENTER" and "QTY." will flash):
2
Press the button repeatedly to select the serving size you want.
The display will cycle through all available serving sizes. Once you
select the correct serving size, the microwave will begin cooking
automatically.
When the cooking times is over, the oven will beep. The oven will
then beep every minute.
Instant Cook Chart
Item Remarks
Popcorn
Potato
Beverage
Weight
Regular
(3.5 oz),
Light
Regular
(3.0-3.5
oz)
1 EA, 2 EA
3 EA, 4 EA
5 EA, 6 EA
½ cup
1 cup
2 cups
Useone microwave-only bag of popcorn.
Pop only one bag at atime.
Usecaution when removing and opening
hot bagfrom oven.
Prick each potato several times with fork.
Place on turntable in spoke-like fashion.
Remove from oven, wrap in foil and let
stand 3-5min.
Use measuring cup or mug ; do not cover.
Place the beverage in the oven.
After heating, stir well.
Boil water
Fresh
vegetables
Frozen
vegetables
ME1060WB/BB/SB
ME1260WB/BB/SB
ME1460WB/BB/SB
MWl060WA/BA
MW1255WA/BA
MW1260WA/BA
MW1455WA/BA
MW1460WA/BA
MW1660WA/BA
Frozen
breakfast
MWl060WA/BA
MW1255WA/BA
MW1260WA/BA
MW1455WA/BA
MW1460WA/BA
MW1660WA/BA
Frozen
breakfast
ME1060WB/BB/SB
ME1260WB/BB/SB
ME1460WB/BB/SB
Frozen dinner
ME1060WB/BB/SB
ME1260WB/BB/SB
ME1460WB/BB/SB
MWl060WA/BA
MW1255WA/BA
MW1260WA/BA
MW1455WA/BA
MW1460WA/BA
MW1660WA/BA
Pizza reheat
½ cup
1 cup
2 cups
1 serving
2 servings
3 servings
4 servings
1 serving
2 servings
3 servings
4 servings
214 oz
4-6 oz
6-8 oz
4-6 oz
6-8 oz
7-10 oz
10-12 oz
12-18 oz
1 Slice
2 Slices
3 Slices
4 Slices
Measure liquid; pour into microwave-safe
container that is 2 times larger than
amount of liquid. Example: For 1cup
liquid use a 2 cup or largerdish.
Stir well before and after heating to
prevent boil over.
Place the vegetables into a casserole
bowl and add a small amount of water
(2-4Tbsp).
Cover during cooking and stir before
standing.
Remove from package.
Place the vegetables into a casserole
bowl and add a small amount of water
(2-4Tbsp).
Cover during cooking and stir before
standing.
Remove package from outer
wrapping and follow package
instructions for covering and standing.
After cooking, let stand 1-3 min.
Remove package from outer wrapping
andfollow package instructions for
covering andstanding.
After cooking, letstand 1-3min.
Put the pizza on a microwave-safe
plate with wide end of slice towards
the outside edge of the plate.
Do not let slices overlap. Do not
cover.
Before serving, let stand 1-2 min.
13
Operation
Instant Cook Chart
Item
Bacon
Baby food
ME1060WB/BB/SB
ME1260WB/BB/SB
ME1460WB/BB/SB
MW1060WA/BA
MW1150WA/BA
MW1230WA/BA
MW1235WA/BA
MW1250WA/BA
MW1255WA/BA
MW1260WA/BA
MW1430WA/BA
MW1455WA/BA
MW1460WA/BA
MW1660WA/BA
Soften ice
cream
ME1060WB/BB/SB
ME1260WB/BB/SB
ME1460WB/BB/SB
MW1060WA/BA
MW1150WA/BA
MW1230WA/BA
MW1235WA/BA
MW1250WA/BA
MW1255WA/BA
MW1260WA/BA
MW1430WA/BA
MW1455WA/BA
MW1460WA/BA
MW1660WA/BA
Weight
2 Slices
4 Slices
6 Slices
2.5 oz
4 oz
6 oz
1 pint
½ gallon
Remarks
Place 2 paper towels on plate and
arrange bacon on towels, do not
overlap. Cover with additional paper
towel. Remove paper towel
immediately after cooking.
Use More or Less button for desired
crispness.
Remove lid from baby food and place
in the center of oven.
Check temperature and stir well
before serving.
The More/Less key cannot be used
with the baby food key.
Remove top of carton. Place carton in
center of microwave oven.
Let stand 2 min. after microwaving.
Using the Handy Helper Button
1. Press the Handy Helper button corresponding to the food you are
cooking. The display show "A-l".(code of item) Press the
Handy Helper button repeatedly to select the item you want.(Refer
to the Handy Helper Chart below)
2. Press the Number button to select the serving size you want. You
can press "1" or "2" button for selecting serving size.
Only "1" button(serving)is available for Sofetn Cream Cheese and
Melt Chocolate.(Refer to the Handy Helper Chart below for the
serving)
3. Press Start button to begin cooking.
Handy Helper Chart
Item Code Weight
Melt A-1 1 cup chips
Chocolate
Soften A-2 1 package
Cream (8 oz.)
Cheese
Melt Butter A-3 1 stick
(1/4 lb.)
2 sticks
(1/2 lb.)
Remarks
Place chocolate chips or square in a
microwave-safe dish.
Stirwell at half time when the oven
beeps, and re-start the oven.
Unlessstirred, the chocolate keeps
its shape even when heatingtime is
over.
Unwrap cream cheese andplace on
microwave-safe dish.
Let stand 1-2min.
Removewrapping and cut butter in
half vertically.
Place butter in dish, cover with wax
paper.
Stirwell after finishing and let stand
1-2min.
14.
Operation
Using the Kids Meals Button
1. Press the Kids Meals button corresponding to the food you are
cooking. The display shows "A-l"(Code of item).
Press the Kids Meals button repeatedly to select the item you
want.(Refer to the Kids Meals Chart below)
2. Press the Number button to select the serving size you want. You
can Press 1or 2 button for selecting serving size.(Refer to the
Kids Meals Chart below for the serving.)
3. Press Start button to begin cooking.
Kids Meals Chart
Item Code Weight
Chicken A-1 4-5 oz
Nuggets 6-7 oz
Hot Dogs A-2 2 EA
4 EA
French Fries A-3 4-5 oz
6-7 oz
Frozen A-4 1 EA
Sandwich 2 EA
Remarks
Put a paper towel on top of plate and
arrange nuggets in spoke fashion on
paper towel.
Do not cover. Let stand 1 min.
Prick hot dogs, place on plate. When the
oven beeps, add buns and re-start the
oven.
Place 2 paper towels on plate and
arrange french fries on towels, do not
overlap.
Blot with additional papertowel after
removal from oven.
Place frozen sandwich in susceptor
"sleeve" (which is in package) and put on
plate.
Using the Snack Bar Button
1. Press the Snack Bar button corresponding to the food you are
cooking. The display shows "A-1 "(Code of item).
Press the Snack Bar button repeatedly to selcet the item you
want.(Refer to the Snack Bar Chart below)
2. Press the Number button to select the serving size you want. You
can press 1 or 2 button for selecting serving size.
Only 1 button(serving) is available for Nachos.
(Refer to the Snack Bar Chart below for the serving)
3. Press Start button to begin cooking.
Snack Bar Chart
Item Code
Nachos A-1
Chicken Wings A-2
Potato Skins A-3
Cheese Sticks A-4
Weight Remarks
1 serving Place tortilla chips on platewithout
overlapping.
Sprinkle evenlywith cheese.
Contents
- 2 cups tortilla chips
- 1/3 cup grated cheese
5-6 oz Use pre-cooked, refrigerated chicken
7-8 oz wings.
Place chicken wings around plate in
spoke fashion and cover with wax
paper.
1cooked Cutcooked potatointo 4 even
potato wedges. Scoop or cut out potato flesh,
2 cooked leaving about 1/4" of skin.
potatoes Place skinsin spoke fashion around
plate.
Sprinkle with bacon, onions and
cheese. Do not cover.
5-6 pcs Place cheese stickson plate in spoke
7-10 pcs fashion.
Donotcover.
15
Operation
Using the One Minute + Button
This button offers a convenient way to heat food in one-minute
increments at the High power level.
1
Press the One Minute + button once for each minute you wish to
cook the food. For example, press it twice for two minutes. The
time will display, and the oven starts automatically.
Add minutes to aprogram in progress by pressing the One Minute
÷ button for each minute you want to add.
2
,3
Use the number buttons to increase the serving size. For example,
for three servings, press the 3 button(Refer to the Auto Reheat
Chart below for the servings). The display shows the number of
servings you have selected:
Press the Start button. The display will show Cooking Time.
Reheating Automatically(Option Item)
MW1060WA/BA, MW1260WA/BA, MW1460WA/BA, MW1660WA/BA
ME1060WB/BB/SB,ME1260WB/BB/SB,ME1460WB/BB/SB
To reheat food, select the type of dish and the number of servings you
want to reheat, and the microwave automatically sets the reheating time.
1 Press the Auto Reheat button repeatedly to select the type of dish
you wish to reheat. The initial serving size for each dish is one
serving.
Plate of Food
Casserole
Auto Reheat Chart
Item
Plate of
food
Casserole
Pasta
Reheat
Weight Remarks
1serving
1to 4 servings
(8 oz./serving)
1to 4 servings
(8 oz./serving)
Use only pre-cooked, refrigerated
foods.
Cover plate with vented plastic wrap
or wax paper.
Contents
- 3-4 oz. meat, poultry or fish ( upto
6 oz. with bone)
- ½ cup starch (potatoes, pasta,
rice, etc.)
- ½ cup vegetables (about 3-4 oz.)
Use only refrigerated foods.
Cover with lid or vented plastic
wrap.
Stir foods well before serving.
Pasta Reheat
You can select up to four servings for casseroles and pasta
reheat. Only one serving is available for a plate of food.
The display shows the dish and quantity you have chosen.
16
Operation
Defrosting Automatically
To thaw frozen food, set the weight of the food and the microwave
automatically sets the defrosting time, power level and standing time.
1 Press the Auto Defrost button. The display shows "0.5 lbs." (0.2Kg
if you have set your oven for metric measure).
("ENTER" and " Lbs." will flash).
2
3
4
To set the weight of your food, press the Auto Defrost button
repeatedly. This increases the weight by 0.5 lb increments, up to
6.0 lbs (The Auto Defrost button wilt increase the weight by 0.2Kg
up to 2.6kg if you are using metric measurement).
You can also use the number buttons to enter the weight of the
food directly.
The oven calculates the defrosting time and starts automatically.
Twice during defrosting, the oven will beep to let you know to turn
the food over.
Press the Pause/Cancel button, open the oven door, and turn the
food over.
Press the Start button to resume defrosting.
See page 24 for the Auto Defrosting Guide.
Setting Cooking Times & Power Levels
Your microwave allows you to set up to two different stages of cooking,
each with its own time length and power level. The power level button
lets you control the heating intensity from Warm (1) to High (0).
One-stage Cooking
For simple one-stage cooking, you only need to set a cooking time. The
power level is automatically set to High. If you want to set the power to
any other level, you must set it using the Power Level button.
1
Use the number buttons to set a cooking time. You can set a time
from one second to 99 minutes, 99 seconds. To set a time over one
minute, enter the seconds too. For example, to set 20 minutes,
enter 2, 0, 0, 0.
2 If you want to set the power level to something other than High,
press the Power Level button, then use the number buttons to
enter a power level.
Power Levels:
1 = PL:10 (Warm)
2 = PL:20 (Low)
3 = PL:30 (Defrost)
4 = PL:40 (Medium Low)
5 = PL:50 (Medium)
6 = PL:60 (Simmer)
7 = PL:70 (Medium High)
8 = PL:80 (Reheat)
9 = PL:90 (Saute)
0 = PL:Hi (High)
0 Press the Start button to begin cooking. If you want to change the
power level, press Pause/Cancel before you press Start, and re-
enter all of the instructions.
17
Operation
Setting Cooking Times & Power Levels, continued
Some recipes require different stages of cooking at different
temperatures. You can set multiple stages of cooking with your
microwave.
Multi-stage Cooking
1
Follow steps 1 and 2 in the "One-Stage Cooking" section on the
previous page.
When entering more than one cooking stage, the Power Level
button must be pressed before the second cooking stage can be
entered.
To set the power level at High for a stage of cooking, press the
Power Level button twice.
2 Use the number buttons to set a second cooking time.
3 Press the Power Level button, then use the number buttons to set
the power level of the second stage of cooking.
4 Press Start to begin cooking.
You can check the Power Level while cooking is in progress by
pressing the Power Level button.
Using the More/Less Buttons
The More/Less buttons allow you to adjust pre-set cooking times. They
only work in the Instant, Handy Helper, Kids Meals, Snack Bar or
Time Cook modes. Use the More/Less button only after you have
already begun cooking with one of these procedures.
The More/Less feature cannot be used with the Baby Food button.
1
2
To ADD more time to an automatic cooking procedure: Press the
More(9) button.
To REDUCE the time of an automatic cooking procedure: Press the
Less(1 ) button.
If you wish to increase/decrease in Time Cook mode by l Osec,
press the More(9) or Less(l) button.
Switching the Beeper On/Off
You can switch the beeper off whenever you want.
1 Press the Sound button. The display shows "ON".
("START" will flash)
2 Press the Sound button to turn the volume off. The display shows:
"OFF".("START" will flash)
3 Press Start.
The display returns to the time of day.
18
Operation
Using the Kitchen Timer
1 Press the Kitchen Timer button.
2 Use the Number buttons to set the length of time you want the
timer to run.
3 Press Start to begin Kitchen Timer.
4 The display counts down and beeps when the time has elapsed.
"Note: The microwave does not turn on when the Kitchen timer
is used,"
Demonstration Mode
You can use the Demonstration Mode to see how your microwave oven
operates without the oven heating.
1 Hold the 0 button and then press the 1 button.
To turn demo mode off, repeat step 1above.
Setting the Child Protection Lock
You can lock your microwave oven so it can't be used by unsupervised
children.
1
Hold the "0" button and then press the 2 button..
At this point, the microwave oven cannot be used until it is
unlocked. To unlock it, repeat step 1 above.
19
Cooking Instructions
Cooking Utensils
Recommended Use
Glass and glass-ceramic bowls and dishes -- Use for heating or
cooking.
Microwavable browning dish -- Use to brown the exterior of small
items such as steaks, chops, or pancakes. Follow the directions
provided with your browning dish.
Microwavable plastic wrap-- Use to retain steam. Leave a small
opening for some steam to escape and avoid placing it directly on ®
the food.
Wax paper-- Use as a cover to prevent spattering.
Paper towels and napkins -- Use for short-term heating and
covering; they absorb excess moisture and prevent spattering. Do
not use recycled paper towels, which may contain metal and can
catch fire.
Paper plates and cups -- Use for short-term heating at low
temperatures. Do not use recycled paper, which may contain metal
and can catch fire.
Thermometers -- Use only those labeled "Microwave Safe" and
follow all directions. Check the food in several places. Conventional
thermometers may be used once the food has been removed from
the oven.
Limited Use
Aluminum foil -- Use narrow strips of foil to prevent overcooking of
exposed areas. Using too much foil can damage your oven, so be
careful.
Ceramic, porcelain, and stoneware-- Use these if they are
labeled "Microwave Safe". If they are not labeled, test them to make
sure they can be used safely. Never use dishes with metallic trim.
Plastic -- Use only if labeled "Microwave Safe". Other plastics can
melt.
Straw, wicker, and wood -- Use only for short-term heating, as
they can be flammable.
Not Recommended
Glass jars and bottles -- Regular glass is too thin to be used in a
microwave, and can shatter.
Paper bags -- These are afire hazard, except for popcorn bags that
are designed for microwave use.
Styrofoam plates and cups -- These can melt and leave an
unhealthy residue on food.
Plastic storage and food containers -- Containers such as
margarine tubs can melt in the microwave.
Metal utensils -- These can damage your oven. Remove all metal
before cooking.
Testing Utensils
If you are not sure whether a dish is microwave-safe or not, you can
perform this test:
1 Fill a 1 cup glass measuring cup with water and put it inside your
oven, next to the dish you want to test.
2 Press the One Minute + button once to heat them for one minute at
High power.
The water should be warm and the dish you are testing should be cool. If
the dish iswarm, then it is absorbing microwave energy and is not
acceptable for use in the microwave.
20
  • Page 1 1
  • Page 2 2
  • Page 3 3
  • Page 4 4
  • Page 5 5
  • Page 6 6
  • Page 7 7
  • Page 8 8
  • Page 9 9
  • Page 10 10
  • Page 11 11
  • Page 12 12
  • Page 13 13
  • Page 14 14
  • Page 15 15
  • Page 16 16
  • Page 17 17
  • Page 18 18
  • Page 19 19
  • Page 20 20
  • Page 21 21
  • Page 22 22
  • Page 23 23
  • Page 24 24
  • Page 25 25
  • Page 26 26
  • Page 27 27
  • Page 28 28
  • Page 29 29
  • Page 30 30
  • Page 31 31
  • Page 32 32
  • Page 33 33
  • Page 34 34
  • Page 35 35
  • Page 36 36

Samsung MW1150WA/XAA Owner's manual

Category
Microwaves
Type
Owner's manual

Ask a question and I''ll find the answer in the document

Finding information in a document is now easier with AI