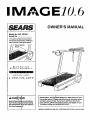
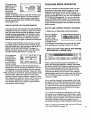
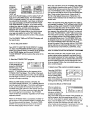
Image 831.297561 Owner's manual
- Category
- Treadmills
- Type
- Owner's manual
This manual is also suitable for

I.MAG E'I0.6
SE /ARS
Model No. 831.297561
Serial No.
The serial number can be found in
the locationshownbelow. Write the
serial number in thespace above.
Serial Number
Decal
F" x E: R C_ i S _-
EC:> u i F'M F=" NT
HELPLINE!
_:-800- 736- 6879
CA lbN -,
Read all precautions and instruc-
tions in th s manual before using
this equipment. Keep this ,lanua]
for future referen_ce...
OWNER'S MANUAL
IMPORTANT: ThiS trea.dmlUfeatures a state-of-the-art cord-
less pulse sensor. Pl_ase read this manual carefully before
using the pulse sensor. If you have questions about the
pulse sensor, please see pageso6 and 7, and pages 18 and
19, before calling our toll-free HELPLINE.
SEARS, ROEBUCK AND CO., HOFFMAN ESTATES, IL 60179 USA

TABLE OF CONTENTS
FULL ONE YEAR WARRANTY ............................................. _... : ............... 2
IMPORTANT PRECAUTIONS ........ ............................................ ............... 3
BEFORE YOU BEGIN ............ ........... .,. •_........................................... 4
ASSEMBLY ...... ......................................................................... 5
HOW TO USE THE PULSE SENSOR ........................................................... 7
OPERATION AND ADJUSTMENT ..................................................... _....... 8
MANUAL MODE OPERATION ............................................................ 10
HOW TO CONTROL THE SPEED ...................................................... 10
HOW TO CONTROL THE INCLINE ..................................................... 10
HOW TO USE THE FAT CALORIE MONITOR ............................................ 11
PROGRAM MODE OPERATION .......................................................... 11
HOW TO USE A PRESET WORKOUT PROGRAM ......................................... 11
HOW TO USE THE PULSE MODE ....................... ............................... 12
HOW TO USE THE FAT BURN AND FAT BURN PLUS PROGRAMS ............... ; .......... 14'=
HOW TO USE THE FITNESS TEST PROGRAM ........................................... 14
HOW TO CREATE CUSTOM WORKOUT PROGRAMS ......................... ............. 15
HOW TO USE A CUSTOM WORKOUT PROGRAM .................. "_.,"................... 16
TROUBLE-SHOOTING AND STORAGE ........................................................ 18
CONDITIONING GUIDELINES ....... . ........................................................ 20
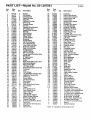
ORDERING REPLACEMENT PARTS .................................................. Back Cover
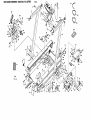
Note: There is an EXPLODED DRAWING and PART LIST attached to the center of this manual. Save the
EXPLODED DRAWING and PART LIST for future reference.
2
I FULL ONE YEAR WARRANTY I
For one (1) year from the date of purchase, if failure occurs due to defect in material or workma_3shipin
this SEARS TREADMILL EXERCISER, cor_tactthe nearest SEARS Service Center throughout the
United States and SEARS will repair or replace the TREADMILL EXERCISER, free of charge.
This warranty does not appiy when the TREADMILL EXERCISER is used commerciallyor for rental pur-
poses.
This warranty gives you specificlegal rights, and you may also have other rights which vary from state
to state,
SEARS, ROEBUCK AND CO., DEPT. 817WA, HOFFMAN ESTATES, IL 60179

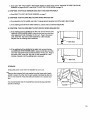
_i ;_ less in lehg.th_w
ustment :.._
BEFORE yOU BEGIN:on page 4 ifthe tread. ;_.i:.:_.;::Servicing in this i i:.:
mill ish0t Wor_<ing_rQperly, ) !;::i;:: manual sh0u d be performed by an autho-
: : " riz_d Servlce:_;ep_'esentative only.
damag,= _ orthrough the use,of this product.

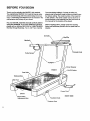
BEFORE YOU BEGIN
Thank you for selecting the IMAGE• 10.6 treadmLII.
The sophisticated IMAGE 10.6 treadmill blends state-
of-the-art technology with innovative design to let you
enjoy a motivating and effective form of exercise in the
convenience and privacy of your home.
For your benefit, read this manual carefully before
using the treadmill. If you have additional questions,
please call our toll-free HELPLINE at 1-600-736-6879,
Monday through Saturday, 7 a.m. until 7 p.m. Central
Time (excluding holidays). To help us assist you,
please note the productmodel number and sedal num-
ber before calling. The model number of the treadmill
is 831.297561. The serial number can be found on a
decal attached to the treadmill (see the front cover of
this manual for the locationof the decal).
Before reading further, please review the drawing
below and familiarize yourself with the parts that are
labeled.
Pulse Sen
Foot Rails
FRONT
Breaker
_witch
Walking Belt
Belt Tool
BACK
Rear Roller
Adjustment Bolt
Knob
inon Foot
RIGHT SIDE
4

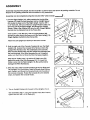
ASSEMBLY
Assembly requires two people. Set the treadmillin a cleared area and remove all packing materials. Do not
dispose of the packing materials until the treadmillis fully assembled.
Assembly can be completed using the included 7/32" allen wrench J_ .
1. Find the Right Upright (15), which contains the Upright Wire
Harness (12) (see the inset drawing). Hold an Upright Spacer
(25) inside the lower end of the Right Upright.Insert a 3/8" x
3 1/2" Bolt (27), with one of the four Upright Washers (26), into
•the lower hole in the Right Updght, and throughthe Upright
Spacer. Slide a Star Washer (49) onto the Bolt, Finger tighten
the Bolt into the indicated hole in the Frame (50).
Insert a 3/8" x.3 1/2" Bolt (27), with an UpdghtWasher (26),
through the other hole in the lower end ofthe Right Upright(15).
Finger Ughte.n the Boltinto the Frame (50)_
Attach the Left Upright (not shown) in the same manner.
, /
;- •
26 27
2. Hold the right end of the Console Crossbar (6) near the Right
Upright (15). Connect the Console Wire Harness (10) to the
Updght Wire Harness (12). The small latchon the Console
Wire Harness should snap ontothe UprightWire Harness (see
the inset drawing). Ifthe Wire Harnesses do notfit together
easily, turn them; do not force the Wire Harnesses together.
Slide the 24" Cable Loom (11) and the 6" CableLoom (30)
against the ends ofthe Wire Hamesses (10, 12). Insert the
Cable Looms into the Right Upright (15). Be careful not to
damage the Wire Harnesses.
3: Slide the ends of the Console Crossbar (6) int0the Right and
Left Uprights (15, 2) as shown. Insert a ConsoleKnob (3) into
each Upright, and thread the Console Knobs intothe ends of
the Console Crossbar. Rotate the Console (9) to the desired
angle, and tighten the Console Knobs.
3 9
3
6
12
3o
15
4. Tap an Upright Endcap (4) into each of the Uprights (15, 2).
See assembly step 1. Using the included 7/32"•allenwrench
tighten the four 3/8" x 3 1/2" Bolts (27).
4
15
5

5. Plug the-lower end ofthe Upright Wire Hamess (12) into the
20"Wire Hamess (45). The small latch on the UprightWire
Harness should snap ontothe 20" Wire Harness (see the
upper inset drawing). Ifthe Wire Harnesses do not fittogether
easily, turn them; donot force the Wire Harnesses together.
Slide the ends ofthe 6"Cable Loom(30) and the 12" Cable
Loom(36) against the ends ofthe.Wire Hamesses (12, 45) (see
the lower inset drawing). Be careful not to damage the Wire
Harnesses. +
12
6. •Pressthe Belt Tool (86) into the opening inthe Left Rear
Endcap (82). The use of the Belt Tool isexplained on page 19.
Make sure that all parts are tightened before using ihe treadmill.
The use of all remaining parts will be explained in other sections
of this manual. Note: Cover the floor under the treadmill for
protection.
6
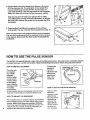
HOW TO USE THE PULSE SENSOR
The IMAGE 10.6 treadmiilfeatures a state-of-the-art cordless pulsesensor. The pulsesensor is specially designed
for greater accuracy, comfortand durability. Read the fo!lowlng Instruction s before U_ing the pulse sensor.
HOW TO INSTALL BATTERIES
The pulse sen-
sor requires
two "AAA"
batteries.
Alkaline batter-
ies are recom-
mended. Slide
off the battery
cover. Note the
markings inside
the battery
compartment
Batte_.__ ' _
-- "k_Batteries
showing which direction the batteries must be turned.
Insert two "AAA" batteries. Close the battery cover.
HOW TO ADJUST THE HEADBAND
For the pulse.sensor tofunction properly, the headband
must fit snugly around your head, withoutbeing uncom-
fortabfe. Note: Each time you exercise, the head-
band may expand slightly during the first few min-
utes of use. As a result, it may be necessary to
readjust the headband periodically.
To adjust the
headband,.
•insert the
adjustment tab
•through the
appropriate
hole in the
headband.
HOW TO PUT ON THE PULSE SENSOR
Rub your fore-
head for a
moment to stim-
ulate circula-
tion. Put on the
headband as
shown at the
right,with the
sensor window
centered on
your forehead.
-'"---- Sensor
Headband Window
/\

PROPER ORIENTATION OF THE PULSE SENSOR "
The transmitter on the pulse sensor is angled down-
ward, as shown in the drawing below. For the pulse
sensor to function propedy, the transmitter must be
pointedwithin 30 ° of the center of the console (the
shaded area of the drawing). If you turn yourhead too
far away from the console, the signal from the pulse
sensor will not be received.
Transmitter
Pulse Sensor
Center of
I
o
your fdrehead_your pulse may be detected more
easily from a slightlydifferentpositiOn. "
Avoid turningyour head more than 30"awaY from
the console, Orthe console may not pick up the sig-
nal from the pulse sensor.
5. The sensor window shouldbecleaned weekly when
thetreadmillis used regularly.Moisten a cotton swab
with water, and carefully wipe the sensor window.
6. Because your pulse constantlychanges, the pulse
• sensor will sample andaverage your pulse every
few seconds. When you firstput on the pulse sen-
sor, it maytake up to ten secondsbefore an accu-
rate pulse is shown.
7. If the pulse sensor does notfunction properly, check
• the battedes (see HOW TO INSTALL BATTERIES
on page 6).
GUIDELINES FOR OBTAINING ACCURATE PULSE
READINGS
The instructionson page lO explain how the pulse sen-
sor is used with the console (see HOWTO USE THE
PULSE DISPLAY), For the best rasul!s, remember the
following important guidelines:
1. Before puttingon the headband, rubyourforehead
for a moment to stimulate circulation.
2. Make sure that the headbanclfitssnuglyaround your
head, without being uncomfortable. Ifthe headband
is too loose or too tight, your pulse may not be
detected..
3. The headband must be worn with the sensorwin-
dow centered on your forehead (see HOW TO PUT
ON THE PULSE SENSOR on page 6). The small
button next to the sensor window must be
depressed. Make sure that there is no hair in front of
the pulse sensor or between the sensor window and
your forehead. Make-up applied to the forehead
may also interfere with pulse readings.
Note: If the.pulse sensor does not detect your pulse
when the se0sor window is centered on your fore-
head, try positioning the .sensor window above your
dght or=lefteyebrow. Depending on the shape of
HOW TO CLEAN THE PULSE SENSOR AND
HEADBAND
To clean the pulse sensor, first remove the headband.
• Wipe the pulse sensor clean with a damp cloth; never
immerse the pulse sensor in water.
To clean the headband, hand wash it in mild detergent
•and gently wdng it out.

OPERATION AND ADJUSTMENT
8
"THE PERFORMANT LUBE TM WALKING BELT
The treadmill features a low maintenance walking belt.
Never apply silicone spray or other substances to
the walking belt or the walking platform; such sub-
stances will deteriorate the walking bell
HOW TO PLUG IN THE POWER CORD
This product must be groundedl Ifit shouldmalfunc-
tion or break down, grounding providesa path ofleast
resistance for electdc current to reduce the riskof
electricshock. This product isequipped with a cord
havingan equipment-grounding conductorand a "
grounding plug. Plug the power.cord into an appro-
priate outlet that Is properly Installed and ground-
ed In accordance withall local codes and 0rdi-
nances.This product is for use on a nominal 120-volt
cii'cuit,and has a grounding plug that looks like the
plug illustrated in drawing 1 below.
.Grounded Outlet Box •
Plug
Grounding Pin
Grounded Outlet
jGrounded Outlet Box
_,_apter
.n_._ IGrounding P'ug
A temporary adapter that lookslike the adapter illus-
trated in drawing 2 may be used to connect this plug
to a 2-pole receptacle as shown in drawing 2 ifa
propedy grounded outlet is not available. The tempo-
rary adapter should be used only until a propedy
grounded outlet (drawing 1) can be installed by a
qualified electrician. The green-colored rigidear, lug,
or the like extending from the adapter must be con-
nected to a permanent ground such as a propedy
grounded outlet box cover. Whenever the adapter is
Used it must be held in place by a metal screw.
Some 2-pole receptacle outlet box covers are not
grounded. Contact a qualified electrician to deter-
mine If the outlet box cover Is grounded before
using an adapter.
HOW TO ADJUST THE CUSHION LEVEL
• The rear legs of the treadmill are designed to cushion
the impact as you walk or run on the treadmill. The
legs can be adjusted for a firmer or softer cushion
level usingthe knob on the right side of the treadmill
(see the drawing below);
For a firmer cushion level, turn the knob clockwise; for
a softer cushion level, turn the knob counterclockwise.
• - Note: The faster you run on the treadmill, the firmer
the cushion level should be. Ifthe cushion level is too
soft, the treadmill will bounce excessively.
HOW TO ADJUST THE ANGLE OF THE CONSOLE
In order for the console to receive signals from the
pulse sensor, the console must be angled toward the
purse sensor. Loosen the knobs on the ends of the
console crossbar, rotate the console to the proper
angle, and retighten the knobs.

DIAGRAM OF THE CONSOLE
Fat (
Key
THEFEATURESOFTHECONSOLE
The treadmillconsole offers an impressive array of
features to make your workouts more effective and
enjoyable, in the manual mode, the speed and incline
of the treadmill can be changed with a touch of a but-
ton. As you exercise, six displays will provide continu-
ous exercise feedback. Ifyour goal is to burn fat, the
buiit-in Fat Calode Monitor willshow you when your
exercise intensity istoo low,too high, or perfect for
burning fat. In the program mode, the console offers
six preset workout programs and two special fat bum-
ing programs, each designed to guide you througha
different type ofworkout. In addition, there is a unique
FITNESS TEST programthat measures your relative
fitness level. You can even create your own workout
programs, and save them in the console's memory.
• Carefully read these Instructions before operating
the console. Note: Ifthere is a thinsheet of clear plas-
,,.tic on the face ofthe console,peel itoff.
HOW TO TuRN ON THE POWER
If the key isin the con-
sole, remove it. Make
sure that the on/off
switch located near
the power cord is in
the "on" position,
"On"
Position
Plug in the power cord (see HOW TO PLUG IN THE
POWER CORD on page 8). All displays and indica-
tors will flash thi'ee times. Note: If the key is in the
console when the power cord is plugged in, the letters
"PO _will flash in the SPEED display. If this occurs,
remove the key.
Stand on the foot rails of the treadmill. Find the clip
attached to the key, and slide the clip onto the waist-
band of your clothing. Always stand on the foot rails
Infrared Window
when turning on the power or starting the walking
belt. Always wear the clip while exercising.
Insert the key intothe console. The NO PULSE
DETECTED indicator,the MANUAL CONTROL indica-
tor, the TIME indicator,and the six displayswill light.
The PULSE displaywillflash the letters"AGE" three
•times, and the CALORIES display willflash the lettP,_.
"LbS" (pounds) three times. __:i
HOW TO ENTER YOUR AGE AND WEIGHT ".
For some of the console'•sfeatures to functionproper-
ly, your age and weight must be entered intothe con-
sole. Ifyou have not entered your age and weight, fol-
low the instructionsbelow.
Press one of-I__l
the AGE SET o
buttons. The
letters ".AGE"
will flash in the'
PULSE dis-
play. Press the AGE SET buttons again to enter your
age. The firsttime one of the buttons is pressed, the
current age setting willbe shown. The age settingwill
then change by 1 year each time one ofthe buttons is
pressed. Ifone of the buttons is held down, the age
setting will change in increments of 5 years.
After you have enteredyourage, press theWEIGHT SET
buttons to enter your weight. The first time one of the
buttons is pressed, the current weight.setting will be
shown in the CALORIES displ._y. The weight setting
Will then change by 1 pound each time one of the but-
tons is pi'essed. If one of the buttons is held down, the
weight setting will change in increments of 5 pounds.
Once you have entered your age and Weight, they will
be saved in the console's memory, even if the power
cord is unplugged. 9

10
MANUAL MODE OPERATION
HOW TO CONTROL THE SPEED
When the power is turned on, the console will be in
the manual mode. For your safety, the walking belt will
be stationary.
The speed range
ofthe treadmill is
0.5 to 10 miles
per hour. The
speed is con-
trolledwith the
INCREASE
SPEED and DECREASE SPEED buttons..Each time
one of the buttons is pressed, the speed will change
by 0.1 mph. The buttons can be held down to change
the speed rapidly.
Press the INCREASE SPEED button until the walking
belt is moving at slow speed. Hold the handrails and
step carefully onto the walking belt. Change the speed •
of the walking belt as desired by pressing the
INCREASE SPEED and DECREASE SPEED buttons,
To stop the walking belt, press the STOP button.
HOW TO coNTROL THE INCLINE
The incline range
of thetreadmill is
1% to12%. The
inclineis con-
trolledwith the
INCREASE
INCLINE and
DECREASE INCLINE buttons. Each time one ofthe
buttons is pressed, the incline will change by 0.5%. The
buttons can be held down to change the incline rapidly,
Note: After the INCLINE buttons are pressed, it will
take a few seconds for the treadmill to reach the
selected incline setting. Because the INCLINE display
has two digits, the display will show 10% When the
incline is set at either 10% or 10.5%, and 11% when
the incline i.sset at either 11% or 11.5%.
HOW TO USE THE PULSE D SPLAY
Put on the pulse sensor (see HOW TO USE THE
PULSE SENSOR on page 7). After a few seconds, the
heart-shaped indicator beside the PULSE display will
flash each time your heart beats, the NO PULSE
DETECTED indicator will darken, and your pulse will
be shown. Note: Because your pulse constantly
changes, the pulse sensor will sample and average
your pulse every few seconds. It may take up to ten
seconds before an accurate pulse is shown. If your
pulseis not shown, see HOW TO OBTAIN ACCU-
RATE PULSE READINGS on page 7.
How TO USE THE CALORIES DISPLAY
For the CALORIES display to be accurate, your age .
and weight must be entered intothe console. If you
have not entered your age and weight, see HOW TO
ENTER YOURAGE AND WEIGHT on page 9. The
CALORIES display will show the approximate number
ofcalories you have burned.
To find the•number
of fat calories you •
have burned (see
BURNING FAT on
page 20), press
the FAT button
besidethe CALO-.
RIES display. The approximate number offat calodes
you haveburnedwillbe shownfor three seconds.
HOW'TO USE THE TIME DISPLAY
TheTIME display will show how long the walking belt
has been moving.
• If desired, a time
goal can be set.
First,stop the walk-
ingbelt. Press the
TIME SET buttons
to set the length of
time that you plan
to exercise. Each time one of the buttons is pressed,
the time goal will change by 10 seconds. If one of the
buttons is held down, the time goal will change in
increments of 1 minute. As you exercise, the time will
be counted down. When no time remains, the walking
belt will slow to a stop. Note: The purpose of the SEG-
MENT TIME button will be explained later. If the
FtTNESS TEST program isselected, the TtME display
willbe reset to zero. The display will be reset again
when the prog_'amis completed.
HOW TO USE THE DISTANCE DISPLAY
The DISTANCE display willshow the distance that
you have walked or run, in miles. Note: If the
FITNESS TEST program is selected, the DISTANCE
display will be reset to zero. The display will TSereset
again when the program is completed.

ec--e"k I
keepstrack of the C.ST*,,,CE &
total numberof _ FI 0 I-I
milesaccumulat- L..,/O. ".%_
ed sincethe
tre_.dmillwas pur-
chased.To findthis number, press the TOTAL button
besidethe DISTANCE display. The total number of
miles willbe shown for throe seconds. Note: When
the total exceeds 999 miles, the DISTANCE display
will bereset to zero.
HOWTO USE THE FAT CALORIE MONITOR
Ifyou want to burn fat, the built-in Fat Calorie Monitor
isdesignedto help you reach your goal. As you exer-
cise, yourbody can bum either fat calories or carbo-
hydratecalories, depending on the intensity ofyour
exeL;cise(see BURNING FAT on page 20). The Fat
Calorie Monitor will show you when your exercise
intensityis too low, too high, or perfect for burningfatl
For theFat Calorie Monitor to be accurate, yourage
and weightmust be entered intothe console. If you
have not entered your age and weight, seeHOW TQ
ENTER YOUR AGE AND WEIGHT on page 9. !n
addition,the pulse sensor mustbe worn (see HOW
TO USE THE PULSE DISPLAY on page 10).
As you exercise,
one ofthe five
indicatorsabove
the CUSTOM 1
and CUSTOM 2
buttons willlight.
The two _redindicators on the left indicate that your
intensityis too low for burning fat effectively. The two
red indicators on the right indicate that your intensity
is too high for burning fat effectively. When your inten-
""sity is perfect for burning fat, the green indicator in.the
center will.light.Adjust the speed or incline of the
treadmill so that the green indicator remains lit. Note:
After adjusting the speed or incline, wait for about one
minute before adjusting the speed or incline again.
This will allow time for your pulse to respond to the
new speed or incline setting.
PROGRAM MODE OPERATION
When the console is in the program mode, you can
choose any of six preset workout programs, each
designed to guide you through a different type of
workout. If your goal isto burn fat, two additionalpro-
grams are included just for you--the FAT BURN and
FAT BURN PLUS programs. Or, you can select the
unique FITNESS TEST program, and measure your
relative fitness level. You can even create your own
custom workout programs, and save them in the con-
sows memory.
HOW TO USE A PRESET WORKOUT PROGRAM
1. Select one of the preset workout programs
Press the INTER-
VAL, PLATEAU,
VALLEY, RAN-
DOM, MOUNTAIN,
or RAMP button.
I.......!
The indicator on the button you press will light. Note:
If the walking belt is moving, itwill slow to a stop.
2. Select one of the modes (WALK, RUN, INCUNE,
. WALK/INCLINE, or RUN_NCLINE) :_
!-
_ _ _w*_ __l's is OOOOOOOOOOOOOOOOOOOO _ 2
When a preset workout program isselected, the
WALK and INCLINE indicatorswill light.When both
the wALK and INCLINE modes are selected, the con-
sole will automatically control boththe speed and
inc/ine of the treadmill during the program, and the
speed range will be T.5 to 4.5 mph. Ifyou want the
speed.range to be 3.5 to 8.5 mpH, press the RUN but-
ton. The WALK indicatorwill darken, and the RUN
indicator will light.
If you want the console to automatically control only
the speed of the treadmill during the program, press
the INCLINE button. The INCLINE indicator willdark-
en. (The incline can then be controlled manually dur-
ing the program with the INCREASE INCLINE and
DECREASE INCLINE buttons).
If you want the console to automatically contro!only
theincline of the treadmill during the program, press
the WALK, RUN, and INCLINE buttons until only the
INCLINE indicatol" is.lighted. (The speed can theri be
controlled manually during the program with the
•INCREASE ,._PEED and DECREASE SPEEI3 buttons).
Note: To select the PULSE mode, see HOW TO USE
THE PULSE MODE on page 12.
11

12
3. The program settings
Each program is divided intotwenty equal time peri-
ods, called segments. One speed settingand/or one
incline setting (depending on which models] you
selected)are programmed for each segment. The
speed and/or incline settings of the program you have
selected are shown in the columns of indicatorsin the
center of the console. The setting(s) of the firstseg-
ment are shown in the far left column, and the set- :
ting(s) of the twentieth segment are shown in the far
right column.
s_
IO
D
i'-I
Ifyou selected the WALK or RUN mode, red indicators
will show the speed setting of each segment. Ifyou
selected the INCLINE mode, green indicatorswill show
the incline setting of each segment. Ifyou selected the
WALK and INCLINEmodes or the RUN and INCLINE
modes, both red and green indicators willbe lit.
4. Adjust the difficulty level of the program
If desired, the difficulty level of the program can be
adjusted with the FITNESS LEVEL buttons (see the
drawing above). Each time the FITNESS LEVEL
increase button is pressed, the speed and/or incline
settings of all segments will increase. Each time the
FITNESS LEVEL decrease button is pressed, the
speed and/or incline settings of all segments will
decrease. Note: The difficulty.level of the program can
be increased only until the highest indicator in any of
the columns islit, and decreased only untilthe lowest
indicator in any of the columns is lit.
5. Set the program time
The program is set
to last for 20 min-
utes, as shown in
the TIME display.
The length of time
can be changed, if
desired, with the
m TfME
h-,-l.l-l,-ll
tI-H-I.I-Jri /
TIME SET buttons_ Each time one ofthe buttons is
pressed, the length of time willchange by 20 seconds•
If one of the buttons is heid down, the length of time
will change in increments of 1 minute. The program
can be set to last for a minimum of 5 minutes, up to a
maximum of 80 minutes. (If the SEGMENT TIME but-
ton is preSsed,the TIMI= Oisplaywill sllow Ilow many
seconds each of the _venty segments willlast.)
6, Start theprogram
Stand on the foot rails _ (- "_- ) I-_
of the treadmill and
press the PROGRAM ( ,,_o,_,=,_ )
START button. The first
column of indicators will
begin toflash, and the treadmill will automatically
adjust tothe speed and/or inclinesetting(s) of the first
segment. Carefully step onto the walking belt and
begin exercising. Note: If you selected the INCLINE
mode, the walking belt willbegin to move at 1.0 mph.
The speed can then be controlled during the program
with the INCREASE SPEED and DECREASE SPEED
buttons. If you selected the WALK or RUN mode, the
incline can be con'trolledwith the INCREASE
INCLINE and DECREASE INCLINE buttons.
The time remaining in the program willbe shownin the
TIME display. (If the SEGMENT TIME button is
pressed, the number of seconds remaining ir_the first
segment willbe shown). During the last three seconds
ofthe first segment, tl)e TIME display wiXflash three
times. When the firstsegment is completed, the second
column of indicatorswill begin to flash, and the tread-
millwill automaticallyadjust to the speed and/or incline
setting(s)of the second segment. The program will
continue until the twentieth column is flashing and no
time remains. The walking belt willthen slow to a stop.
Note: During the program, the difficultylevel ofthe
program can be adjusted with the FITNESS LEVEL
buttons. The length Oftime that the program will last
can be changed with the TIME SET buttons. The pro-
gram can be stopped at any time with the STOP but-
ton. The console will then be in the same state as if
the program had been completed.
HOW TO USE THE PULSE MODE
mediCbt]on V
1. Select the PLATEAU program
Press-the PLATEAU ----.---_ _'_ '-_._'_
button. The indicator
on the button will
light. Note: If the
walking belt is mov-
ing, it will slow to a stop.

2. Select the PULSE mode
Ioo •°°°°0°°°°°°°°°°°°°°o o
Press the PULSE button.The PULSE indicatorwill
light,and the WALK, RUN and INCLINE indicators will
darken.
When the
PULSE mode
isselected,
the letters
"AGE" will
flash in the
l(V-= (Z
PULSE display, and the letters"LbS" will flash in the
CALORIES display. If you have not entere d your age
and weight intothe console; see HOW TO ENTER
YOUR AGE AND WEIGHT on page 9. If you have
already enterbd your age and weight, simply press
one ofthe AGE SET buttons,and then press one of
the WEIGHT SET buttons.
3. Put on the.pulse sensor
See How TO USE THE PULSE DISPLAY on page 10.
only untilthe lowest indicatorin one of the columns is
lit. In addition,there may be a limitto how far the diffi-
culty level can be adjusteddepending on your age.
6. Set the program time
The pmgmm is
set to last for 20
minutes, as shown
in the TIME dis-
play.•The program
can be set to last
for different length
of time, if desired, withthe TIME SET buttons. Each
time one of the buttons is pressed, the lengthof time
will change by 20 seconds. If one of the buttons is
held down, the length of time wilt change in incre-
ments of I minute. The program can be set to last for
a minimum of 20 minutes, up to a maximum of 80
minutes. (If the SEGMENT TIME button is pressed,
the TIME display willshow how many seconds each
of the twenty segments willlast.)
7. Start the program
4. 1:heprogram settings
Each program is divided intotwenty equal time peri-
ods, called segments. One pulsesetting is pro-
grammed for each segment.The pulse settings of the
program you have selected are shown in the columns
of indicators in thecenter of the console. Red indica-
tors willshow the pulse settingof each segment.
$
;=1 ]
o
0(6=
E
5. Adjust the difficulty level of the program
If desired, the difficulty level ofthe program can be
adjusted with the FITNESS LEVEL buttons (see the
drawing above). Each time the FITNESS LEVEL
increase button is pressed, the pulse settings of all •
segments will increase. Each time the FITNESS
LEVEL decrease button is pressed, the pulse settings
of all segments will decrease. Note: The difficulty level
of the program can be increased only until the highest
indicator in one of the columns is lit,and decreased
( .=
of the treadmilland
press the PROGRAM _ "="_=_, )
START button. The first
column of indicators will
begin to flash. When the walking belt begins to move,
carefully step onto the walking belt and begin exercis-
ing. The consolewUl automaticallychange the speed
and/or inclineof the treadmillat any time to keep your
pulse near the settingofthe first segment. The SPEED
or INCLINE display willflash three times to warnyou
each timethe speed or inclineis about tochange.
The time remaining in the program will be shown in
the TIME display. (If the SEGMENT TIME button is
pressed, the number ofseconds remaining in the cur-
rent segment will be shown). During the last three
seconds of the first segment, the TIME display will
flash three times. When thefirst segment is completed,
the second column of indicatorswill begin toflash. The
console willthen change the speed and/or inclineof
the treadmill at any time tokeep your pulse near the
setting of the second segment, The program will con-
tinue until the twentieth column is flashing, and no
time remains. Thewalking belt.will then slow toa stop.
Note: During the program, the difficulty level of the
program can be adjusted with the FITNESS LEVEL
buttons. The speed of the treadmill can be changed
with the INCREASE SPEED and DECREASE SPEED
buttons. The incline ofthe treadmill can be changed
13

with the INCREASE INCLINE and DECREASE
INCLINE Ioutto_s. However, if you increase the speed,
the incline will automatically decrease; ff you decrease
the speed, the incline will automatically increase. The
console will always attempt to keep your pulse near
the setting of the current segment. If your pulse is not
detected for one minute, the speed of the treadmill will
automatically decrease by half. If your pulse is not
detected for a second minute, the speed will decrease
by half again. If your pulse is not detected for three
minutes, the walking belt will slow to a stop. The pro-
gram can be stopped at any time with the STOP but-
ton. The console will then be in the same state as if
the program had been completed.
HOW TO USE THE FAT BURN AND FAT BURN
PLUS PROGRAMS
.1. Select the FAT BURN or FATBURN PLUS program
Press the FAT BURN _ I
or FAT BuRN PLUS
button. The indicator
on the button you press
will light. Note: If the
walking belt is moving, it will slow to a stop.
When the
FAT BURN
or FAT
BURN PLUS
button is
pressed, the
letters "AGE" will flash in the PULSE display, and the
letters =LbS" will flash in the CALORIES display. If you
have not entered your age and weight into the console,
see HOW TO ENTER YOUR AGE AND WEIGHT on
page 9. If you have already entered your age and
weight, simply press one of the AGE SET buttons,
and then press one of the WEIGHT SET buttons.
When the FAT BURN or FAT BURN PLUS program is
selected, the WALK and INCLINE indicators will light.
During these programs, the console will automatically
control the speed and incline of the treadmill, and the
speed range will be 1.5 to 4.5 mph. The RUN and
PULSE modes cannot be selected.
Each program is divided intotwenty equal time peri-
ods, called segments. One speed setting and one
incline setting are programmed for each segment.
The speedand incline sattiogs of the program you
have selected are shown in the columns of indicators
in the center of the console. Red indicators will show
the speed setting of each segment, and green indica-
tors will show the incline setting of each segment. The
speed and incline settings are Optimal for maximum •
fat burning. The difficulty level of the program canrfot
be changed with the FITNESS LEVEL buttons.
The FAT BURN program is set to last for 40 minutes,
as shown in the TIME display. (If the SEGMENT TIME •
button is pressed, the TIME display willshow that
each segment is set to last for 120 seconds.) The FAT
BURN PLUS program is set to last for 60 minutes.
(Each segment is set to last for 180 seconds.) The
time settings of these programs cannot be changed.
2. Start the program
Stand on the foot rails _ ,...... A...... J
of the treadmill and _3) (, "" ,]
press the PROGRAM ( ,'_,.,==,,.. )
START button. The
first column of indica-
tors will begin to flash, and the treadmill will automati-
cally adjust to the speed and inclinesettings of the
first segment. Carefully step onto the walking belt and
begin exercising.
The time remaining in the programwill be shown in
the TIME display. (If the SEGMENT TIME button is
pressed, the number of seconds remaining in the first
segment will be shown). During the last three seconds
of the first segment, the TIME display will flash three
times. When the first_segment is completed, the sec-_
ond column of indicators willbegin to flash, and the
treadmillwill automatically adjust tothe speed and
incline settings of the second segment. The program
willcontinue in this manner untilthe twentieth column
isflashing and no time remains. The walking belt will
then slow to a stop.
Note: The program'can be stopped at any time with
the STOP button. The console willthen be in the
same state as if the program had been compieted.
HOW TO USE THE FITNESS TEST PROGRAM
The FITNESS TEST program isdesigned to measure
your relative fitness level. For the best results, take
the FITNESS TEST at a time when your energy level
is high. The FITNESS TEST should not be taken after
you have already exercised during the day.
The FITNESS TEST consists of seven 3-minute seg-
ments, and is followed by a 1-minute cool-down peri-
od. The console will automatically control the speed
and incline of the treadmill during the FITNESS
TEST. The speed and incline settings cannot be
adjusted•
1. Select the FITNESS TEST program
Press the FITNESS I
TEST button. The indi-
cator on the button will
I_ght.Note: If the walk-
ing belt is moving, it will slow to a stop.

Whenthe
FITNESS
TEST button
is pressed,
the letters
"AGE" will
O PULSE _) S
tqm_ bC_,d ,c1_o_
flash in the PULSE display, and the letters =LbS"will
flash in the CALORIES display. For the FITNESS
TEST tooperate properly,your age and weightmust
be entered into the console. Ifyou have not entered
your age and weight, see HOW TO ENTER YOUR
AGE AND WEIGHT on page 9. If you have already
entered yourage and weight, simply press one of the
AGE SET buttons, and then press one of the
WEIGHT SE-[ buttons.Note: Ifthe PROGRAM
START button is pressed before you have entered
your age and weight, the words "SET AGE AND
WEIGHT" will move across the center of the console.
The CALORIES, TIME and DISTANCE displayswill
be reset to zero.
2. Put on the pulse sensor
See HOW TO USE THE PULSE DISPLAY on page
10. Note: If the PROGRA M START button ispressed
before your pulse is shown,the letters "PLS" willflash
in the PULSE display, and the words"ADJUST
PULSE SENSOR" willmove across the center ofthe
console,
3. Start the FITNESS TEST program
Stand°nthef°°traiis _ _v _ _ _
of the treadmill and
press the PROGRAM (_ _
START button.The
CALORIES display will
,,show "L 1," indicating thatthe first segment ofthe
FITNESS TEST has begun..The incline of the tread-
millwill automatically adjust to 2.0%, and thewalking
belt will begin to move at 1.5 mph. Step ontothe walk-
ing belt and begin exercising.
When the TIME display reaches 3 minutes, the
CALORIES display will show "L 2," indicating thatthe
second segment has begun. The incline willincrease
to 3%, and the speed will increase to 2.0 mph. The
FITNESS TEST will continue in this manner until your
pulse reaches 70% of your maximum heart rate, and
the current segment is completed. The FITNESS
TEST will then be completed, regardless of how many
segments remain.
When the FITNESS TEST iscompleted, the'letter"C"
will be shown in the CAEORIES display, indicating that
the cool-down period has begur_. The words "COOL
DOWN" will move across the center of the console,
and the TIME display will count down 1 minute.
When the cool-down period is completed, the walking
belt will slow toa stop and the words =FITNESS TEST
COMPLETE" willmove across the center of the con-
sole. The FITNESS LEVEL indicator willlight, and
yourfitness level willbe Shown in the CALORIES dis-
play. There are ten fitness levels--fitness level 10
(FL10) isthe highestfitness level. Remember, the
Fitness Test is intended only to indicate your relative
fitness level.
Note: If at any time during the program your pulse is
not detected, the letters "PLS" willflash in the PULSE
display, and the words "ADJUST PULSE SENSOR"
will move across the center of the consoie. If your
pulse is not detected during the last thirty seconds of
any segment, the walking belt will slowto a stop and
the words "PULSE SIGNAL LOST" willmove across
the center of the console. The FITNESS LEVEL indi-
cator willlight, and the CALORIES display will show
an estimated fitness level. The FITNESS TEST can
be stopped at any time by pressing the STOP button.
The words "FITNESS TEST HALTED" will move
across the center of the console, and the CALORIES
display will show an estimated fitness level. The con-
sole will then be in the MANUAL CONTROL mode.
HOW TO CREATE CUSTOM WORKOUT PROGRAMS
When the console is in the program mode, you can
create custom workout programs, and save them in
the console's memory for future workouts.Two differ-
ent custom programs can be saved at the same time,
and the custom programs can be changed as many
times as desired. Follow the instructionsbelow to cre*
ate a custom program.
1. Select one of the custom workout programs
Press the CUSTOM1 _ - " "_ .... n
or CUSTOM 2 button. _
(One custom program
can be created using
each button.) The indi-
cator on the button you press will light. Note: If the
walking belt is moving, it will slow to a stop,
2. Select the WALK or RUN mode
When a custom pro- !
gram is selected, the '
WALK and INCLINE
indicatorswill light. The
console .will automati- •
cally control the speed and incline of the treadmill dur-
ing the program, and the speed range wi!l be 1.5 to
4.5 mph. If you want the speed range to be 3.5 to 8.5
mph, press the RUN button. The WALK indicator will
darken, and the RUN indicator.will light. Note: No
other modes can be selected. If you press the PULSE
button, the PLATEAU program will be selected•
15

3. Press the LEARN button
When the learn button
is pressed, the indica-
tor on the CUSTOM 1
or CUSTOM 2 button
will begin to flash.
4. Set the program time
The first column of indicatorswill be flashing. Program
the desired speed settingfor the first segment with the
INCREASE SPEED and DECREASE SPEED buttons.
(Note: If you selected the WALK mode, the speed set-
ling will change in increments of 0.3 mph; if you
selected the RUN mode, the speed setting will change
in increments of 0.5 mph.) Select the desired incline
setting for the first segment with the INCREASE
INCLINE and DECREASE INCLINE buttons.
16
Press the TIME
SET buttons to
set the length of
time that you want
the program to
last. Each time
one of the buttons
Irtcl.e r'_l
lm .cJci
(o -,Xo,-,-,-,)
is pressed, the length of time shown in the TIME dis-
play will change by 20 seconds. If one ofthe buttorts
is held_lown, the length of time will change in incre-
ments of I minute. The program can be set to lastfor
a minimum of 5 minutes, up to a maximum of 80 min-
utes. (If the SEGMENT TIME button is pressed, the
TIME display will show how many seconds each of
the twenty segments will last.)
5. Start the program
Stand on the foot rails _ (- "_-. i
of the treadmill and
press the •PROGRAM / ( ,,=,,,,st,,_)
START button. When
the walking belt begins
to move, carefully step onto the walking belt and
begin exercising.
%
6. Program speed and incline settings
Each program is divided into twenty equal time peri-
ods, called segments.•One speed setting and one
incline setting can be programmed for each segment.
The speed and incline settings will be shown inthe
columns of indicators in the center of the console.
L
II
.._<-
[
o
oC
The settings of the first segment willbe shownin thefar
leftcolumn,and the settingsofthe twentiethsegmentwill
be shown inthe fa_right column. Red indicators will
show the speed settingofeach segment, and green
indicators will show the incline setting of each segment.
The time remaining in the program will be shown in the
TIME.display. (If the SEGMENT TIME button is
pressed, the number of seconds remaining in the first
segment will be shown). During the last three seconds
ofthe first Segment, the TIME display will flash three
times. When the first segment iscompleted, the current
speed and incline settingswillbe saved in memory.
When _hefirstsegment is completed, the second col-
umn of indicators will begin toflash. Program a speed
setting and an incline settingfor the second segment
as described above. When the second segment is
completed, the current speed and incline settingswill
be saved in memory. The program will continuein this
manner untilthe twentieth segment is flashing and no
time remains. The walking belt will then slow to a stop.
After the program is completed, one speed setting
and one incline setting will be programmed for each of
the twenty segments. The speed and inclinesettings
willbe saved in the console's memory. To use the pro-
gram for future workouts, follow the instructionsbelow.
HOW TO USE A cuSToM WORKOUT PROGRAM
1. Select one of the custom workout programs
Press theCUSTOM 1 t - " _"_ .....
or CUSTOM 2 button. [_ ,.,_._,.,,..__..
The indicator on the
button you press will
light. Note: If the walk-
ing belt is moving, it will slow to a stop.
2. Select the WALK or RUN mode
O_lS_s 00000000000000000000 0_ 2
When a custom program is selected, the WALK and
INCLINE indicators will light.The console willauto-
matically.control the speed and'incline of.the treadmill
dudng the progrem_ and the speed range will be 1.5to
4.5 mph. If you want the speed range to be 3.5 to 8.5
mPh, press the RUN buttom.The WALK indicstoi" will.
darken, and the RUN indicator will light. Note: No
other modes can be selected. If you press the PULSE
button, the PLA TEAU program will be selected.

3. The program settings
The speed and inclinesettingsof the programyou
have selected willbe shown in the columns ofindica-
tors inthe center of the console. Red indicators will
show the speed setting of each segment, and green
indicatorswill show the inclinesetting ofeach segmenL
L
O O O
4. Adjust the difficulty level •of the program
If desired, the difficultylevel of the program can be
adjusted with the FITNESS LEVEL buttons (see the
drawingabove). Each time the FITNESS LEVEL
increase button is pressed, the speed and inclineset-
tingsof a_lsegments willincrease. Each time the FIT-
NESS LEVEL decrease button is pressed, the speed
and incline settings of all segments will decrease..
Note: The difficulty level ofthe program can be
increased only until the highest indicator in one of the
columns islit, and decreased only untilthe lowest indi-
cator in one of the columns is lit.
The time remaininginthe program will be shown in the
TIME display.:(!fthe SEGMENT TIME button is pressed,
the number of seconds remaining in the first segment
will be shown). Dudng the last three seconds of the first
segment, the.TIME display will flash three times. When
the first segment is completed,the second columnof
indicators will begin to flash, and the treadmill will auto-
matically adjust to the.speed and inclir3e"._ettihgsof the
second segment. The program willcontinue inthis man-
ner until the twentieth column is flashing and no time
remains. The walPJngbelt willthenslow toa stop.
Note: Dudng the program, the difficultylevel of the pro-
gram can be adjusted Withthe FITNESS LEVEL but-
tons. The length of time that the program willlast can
be changed Withthe TIME SET buttons. The program
can be stopped at any time with the STOP button. The
console will then be in the same state as if the pro-
gram had been completed:
Note: Although the difficultylevel ofthe programcan be
adjusted, only the odginal speed and inclinesettings
will be saved in memory. If you desire tochange the
originalspeed and inclinesettings_see HOW TO CRE-
ATE CUSTOM WORKOUT PROGRAMS on page 15.
HOW TO TURN OFF THE pOWER
To turn off the Power, remove the key from the con-
sole. Store the key in a secure location. In addition,
move the on/off switchtothe =off"position.(See the
drawing near the bottomof page 9,)
5. Adjust the program time
The length of time
the program will
lastcan be adjust-
ed, if desired, with
,,,,theTIME SET but-
tons. Each time
one of the buttons
" "tw,E
ct/-i. _-TSfd
is pressed, the length of time willchange by 20 sec-
onds. If one of the buttons is held down, the lengthof.
time willchange in increments of 1 minute. The pro-
gram can be set to last for a minimum of 5 minutes,up
to a maximum of 80 minutes. (If the SEGMENT TIME
button is pressed, the TiME display will show how
many seconds each of the twenty segments will last,)•
6. Start the program
Stand on the foot •rails . _ ,L. .,v
Qfthe treadmill and [::3) (- =" _ Io1
-press thePROGRAM L C_ _ )
•START button. The first
column of indicators will
•begin to flash, and the treadmill will automaticallyadjust
to the speed and incline settings of thefirst segment.
Step onto the walking belt and begin exercising.
HOW TO SELECT THE INFORMATION MODE
The console features an information mode that keeps
track of trip time and distance, as well as the total time
and distance accumulated.
To selectthe information mode, hold down the STOP
button while inserting the key into the console.The
indicator On the SEGMENT TIME button willlight, and
the trip time and distance will be shown in the TIME
and DISTANCE displays. (Note: If the distance
exceeds 999 miles, the thousands digits will be shown
in the SPEED display.) If desired, the trip time and dis-
tance can be reset to zero by pressing the TIME SET
decrease button.
To view the total time and distance, press the TIME
button. The total time and distance will then be shown.
The total time and distance cannot be reset.
Note: The PULSE display will show the letter "l," indi-
cating that the console is set for an infrared (cordless)
pulse sensor. Do n<_tpress the AGE SET decrease
button, or the setting will change to the letter "C,"
• for a corded pulse sensor. The setting can be
changed back by pressing the button again.
To exit the information mode, remove the key.
17

TROUBLE-SHOOTING AND STORAGE
18
Most treadmill problems can be solved by following the simple steps below. Find the symptom that
applies, and follow the steps listed. If further assistance is needed, call our toll-free HELPLINE at 1-800-
736-6879, Monday through Saturday, 7 a.m. until 7 p.m. Central Time (excluding holidays).
1. SYMPTOM: THE POWER DOES NOT TURN ON
a. Make sure that the power cord is plugged intoa properlygrounded outlet. (See HOW TO PLUG IN THE
POWER CORD on page 8.) If an extension cord isneeded, use onlya 14-gauge general-purpose cord of
five feet or less in length.
b. After the power cord has been plugged in, make sure that the key is fullyinserted into the console. Various
indicators on the console should light. (See HOW TO TURN ON THE POWER onpage 9.)
c. Check the circuit breaker located on the treadmill near the
power cord. If the switch protrudes as shown, the circuitbreak-
er has tripped. To reset the circuit breaker, wait for five min-
utes and then press the switch back in.
d. Check the on/off switch located at the front of the treadmill
near the power cord. The switch must be in the "on" position.
"On"
Position
2. SYMPTOM: THE POWER TURNS OFF DURING USE
a. Check the circuit breaker located on the treadmill near thepower cord. If the circuit breaker has tripped (see
the drawing above), wait for five minutes and then press the switch back in.
b. Make sure that the power cord is plugged in.
c. Remove the key from the console. Reinsert the key fully into the console. Various indicators on the console
should light.
d. Check to make sure the on/off switch is in the "on" position. (See 1. d. above.)
e. If the treadmill still will not run, please call our toll-free HELPLINE.
3. SYMPTOM: AN ERRORCODE ("El," "E2," "E3," "E4," OR "ES") APPEARS ON THE CONSOLE
a. If error code "El" appears in the INCLINE display, a malfunction may have occurred in the incline system.
Remove the key, wait for ten seconds, and then reinsertthe key. If the error code appears again, call ourtoll-
free HELPLINE. Do not operate the treadmilluntilthe problemiscorrected.
b. Error code "E2" may appear in the SPEED display if the INCREASE SPEED or PROGRAM START button is
pressed and no movement of the walking belt is detected within seven seconds. Remove the key, wait for ten
seconds, and then reinsert the key. Make sure that you stand on the side rails of the treadmill each time you
start walking belt. If the error code appears again, call our toll-free HELPLINE. Do not operate the treadmill until
the problem is corrected.
c. Error code "E3" may appear inthe SPEED display if the speedof the walking belt surgesabove the selected
speed setting. Remove the key, wait for ten seconds, and then reinsertthe key. Ifthe error code appears again,
'callour toll-free HELPLINE. Do not operatethe treadmilluntil the problemis.corrected.
d. Error code "E4" may appear in the SPEED disp!ay if the walk!rig belt is moving at.a slow speed, and there is
excessive stress on"the motor. Remove thekey, wait for ten seconds, and then reinsertthe key. If you weigh
over 200 I_ounds,it may be helpfu!to increasethe incline ofthe treadmill. If the errorcode appears again, call
our toll-free HELPLINE. Do not operate the treadmill until the problem is corrected.

e.Errorcode"E5" may appear in the PULSE display if a pulse error occurs. See HOW TO USE THE PULSE
SENSOR on pages 6 and 7, and HOW TO USE THE PULSE MODE on page 10.
4. SYMPTOM: THE PULSE SENSOR DOES NOT FUNCTION PROPERLY
a. See HOW TO USE THE PULSE SENSOR on page 7.
5. SYMPTOM: THE WALKING BELT SLOWS WHEN WALKED ON
a. Ifan extensioncord is needed, use onlya 14-gaugegeneral-purposecord of fivefeet or lessin length
b. If thewalking belt stillslows when walked on, please call our toll-free HELPLINE.
6. SYMPTOM" THE WALKING BELT IS OFF-CENTER WHEN WALKED ON
a. If the walking belt has shiftedto the left, first remove the key and
UNPLUG THE POWER CORD. Using the belt tool,turn the rear
rolleradjustment bolt clockwise 1/4 of a turn. Plug in the power
cord, insert the key and nJn the treadmillfor a few minutes.
Repeat untdthe walking belt is centered.
b. If the walking belt has shiftedto the right,first remove the key
and UNPLUG THE POWER CORD. Using the belt tool, turn the
rear roller adjustment boltcountemlockwise 1/4 of a turn. Plug in
the power cord, insert the key and run the treadmillfor a few
minutes. Repeat until the walking belt is centered.
STORAGE
Unplug the power cord when the treadmill is not in use,
Remove the ind=cated bolt and washer from the lower end of each
upright. Loosen the other bolt in each upright.Carefully lay the con-
sole on thetreadmill. Keep the bol_sand washers in a secure loca-
tion.
It is recommended that the treadmill be covered during extended
periods of storage.
19

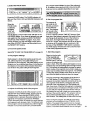
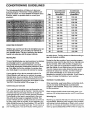
CONDITIONING GUIDELINES
20
The following guidelines will help you to plan your
exercise program. Remembers-these guidelines are
general in nature. For more detailed information about
exercise, obtain a reputable book or consult your
physician.
EXERCISE INTENSITY
Whether you want to burnfat or to strengthen•your car-
diovascular system, you can tailoryour exercise to
your specilic goals. The key to achieving the desired
results is to exercise with theproper intensity.
Burning Fat
To burn fateffectively, you must exercise at a relatively
low intensity level for a sustained period of time.
.During the first few minutes of exercise, your body
uses easily accessible carbohydrate calories for ener-
gy. Only after th_ first few minutes of exercise does
your body begin to use stored fat calories for energy.
If your goal is to r0umfat, the console's built-in Fat
Calorie.Monitor will help you to maintain the proper
intensity level. As you exercise, the Fat Calorie Monitor
will show you when your exercise intensity is too low,
too high, or perfect for burning fat. (See HOW TO USE
THE FAT CALORIE MONITOR on page 11.)
Cardiovascular Exercise
If your goal is to strengthen your cardiovascular sys-
tem, your exercise must be "aerobic." Aerobic exercise
is activity that requires large amounts of oxygen for
prolonged periods of time. Aerobic exercise increases
the demand on the heart to pump blood to the mus-
cles, and o_nthe lungs to oxy_]enatethe blood. The
proper'intensity level for aerobic exercise can be found
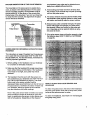
by using your pulse as a guide. As yOuexercise, your
pulse should be kept at a level between 70% and 85%
of your maximum possible heart rate. This is known as
your training zone. You can find your training zone in
Unconditioned
Training Zone
Age (Beats/Min.)
20 138-167
"25 136-166
30 135-164
35 134-162
40 132-161
45 131-159
50 129-156
55 127-155
60 126-153
65 125-151
70 : 123-150
75 122-147
80 120-146
85 118-144
Conditioned
Training Zone
(Beats/Min.)
133-162
132-160
130-158
129-156
127-155
125-153
124-150
122-149
121-147
119-145
118-144
117-142
115-140
114-139
the table above. Training zones are listed according to
age and physical condition.
During the first few months of your exercise program,
keep your pulse near the low end of your training zone
as you exercise. After a few months of regular exer-
cise, your pulse can be gradually increased until itis
near the middle of your training zone as you exercise.
You can measure your pulse using the pulse sensor.
Exercise for about four minutes, and then measure
your pulse immediately. If your pu!Se is too high,
.decrease the intensity of your exercise. If your pulse is
too low, increase the intensity of your exercise.
WORKOUT GUIDELINES
When exercising, wear loose-fitting, comfortable cloth-
ing. Do not wear clothing that could become
caught in the treadmill. Always wear athletic shoes
for foot protection.
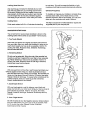
Each workout should include three basic parts: (1) a
warm-up, (2)training zone exercise, and (3) a cool-down.
Warming Up .
Warming up prepares the body for exercise by increas-
ing circulation, delivering more oxygen to the muscles
and raising the body temperature. Begin each workout
with 5 to 10 minutes of stretching and light exercise to
warm up (see SUGGESTED STRETCHES on page 21)•
Page is loading ...
Page is loading ...
Page is loading ...
Page is loading ...
Page is loading ...
Page is loading ...
Page is loading ...
Page is loading ...
-
 1
1
-
 2
2
-
 3
3
-
 4
4
-
 5
5
-
 6
6
-
 7
7
-
 8
8
-
 9
9
-
 10
10
-
 11
11
-
 12
12
-
 13
13
-
 14
14
-
 15
15
-
 16
16
-
 17
17
-
 18
18
-
 19
19
-
 20
20
-
 21
21
-
 22
22
-
 23
23
-
 24
24
-
 25
25
-
 26
26
-
 27
27
-
 28
28


Image 831.297561 Owner's manual
- Category
- Treadmills
- Type
- Owner's manual
- This manual is also suitable for
Ask a question and I''ll find the answer in the document
Finding information in a document is now easier with AI
Related papers


Other documents
-
Sears 831297540 Owner's manual
-
Fossil STARCK O-RING MODULE User manual
-
ProForm 725tl User manual
-
-
-
-
-
ProForm PETL4356 Owner's manual
-
-
Weslo WLTL10070 User manual