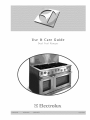
Electrolux E48DF76EPS Owner's manual
- Category
- Ovens
- Type
- Owner's manual
This manual is also suitable for

Use _ Care Guide

PLEASEREADANDSAVETHISGUIDE
[] [] [] [] [] [] [] [] [] [] [] [] [] [] [] [] [] [] [] [] []
Thank you for choosing Electrolux, the new premium brand in home appliances.
This Use & Care Guide is part of our commitment to customer satisfaction and
product quality throughout the service life of your new range.
We view your purchase as the beginning of a relationship. To ensure our ability to
continue serving you, please use this page to record key product information.
Once you have your unit installed, we suggest you keep this manual in a safe
place for future reference. Should any problems occur, refer to the
Troubleshooting section of this manual. This information wilt help you quickly
identify a problem and get it remedied. In the event you require assistance, please
contact the dealer where you purchased your unit.
MAKEA RECORDFORQU CKREFERENCE
[] [] [] [] [] [] [] [] [] [] [] [] [] [] [] [] [] [] [] [] []
Whenever you call to request information or service, you will need to know your
model number and serial number. You can find this information on the serial plate
located behind the air intake vents. With the oven door open, the air intake vents are
located just below the control panel on the front of the appliance. These numbers are
also printed on the product registration card.
@2005 Electrolux Home Products, Inc.
Post Office Box 212378, Augusta, Georgia 30917, USA
All rights reserved. Printed in the USA

PB©DUCTBEG ST T ©N CABD
[] [] [] [] [] [] [] [] [] [] [] [] [] [] [] [] [] [] [] [] [] []
The package containing tMs manual also includes your product registration
information. Warranty coverage begins at the time your Electrolux range was
purchased.
If you received a damaged product, immediately contact your dealer or builder. Do
not install or use a damaged appliance.
Please record the purchase date of your Electrolux unit and your dealer's name,
address and telephone number.
Purchase Date
Electrolux Model Number
Electrolux Serial Number
Dealer Name
Dealer Address
Dealer Telephone
Keep tMs manual and the sales receipt together in a safe peace for further
reference.
[] [] [] [] [] [] [] [] [] [] [] [] [] [] [] [] [] [] [] [] [] []
For toll-free telephone support in the U.S. and Canada:
1_877_ 4ELECTROLUX (1_877435_3287)
For online support and Intemet product information:
www.e_ectroluxusa.com

TABLEOFCONTENTS
[] [] [] [] [] [] [] [] [] [] []
Findinginformation...........................................2
PleaseReadAndSaveThisGuide...................2
MakeARecordForQuickReference................2
Questions..........................................................3
TableOfContents..............................................4
Safety...................................................................5
importantSafetyinstructions..............................5
GeneralPrecautions..........................................6
LiquifiedPetroleum(Propane)
GasConversion................................................9
FeatureOverview ..............................................10
ControlPanelLayouts.....................................10
Cooktop Featu_'es..............................................11
ProperBurnerAdjustments...............................11
BurnerLocations..............................................11
SealedBurnerConfigurations.........................12
BrassBurnerRings.........................................12
Burnerigniters................................................12
ControlKnobs.................................................13
PlacementofBurnerGrates.............................13
Surface Cooking...............................................13
FiameAdjustment.............................................13
UtensilsforBestPerformance..........................14
UsingtheGriddle.............................................14
UsingtheWokStand.......................................15
UsingtheSimmerHate....................................16
SettingSurfaceControls...................................17
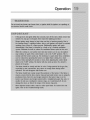
Operation...........................................................18
BeforeCooking...............................................18
OperatingtheControlValves...........................18
SettingtheBurnerFlameHeight......................20
EnergySavingTips ........................................20
[] [] [] [] [] [] [] [] [] [] []
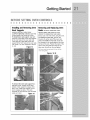
Getting Started .................................................21
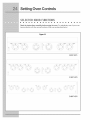
BeforeSettingOvenControls..........................21
CompanionOven............................................23
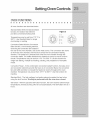
Setting Oven ControJs.....................................24
SelectorKnobFunctions..................................24
OvenFunctions...............................................25
Cookinginstructions.......................................26
Baking.............................................................26
BakingProblems.............................................27
ConvectionBaking..........................................28
ConvectionRoasting.......................................29
Broiling............................................................31
Careand Cieaniag ............................................3S
UsingtheSelf-CleanFeature..........................33
StartingtheSelf-CleanCycle...........................34
CleaningTips..................................................35
CleaningStainlessSteelSurfaces....................37
CleaningPorcelainGrates...............................37
CleaningKnobsandBezels............................38
CleaningBurnerBases...................................38
CleaningBurnerRings....................................39
CleaningBurnerigniters..................................39
GeneralCleaning............................................40
OvenLight......................................................41
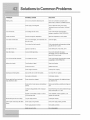
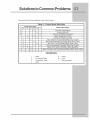
Solutions to Common ProNems.....................42
Warranty............................................................44

MPORTANTSAFETY NSTRUCT ONS
[] [] [] [] [] [] [] [] [] [] [] [] [] [] [] [] [] [] [] [] [] []
Safety PrecautJens
Do not attempt to install or operate your appliance until you have read the safety
precautions in this manual. Safety items throughout this manual are labeled with a
Warning or Caution based on the risk type.
Befinitiens
This is the safety alert symbol. It is used to alert you to potential personal
injury hazards. Obey all safety messages that follow this symbol to avoid possible
injury or death,

GeneraJPrecautions


LIQUIFIEQ PETROLEUM (?IO?AIE) GAS COIVERSIOI
[] [] [] [] [] [] [] [] [] [] [] [] [] [] [] [] [] [] [] [] []
This appliance can be used with Natural Gas and Propane Gas. It is shipped from
the factory for use with natural gas.
A kit for converting to LP gas is supplied with your range. The kit is marked "FOR
LPiPROPANE GAS CONVERSION". Follow the installation instructions which are
inside the envelope.
The conversion must be performed by a qualiled service technician in
accordance with the kit instructions and aH local codes and requirements.
Failure to follow instructions could result in serious injury or property
damage. The qualified agency performing this work assumes responsiblity
for the conversion.

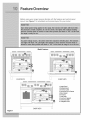
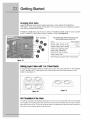
Before using your range, become familiar with the features and control panel
layout. See Figure 1 for a detailed control panel layout for your model.
Model Features
m_ms_Bm_m
®®®®i i®
®_®®i® ®i:::_
1,ControlPanel
2.BroilingElement
3.OvenBoerLatch
4.ConvectionFan&Element
5.BakeElement
6.OvenDoor
7.OvenRacks
8.OvenffackSupports
9.OvenffackGlides
10.CompanionOven
Figure 1
E48DF76EPS

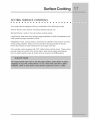
PROPERBURNERAWUST EHTS
[] [] [] [] [] [] [] [] [] [] [] [] [] [] [] [] [] [] [] [] []
The color of the flame is the key to proper burner adjustment. A good flame is clear, blue
and hardly visible in a weJNighted room. Each cone of flame should be steady and sharply
defined. Adjust or clean burner ifflame is yellow=orange. To clean burner, see instructions
under Generam Care & Cleaning.
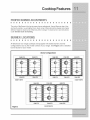
BURNER LOCATIONS
[] [] [] [] [] [] [] [] [] [] [] [] [] [] [] [] [] [] [] [] [] []
All Electrolux Icon range cooktops are equipped with sealed burners. Burner
configurations vary by the model number of your range. See Figure 2 for a detailed
burner layout for your model.
Burner Configurations
15000BTU 15000BTU
[ isO oBTu 17000BTU
EsODF74EPS
15000BTLI 17000BTU
Figure 2
0500BTU

SE£ D BURNER CONFIGURATIONS
[] [] [] [] [] [] [] [] [] [] [] [] [] [] [] [] [] [] [] [] [] []
On E30DF74EPS ranges, there are a total of four burners, including one burner
rated at a maximum output of 17,000 BTUiHR, two burners rated at a maximum of
15,000 BTU/HR and one burner rated at a maximum output of 8,500 BTU/HR. The
knobs are grouped in twos. The left two knobs operate the left two burners, and the
right two knobs control the two right burners.
On E36DF76EPS and E48DF76EPS ranges, there are a total of six burners,
including two burners rated at a maximum output of 17,000 BTU/HR, two burners
rated at a maximum of 15,000 BTUiHR and two burners rated at a maximum
output of 8,500 BTUiHR. The knobs are positioned to correspond with the burner
layout.
B SS BURNER RINGS
[] [] [] [] [] [] [] [] [] [] [] [] [] [] [] [] [] [] [] [] [] []
All burners are attached to the cooktop by retaining nuts. Gaskets around the
undersides of the burner bases ensure that the burners are sealed, thereby
preventing any liquid spills from entering the cooktop chassis. All spills remain on
the surface of the cooktop.
The brass burner heads spread the flame evenly around the burner perimeters.
The burner heads must seat properly in the burner bases to enable proper cooktop
operation. To ensure proper seating, positioning tabs have been placed on the
bottom of each burner head to slide into corresponding notches in the fixed burner
base.
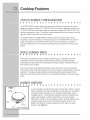
BURNER IGNITORS
[] [] [] [] [] [] [] [] [] [] [] [] [] [] [] [] [] [] [] [] [] []
A burner igniter is located on each gas burner base. When a control
knob is rotated more than 90 degrees counterclockwise, the ignitor
will spark and the selected burner will ignite. Additionally, due to
Vantage Flame TM, the automatic reignition feature, the igniters will
spark automatically if a flame should blow out or be severely
distorted by a draft or by a ventilation system. Burner igniters must
always be kept clean and dry to function properly. Dirty or wet
igniters will result in constant sparking, even if there is a flame
present. See Figure 3.

CONTROl,,,,,,,,,,KNOBS
[] [] [] [] [] [] [] [] [] [] [] [] [] [] [] [] [] [] [] [] [] []
The control knobs provided with this range are designed for ease of use and
longevity. The "D" shaped design of the knob shaft ensures proper orientation when
reinstalling the knob. Located beneath each knob is a bezel ring that mounts to the
range.
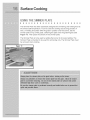
IPII,,,,,,,,,,A©EMENTOFBURNERGRATES
[] [] [] [] [] [] [] [] [] [] [] [] [] [] []
Place grates on the porcelain coated spill tray. See
Figure 4. Be sure they are located correctly inside the
stainless steel frame.
[] [] [] [] [] [] []
Figure 4
IH,,,,,,,,,AMEADJUSTMEHT
[] [] [] [] [] [] [] [] [] [] [] [] [] [] [] [] [] [] [] [] []
For most cooking, start on the highest control setting and then turn to a lower
one to complete the process. Use the chart below as a guide for determining
proper flame size for various types of cooking. The size and type of utensil used
and the amount of food being cooked will influence the setting needed for cooking.
For deep fat frying, use a thermometer and adjust the surface control
knob accordingly. If the fat is too cool, the food will absorb the fat and be
greasy, tf the fat is too hot, the food will brown so quickly that the center will
be undercooked. Do not attempt to deep fat fry too much food at once as
the food will neither brown nor cook properly.
*Flame Size Type of Cooking
High Flame Start most foods; bring water to a boil; pan broiling
Medium Flame Maintain a slow boil; thicken sauces, gravies; steam
Low Flame Keep foods cooking; poach; stew
*These settings are based on using medium-weight aluminum pans
with lids. Settings may vary when using other types of pans.
Never extend the flame beyond the outer edge of the utensil. A higher flame
simply wastes heat and energy, and increases your risk of being burned by the
flame.
Incorrect
Figure 5

U NS)LSTO USE FOB BEST I?EBFOBMANCE
m m m m m m m m m m E m m [] [] m m m m m m
*GOOD POOR
• Curved and warped pan bottoms.
J
Figure 6
• Flat bottom and straight
sides.
• Pan overhangs unit by more than
2.5 cm (1").
Pans should have fiat bottoms,
Check for flatness by rotating a
ruler across the bottom, There
should be no gaps between the
pan and ruler,
* Specialty pans such as
lobster pots, griddles and
pressure cookers may be used
but must conform to the above
recommended cookware
• Tight fitting lids.
• Weight of handle does not tilt
pan. Pan iswell balanced.
• Pan sizes match the amount
of food to be prepared and the
size of burner.
• Made of material that
conducts heat well.
• Easy to clean.
• Heavy handle tilts pan.
• Flame extends beyond unit.
Note: Always usea utensil foritsintended purpose, FollowmanufactureCs
instructions, Some utensils were not made to be used intheoven or on thecooktop,
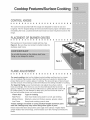
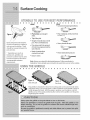
USIINGTHE@BDBIIIL,,,,,E
[] [] [] [] [] [] [] [] [] [] [] [] [] [] [] [] [] [] [] [] [] []
Figure 8 Figure £
Side with grill Fiat Side
The griddle is intended for direct food cooking and can be used on both sides
(Figures 8 and 9), Do not use pans or other cookware on the griddle, Doing so
could damage the finish, With the grate in position over the burner, set the
griddle on top of the grate positioning the notches in the griddle over the grate

USINGTHEWOK STANB
[] [] [] [] [] [] [] [] [] [] [] [] [] [] [] [] [] [] [] [] [] []
The Wok Stand provided with your cooktop is designed to allow round-bottomed
woks to be used. mtis recommended that you use a 14 inch diameter (35.5
cm) or less Wok. It is recommended that you use the right front POWER burner
for model E30DF74EPS or center front POWER burner for models E36DF76EPS
and E48DF76EPS with the wok stand for best performance. If properly positioned,
the Wok Stand will not slide off the grate.
To Proper_y Position the Wok Stand:
With the grate in position over the burner, set the Wok Stand on
top of the grate positioning the center of the Wok Stand over the
center of the cooktop grate fingers (See Figure 10).
Figure 10
Note: E48BF?6EPS model is shown
Hat-bottom woks with large flat bottoms may also be used on your cooktop
Surface Burner Grates without the Wok Stand. Insure the stability of the flat-bottom
wok before cooking without the Wok Stand. If unstable, DO NOT use the flat-
bottom wok without the Wok Stand.
Round-bottom woks (with a support ring) should NOT be used. The supporting
ring was not designed for proper or stable use on the Surface Burner Grates.

USINGTHES MMERPLATE
[] [] [] [] [] [] [] [] [] [] [] [] [] [] [] [] [] [] [] [] [] []
The Simmer Plate has been specfically designed for simmering and holding food at
the lowest safe temperature. It can be used for cooking sauces long periods of
time, or melting chocolate. With the grate in position over the burner, set the
simmer plate on top of the grate, centering the plate over the grate fingers (See
Figure 11). Then place the utensil on the simmer plate.
The Simmer Plate is to be used by setting the burner to its lowest setting. The
Simmer Plate is intended to be used for simmering only. The Simmer Plate must
be removed when cooking.
Figuce 11

SETTINGSURFACECONTROLS
[] [] [] [] [] [] [] [] [] [] [] [] [] [] [] [] [] [] [] [] [] []
Your range may be equipped with any combination of the following burners:
Simmer Burner: best used for simmering delicate sauces, etc.
Standard Burner: used for most all surface cooking needs.
Large Burner: best used when bringing large quantities of liquid to temperature and
when preparing larger quantities of food.
Regardless of size, always select a utensil that is suitable for the amount and type
of food being prepared. Select a burner and flame size appropriate to the pan.
Never allow flames to extend beyond the outer edge of the pan.
Your cooktop is also equipped with 300 ° rotation flame control valves. These valves
provide enhanced control of the burner flame. Each burner lights automatically
from an electric ignitor when its control knob is turned to the UTE position.

BEFORECOOKING
[] [] [] [] [] [] [] [] [] [] [] [] [] [] [] [] [] [] [] [] [] []
Ensure that the range has been installed by a qualified individual who has tested
the operation of the range in accordance with the Installation Instructions. The
brass burner rings, burner caps, grates, knobs and spill protectors must be in
place for the cooktop to operate properly. All range components must be clean. Be
certain that the gas and electrical power supplies to the range are operational.
Read this Use and Care Manual in its entirety prior to operating the range.
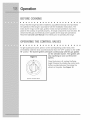
OPERATINGTHE OLVALVES
[] [] [] [] [] [] [] [] [] [] [] [] [] [] [] [] [] [] [] [] [] []
To light a particular burner, press in on the corresponding control knob, then
immediately rotate the knob counterclockwise from the "OFF" position to the "UTE
HI" position. The burner igniters will spark continuously until the gas ignites
m
Figure 12
Burner Control Valve
on the selected burner. The igniters wH_
stop sparking as soon as the burner
ignites.
Once the burner is lit, reduce the flame
height if desired by rotating the control knob
further counterclockwise, then place the
utensil on the grate. See Figure 12


SETTINGTHEBURNERF ME HEIQHT
[] [] [] [] [] [] [] [] [] [] [] [] [] [] [] [] [] [] [] [] [] []
Setting the proper burner flame height for the desired cooking process and
selected utensil will result in superior cooking performance, while also saving time
and energy. Follow these recommendations for best results:
1. Use low or medium flame heights when cooking in utensils that are poor
conductors of heat, such as glass, ceramic, and cast iron cooking vessels.
Reduce the flame height until it covers approximately 1/3 of the utensil
diameter. This will ensure even heating within the utensil and reduce the
likelihood of burning or scorching of food.
2. Reduce the flame if it is extending beyond the bottom of the utensil. A flame
that licks along the sides of the utensil is potentially dangerous, heats the
utensil handle and kitchen instead of the food, and wastes energy.
3. Reduce the flame height to the minimum level necessary to perform the
desired cooking process. Remember that food cooks just as quickly at a
gentle boil as it does at a vigorous, rolling boil. Maintaining a higher boil than is
necessary wastes energy, cooks away moisture, and causes a loss in food
flavor and nutrient level.
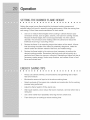
ENERGYS£ NG TIPS
[] [] [] [] [] [] [] [] [] [] [] [] [] [] [] [] [] [] [] [] [] []
, Always use utensils with flat, smooth bottoms and tight-fitting lids to retain
heat and moisture.
, Minimize the amount of liquid or fat to reduce cooking times.
Select cookware of the proper size, material and construction for the cooking
process being performed.
Adjust the flame height to fit the utensil size.
, After liquid reaches a boil, reduce the heat to maintain a simmer rather than a
rolling boil.
Use a timer rather than repeatedly removing the lid to check food,
Thaw foods prior to cooking to reduce cooking time.
Page is loading ...
Page is loading ...
Page is loading ...
Page is loading ...
Page is loading ...
Page is loading ...
Page is loading ...
Page is loading ...
Page is loading ...
Page is loading ...
Page is loading ...
Page is loading ...
Page is loading ...
Page is loading ...
Page is loading ...
Page is loading ...
Page is loading ...
Page is loading ...
Page is loading ...
Page is loading ...
Page is loading ...
Page is loading ...
Page is loading ...
Page is loading ...
-
 1
1
-
 2
2
-
 3
3
-
 4
4
-
 5
5
-
 6
6
-
 7
7
-
 8
8
-
 9
9
-
 10
10
-
 11
11
-
 12
12
-
 13
13
-
 14
14
-
 15
15
-
 16
16
-
 17
17
-
 18
18
-
 19
19
-
 20
20
-
 21
21
-
 22
22
-
 23
23
-
 24
24
-
 25
25
-
 26
26
-
 27
27
-
 28
28
-
 29
29
-
 30
30
-
 31
31
-
 32
32
-
 33
33
-
 34
34
-
 35
35
-
 36
36
-
 37
37
-
 38
38
-
 39
39
-
 40
40
-
 41
41
-
 42
42
-
 43
43
-
 44
44


Electrolux E48DF76EPS Owner's manual
- Category
- Ovens
- Type
- Owner's manual
- This manual is also suitable for
Ask a question and I''ll find the answer in the document
Finding information in a document is now easier with AI
Related papers
-
Electrolux E36GF76HPS2 Owner's manual
-
-
Electrolux E30DF74GPS User manual
-
-
-
Electrolux EW30GC55GW2 Owner's manual
-
Electrolux EW36GC55GB1 Owner's manual
-
Electrolux E30DF74TPS Owner's manual
-
Electrolux E30GF74TPSB Owner's manual
-
Other documents
-
Smeg GP705 Datasheet
-
GE JGSP44BEYBB User manual
-
-
DCS Range RGTC-305 User manual
-
-
Sears 911.363209 User manual
-
Frigidaire FEB24S5ABE Owner's manual
-
 LavoHome KE-170.2BurnerPropaneStove User manual
-
Tramontina 80203/006DS User guide
-
Frigidaire FGB557CESB User manual
