Page is loading ...

NS-75
4
IC Pro / IC Elite
ASSEMBLY INSTRUCTIONS
®

Ref. # Description Qty.
1. Frame 1
42. Handle Bar 1
3. Seat Slider Assembly with Saddle 1
AFront Stabilizer Bar with Wheels and Feet 1
B Rear Stabilizer Bar with Feet 1
51. Water Bottle Cage 2
Small Parts Box 1
Small Part Box Contents
34. Pedals with Toe Clips & Straps (Left & Right) 1 Pair
29. Pop Pin Assembly for Head Tube 1
46. 13mm Hex Bolt 4
44. Flat Washer 8
45. 13mm Lock Nut 4
Tools Supplied
Stamped Steel 13/14/15/17mm Combination Wrench 1
3mm Hex Wrench 1
Prior to assembly of the product, remove all components from the packaging and check them
against the packaged components list supplied above. Once you are certain that all the necessary
parts have been supplied, begin with the first assembly step.
Tools Needed
3mm Hex Wrench
Adjustable wrench (not included)
Grease (not included)
SCHWINN IC BIKE - PACKAGE COMPONENTS LIST
step
#1
2
IC Pro / IC Elite
17/15
13/14
Stamped Steel
Combination wrench

NS-75
Ref. # Description Qty
1 Frame 1
AFront Stabilizer Bar with Wheels and Feet 1
B Rear Stabilizer Bar with Feet 1
46 13mm Hex Bolt 4
44 Flat Washer 8
45 13mm Lock Nut 4
Tools Required
Stamped Steel Combination Wrench 1
Adjustable wrench or 13mm Socket (not supplied) 1
ATTENTION
The following steps utilize stainless steel hardware. Stainless steel hardware is susceptible
to “cold welding”, also known as galling, if not handled properly. To reduce the chances for
cold welding, make sure you apply grease to the threads at the end of the stainless hex bolts
#46. When tightening the 13mm lock nuts #45, turn them at a fairly low rotational speed.
High rotational speeds as well as lack of grease are common causes for cold welding of
stainless steel hardware.
A. Position the Front Stabilizer Bar (A) on the frame bracket as shown in the illustration.
B. Make sure the adjustable feet are on the bottom and the transport wheels are facing up and
toward the front of the bike.
C. Attach Front Stabilizer Bar (A) to Frame (1) using two hex bolts (46), four washers (44), and two
lock nuts (45). Tighten hardware firmly but do not over tighten as deformation of the stabilizer
tube may occur
D. At this time make sure that the adjustable feet with lock nuts are screwed fully into the stabilizer.
E. Position the Rear Stabilizer Bar (B) on the frame bracket as shown in the illustration.
F. Make sure the adjustable feet are on the bottom.
G. Attach Rear Stabilizer Bar (B) to Frame (1) using two hex bolts (46), four washers (44), and two
lock nuts (45). Tighten hardware firmly but do not over tighten as deformation of the stabilizer
tube may occur
H. At this time make sure that the adjustable feet with lock nuts are screwed fully into the stabilizer.
MATERIALS & TOOLS
step
#2
3
Front
Rear
IC Pro / IC Elite

Ref. # Description Qty
1 Frame 1
29 Pop Pin Assembly for Head Tube 1
42 Handle Bar 1
7, 8, & 9 Seat Slider Assembly 1
51 Water Bottle Cage 2
Tools Required
3mm Hex 1
Adjustable wrench (not supplied) 1
A. Using your hand, grab the T-handled of the Pop Pin attached to the seat tube of the frame. Turn
the Pop Pin counter clockwise for several revolutions to make sure it is free of the securing
threads and can be pulled freely.
B. Pull the entire seat slider assembly (7,8,9) from the frame and reverse its direction. Reinsert the
seat slider assembly into the frame (with the holes facing the front of the bike) while pulling out on
the Pop Pin. Release the Pop Pin and make sure it fully engages one of the holes provided in
the seat post.
C. Using the stamped steel combination wrench supplied, loosen up the 14mm nuts that secure
the saddle bracket to the seat slider (8). Once loose, rotate the saddle so that the nose of the
saddle is facing the handle bars and is level with the ground or in your desired position. Tighten
the 14mm nut securely and manually attempt to twist the saddle sideways to confirm that it is
secure before ridding.
D. Remove the Pop Pin Assembly (29) from the small parts bag and add some grease to the
threads of the large 21mm nut that will screw into the head tube boss on the bike.
E. Thread the Pop Pin Assembly (29) into the head tube boss using a large adjustable wrench and
tighten firmly.
F. Using your hand, grab the T-handled of the Pop Pin, turn it counter clockwise for several revolu-
tions to make sure it is free of the securing threads and can be pulled freely.
G. Insert the handle bar (42) into the head tube of the bike while pulling the Pop Pin out. Lower the
handle bar to the desired height and release the Pop Pin. Make sure the Pop Pin fully engages
one of the holes provided in the handle bar. Turn the T-handle of the Pop Pin clockwise until it is
fully tightened, this will secure the handle bar firmly at the desired height.
H. Using the 3mm hex tool supplied, mount the two water bottle cages (51) to each side of the fork
legs. The necessary mounting screws have previously been installed and must be removed from
the fork legs prior to securing the water bottle cage.
MATERIALS & TOOLS
step
#3
4
IC Pro / IC Elite

NS-75
MATERIALS & TOOLS / INITIAL SETUP ADJUSTMENTS
step
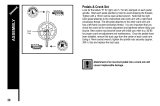
#4
Ref. # Description Qty
1 Frame 1
43 Pedals with Toe Clips & Straps (Left & Right) 1 Pair
Tools Required
Stamped Steel Combination Wrench 1
A. Remove Pedals (43) from the small parts box and look at the ends of
the pedal threads. You will notice that each pedal is market with an "R"
or an "L" on the very end of the spindle past the threads. This mark
indicates which side of the bike the pedal is intended to mount. This is
important since the thread directions are different for each pedal.
B. Locate the Pedal that has the "R" on the spindle. This pedal is for the
right side crank arm of the bike (chain guard side) and is right hand
threaded (turn clockwise to tighten). It is a good idea to apply grease
to the threads before attaching them to the crank, this will assure that
they can be removed in the future. Using the supplied Combination
Wrench thread the right Pedal on to the crank arm, tighten firmly.
C. Locate the Pedal that has the "L" on the spindle. Follow the directions in step B. however, you will
need to turn the spindle left (counter-clockwise) to tighten as the "L" spindle is reverse threaded.
Prior to first using the Schwinn IC bike it is a good idea to follow
these initial set up steps.
A. Move bike into its final location. Confirm that all four feet are firmly in contact with the floor and that
the bike is stable. If any of the feet are not making full contact it is recommended that you adjust
them by turning the entire foot assembly counter-clockwise which will extend it further from the sta-
bilizer bar. Once the foot is in full contact and the bike is stable, thread the jam nut clockwise until
it comes into contact with the stabilizer at the point the foot assembly threads in. Tighten the jam
nut snug using an adjustable wrench. This will secure the foot at the desired height.
B. With the resistance adjustment knob turned fully in the counter-clockwise position (no brake con-
tact with flywheel) it is recommended that you soak the brake pads with Schwinn Fit-Tech Lube.
This will extend the life of the brake pads and assure a smooth resistance interface with the fly-
wheel.
C. Once the pads are lubricated it is recommended that you tighten the resistance adjustment knob
clockwise to tighten the brake pads against the flywheel surface. Do this until the brake pads are firm-
ly clamped against the flywheel. This will set the brake parts and give the springs some initial com-
pression. This process will also assure that the Fit-Tech Lube penetrates the entire brake pad surface.
D. Confirm that the Saddle is positioned in the desired location on the saddle mounting bracket. If the
angle of the saddle or the fore/aft position of the saddle needs to be adjusted, use the Combination
Wrench to loosen the 14mm nuts on either side of the saddle mounting bracket. This will allow you
to adjust the tilt angle and fore/aft position of the saddle. Once in the correct position, tighten both
14mm nuts on the saddle mounting bracket with the Combination Wrench.
That's it! Initial set up is complete and you can now enjoy all these
features and quality of you new Scwhinn IC Bike!
5
IC Pro / IC Elite

IC PRO ASSEMBLY DRAWING AND REPLACEMENT PARTS
Tech
Info
55
53
54
37
65
32
44
45
14
10
45
44
43
17
2
4
3
19
18
18
19
40
80
11
22
58
56
24
39
1
47
45
34
23
6
29
19
5
23
63
62
68
8
9
31
12
7
16
15
13
34
12
19
60
42
59
44
41
48
27
19
44
46
26
51
21
33
47
51
80
71
72
73
74
75
75
76
77
78
79
PRO
6
Dwg# Description Part #
1 FRAME 84958
2RIGHT CRANK W/SPOCKET, ISIS M12 80034
3 B.B. SET, OVERDRIVE W/BOLTS 68X113L 84990
4 CHAIN, 1/2x3/32", 112L 95120
5 RESISTANCE ASSY 84965
6 BRAKE PADS 92874
7 SEAT POST 84973
8 SEAT ADJUSTING BRACKET 84975
9 SEAT, 7777-1 BLACK 93092
10 OUTER CHAINGUARD 84968
11 INNER CHAINGUARD 84967
12 SLEEVE, SEAT POST/HANDLEBAR 84966
13 TENSION KNOB BALL PIVOT 84976
14 RUBBER CHAINGUARD RING 91719
15 ROD CARRIER 98009
16 SQUARE NUT FOR TENSION KNOB 98022
17 CRANK BOLT 8MM HEX FOR ISIS 80044
18 HEX HEAD SCREW M6 X 1.0 X 12L 95432
19 WASHER M6 6.5 X 16 x 1T 95431
21 FLANGED AXLE NUT 95149
22 LEVELER NUT 80016
23 NYLON NUT M6 X 1.0 95456
24 LEVELER FOOT 84995
26 HEX HEAD SCREW M6 X 1.0 X 15L 98775
27 ADJUSTING BOLT, STAINLESS 95433
29 T-HANDLE POP PIN, DOUBLE LEAD 84994
31 TENSION KNOB 84974
32 CHAIN ADJ BRACKET, LEFT 84970
33 CHAIN ADJ BRACKET, RIGHT 84969
34 YELLOW PLASTIC BUSHING, SET OF 2 92204
37 FLYWHEEL, COMPLETE 16T 84996
39 FRONT STABILIZER ASSY 22" W/ TRANSPORT 84964
40 REAR STABILIZER 22" 84963
41 TRANSPORT WHEEL 92220
42 HANDLEBAR 84959
43 PEDALS 95129
44 WASHER M8 19 X 8.5 X 1T STAINLESS 95426
45 NYLON NUT M8 X 1.25 STAINLESS 91731
46 HEX BOLT M8 X 1.25 X 40L STAINLESS 95434
47 BOTTLE CAGE BOLT 95428
48 BOLT M8 X 1.25 X 45L 92218
51 BOTTLE CAGE 84998
53 LOCK RING 1.29 X 24 X 4T B.E.D. 95450
54 SPROCKET, 16T 84997
55 WASHER 95457
56 LEFT CRANK ARM , ISIS 80035
58 TOE CLIP 47046
59 TOE STRAP 57880
60 FRAME PLUG FOR BRAKE ASSEMBLY 80052
62 SAFETY RELEASE CLIP 92450
63 END CAP FOR SEAT SLIDER 84971
65 HUB SHELL PLASTIC COVER 92451
68 SLEEVE, SEAT SLIDER 84972
71 PROTECTIVE STEP PLATE STAINLESS 84961
72 MACHINE SCREW M5X.08X12L SS 84957
73 SHROUD - RIGHT 84978
74 SHROUD - LEFT 84977
75 MACHINE SCREW M4X.7X10L SS 84961
76 EMERGENCY BRAKE LEVER 84979
77 EMERGENCY BRAKE BUSHING 84957
78 EMERGENCY BRAKE PIVOT PIN 84981
79 EMERGENCY BRAKE E-CLIP 84960
80 RUBBER FRAME GUARD 84999
IC Pro / IC Elite

NS-75
4
IC ELITE ASSEMBLY DRAWING AND REPLACEMENT PARTS
Tech
Info
32
44
45
14
10
45
44
43
17
2
4
3
19
18
18
19
40
11
22
58
56
24
39
1
47
45
34
23
6
29
19
5
23
63
62
68
8
9
31
12
7
16
15
13
34
12
19
60
42
59
44
41
48
27
19
44
46
26
51
21
33
47
51
80
71
72
73
74
75
75
76
77
78
79
66
70
55
54
53
54
67
64
37
65
80
ELITE
7
Dwg# Description Part #
1 FRAME 84958
2 RIGHT CRANK W/SPOCKET, ISIS M12 80034
3 B.B. SET, OVERDRIVE W/BOLTS 68X113L 84990
4 CHAIN, 1/2x3/32", 112L 95120
5 RESISTANCE ASSY 84965
6 BRAKE PADS 92874
7 SEAT POST 84973
8 SEAT ADJUSTING BRACKET 84975
9 SEAT, 7777-1 RED 92202
10 OUTER CHAINGUARD 84956
11 INNER CHAINGUARD 84967
12 SLEEVE, SEAT POST/HANDLEBAR 84966
13 TENSION KNOB BALL PIVOT 84976
14 RUBBER CHAINGUARD RING 91719
15 ROD CARRIER 98009
16 SQUARE NUT FOR TENSION KNOB 98022
17 CRANK BOLT 8MM HEX FOR ISIS 80044
18 HEX HEAD SCREW M6 X 1.0 X 12L 95432
19 WASHER M8 19 X 8.5 X 1T 95431
21 FLANGED AXLE NUT 95149
22 LEVELER NUT 80016
23 NYLON NUT M6 X 1.0 95456
24 LEVELER FOOT 84995
26 HEX HEAD SCREW M6 X 1.0 X 15L 98775
27 ADJUSTING BOLT, STAINLESS 95433
29 T-HANDLE POP PIN, DOUBLE LEAD 84994
31 TENSION KNOB 84974
32 CHAIN ADJ BRACKET, LEFT 84970
33 CHAIN ADJ BRACKET, RIGHT 84969
34 YELLOW PLASTIC BUSHING, SET OF 2 92204
37 FLYWHEEL, COMPLETE 92207
39 FRONT STABILIZER ASSY 22" W/TRANSPORT 84964
40 REAR STABILIZER 22" 84963
41 TRANSPORT WHEEL 92210
42 HANDLEBAR 84959
43 PEDALS 95129
44 WASHER M8 19 X 8.5 X 1T STAINLESS 95426
45 NYLON NUT M8 X 1.25 STAINLESS 91731
46 HEX BOLT M8 X 1.25 X 40L STAINLESS 95434
47 BOTTLE CAGE BOLT 95428
48 BOLT M8 X 1.25 X 45L 92218
51 BOTTLE CAGE 84998
53 HUB SPROCKET W/ BEARING 98419
54 ELITE BRAKE PAD SET, WHITE U.H.P. 92213
55 FLANGED HUB LOCKNUT 92214
56 LEFT CRANK ARM , ISIS 80035
58 TOE CLIP 47046
59 TOE STRAP 57880
60 FRAME PLUG FOR BRAKE ASSEMBLY 92206
62 SAFETY RELEASE CLIP 80052
63 END CAP FOR SEAT SLIDER 84971
64 CONICAL SPRING 92208
65 HUB SHELL PLASTIC COVER 92451
66 INNER ADJUSTABLE SMART RELEASE PLATE92452
67 INTERFACINE PLATE TO BRAKE PADS 92453
68 SLEEVE, SEAT SLIDER 84972
70 BEARING RETAINING RING 92458
71 PROTECTIVE STEP PLATE STAINLESS 84961
72 MACHINE SCREW M5X.08X12L SS 84957
73 SHROUD - RIGHT 84978
74 SHROUD - LEFT 84977
75 MACHINE SCREW M4X.7X10L SS 84961
76 EMERGENCY BRAKE LEVER 84979
77 EMERGENCY BRAKE BUSHING 84957
78 EMERGENCY BRAKE PIVOT PIN 84981
79 EMERGENCY BRAKE E-CLIP 84960
80 RUBBER FRAME GUARD 84999
IC Pro / IC Elite

Nautilus Health & Fitness Group • 1886 Prairie Way• Louisville, CO 80027
© 2003 Nautilus, Inc. • SCHWINNFITNESS.COM
1.800.864.1270
®
/