Page is loading ...

234
© 1999 Graco 760-11-99
Failure to follow these warnings and the assembly instructions
could result in serious injury or death.
Avoid serious injury from falling or
sliding out. Always use seat belt.
Be certain the stroller is fully erected
and latched before allowing your
child near the stroller.
Never place child in the stroller with
head toward front of the stroller.
Never leave child unattended.
Always keep your child in view.
DO NOT place purses, shopping
bags, parcels and accessory items
on handle or canopy. They may fall
on the child or change the balance
of the stroller and make it unstable.
Congratulations on your purchase of a
Graco
®
stroller!
Graco is a world leader in strollers and
has helped thousands of parents transport
their children in comfort. We believe your
new Graco
®
stroller is a wise choice,
promising many hours of enjoyment for
your baby.
Before using your stroller, please take a
few minutes to read this Owners Manual.
The short time you spend reading these
instructions will help you assemble and
use your stroller properly.
Please save your Owners Manual
for future use.
Customer Satisfaction
Our goal is to make every product the best it
can be! We are also committed to supporting our
products after purchase. If you would like to speak
to Graco about your product, please contact our
Customer Service Department at 1-800-345-4109
or visit our Internet website, www.gracobaby.com.
Our knowledgeable staff will be ready to answer
any questions you may have concerning parts, use
or maintenance. When you call, please have the
model and serial numbers ready so your call
may be processed quickly and efficiently.
OWNERS
MANUAL
Model No.
Serial No.
Dear Customer,
Please fill in the model
and serial numbers
above from the label
on the rear leg of
your new stroller.
Models 6675 and 6687
Stroller
Use of the stroller with a child
weighing more than 40 lbs. (18.1 kg)
will cause excessive wear and stress
on the stroller. Use the stroller with
only one child at a time.
Never use stroller on stairs or escalators.
You may suddenly lose control of the
stroller or your child may fall out. Also,
use extra care when going up or down
a step or curb.
DO NOT lift the stroller by the
childs tray.
TO PREVENT A HAZARDOUS CONDITION, do not place more than 10 lbs.
(4.5 kg) in the storage basket. DO NOT use storage basket as a child carrier.
Do not place more than 2 lbs. (0.9 kg) in the storage pocket.
DO NOT ALLOW YOUR CHILD to stand on the basket. It may collapse and
cause injury.
NEVER ALLOW YOUR STROLLER to be used as a toy.
STROLLER TO BE USED only at walking speed. Product not intended for use
while jogging, skating, etc.
DISCONTINUE USING YOUR STROLLER should it become damaged or broken.
Avoid strangulation. DO NOT place
items with a string around your
childs neck, suspend strings from
this product, or attach strings to toys.
FOR ADDITIONAL IMPORTANT
INFORMATION, please see the
Helpful Hints and Care and
Maintenance sections in these
instructions.

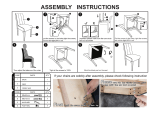
5
760-11-99
6 87
*
On certain models
To Assemble Front Wheels*
Place parts in order on front axle as shown. Push
red retainer onto axle BEFORE attaching white cap.
Repeat on other side.
Be sure cap is snapped securely over red retainer.
Axle
Wheel
Cap (white)
Attach AFTER
retainer is on axle
Retainer (red)
Wide end toward wheel
To Assemble Rear Wheels
Place parts in order on rear axle as shown. If the hub
adapter will not go against the rear axle mount, push the
brake wire down and check to make sure the hub adapter is
aligned in the wheel correctly.
Rear
axle
Hub adapter
toward inside
Be sure cap is snapped securely over red retainer.
Retainer (red)
Wide end toward wheel
Wheel
Cap (white)
Attach AFTER
retainer is on axle
To Assemble Front Axle*
Step 1.
Put both front axle mounts on
the frame. (The pointed side of
the axle mount faces the rear of
the stroller.)
Step 2.
Put the axle through the hole in the
axle mount and frame. It may be
necessary to twist the axle mount
slightly to get the axle into the hole.
Footrest
Pointed
side to
back
Step 4.
Pull firmly on each axle mount to be sure it is securely
attached.
If the axle mounts do not snap on the legs, they may be
facing the wrong way. Remove the axle mounts with
brake wire and face them the other way.
Step 5.
Insert rear axle (longer axle)
through holes in the rear axle
mounts. It may be necessary to
twist the axle mount slightly to
get the axle through the holes.
Axle
To Unpack Stroller
Step 1.
Flatten stroller carton to
protect floor.
Step 2.
Open stroller on carton until
locking latches on both sides
are locked as shown.
Step 3.
Push down on the footrest until
it snaps on the bar under it.
Flattened carton
Locking
latch
Step 2.
Turn stroller over as pictured above.
Step 3.
Position rear axle mount assembly and brake wire as shown.
Push assembly onto rear legs until plastic tabs snap into the
slots on the legs.
To Assemble Rear Axle
Step 1.
Push rear axle mounts onto
brake wire as shown. It is very
important to insert the brake
wire into the axle mounts
correctly. If it is not, the brakes
will not work properly.
Brake
wire slot
PARTS LIST
CHECK that you have all the parts listed below
BEFORE assembling your stroller.
If any parts are missing,
call Customer Service at 1-800-345-4109
or visit our Internet website, www.gracobaby.com.
THIS PRODUCT REQUIRES ADULT ASSEMBLY
.
Retainer
(4, 1 extra)
Front axle (short)
(on certain models)
Frame
Large wheel (4)
(on certain models)
Brake wire
Rear axle
mount (2)
Rear axle (long)
Front axle mount (2)
(on certain models)
Hub
adapter (2)
Cap
(4, 1 extra)
Retainer
(2, 1 extra)
Cap
(2, 1 extra)
Large wheel (2)
The following parts are only included
on models with front swivel wheels:
Front swivel
assembly (2)
Childs tray
(on certain models)
Parents tray
(on certain models)
Red brake
on top
Brake wire
angles toward
rear of stroller
Push rear axle
mounts onto brake wire
To Assemble Front Swivel Wheels*
To prevent
serious injury or death
from choking, remove and
IMMEDIATELY discard plastic
end caps on the front leg pins.
Step 1.
Line up pin with a wheel
assembly as shown. Plastic
snap inside wheel mount
must be away from pin.
Step 2.
Push wheel assembly onto pin
until it snaps into place.
Step 3.
Repeat for other wheel assembly.
Pull firmly on each wheel assembly to be sure the
wheel assemblies are securely attached.
End cap
Plastic
snap
Parents tray,
adapter (2) and screw (2)
(on certain models)

9
760-11-99
10 11 12
To Secure Your Child
Avoid serious injury from falling or
sliding out. Always use seat belt.
Your stroller may have a single button buckle, double button
buckle, or two-buckle seat belt. Follow the appropriate
instructions below.
Double Button Buckle Seat Belt:
Place crotch strap between
childs legs. Snap both side
buckles to the center buckle.
Adjust belt as needed to get
a snug fit around your child.
Push in on front of buckle to
release.
Two-Buckle Seat Belt:
Place crotch strap between
childs legs. Snap together the
buckles on each side of crotch
strap. Adjust belt at each buckle
as needed to get a snug fit
around your child.
Squeeze both sides of each
buckle to release.
To Adjust Back
Step 1.
Push in the two latches behind
the seat to recline it.
Step 2.
To return seat to upright
position, lift the seat back until
both latches are locked.
Fabric caught
in the latches may prevent
them from locking. When
returning seat to upright
position, do not allow fabric
to be pinched in the latches.
To Use Brakes
Push DOWN FIRMLY to park.
Check to make sure brake is on
by trying to push the stroller.
Lift UP to stroll.
To Unfold Stroller
Step 1.
Release storage latch located
by the stroller handle and
begin opening stroller.
Step 2.
Continue unfolding until both
latches lock.
Storage
latch
Always apply
brakes when parking stroller.
To Adjust Canopy
Push or pull canopy to desired
position.
Snap the childs tray under
the fold latch on both leg
tubes as shown.
Always secure your child with
the seat belt. The childs tray is not a restraint
device.
DO NOT lift the stroller by the childs tray.
Only use safety seat if your model has a childs tray
designed for use with a safety seat.
Use care when snapping the childs tray on the
stroller with a child in the stroller.
To Fold Stroller
Before folding the stroller:
1. Fold the canopy.
2. Lock the front swivels
(on certain models).
Step 1.
Fully recline the seat back.
Step 2.
Pull latches up to release
and fold handle down.
OR
On other models:
1. Slide red button on handle
to the right.
2. Twist grip away from
yourself until it stops.
3. Push stroller handle down.
Step 3.
Close completely and fasten
the storage latch to the handle.
To Use Childs Tray*
The following optional features
are found only on certain models:
Single Button Buckle Seat Belt:
Place crotch strap between
childs legs. Snap both side
buckles to the center buckle.
Adjust belt as needed to get a
snug fit around your child.
Push in on front of buckle to
release.
Ë
Ê
Ë
Ì
To avoid
burns, never put hot
liquids on the parents
tray. To prevent tipping
over, do not place more
than 3 lbs. (1.4 kg) on the
parents tray.
Snap parents tray to stroller handle as shown.
To Use Parents Tray
(one of two styles)*
*
On certain models
OR
For trays with an adapter:
Step 1.
Push the screw through the
hole on the handle of the
stroller and line up the
adapter as shown.
Step 2.
Screw the adapter halfway
on and then snap the
adapter to the stroller
handle. Finish tightening
the screw.
Step 3.
Snap one pin on the parent
tray into the hole in the
stroller handle as shown.
Repeat on other side. Rest
the tray on the adapters.

13
760-11-99
14 15 16
To prevent a hazardous condition,
do not place more than 2 lbs (0.9 kg) in the
storage pocket.
A storage pocket is located behind the seat back.
To Use Storage Pocket*
Storage
pocket
HELPFUL HINTS
IF WHEEL SQUEAKS, use a light oil
(e.g., WD-40, 3-in-1, or sewing machine
oil). It is important to get the oil into the
axle and wheel assembly as illustrated.
WHEN USING YOUR STROLLER AT THE BEACH,
completely clean your stroller afterward to remove sand
and salt from mechanisms and wheel assemblies.
TO STAND FOLDED STROLLER, lock the brakes.
CARE AND MAINTENANCE
TO CLEAN THE SEAT, remove the screws and
plastic clasps and hand wash in warm water with a
mild detergent. Drip dry onlyseat contains plastic
inserts. Replace seat on frame with screws and clasps
when dry.
REMOVABLE SEAT PAD (if so equipped) may be
machine washed in lukewarm water on delicate cycle
and drip-dried. NO BLEACH.
FROM TIME TO TIME CHECK YOUR STROLLER for
loose screws, worn parts, torn material or stitching.
Replace or repair the parts as needed. Use only
Graco
®
replacement parts.
TO CLEAN STROLLER FRAME, use only household
soap or detergent and warm water. NO BLEACH.
EXCESSIVE EXPOSURE TO SUN OR HEAT could
cause fading or warping of parts.
Replacement Parts
Instructions for ordering stroller parts:
Complete form below. Your stroller model number
MUST be included on the form to ensure proper
replacement parts. Your model number can be found
on a sticker on the rear leg of your stroller.
Payment must accompany your order.
Return the form below with payment to:
GRACO CHILDRENS PRODUCTS INC.
CUSTOMER SERVICE DEPARTMENT
P. O. BOX 100, MAIN STREET
ELVERSON, PA 19520
IF YOU NEED HELP
If you have any questions or if you need
any part not listed, please call toll-free:
1-800-345-4109
or visit our Internet website, www.gracobaby.com.
Model Number
(Must be filled in)
SHIP TO:
Name
Address
City, State, Zip
( )
Telephone
Check enclosed
(payable to Graco Childrens
Products Inc.)
Charge to credit card:
Visa
MasterCard
Discover
Account #:
Expiration date:
Signature:
Seat
Seat pad
Canopy
Large wheel
Front swivel assembly
Rear axle
Front axle
Basket
Brake wire
Childs tray
Rear axle mount
Front axle mount
Hub adapter
Storage latch
Parents tray
Parents tray adapter
Elastic strap
Parts List:
Seat .......................................
Seat pad ................................
Canopy ..................................
Large wheel*..........................
Front swivel assembly* ..........
Rear axle ...............................
Front axle*..............................
Basket ...................................
Brake wire .............................
Childs tray*............................
Rear axle mount ....................
Front axle mount*...................
Hub adapter ..........................
Storage latch .........................
Parents tray*..........................
Parents tray adapter*.............
Elastic strap............................
* On certain models only.
Price:**
$ 21.00
$ 16.00
$ 18.00
$ 8.00 (each)
$ 16.00
$ 7.00
$ 7.00
$ 16.00
$ 5.00
$ 13.00
$ 5.00
$ 5.00
$ 5.00
$ 5.00
$ 12.00
$ 5.00 (each)
No charge
** Prices subject to change without notice.
Two mesh pockets are
provided in rear of basket
for infant bottle storage.
Bottle
holders
The following optional features
are found only on certain models:
Total:
Shipping
& handling: $5.00
6% sales tax
(PA only):
Total amount
due:
To Attach the Graco
®
Safety Seat*
Improper use of this stroller with a
carrier may result in serious injury or death.
Do not use this stroller with carriers or safety seats
other than Graco
®
Travel System models.
Read the manual provided with your Graco
®
Travel
System Safety Seat before using the Travel System.
If you do not have the owners manual for the
Graco
®
Travel System Safety Seat, call Graco at
1-888-224-6549.
Make sure the stroller is fully assembled according to
the preceding instructions, with the childs tray attached.
Step 1.
If the stroller is folded, unfold it and RECLINE the
stroller seat back to its lowest position.
Step 2.
Push down on the childs tray to be sure it is securely
attached to the stroller.
Only use safety seat if your stroller
has a plastic childs tray designed for use with a
safety seat.
Step 6.
Pull elastic strap through vehicle
belt hook on one side of the safety
seat. Check that plastic tab at end
of strap securely holds the safety
seat.
Step 7.
Pull up on safety seat handle to
be sure the safety seat is securely
attached to the stroller.
Step 8.
To remove safety seat from the
stroller, remove elastic strap from
vehicle belt hook, squeeze release
handle at back of safety seat, and
lift safety seat out of the stroller.
*
On certain models
To Use Bottle Holders*
Step 3.
If your child is already in the safety seat because you
have been using it as a carrier, make sure child is
secured with the harness.
Always secure your child with the
safety seat harness when using the safety seat in
the stroller.
Step 4.
Move the safety seat handle
into the carrying position.
Step 5.
Position the safety seat so
that the mounting notches fit
over the edge of the tray.
Push down on safety seat
until the attachment latch
snaps onto the tray.
To Change to Swivel
or Non-swivel Wheels
*
Front swivel wheels lock for use on uneven surfaces
such as grass, stones or gravel.
Before locking swivels, first push stroller forward
a few feet to ensure the wheels are correctly
positioned.
Push buttons up or down, depending on model, to lock
or release swivels. Turn swivel to check that it is locked
or released.

Infant Safety
Seat/Carrier
OWNER'S MANUAL
Even if using this seat seems easy to figure out on
your own, it is very important to read this manual.
Your child’s safety depends on you installing and
using this seat correctly. READ THIS MANUAL!
Return this manual to the storage pocket on the back
of the safety seat for quick reference.
© 2000 Graco 413-11-00

Table of Contents
1. Warnings to Parents and Other Users
2. Registering Your Safety Seat
3. Important Safety Information
3.1 About Your Child
3.2 About Using this Safety Seat in Your Vehicle
3.3 A Warning About Air Bags
3.4 When the Safety Seat is Not Occupied
3.5 About the Life and Condition of this Safety Seat
3.6 Warnings About Using the Safety Seat as a Carrier
4. Selecting a Suitable Location for the Safety Seat
4.1 Consider these Basic Recommendations
4.2 Be Sure Your Vehicle Seat Meets All of These Requirements
4.3 Be Sure Your Vehicle Seat Belt is Safe to Use
A. Seat Belt Systems that are NOT Safe for Use with the
Safety Seat
B. Seat Belt Systems that are Suitable for Use with the
Safety Seat
........................................5
................................................6
............................................7-12
.......................................................7
............................8
..............................................9
..................................9
.......................10
..................11-12
........................13-20
............................13-14
.......14-15
..........................16
...........17-18
.............19-20
2

3
5. Adjusting the Features and Components of the Safety Seat
5.1 Features and Components: 3-Point Harness
5.2 Features and Components: 5-Point Harness
5.3 Removing and Attaching the Safety Seat Base
5.4 Adjusting the Handle
5.5 Attaching the Canopy
6. Inserting the Harness Straps in the Proper Slots
7. Securing Your Child in the Safety Seat/Carrier
8. Securing the Safety Seat/Base in Your Vehicle
9. Using the Safety Seat in an Airplane
10. Using the Safety Seat with a Graco
®
Stroller
11. Cleaning and Maintenance
12. Replacement Parts
.............21-29
.....................22-23, 26
.........................24-26
..........................27
...............................................27-28
...............................................28-29
.........................30-36
..........................37-41
..........................42-54
.......................................55
...............................56
..............................................56-59
......................................................60-61

Our goal is to make every product the best it can be! We are also committed to
supporting our products after purchase. If you would like to speak to Graco about
your product, please call our Customer Service Department at 1-888-224-6549.
Our knowledgeable staff is ready to answer any questions you may have
concerning parts, use or maintenance.
When you call, please have the model and serial numbers ready so your call
may be processed quickly and efficiently. The model and serial numbers can be
found on a label underneath your safety seat.
Keep this manual in the back pocket of the safety seat.
4

5
1. Warnings to Parents and Other Users
DO NOT install or use this safety seat until you read and understand the
instructions in this manual and in your vehicle owner’s manual. DO NOT let
others install or use the safety seat unless they understand how to use it.
Failure to properly use this safety seat increases the risk of serious injury or
death in a sharp turn, sudden stop or crash. Your child’s safety depends on you
installing and using this safety seat correctly.
Your child’s safety depends on:
1. Choosing a suitable location in your vehicle. Some seating positions, such
as those equipped with air bags, may not be safe locations for this safety seat.
2. Inserting the harness straps in the proper slots for your child.
3. Properly securing your child in the safety seat.
4. Placing safety seat/base in a rear-facing position.
5. Properly routing the vehicle seat belt.
6. Properly reclining the safety seat.
7. Properly securing the safety seat in the vehicle using a seat belt designed
to restrain a safety seat. Many seat belts are NOT safe to use with safety seats,
even though they can easily be threaded through the safety seat!

2. Registering Your Safety Seat
Model No.
Serial No.
Purchase Date
Dear Customer,
Please fill in the above information. The model and serial numbers can be
found on a label underneath your safety seat.
Fill out the prepaid registration postcard attached to the seat pad and mail it
today. Child restraints could be recalled for safety reasons. You must register
this restraint to be reached in a recall. Send your name, address and serial
number to:
Graco Children’s Products Inc.
P.O. Box 100
Elverson, PA, 19520-9974
or call 1-888-224-6549.
For recall information, call the U.S. Government’s Auto Safety Hotline at
1-800-424-9393 (202-366-0123 in D.C. area).
6

3. Important Safety Information
No safety seat can guarantee protection from injury. However, proper use of
this safety seat reduces the risk of serious injury or death to your child.
3.1 About Your Child
THIS SAFETY SEAT IS DESIGNED for use only by children who
weigh 20 lbs. (9 kg) or less and whose height is 26 inches (66 cm) or less.
Using this safety seat with a child who is heavier than 20 lbs. or more than
26 inches in height may increase the risk of serious injury or death.
If your baby seems too small for this safety seat, you may want to consider
Graco’s Cherish
™
car bed for the first few months.
SOME SPECIAL NEEDS CHILDREN, such as pre-term babies or
those who have tested positive for positional apnea, may be at increased
risk of suffering breathing or other difficulties in a safety seat. If your child
has special needs, we recommend that you have your physician or hospital
staff evaluate your child and recommend the proper safety seat or car bed
before using this product.
NEVER LEAVE CHILD UNATTENDED.
DO NOT dress your child in bulky clothing. Use clothing which allows
the harness to securely latch between your child’s legs.
7

3.2 About Using this Safety Seat in Your Vehicle
YOUR CHILD CAN BE INJURED in a vehicle even if you are not in
a crash. Common events such as sudden braking and sharp turns can injure
your child if the safety seat is not properly installed or if your child is not
properly secured in the safety seat.
THERE ARE MANY KINDS of vehicles, seat belt systems, and occupant
protection systems. As a result, it is not possible for this manual to tell you
everything you need to know about putting this safety seat in your vehicle.
You must carefully follow the instructions provided by your vehicle
manufacturer, in addition to the information in this manual.
SOME VEHICLES do not have any safe location for this safety seat, and
many vehicles have seat belt systems that must not be used with the safety
seat because those systems will not safely hold the safety seat in place.
Again, you must refer to both this manual and your vehicle owner’s manual
for complete information.
NEVER COMBINE another manufacturer’s base or safety seat with a
Graco
®
base or safety seat. Call Graco for additional or replacement items.
THIS SAFETY SEAT conforms to all applicable Federal Motor Vehicle
Safety Standards.
THIS SAFETY SEAT is certified for use in Motor Vehicles and Aircraft.
8

3.3 A Warning About Air Bags
NEVER PLACE THIS SAFETY SEAT IN A VEHICLE SEATING
LOCATION THAT HAS AN AIR BAG. If an air bag inflates, it can hit
the safety seat with great force and cause serious injury or death to your
child. Refer to your vehicle owner’s manual for information about air
bags and child safety seat installation.
3.4 When the Safety Seat is Not Occupied
PARTS OF THE SAFETY SEAT can become very hot if the seat is left
in the sun. Contact with these parts can burn your child’s skin. Cover the
safety seat with a blanket if it will be exposed to the sun, and always touch
the surface of any metal or plastic part before putting your child in the
safety seat.
NEVER LEAVE a safety seat or safety seat base unsecured in your
vehicle. When you are not using the safety seat, either remove it or make
sure that it is securely belted in the vehicle. An unsecured seat can be
thrown around and may injure occupants in the event of a sharp turn,
sudden stop or crash.
DO NOT PLACE HEAVY OBJECTS on safety seat while in storage.
Heavy objects may deform safety seat over a period of time.
9

3.5 About the Life and Condition of this Safety Seat
REPLACE THE SAFETY SEAT AND BASE after an accident of any
kind. An accident can cause damage to the safety seat and base that you
cannot see.
EVEN IF THE SAFETY SEAT AND BASE are not involved in an
accident, stop using both and throw them away six years after the date
of manufacture. The date of manufacture can be found on the serial label
located on the underside of the safety seat or base.
DO NOT MODIFY YOUR SAFETY SEAT OR BASE or use any
accessories or parts supplied by other manufacturers. Only make adjust-
ments to the safety seat or base as recommended in these instructions.
NEVER USE THE SAFETY SEAT OR BASE if it has damaged or
missing parts. Do not use a cut, frayed or damaged safety seat harness
or vehicle seat belt.
NEVER GIVE THIS SAFETY SEAT OR BASE to someone else
without also giving them this manual.
NEVER USE A SECOND-HAND SAFETY SEAT OR BASE whose
history you do not know.
10

3.6 Warnings About Using the Safety Seat as a Carrier
FALL HAZARD:
Child’s movements can slide carrier. Never place carrier near edges of
counter tops, tables or other high surfaces. Always stay within arms reach
whenever carrier is not on floor/ground.
Be sure handle locks into position before lifting carrier.
SUFFOCATION HAZARD:
Infant Carrier can roll over on soft surfaces and suffocate child. Never
place carrier on beds, sofas or other soft surfaces.
STRANGULATION HAZARD:
Child can strangle in loose restraint straps. Always use harness, never
leave child in carrier when straps are loose or undone.
NEVER LEAVE CHILD UNATTENDED.
USE ONLY WITH STROLLERS that are part of the Graco Travel System.
11

NEVER PLACE carrier in the top of a shopping cart.
Strings and cords can cause strangulation. Keep strings and cords away
from child:
DO NOT place carrier near a window where cords from blinds or drapes
can strangle a child.
DO NOT hang strings on or over the carrier.
DO NOT place items with a string around a child’s neck, such as hood
strings, pacifier cords, etc.
DO NOT attach strings to toys.
12
/