TC 760
Réalisation :
EVOLUTION
+ 32 / 69 250 500
NOTICE D’UTILISATION
OPERATING INSTRUCTIONS
MODO DE EMPLEO
GEBRAUCHSANWEISUNG
ISTRUZIONI PER L’USO
GEBRUIKSHANDLEIDING
MANUAL DE UTILIZAÇÃO
INSTRUKCJA UŻYTKOWANIA
HASZNÁLATI ÚTMUTATÓ
Инструкция по использованию
Exe TC 760.qxd:TC 760 3/20/2008 3:58 PM Page 1

TC 760
Réalisation :
EVOLUTION
+ 32 / 69 250 500
DECATHLON - 4, Boulevard de Mons - 59665 Villeneuve d'Ascq - France
Notice à conserver
Keep these instructions
Bitte bewahren Sie diese Hinweise auf
Istruzioni da conservare
Conservar instrucciones
Bewaar deze handleiding
Instruções a conservar
Zachowaj instrukcję
Őrizze meg a használati útmutatót
Сохранить инструкцию
Réf. pack : 1039.072 - CNPJ : 02.314.041/0001-88 -
Made in Taiwan - Hecho en Taiwan - Произведено в Таиланде -
Exe TC 760.qxd:TC 760 3/20/2008 3:58 PM Page 156

3
Exe TC 760.qxd:TC 760 3/20/2008 3:58 PM Page 3

4
Exe TC 760.qxd:TC 760 3/20/2008 3:58 PM Page 4

5
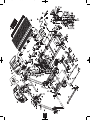
MONTAGE • ASSEMBLY •MONTAJE • MONTAGE • MONTAGGIO • AFWERKING
• MONTAGEM • MONTAŻ • SZERELÉS • Сборка •
1a
1b
1c
1d
1e
x4
Exe TC 760.qxd:TC 760 3/20/2008 3:59 PM Page 5

6
x2
x2
2a
2d
2b
2c
Exe TC 760.qxd:TC 760 3/20/2008 3:59 PM Page 6

7
Exe TC 760.qxd:TC 760 3/20/2008 3:59 PM Page 7

8
x2
3a
3b
3c
3d
Exe TC 760.qxd:TC 760 3/20/2008 3:59 PM Page 8

9
x4
4a
4b
4c
Exe TC 760.qxd:TC 760 3/20/2008 3:59 PM Page 9

10
CLIC !
x6
5b5a
5d
5c
x4
Exe TC 760.qxd:TC 760 3/20/2008 4:00 PM Page 10

24
ENGLISH
You have chosen a piece of fitness equipment by DOMYOS. We thank you for your confidence in us.
We have created the DOMYOS brand to provide a way for all athletes to train at home.
Our products are created by athletes for athletes.
We would like to receive your comments and suggestions concerning DOMYOS products.
Therefore, your store team and the DOMYOS product design departments are ready to listen.
If you would like to write us, you may send us an email at the address of the following site: www.decathlon.com choosing your country.
We wish you successful training and hope that you will enjoy using this DOMYOS product.
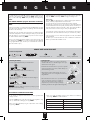
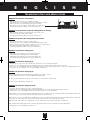
TC 760
188 x 82 x 133 cm
74 x 33 x 52 inch
92,5 kg
203,9 lbs
Model No: _ _ _ _ _ _ _ _ _ _ _ _ _ _ _ _ _ _ _
Serial no. _ _ _ _ _ _ _ _ _ _ _ _ _ _ _ _ _ _ _ _
Maximum speed 18 km/h (11 mph)
Voltage 220-240 Volts AC / 50 Hertz
Wattage 1680 watts
Motor power output 2 hp
Peak motor power 4.5 hp
Product weight 87 kg (192 lbs)
Boxed weight 100 kg (220 lbs)
Dimensions in unfolded position 188 x 82 x 133 cm (74 in x 32 in x 52 in)
Dimensions in folded position 97 x 82 x 162 cm (38 in x 32 in x 64 in)
Box dimensions 187 x 87 x 34 cm (74 in x 34 in x 13 in)
Level of sound pressure measured 1m from the surface of the machine and at a
height of 1.60m above the ground: 75±5dB (maximum speed).
CAUTION
• Read all warnings affixed to the product
• Read all the warnings and instructions in this operating
manual before using this machine.
• Retain this manual for future reference.
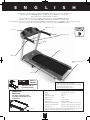
Serial no.
Console
Belt
Footrest
Grab rail
Safety key + clip
Upright
Heart rate sensor
Belt tension adjusting
screw
For future reference, please
write the serial number in the
space above.
MAX
Exe TC 760.qxd:TC 760 3/20/2008 4:01 PM Page 24

25
ENGLISH
ng
WARNINGS
WARNINGS
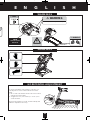
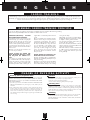
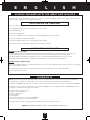
HORIZONTAL ADJUSTMENT
To assure total stability of the machine on the floor, you
can adjust the 2 screws located under the front of the
frame.
1. Lift one side of the machine and turn the screw located
under the front of the frame.
2. To tighten the screw, turn clockwise; to loosen it, turn
counter-clockwise.
Every time the machine is moved, check the stability and
make this adjustment if necessary.
NOTE
READ THIS NOTICE
BEFORE USE
Never remove or open this casing
• Important: Always use the key
WARNING
MAX
WARNING
Exe TC 760.qxd:TC 760 3/20/2008 4:01 PM Page 25

26
ENGLISH
1. Read all the instructions in this manual before using the product. Only use
this product in the manner described in this manual. Keep this manual for
the entire life of the product.
2. The owner is responsible for ensuring that all users of this product are pro-
perly informed about how to use this product safely.
3. Domyos disclaims all responsibility for personal injuries or property
damage caused by improper use of this product by the purchaser or by
any other person.
4. This machine complies with European standards (EN-957-1 and 6, class
HB and standard CE) pertaining to fitness products in home and non-the-
rapeutic use (equivalent to GB17498)
ELECTRICAL HAZARDS
5. Immediately following each use and before any cleaning, assembling, or
maintenance, turn off the main switch and disconnect your treadmill from
the power source.
6. Never leave the machine plugged in without supervision.
7. Never use this machine with a damaged cable or electrical plug, if it has
tipped over, if it has been damaged, or if it has come into contact with
water.
8. Do not use the machine in a place where aerosol products are used or
where oxygen is being administered.
9. Never pull the machine by the electrical cord. Do not use the cord as a
handle.
10. If you need to use an extension cord, only use one with a ground
connection, with a maximum length of 1.5 m (4.92 ft)
11. Keep the electrical cord away from hot surfaces.
12. Warning: only plug the machine into an outlet that is properly groun-
ded.
13. The treadmill must be connected to an electrical outlet on a 10-A system
(amperes).
14. Your home's electrical installation must be in good condition and com-
pliant with applicable standards.
15. Your home’s fuse board must be fitted with a 30 mA ground fault circuit
breaker. This device detects leaks of electricity and ensures the safety of
persons.
16. In certain areas, installation of a lightning arrester on the fuse board is
mandatory. Check whether the regulations in your region or country
require a lightning arrester to be installed.
Grounding instructions
This product must be grounded. In case of malfunction or breakdown, the cur-
rent is routed to the ground to reduce the risk of electrocution. This machine is
also equipped with a cable that has a ground wire and plug. This plug must be
connected to a properly installed electrical outlet and provided with a ground
in accordance with current regulations. Improper connection between the plug
and the machine’s ground may cause a risk of electrocution. In case of doubt,
have a qualified electrician verify that the product is properly grounded. Make
no modifications to the plug supplied with your treadmill. If it does not match
your electrical outlet, have a qualified electrician install a properly grounded
outlet.
DANGER:
Before performing any maintenance or visual inspection, turn off the main
switch and remove the electrical plug from the power outlet. Never remove
the motor cover. Adjustment and handling other than as described in this
manual must be carried out only by an authorized technician. Failure to
observe this safety measure may lead to serious injury or death.
PHYSICAL HAZARDS:
17. The assembly of this machine must be performed by an adult (2 recom-
mended).
18. Never introduce any object into any opening.
19. Keep your hands away from all moving parts. Never put your hands or
feet underneath the treadmill.
20. This product is intended for domestic use only. Do not use this product
in any commercial, rental, or institutional setting.
21. Use the product indoors on a level surface, away from moisture and dust
and in a clear area. Be sure there is enough space for safe access to and
passage around the machine. Leave a safety clearance of 2 m (6.6 ft)
behind the treadmill and 0.65 m (2.13 ft) on each side. When using the
machine, please ensure that the space around your machine always
remains sufficiently unobstructed. Do not store or use the product outdoors.
See the illustration below.
22. Never let liquids spill on the treadmill. Tip: if you drink while running,
use a sports bottle with a closeable top.
23. Never damage the cord.
24. It is the responsibility of the user to inspect and tighten all parts after
assembly and before each use of the product. Do not let the adjustment
mechanisms protrude. Immediately replace worn or defective parts.
25. Before each use, make sure that the treadmill is properly aligned and
centered on the frame.
26. Check the tension of the belt after 2 hours of use, and then every 10
hours (see maintenance section).
27. Check the lubrication of the belt every 10 hours of use (see maintenance
section).
Comment: Failure to carry out regular and preventive mainte-
nance may void the warranty.
28. Do not try to repair or alter this product yourself.
I29. If your product is damaged, return it to your Decathlon store and do not
use it again until it has been completely repaired. Use only Decathlon
replacement parts.
30. Do not store this product in a damp place (next to a pool, bathroom
etc.).
31. Maximum user weight: 286 lbs. (130 kg).
SAFETY
Warning: To reduce the risk of serious personal injury and product damage, read the following important instruc-
tions for safe use before using the product.
FRONT
REAR
LEFT SIDE
RIGHT
SIDE
Top view
minimum approximately
25.5 in. (0.65 m)
minimum approximately
25.5 in. (0.65 m)
minimum approximately
6.5 ft (2 m)
Exe TC 760.qxd:TC 760 3/20/2008 4:01 PM Page 26

27
ENGLISH
USE
CAUTION
Please read the following instructions carefully
before using your treadmill.
• Make sure there is adequate ventilation for the duration of your workout.
• Increase your speed gradually.
• Before beginning a workout, please make sure that the safety key clip is
carefully fastened to your clothing and that the safety key is correctly atta-
ched in its place.
• Always begin by standing on the footrests, not on the belt. Before walking
on the belt, wait until the speed of the belt is at least mile (1 km) per hour.
Never start the treadmill at more than 1.8 miles (3 km) per hour.
• When finishing your workout, wait for the treadmill to stop completely before
getting off.
• When using your treadmill, never hang a towel on the machine while it is
running.
• Always use the rails and the handlebar when climbing onto or off the
machine and when changing the incline or the speed.
• This treadmill is equipped with a safety key. Always attach the clip of the
security key to your clothing so that it will detach completely from the console
and stop the machine if necessary.
• Wear athletic or walking shoes with high-traction treads. To avoid damaging
your machine, make sure that the soles are free of all debris, such as gravel
and rocks.
• Put your hair up so that it does not get in the way during exercise.
• Do not wear loose clothing that may get in the way while you are exerci-
sing.
• To protect the floor, cover the area under the product with a protective mat,
available from Decathlon stores.
• Never allow more than one person at a time on the running belt.
• Make sure your shoelaces pose no risk of getting caught on the moving belt
• Keep children and pets away from the product at all times.
• This product must never be used by animals (e.g. dog training etc.).
• Do not use this product if you have a PACE MAKER.
• Never run the motor when the treadmill is folded up.
WARNING: If you feel dizziness, nausea, chest pain, or any other
abnormal symptom, stop your exercise immediately and consult
your doctor before continuing.
Instructions for use
• Immediately after assembly, let the treadmill run with no load for 20 minutes
at 6 miles (10km) per hour so that all the components can settle in.
• To break the product in properly, do not exceed 6 miles (10 km) per hour
for the first 2 hours of use.
• Always stretch your muscles before beginning your exercise program.
Warm up gradually by walking slowly. Gradually increase the intensity of
your workout until you reach your desired speed. Before ending a workout,
gradually reduce your speed to an easy walk to allow your heart rate
to return to normal.
Always do the following before ending a workout:
1. Before ending your workout, allow time to slow down your pace and let
your heart rate return to normal.
2. Grab the rails and push on the " - " speed button. Slow your pace to an
easy walk (1/2 mph - 1km/h).
3. Before getting off the treadmill, make sure that the treadmill has come to a
complete stop.
At the end of each exer-
cise session, always do
the following:
1. Remove the safety key from
the console and store it out of
the reach of children.
2. Always stop the machine using
the main switch.
3. Unplug the electrical cable from the power source. This is especially impor-
tant if you do not use your machine for an extended period of time.
4. Always place and store the electrical cable far away from areas where peo-
ple walk.
5. Wipe all surfaces of your machine with a dry cloth or towel, especially to
remove perspiration from the grab rails, the console, the belt and all other
components of your machine.
6. When you put the treadmill away, check that the left piston is locked before
moving or putting away the treadmill.
7. Do not try to lift, lower, or move the treadmill before it is assembled.
Consult with your physician before beginning any exercise program. This is especially important for persons over 35 years of age or
for those who have had previous health problems and who have not done any sports for several years.
Read all instructions before use.
Exe TC 760.qxd:TC 760 3/20/2008 4:01 PM Page 27

28
ENGLISH
LEFT SCREEN
Constantly indicates the incline increment that can vary from 0 to 12 (e.g. from
0% to 12%).
CENTRAL SCREEN DISPLAY
“TIME”: Duration of the workout.
“DISTANCE”: Distance covered in kilometers
“CALORIES”: Estimates of calories expended.*
Display 1 = 1 Cal.
“PULSE”: Indication of your heart rate measured by the handlebar sensors or
the chest belt provided with the product.*
* Important: this is only an estimate, which in no case should be considered a
medical certainty.
“LAP”:
Indicates the number of laps around the stadium that you have completed.
One lap around the stadium is equivalent to a distance of 1/4 mile (400 m)
“SCAN” :
Automatic scroll through all the information displayed by the central screen.
The counter’s information is expressed as:
TIME : 88 :88 (minutes)
DISTANCE : 88.88 (km or miles)
CAL: 8888
PULSE : 888 (battements par minute)
LAP : 8888
Use the “MODE” key to select the information you want to display.
RIGHT SCREEN DISPLAY
“SPEED”: Running speed expressed in kilometers per hour.
Displays the treadmill speed from 1km/h to 18km/h preset by the speed control
button in increments of 0.1 km/h.
"START/STOP" :
1. To interrupt the workout, press on "STOP" once.
To resume the workout, press "START."
2. To reset the workout to zero, hold the “STOP” button down for 3 seconds.
"MODE" :
1. To select the program and confirm a value selection.
SPEED "
+ " and " - " :
1. While setting the workout parameters, select a program or increase or reduce
the duration of the workout.
2. During the workout:
+ : increases the speed of the treadmill in increments of 0.1 km per hour.
- : reduces the speed of the treadmill in increments of 0.1 km per hour.
INCLINE "
+ " and " - " :
1. While setting the workout parameters, select a program or increase or reduce
the duration of the workout.
2. During the workout:
+ : increases the incline of the running surface in increments of 1°.
- : reduces the incline of the running surface in increments of 1°.
STADIUM DISPLAY:
Counts the number of laps (400 m or 1/4 mile) completed during the workout.
When all the red blinkers are on around the stadium, you have covered 400 m
(1/4 mile).
THE CONSOLE
The TC760 offers 9 automatic preset programs
(4 speed programs and 5 incline programs) as
well as 1 program for your heart rate and 1 per-
sonal program.
With the exception of the personal and heart
rate programs, you can select 3 different levels
of difficulty per program.
You can directly access a preset speed and/or
incline with the 8 vertical buttons marked
“SPEED” and “INCLINE” plus a number.
The 4 buttons marked +/- increase and decrease
the “SPEED” in increments of 0.1km/h and the
“INCLINE” of the belt in increments of 1 segment
of 1%.
The same adjustments can be made with the two
adjusting buttons on the left and right grab rails,
marked +/-.
The information is presented on 3 screens.
Left: Incline in 12 increments
Middle: Calories, Distance, Time, Pulse, 400
meter laps.
Right: Speed between 1 km/h and 18 Km/h
The safety key must be placed on the yellow
area at the bottom center of the console.
BUTTONS
FUNCTIONING OF THE CONSOLE
Exe TC 760.qxd:TC 760 3/20/2008 4:01 PM Page 28

2929
ENGLISH
SIMPLIFIED START:
Attach the safety key to your clothing with the clip. This is mandatory to ensure
your safety. As soon as this key is removed, the treadmill stops instantly.
After inserting the safety key, the easiest way to start your workout is to press
on the "START" button. After a 3-second countdown the treadmill starts at a
speed of 1 km/h in the MANUAL program.
Speed selection:
You can select the speed in three different ways
1) "+/- SPEED" buttons on the console; To set the speed, press on "+/-
SPEED". Each time you press on this button you adjust the speed in incre-
ments of 0.1 km/h
2) Speed button on the right handlebar; the same function is obtained
by pressing on the "+/-" button located on the right handlebar.
3) “Direct access to speed functions” buttons; these are the 4 vertical
buttons marked with the preset speed values.
To choose the pre-selected speed, press the button that corresponds to the des-
ired speed 4Km/h, 8Km/h, 12Km/h or 16km/h
You can then adjust the speed more precisely with the “SPEED +” and “-” but-
tons on the console or the right handlebar.
Selecting the incline:
Follow the same procedure as for adjusting the speed, using the "+/-
INCLINE buttons ” on the console or the left handlebar.
"Direct access to incline functions" buttons:
These are the 4 vertical buttons marked with the pre-selected incline values.
To choose a pre-selected incline, press on the button corresponding to the
selected incline increment 4, 6, 8 or 10
You can then adjust the incline with more precision using the “INCLINE +/- ”
buttons on the console or the left handlebar.
Each pre-selected program (P1 to P9) is made up of 10 segments with a set speed
or incline. In these programs, only the time and intensity can be adjusted.
The “USER” program enables you to set each of the segments separately for the
time, speed and incline.
The HRC program enables you to select the heart rate and a maximum speed not
to be exceeded.
Selecting the P1 to P9, USER and HRC programs:
Turn the treadmill on and select a program with:
a) “+/- SPEED” on the console or +/- of the adjusting button on the right
handlebar
b) “+/- INCLINE” on the console or +/- of the adjusting button on the left
handlebar
The program selected is displayed on the central screen: P1 to P9, USER, HRC
c) confirm your choice using “MODE”.
Setting programs P1-P9:
You can then choose from three intensity levels per program “L1 to L3” (displayed
on the central screen) using the same procedure and the same buttons as for selec-
ting the programs.
Confirm your choice with “MODE”
Selecting the duration of exercise:
The last step before beginning your program-guided workout is to select the dura-
tion.
To do so, use the same procedure and the same buttons as for selecting the speed.
In addition to the total time of the workout, you set the duration of each of its 10
segments.
For example: Total duration selected = 30 minutes, duration of each segment
= 3 minutes.
Total duration selected = 60 minutes, duration of each segment
= 6 minutes.
When you go from one segment to the next one, a beep sounds.
MANUAL program:
The MANUAL programme can be selected by pressing START after inserting the
safety key.
The MANUAL programme gives you the option of setting a TIME objective.
To set your objective:
1. Press MODE
2. Set your race time using the “+/-“ buttons (from 1 to 99 min).
3. Press START to start exercising. Your set objective will begin to count down as
soon as you start exercising.
4. While exercising you can vary your speed and incline by pressing the “+/-“ but-
tons.
5 km “P9” program:
This program has a predefined distance of 5 kilometers and a preset incline profile.
It stops automatically when this distance is reached. This means that you cannot set
the time or calories in P9. However, you can vary the distance to be covered from
1 to 10 km.
“U1” USER program:
a) Select the “U1 ” user program in the same way as the other programs using the
“+/” buttons and confirm with “MODE”.
b) Next, enter the target time of the program using “+/-”.
c) Enter the speed for each segment of the program, one after the other, with the
“+/- SPEED” buttons, and then select the incline using the “+/- INCLINE ” but-
tons. Confirm the selection using “MODE” and go to the next segment, until all 10
segments of the program have been set.
You can now start your workout by pressing on “START”.
FUNCTIONING OF THE TREADMILL
THE PROGRAMS
Exe TC 760.qxd:TC 760 3/20/2008 4:01 PM Page 29

30
ENGLISH
d) To make changes to your USER “U1” program, select it as explained in point
a) and choose the segment(s) to be changed using “MODE”. Change the values
using + /- and confirm using “MODE”. Start your training session by pressing
“START”
HRC CARDIO TRAINING program (Heart Rate Controlled):
a) Select the “ HRC” program as described above and confirm by pressing on
“MODE”.
b) Enter your age with the “+/-” buttons followed by the MODE button. The right
screen of the console will indicate a value corresponding to 60% of the maximum
heart rate* for the selected age.
* Important: this is only an estimate, which must under no circumstances be taken
as a medical certainty. Please consult a cardiologist to obtain your personal data!
c) This step enables you to select the heart rate of your choice. Select it using the
“+/-” buttons and then validate using “MODE”
d) Now, you can enter the maximum speed that you do not want to exceed, using
"+/-" and pressing on “MODE” to go on to the next setting step. The treadmill will
never go higher than this speed, even when your current heart rate is below the
target value selected in step c).
e) The last setting step is to enter the exercise time you want, using "+/-" and confir-
ming with “MODE ” followed by “START” to begin your training session.
Please note:
When the “HRC ” program begins, there is always a warm-up phase that lasts 3
minutes, at 3 km/h (2 mph) and with a 5-increment incline.
Your heart rate will not be monitored until this phase has been completed!
Your heart rate is measured every 5 to 10 seconds. If it is below the target heart
rate, the treadmill will increase the speed by 0.2 km/h each time it measures your
heart rate. When the speed has increased by 1 km/h, the program will add an
extra incline increment in order to help you reach your target heart rate.
If your heart rate exceeds its target value, the speed will decrease by 0.4 km/h
per measurement. The incline will also decrease by one increment every 2 km/h.
If the console does not receive a heart rate signal for 30 seconds, the treadmill
stops automatically.
We advise you to use the heart rate belt to ensure a reliable flow of information
between your heart and the treadmill's console
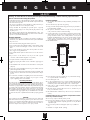
HEART RATE MONITOR BELT
3. Using the belt
• Before placing the emitter on your chest, moisten the two
electrodes with water or a water-based gel to ensure opti-
mal transmission of the signal.
• Center the heart rate monitor belt on your chest or pectoral
muscles, directly above your sternum, with the battery com-
partment lid facing inwards.
• Adjust the belt so that the emitter always stays in close
contact with your skin. Do not overtighten, to avoid brea-
thing difficulties.
• If the heart-rate monitor belt is loose or positioned incor-
rectly, you may get an erroneous or irregular rea-
ding. You can check if the emitter is working pro-
perly and if it is positioned correctly by looking at
the flashing red indicator. This light should flash regularly.
Battery compartment lid
Emitter
1. Parts and components
2. Inserting the battery
• Insert the supplied CR2032 battery as illustrated below.
• First, insert the battery with the + pole towards the top.
• Place the seal and then the lid, with the two small dots aligned.
Tighten with a coin.
Important!
Make sure that the lid is tightly closed (around 1/2 turn) to prevent
perspiration or water from entering.
Flexible belt
Lithium battery CR2032, 3V
Waterproof seal
CALCULATING YOUR BODY MASS INDEX
You can calculate your body mass index and use it to assess your fitness and
its changes over time.
a) Select the “body” function in the same way as the other programmes, using
the “+/-” buttons and confirming by pressing “MODE”.
b) Enter your height (130-240cm) using the “+/-” buttons and confirming
by pressing “MODE”.
c) Enter your weight (23-180kg) using the “+/-” buttons and confirming
by pressing “MODE” to start the calculation.
Classification Body mass index
Slim < 18,5
Normal 18.5 - 24.9
Overweight 25 – 29.9
Obese ≥ 30
Exe TC 760.qxd:TC 760 3/20/2008 4:01 PM Page 30

31
ENGLISH
The following information is general in nature and must be considered for reference only. Thus, please adapt these recommendations to your personal needs for getting into
shape and enjoyment.
The treadmill has five preset training programs in its memory. When you use a program the treadmill automatically varies the speed.
INFORMATION CONCERNING THE PRESET PROGRAMS
Program P1 and P5:
CARDIOTRAINING
Program P2 and P6:
WEIGHT LOSS
Program P3 and P7:
WEIGHT LOSS
Program P4 and P8:
INTERMITTENT
Program P9:
CARDIOTRAINING
PAUSE FUNCTION:
At any time, you can PAUSE the treadmill by pressing ONCE on “STOP”. It will
restart with the same program settings as when it stopped, when you press “START”.
RESET FUNCTION:
Pressing for a long time on “RESET” clears the console to 0.
Stopping: The console stops automatically when there is no activity on the tread-
mill for 1 minutes.
Speed program Incline program
Programs
Intensity level
Segment 1
Segment 2
Segment 3
Segment 4
Segment 5
Segment 6
Segment 7
Segment 8
Segment 9
Segment 10
Exe TC 760.qxd:TC 760 3/20/2008 4:01 PM Page 31

32
ENGLISH
Maintenance/Warm-up: Gradual
effort starting with 10 minutes.
For maintenance work to stay in shape or get
back into shape, you can train every day for
about ten minutes. This type of exercise will
stimulate your muscles and joints, or it can be
used as a warm-up before physical activity.
To increase muscle tone in the legs, choose a
greater resistance and increase the duration
of the exercise.
Obviously, you can vary the resistance over
the course of your workout.
Aerobic exercise for getting into
shape: Moderate effort for a relati-
vely long time (35 minutes to 1
hour).
If you wish to lose weight, this type of exer-
cise, combined with a diet, is the only way to
increase the amount of energy your body
consumes. To do so, there is no need to push
yourself beyond these limits. Training on a
regular basis is what will produce the best
results.
Choose a relatively low resistance and per-
form the exercise at your own pace, but for
a minimum of 30 minutes. This exercise
should cause light perspiration to appear on
the skin, but should not in any case leave
you out of breath. It is the duration of the
exercise, at a slow pace, that will require
your body to draw energy from your fat
stores, as long as you run for more than
about thirty minutes a minimum of three
times per week.
Aerobic training for endurance: sus-
tained effort for 20 to 40 minutes.
This type of training aims to strengthen the
heart muscles significantly and improve respi-
ratory functioning.
Resistance is increased to increase breathing
during the exercise. This type of exercise is
more sustained than when you are working
out to get into shape.
Little by little, as you train, you will be able to
maintain this effort for a longer time, at a fas-
ter rhythm or with a greater resistance.
You can train a minimum of three times per
week for this type of training.
More intense workouts (anaerobic work and
red-zone work) are reserved for athletes and
require specific preparation.
After each workout, set aside several minutes
to walk at a slower speed and lower resis-
tance to warm down and slow your body
down gradually.
If you are just starting out, begin by exercising for several days at a low resistance without forcing it, taking
breaks if necessary. Gradually increase the number or duration of the sessions.
GENERAL CARDIO-TRAINING PRINCIPLE
CARDIO-TRAINING
Cardio-training is aerobic exercise (muscle development in the presence of oxygen) and helps you improve your cardiovascular capacity. More
specifically, you improve the tone of your heart muscle and blood vessels. Cardio-training brings the oxygen from the air you breathe to your
muscles. Your heart sends this oxygen throughout your body, especially to the muscles you are working on.
Warm-up phase: progressive effort
The warm-up is the preparatory phase for exercise and gets your body FULLY
READY to start working out. It is a way to PREVENT INJURIES TO TENDONS
AND MUSCLES. It involves two steps: WAKING UP THE MUSCULAR SYSTEM,
AND OVERALL WARM-UP.
1) You wake up your muscles with a SERIES OF SPECIFIC STRETCHES that PRE-
PARE YOU FOR EXERCISE: every muscle group is used, and the joints are
stimulated.
2) The overall warm-up makes it possible to put the cardiovascular and res-
piratory system into action progressively, for a better blood supply to the
muscles and better preparation for the effort. It should be long enough: 10
minutes for a recreational sport, and 20 minutes for a competitive sport.
Note that the warm-up should be longer for people age 55 and older, and
in the morning.
Workout
The workout is the main phase of your physical activity. By working out on a
REGULAR basis, you can improve your physical fitness.
• Anaerobic work for developing endurance.
• Aerobic work for developing cardio-pulmonary strength.
Warming down
This corresponds to low-level activity; it is the progressive “resting” phase.
WARMING DOWN brings your cardiovascular, respiratory and circulatory
systems and your muscles back to normal functioning (thereby preventing unde-
sirable side effects such as lactic acid, the accumulation of which is one of the
major causes of muscle pain namely, cramps and stiffness).
Stretching
Stretching must follow the warm-down phase, while your joints are still warm,
in order to reduce the risk of injury. Stretching after exertion: minimizes
MUSCLE STIFFNESS due to the accumulation of LACTIC ACID, and stimulates
BLOOD CIRCULATION.
A
B
C
D
PHASES OF PHYSICAL ACTIVITY
Exe TC 760.qxd:TC 760 3/20/2008 4:01 PM Page 32

33
ENGLISH
CARE AND MAINTENANCE
It is important to be sure that the belt is always perfectly centered. Your running
style and a surface that is not level may move the belt off center. If this occurs,
slight adjustment of the two screws at the rear of the machine is necessary.
1. Press the "START" button to turn on the treadmill; then increase the speed to 3
mph (5 km/h)
2. Stand at the rear of the machine to check the misalignment of the belt.
3. If the belt strays toward the left, turn the left adjusting screw clockwise a quar-
ter-turn and the right adjusting screw counter-clockwise a quarter-turn
4. If the belt strays toward the right, turn the right adjusting screw clockwise a
quarter-turn and the left adjusting screw counter-clockwise a quarter-turn
5. Watch the alignment of the belt for about two minutes and repeat steps 3, 4,
and 5 if necessary.
You need to adjust the belt tension any time it begins to slip on the rollers. This
operation increases the life of the components of your machine.
Check the tension of the belt after 2 hours of use, and then every 10 hours
When adjusting the belt tension, keep the belt as loose as possible.
1. Press the "START" button to start the treadmill; then increase the speed to 3 mph
(5 km/h).
2. Turn the two adjusting screws clockwise equally, about a quarter-turn.
3. Slow down the belt as you hold onto the handlebar and apply more weight than
when you are walking (as if you were walking downhill). If you slow down the
belt too quickly it may slip.
4. If the belt slips, tighten the adjusting screw a quarter-turn clockwise, and if neces-
sary repeat steps 2 and 3.
Always make sure not to over-tighten the belt.
Before cleaning, make sure the machine is turned off and unplugged.
To remove dust from the machine, use a vacuum cleaner and carefully clean all visible components.
To remove a film of dirt, use a small damp rag.
Never immerse any component of the machine in any liquid.
Fig. A Fig. B
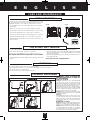
BELT ALIGNMENT
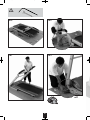
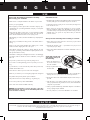
FOLDING/UNFOLDING
CLEANING
ADJUSTING BELT TENSION
HE TREADMILL SHOULD BE SWITCHED OFF
AND UNPLUGGED WHEN IT IS BEING FOL-
DED AND UNFOLDED.
Folding the treadmill:
Image 1: Stand at the rear of the treadmill with
your feet on the ground. Your left foot should be
behind the running belt and your right foot should
be to the right of the running belt. Place your left
hand under the running belt and with your right
hand pull the wheel to release it. The wheel is situa-
ted to the right of the belt. Start to lift the treadmill
by a few centimetres keeping the wheel pulled out.
Keep your legs bent and your back straight.
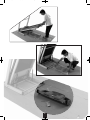
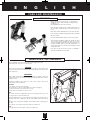
Image 2: Keeping your legs bent and your back
straight, place both hands under the running belt
and lift the treadmill.
Image 3:
The treadmill will lock into a vertical position once
you have heard the “click” of the lock. If the tread-
mill does not lock, lower it by a few centimetres then
start the stage again with your legs bent and your
back straight.
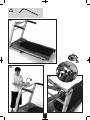
Unfolding the treadmill:
Image 1: With your left hand, gently push forward
against the treadmill, and whilst maintaining this
pressure use your right hand to release the wheel.
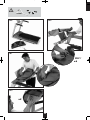
Image 2: Place both hands under the running belt;
now the treadmill can be unfolded. You can support
the treadmill whilst it is lowering, not forgetting to
keep your legs bent and your back straight.
SPACE
SPACE
WARNING
12
12
3
FOLDING
UNFOLDING
Exe TC 760.qxd:TC 760 3/20/2008 4:01 PM Page 33
Page is loading ...
Page is loading ...
Page is loading ...
-
 1
1
-
 2
2
-
 3
3
-
 4
4
-
 5
5
-
 6
6
-
 7
7
-
 8
8
-
 9
9
-
 10
10
-
 11
11
-
 12
12
-
 13
13
-
 14
14
-
 15
15
-
 16
16
-
 17
17
-
 18
18
-
 19
19
-
 20
20
-
 21
21
-
 22
22
-
 23
23


Ask a question and I''ll find the answer in the document
Finding information in a document is now easier with AI