Nikon F6 User manual

Category
Bridge cameras
Type
User manual
Instruction Manual
En
P930_En 04.10.19 7:18 PM Page 1
2
Contents
Before You Begin .............................................................................................2-14
Introduction .......................................................................................................4-5
Nomenclature/Controls ....................................................................................6-14
Camera body...............................................................................................6-7
Top LCD panel ................................................................................................8
Viewfinder display...........................................................................................9
Rear LCD panel (shooting data display) .........................................................10
Rear LCD panel (menu display) .....................................................................11
Command Dials and operating buttons ...................................................12-13
Multi-selector................................................................................................14
Basic Operation ...........................................................................................15-36
1. Installing Batteries....................................................................................16-17
2. Checking Battery Power ..........................................................................18-19
3. Mounting a Lens .....................................................................................20-21
4. Loading Film and Setting Film Advance Mode .........................................22-23
5. Setting Focus Mode, AF Area Mode and Focus Area................................24-25
6. Setting Metering System and Exposure Mode..........................................26-27
7. Holding the Camera and Focusing ...........................................................28-29
8. Confirming Indications in Viewfinder and Releasing the Shutter ..............30-31
9. Rewinding the Film ..................................................................................32-33
Setting Language and Date/Time ...................................................................34-36
Detailed Operation .....................................................................................37-86
Lens Compatibility..........................................................................................36-42
CPU Nikkor ...................................................................................................38
Non-CPU Nikkor ...........................................................................................39
Using a non-CPU Nikkor lenses.....................................................................40
Using a non-AI lenses ..............................................................................41-42
Film ...............................................................................................................43-47
Aligning frame counter and number of frame on the film/
Confirming film advance status.....................................................................43
Setting and confirming film speed ................................................................44
Selecting film advance mode ........................................................................45
Film rewinding with button operation...........................................................46
Rewinding film using the film rewind crank ..................................................47
Autofocus ......................................................................................................48-59
Selecting AF Servo ...................................................................................48-49
Selecting focus area.................................................................................50-51
Selecting AF Area mode ..........................................................................52-53
Combinations of AF functions (Single Servo AF: AF-S) .............................54-55
Combinations of AF functions (Continuous Servo AF: AF-C) ....................56-57
Focus lock................................................................................................58-59
Situations Where Autofocus May Not Work As Expected ....................................60
Manual Focus......................................................................................................61
Exposure Metering System .............................................................................62-63
Shooting in Each Exposure Mode...................................................................64-71
Programmed Auto ...................................................................................64-65
P930_En 04.10.19 7:18 PM Page 2
3
Before You Begin
Basic Operation
Detailed Operation
Menu Guide
Flash Photography
Miscellaneous
Shutter-Priority Auto................................................................................66-67
Aperture-Priority Auto .............................................................................68-69
Manual....................................................................................................70-71
Auto Exposure Lock .......................................................................................72-73
Exposure Compensation......................................................................................74
Auto Exposure Bracketing ..............................................................................75-79
Long Time Exposure ............................................................................................80
Diopter Adjustment/LCD Illuminator....................................................................81
Self-Timer Operation ...........................................................................................82
Depth-of-Field Preview/Film Plane Indicator .........................................................83
Mirror Up Photography .......................................................................................84
Changing Focusing Screens.................................................................................85
Self-Diagnostic Shutter System ............................................................................86
Menu Guide ...............................................................................................87-148
Operation in Menu (all menus).......................................................................88-89
Custom Setting Menu..................................................................................90-110
Setup Menu...............................................................................................111-124
Recording Shooting Data.....................................................................112-124
Shooting Menu..........................................................................................125-143
Imprinting Shooting Data ....................................................................126-137
Multiple Exposure ................................................................................138-139
Interval Timer Photography..................................................................140-143
Non-CPU lens.............................................................................................144-146
Two-Button Reset..............................................................................................147
Recorded/imprinted exposure compensation/flash exposure
compensation value ....................................................................................148
Flash Photography ..................................................................................149-163
Creative Lighting System............................................................................150-153
Non-CLS supporting Speedlight.........................................................................154
Non-TTL fash modes .........................................................................................155
Accessory shoe..................................................................................................156
Sync terminal ....................................................................................................156
Ready-light........................................................................................................156
Flash sync mode.........................................................................................157-158
Usable optional Speedlights .......................................................................159-161
Using Speedlight........................................................................................162-163
About Depth of Field.........................................................................................164
Miscellaneous ..........................................................................................165-191
Optional Accessories ..................................................................................166-171
Camera Care..............................................................................................172-173
Notes on Batteries.............................................................................................174
Troubleshooting .........................................................................................176-180
Specifications .............................................................................................181-187
Index..........................................................................................................188-191
P930_En 04.10.19 7:18 PM Page 3
4
Introduction
Thank you for purchasing the Nikon F6.
Get to know your F6 camera, and be sure to read this manual
thoroughly before using it. We recommend that you keep this
manual handy.
Main features of the F6:
Nikon’s exclusive new 11-area autofocus sensor (Multi-CAM2000)
system, including 9 cross-type sensors, achieves superior
performance in continuous high-speed shooting and enables sharp
focus even on erratically moving subjects.
Exclusive 3D Color Matrix Metering with a 1,005-pixel RGB sensor
provides a correct exposure in diverse shooting situations.
Various settings feature a menu list displayed on the large-sized
LCD panel on camera back, Custom Settings feature customized
combinations of various functions/modes, and two Command Dials
and a multi-selector provide access to more versatile functions.
Various accessory systems including interchangeable lenses. When
used with an optional Nikon Speedlight that features the Creative
Lighting System (CLS), new levels of flash performance, including
i-TTL, Auto FP High-Speed Sync and Advanced Wireless Lighting,
can be achieved.
Shooting data such as shutter speed, aperture or lens’ focal length
can be stored in the camera and saved on a CompactFlash™ (CF)
memory card (with the optional Data Reader MV-1).
Supplied accessories
Body cap ( 21)
Two 3V lithium
batteries ( 16)
Strap*
Attaching strap
* Strap is not supplied in the U.S.A. and Canada.
P930_En 04.10.19 7:18 PM Page 4
5
Before You Begin
Take test shots
Before taking pictures on important occasions (for example, at wedding or
before taking the camera with you on a trip), take a test shot to ensure that
the camera is functioning normally. Nikon will not be held liable for
damages or lost profits that may result from product malfunction.
Have Nikon spot-check your camera regularly
Nikon recommends that you have your camera serviced by an authorized
dealer or service center at least once every two years.
Using your camera correctly
Nikon F6 performance has been optimized for use with Nikon brand
accessories. Accessories made by other manufacturers may not meet
Nikon’s criteria for specifications, and nonconforming accessories could
damage F6 components. Nikon cannot guarantee the performance of the
F6 when it is used with anything other than Nikon brand accessories.
Marks used in this manual
This icon indicates cautions, information that should be read before use to
prevent damage to the camera.
This icon indicates notes, information that should be read before using the
camera.
This icon indicates tips, additional information that may be helpful when using
the camera.
This icon indicates that more information is available elsewhere in this manual.
CSM 00: This icon indicates settings that can be fine-tuned from the Custom Settings
menu.
Life-Long Learning
As part of Nikon’s Life-Long Learning commitment to ongoing product support and education,
continually-updated information is available on-line at the following sites:
• For users in the U.S.A.: http://www.nikonusa.com/
• For users in Europe: http://www.europe-nikon.com/support
• For users in Asia, Oceania, the Middle East, and Africa: http://www.nikon-asia.com/
Visit these sites to keep up-to-date with the latest product information, tips, answers to
frequently-asked questions (FAQs), and general advice on photography. Additional information
may be available from the Nikon representative in your area. See the URL below for contact
information:
http://nikonimaging.com/
P930_En 04.10.19 7:18 PM Page 5
6
Nomenclature/Controls
Camera body
2
3
4
5
6
7
8
9
10
11
12
13
14
15
1
18
16
17
20
21
22
19
23
6
P930_En 04.10.19 7:18 PM Page 6
7
Before You Begin
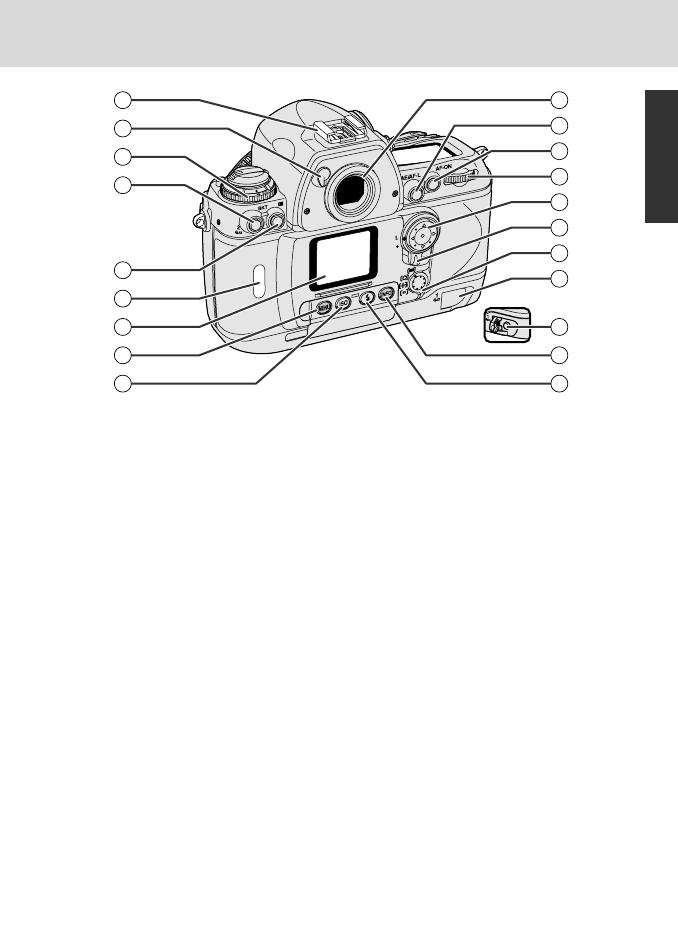
1 Metering system selector
lock release ........................x 26, 62
2 Diopter adjustment knob..........x 81
3 Metering system selector....x 26, 62
4 Top LCD panel............................x 8
5 Exposure mode button..x 26, 64-71
6 Camera strap eyelet
7 Exposure compensation button
................................................x 74
8 Shutter release button..............x 18
9 Power switch......................x 26, 19
!p Sub-Command Dial .............x 12-13
!q Depth-of-field preview button ..x 83
!w Film rewind crank.....................x 47
!e Film rewind knob .........x 22, 32, 47
!r Self-timer indicator LED ............x 82
!t Film advance mode selector lock
release ...................x 22, 45, 82, 84
!y Sync terminal..........................x 156
!u 10-pin terminal.......................x 171
!i Terminal cap
!o Lens release button ..................x 20
@p Focus mode selector...........x 48, 61
@q Function button .....x 108, 146, 152
@w Tripod socket ..........................x 187
@e Battery holder release knob ......x 16
@r Accessory shoe .......................x 156
@t Eyepiece shutter lever.........x 81, 82
@y Film advance mode selector
....................................x 22, 45, 84
@u Auto Exposure Bracketing button
................................................x 75
Film rewind (R2) button............x 46
@i Command lock button .......x 67, 69
@o Film confirmation window........x 23
#p Rear LCD panel.........................x 10
#q MENU button.............x 11, 88, 147
#w Film speed (ISO) button ............x 44
#e Eyepiece DK-17 ........................x 81
#r AE/AF-L (Auto Exposure/Autofocus
lock) button .................x 58, 72, 99
#t AF start button...................x 49, 95
#y Main-Command Dial ...........x 12-13
#u Multi-selector ...........................x 14
#i Multi-selector lock lever
....................................x 24, 51, 88
#o AF Area mode selector .x 24, 50, 52
$p Film rewind (R1) button cover
................................................x 46
$q Film rewind (R1) button............x 46
$w INFO button ...........x 122, 145, 147
$e Flash sync mode button..........x 157
24
25
26
27
28
29
30
31
32
33
34
35
36
37
38
39
41
42
43
40
P930_En 04.10.19 7:18 PM Page 7
8
Nomenclature/Controls—continued
Top LCD panel
1 Shutter speed lock....................x 67
2 Shutter speed...............x 66, 70, 80
3 Aperture stop.....................x 21, 40
4 Aperture lock ...........................x 69
5 Aperture.............................x 68, 70
6 Sync speed .............................x 104
7 Exposure mode .............x 26, 64-71
8 Auto Exposure Bracketing.........x 75
9 Flexible program.......................x 64
!p Exposure compensation............x 74
!q Battery power...........................x 19
!w Exposure compensation value...x 74
!e Electronic analog exposure display
................................................x 71
Exposure compensation value
................................................x 74
Auto Exposure Bracketing status
................................................x 75
!r Frame counter ..........................x 22
4 5321
7
6
9 10 11 12 13 14
8
P930_En 04.10.19 7:18 PM Page 8
9
Before You Begin
Viewfinder display
1 12mm-dia. reference circle for
Center-Weighted Metering area
................................................x 63
2 Focus area (focus brackets).......x 50
Spot Metering area...................x 63
3 Electronic analog exposure display
................................................x 71
Exposure compensation value...x 74
Auto Exposure Bracketing status
................................................x 75
4 Exposure compensation............x 74
5 Auto Exposure Bracketing.........x 75
6 Auto Exposure Lock..................x 72
7 Shutter speed lock....................x 67
8 Aperture lock ...........................x 69
9 Focus indicators..................x 28, 29
!p Metering system.................x 26, 62
!q FV lock ...................................x 152
!w Exposure mode .............x 26, 64-71
!e Sync speed .............................x 104
!r Shutter speed...............x 66, 70, 80
!t Aperture stop.....................x 21, 40
!y Aperture.............................x 68, 70
!u Multiple exposure...................x 138
!i Battery power...........................x 19
!o Frame counter ..........................x 22
Exposure compensation value...x 74
@p Flash ready-light .....................x 156
6 7 8
5
4
3
9 10 11 12 14 1715 16 18
2
1
201913
P930_En 04.10.19 7:18 PM Page 9
10
Nomenclature/Controls—continued
Rear LCD panel (shooting data displays)
At the default setting, shooting data is displayed in normal mode. It can be changed
to detailed or large display by selecting “Detailed” or “Large” in Custom Setting “d7:
Rear panel info” (x 103).
7
1
14
2
10
9
3
8
13
12
4
5
6
11
Normal display
3
7
15 2
14
16
10
17
9
18
8
13
12
4
1
5
6
11
Detailed display
5
15
14
10
7
4
16
3
8
18
9
17
6
11
Large display
1 ISO...................................................x 44
2 Film speed........................................x 44
3 DX ...................................................x 23
4 EV steps in Auto Exposure Bracketing
........................................................x 75
5 Auto Exposure Bracketing ................x 75
6 Flash sync mode.............................x 157
7 Auto Exposure Bracketing status ......x 75
8 Multiple exposures .........................x 138
9 Number of shots in multiple exposure
......................................................x 138
!p Data imprint...........................x 128, 133
!q Custom Setting ................................x 91
!w Focus area........................................x 50
!e AF servo mode .................................x 48
!r Lens number ..................................x 145
!t Shutter speed ......................x 66, 70, 80
!y Aperture ....................................x 68, 70
!u Exposure compensation....................x 74
!i Exposure compensation value ..........x 74
P930_En 04.10.19 7:18 PM Page 10
11
Before You Begin
Rear LCD panel (menu displays)
Custom Setting menu (x 90)
Setup menu (x 111)
Shooting menu (x 125)
Non-CPU lens (x 144)
Language (x 34)
Press the MENU button (if shooting data is displayed) to display the MENU. The
shooting data is displayed by pressing the MENU button again.
Five types of menu—Custom Setting, Setup, Shooting, Non-CPU lens and
Language—are available with the F6.
P930_En 04.10.19 7:18 PM Page 11
12
Nomenclature/Controls—continued
Command Dials and operating buttons
The F6’s Main- and Sub-Command Dials can be used alone or in combination with
other buttons to select and set various functions and modes.
Film
Setting ISO film speed (x 44)
Exposure
Selecting exposure mode (x 26, 64-71)
Performing Flexible Program in Programmed Auto
exposure mode (x 64)
Setting the shutter speed in Shutter-Priority Auto or
Manual exposure mode*
1
(x 66, 70)
Setting the aperture in Aperture-Priority Auto or
Manual exposure mode*
1
(x 68, 70)
Sub-Command Dial
Main-Command Dial
P930_En 04.10.19 7:18 PM Page 12
13
Before You Begin
Locking/unlocking shutter speed*
1
(x 67, 70)
Locking/unlocking aperture*
1
(x 69, 70)
Setting exposure compensation value*
2
(x 74)
Setting the number of shots in Auto Exposure
Bracketing*
3
(x 75)
Setting an EV compensation value in Auto
Exposure Bracketing*
3
(x 75)
Flash
Selecting flash sync mode (x 157)
*1 CSM f4: The shutter speed can be set to change with the Sub-Command
Dial and the aperture with the Main-Command Dial (x 109).
*2 CSM b3: Exposure compensation can be set to be activated with the Main-
or Sub-Command Dial without having to press the exposure compensation
button (x 97).
*3 CSM e8: Auto Exposure Bracketing can be set to turn on/off with the Main-
Command Dial, while the Sub-Command Dial can be used to select the
number of shots and EV compensation value (x 106).
P930_En 04.10.19 7:18 PM Page 13
14
Nomenclature/Controls—continued
Multi-selector
Use the multi-selector to select focus area (x 50), operate
menu (x 88), or display shooting data (x 122).
When “Activate meter” is selected in Custom Setting “f2:
Multi selector”, exposure meter can be activated with the
multi-selector (when exposure meter is off) (x 107). (Or,
by selecting “Initiate AF”, Autofocus can be activated.)
Focus area selection
P (Top) : Select top focus area or focus area group*
1
{ (Bottom): Select bottom focus area or focus area group*
1
> (Right) : Select right focus area or focus area group*
1
< (Left) : Select left focus area or focus area group*
1
U (Center) : Select center focus area or focus area group*
2
Menu operation
P (Top) : Select option item or set option such as a number*
3
{ (Bottom): Select option item or set option such as a number*
3
> (Right) : Set selection or go to next page*
3
< (Left) : Cancel selection or go back one page*
3
U (Center) : Set or go to next page*
3
Shooting data display
P (Top) : Display film number or frame data
{ (Bottom): Display film number or frame data
> (Right) : Set film number or go back to film number selection display
< (Left) : Go back to shooting data display or film number selection display
*1 CSM a6: Focus area position can be set to change continuously in the same
horizontal or vertical direction. With this option, the focus area can be
switched to the opposite position without pressing the opposite position
on the multi-selector (x 96).
*2 CSM f1: Your selected focus area can be set to be highlighted when the
center of the multi-selector is pressed. Also, any operation can be canceled
when the center of the multi-selector is pressed (x 107).
*3 CSM f4: You can also activate menu operation with the Command Dials
(x 110).
P930_En 04.10.19 7:18 PM Page 14
15
Basic Operation
Basic Operation
Lens attached G/D-type AF Nikkor x 20
Film speed s x 23
Film advance mode S (Single frame) x 22
Focus mode S (Single Servo AF) x 24
AF area mode g (Single Area AF) x 24
Exposure metering (3D Color Matrix Metering) x 26
Exposure mode ¡ (Programmed Auto) x 26
Custom Setting Initial (default) settings x 90
Shooting modes/functions explained in this section are
as follows:
P930_En 04.10.19 7:18 PM Page 15
16
1. Installing Batteries
Use two 3V lithium batteries.
1
Turn the power switch off, then turn the
battery holder (MS-41) release knob toward
the icon to release the lock.
When replacing batteries, be sure to turn the
power switch off and replace both batteries at
the same time. Always use fresh batteries of
the same brand and type.
2
Remove the battery holder and insert two
3V lithium batteries with the “+” and “–”
ends positioned as marked on the battery
holder.
Incorrect positioning of the batteries’ + and –
poles may damage the camera.
3
Return battery holder to the battery
chamber and turn the battery holder release
knob away from the icon to lock the
holder.
P930_En 04.10.19 7:18 PM Page 16
17
Basic Operation
Note on storing batteries
Keep the batteries out of children’s reach. If swallowed, contact a doctor
immediately. (For “Notes on Batteries”, x 174.)
Backup battery
The F6 is equipped with a built-in backup battery for the camera’s clock. This charges
in approximately 48 hours when 3 V lithium or the optional Multi Power Battery Pack
MB-40 (x 166) is supplying power to the F6. When the built-in battery is fully
charged, it is able to supply the F6’s built-in clock with power for approx. 4 months.
When camera’s built-in clock has been reset
When power is not supplied for a long time or when batteries are
installed for the first time and power is turned on, “CLOCK HAS
BEEN RESET. Set time and date.” may be displayed in the rear LCD
panel (the display returns to normal when any of the F6’s buttons
or Command Dial are used). In this case, set the date and time
(x 35).
The camera functions normally without setting the date and time but shooting data
cannot be recorded (date and time) (x 112) or imprinted (day/hour/minute, date
and time) (x 126) correctly and interval timer (x 140) cannot be executed
correctly.
If the camera power switch is turned on after the clock data has been lost, date
and time start from 2004, January 1st, 0 hour 0 minute. If date and time are left
unset, the clock data will be lost every time the power switch is turned off.
For number of film rolls that can be shot with fresh batteries, see page
185.
Power source other than 3V lithium batteries
Eight AA-type batteries or optional Rechargeable Li-ion Batteries EN-EL4 (with
optional Battery Chamber Cover BL-3) can be used to power the F6 with an optional
Multi Power Battery Pack MB-40 (x 166) attached.
We recommend that you take spare batteries with you, especially when
traveling.
P930_En 04.10.19 7:18 PM Page 17
18
2. Checking Battery Power
Battery power can be checked in the top LCD panel and viewfinder.
Some indicators in the top and rear LCD panels and
all indicators in the viewfinder turn off after approx.
8 sec. if the power switch is turned on and no
operation is performed (exposure meter off). To
reactivate the indicators (exposure meter on), lightly
press the shutter release button.
“F6 Nikon” is displayed in the rear LCD panel when
exposure meter is off under following conditions:
- Film speed: s
- AF area mode: g (Single Area AF)
- Focus area: center
- Exposure mode: ¡ (Programmed Auto)
- Exposure compensation: 00 (no compensation)
- Auto Exposure Bracketing: no setting
- Data imprint: no setting (all off)
- Flash sync mode: Front-Curtain Sync
1
Turn the power switch on and confirm
battery power with the N indication.
If N appears, battery power is sufficient. If
any other indication appears, see table on the
next page.
When the power switch is turned on, exposure
meter turns on.
Top LCD panel
Viewfinder
Shutter release button operation and exposure meter
CSM c4: It is possible to change the duration before automatic meter switch-off
occurs (x 100).
P930_En 04.10.19 7:18 PM Page 18
19
Basic Operation
Battery status
Sufficient battery power.
Battery power has begun to decline.
Batteries are nearing exhaustion. Have a fresh
set ready.
Batteries are exhausted. Replace batteries.
(Shutter locks and rear LCD panel turns off.)
Viewfinder
Top LCD panel
(Camera’s meter on)
(appears) (appears)
(appears) (appears)
(appears) (appears)
(blinks) (blinks)
Indications and battery status
Battery indications and corresponding battery power status are as follows:
Battery life depends on the battery brand and temperatures. Low battery power
indication M appears or blinks relatively soon at low temperatures. However,
battery power may recover and the indication returns to ˜ or N when the
temperature returns to normal.
Indications when the camera power is off
When the power switch is turned off (with batteries
installed), only the frame counter is displayed in the top
LCD panel.
For setting language and date, see pages 34 and 35.
Set language (x 34) for rear LCD panel displays. In addition to English, German,
Spanish, French, Chinese (simplified) and Japanese are available.
Set date and time (x 35) for recording/imprinting shooting data (x 112/126) or
Interval Timer photography (x 140).
P930_En 04.10.19 7:18 PM Page 19
20
3. Mounting a Lens
Nikon recommends using a G- or D-type CPU lens to take full
advantage of the features the camera offers.
1
Turn the power switch off.
Turn the power switch off before mounting or
detaching lenses.
2
Mount the lens to the camera body.
Position lens in the camera’s bayonet mount so
that the mounting indexes on the lens and
camera body are aligned, then twist the lens
counterclockwise until it locks into place.
Be sure not to touch the lens release button.
3
Lock aperture at the minimum setting.
With a CPU Nikkor lens other than G-type, set
the lens to its minimum aperture (smallest
f/stop) and lock. When a CPU Nikkor lens other
than G-type is not set to its smallest aperture
setting and the power switch is turned on, ƒEE
will blink in the top LCD panel and viewfinder
and the shutter cannot be released.
G-type Nikkor lenses have no aperture ring.
Unlike other CPU Nikkor lenses, aperture does
not need to be set to minimum.
Turn the power switch off, push and hold the lens
release button Å, then turn the lens clockwise Í.
1
2
CPU Nikkor lenses have
CPU contacts
D-type Nikkor lensG-type Nikkor lens
Detaching the lens
P930_En 04.10.19 7:18 PM Page 20
  • Page 1 1
  • Page 2 2
  • Page 3 3
  • Page 4 4
  • Page 5 5
  • Page 6 6
  • Page 7 7
  • Page 8 8
  • Page 9 9
  • Page 10 10
  • Page 11 11
  • Page 12 12
  • Page 13 13
  • Page 14 14
  • Page 15 15
  • Page 16 16
  • Page 17 17
  • Page 18 18
  • Page 19 19
  • Page 20 20
  • Page 21 21
  • Page 22 22
  • Page 23 23
  • Page 24 24
  • Page 25 25
  • Page 26 26
  • Page 27 27
  • Page 28 28
  • Page 29 29
  • Page 30 30
  • Page 31 31
  • Page 32 32
  • Page 33 33
  • Page 34 34
  • Page 35 35
  • Page 36 36
  • Page 37 37
  • Page 38 38
  • Page 39 39
  • Page 40 40
  • Page 41 41
  • Page 42 42
  • Page 43 43
  • Page 44 44
  • Page 45 45
  • Page 46 46
  • Page 47 47
  • Page 48 48
  • Page 49 49
  • Page 50 50
  • Page 51 51
  • Page 52 52
  • Page 53 53
  • Page 54 54
  • Page 55 55
  • Page 56 56
  • Page 57 57
  • Page 58 58
  • Page 59 59
  • Page 60 60
  • Page 61 61
  • Page 62 62
  • Page 63 63
  • Page 64 64
  • Page 65 65
  • Page 66 66
  • Page 67 67
  • Page 68 68
  • Page 69 69
  • Page 70 70
  • Page 71 71
  • Page 72 72
  • Page 73 73
  • Page 74 74
  • Page 75 75
  • Page 76 76
  • Page 77 77
  • Page 78 78
  • Page 79 79
  • Page 80 80
  • Page 81 81
  • Page 82 82
  • Page 83 83
  • Page 84 84
  • Page 85 85
  • Page 86 86
  • Page 87 87
  • Page 88 88
  • Page 89 89
  • Page 90 90
  • Page 91 91
  • Page 92 92
  • Page 93 93
  • Page 94 94
  • Page 95 95
  • Page 96 96
  • Page 97 97
  • Page 98 98
  • Page 99 99
  • Page 100 100
  • Page 101 101
  • Page 102 102
  • Page 103 103
  • Page 104 104
  • Page 105 105
  • Page 106 106
  • Page 107 107
  • Page 108 108
  • Page 109 109
  • Page 110 110
  • Page 111 111
  • Page 112 112
  • Page 113 113
  • Page 114 114
  • Page 115 115
  • Page 116 116
  • Page 117 117
  • Page 118 118
  • Page 119 119
  • Page 120 120
  • Page 121 121
  • Page 122 122
  • Page 123 123
  • Page 124 124
  • Page 125 125
  • Page 126 126
  • Page 127 127
  • Page 128 128
  • Page 129 129
  • Page 130 130
  • Page 131 131
  • Page 132 132
  • Page 133 133
  • Page 134 134
  • Page 135 135
  • Page 136 136
  • Page 137 137
  • Page 138 138
  • Page 139 139
  • Page 140 140
  • Page 141 141
  • Page 142 142
  • Page 143 143
  • Page 144 144
  • Page 145 145
  • Page 146 146
  • Page 147 147
  • Page 148 148
  • Page 149 149
  • Page 150 150
  • Page 151 151
  • Page 152 152
  • Page 153 153
  • Page 154 154
  • Page 155 155
  • Page 156 156
  • Page 157 157
  • Page 158 158
  • Page 159 159
  • Page 160 160
  • Page 161 161
  • Page 162 162
  • Page 163 163
  • Page 164 164
  • Page 165 165
  • Page 166 166
  • Page 167 167
  • Page 168 168
  • Page 169 169
  • Page 170 170
  • Page 171 171
  • Page 172 172
  • Page 173 173
  • Page 174 174
  • Page 175 175
  • Page 176 176
  • Page 177 177
  • Page 178 178
  • Page 179 179
  • Page 180 180
  • Page 181 181
  • Page 182 182
  • Page 183 183
  • Page 184 184
  • Page 185 185
  • Page 186 186
  • Page 187 187
  • Page 188 188
  • Page 189 189
  • Page 190 190
  • Page 191 191
  • Page 192 192

Nikon F6 User manual

Category
Bridge cameras
Type
User manual

Ask a question and I''ll find the answer in the document

Finding information in a document is now easier with AI