Toyota 2004 Matrix Owner's manual
- Category
- Cars
- Type
- Owner's manual
This manual is also suitable for

’04 MATRIX_U (L/O 0307)
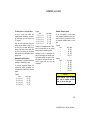
1
2004 MATRIX from Oct. ’03 Prod. (OM12861U)
OPERATION OF INSTRUMENTS AND
CONTROLS
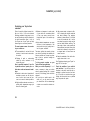
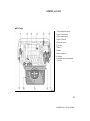
Overview of instruments and controls
Instrument panel overview 2. . . . . . . . . . . . . . . . . . . . . . . . . . . . . . . . . . . . .
Instrument cluster overview 4. . . . . . . . . . . . . . . . . . . . . . . . . . . . . . . . . . . .
Indicator symbols on the instrument panel 5. . . . . . . . . . . . . . . . . . . . . . .
SECTION 1− 1

’04 MATRIX_U (L/O 0307)
2
2004 MATRIX from Oct. ’03 Prod. (OM12861U)
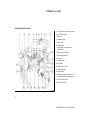
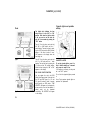
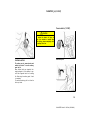
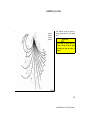
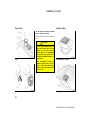
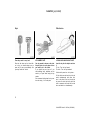
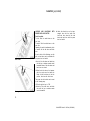
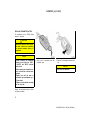
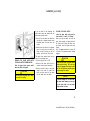
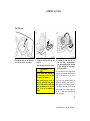
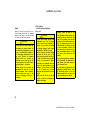
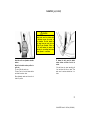
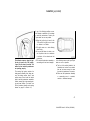
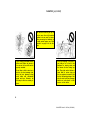
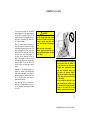
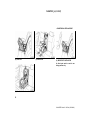
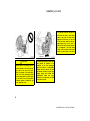
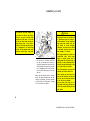
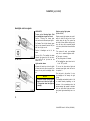
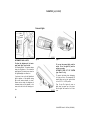
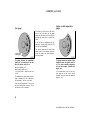
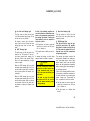
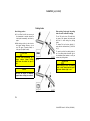
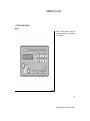
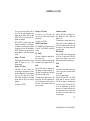
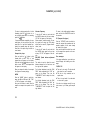
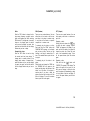
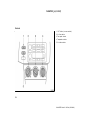
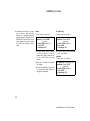
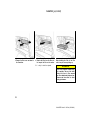
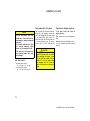
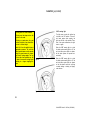
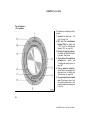
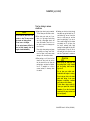
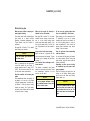
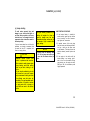
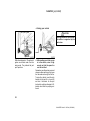
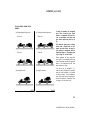
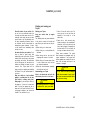
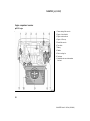
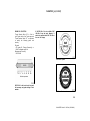
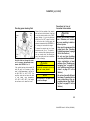
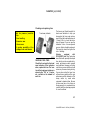
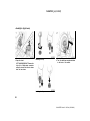
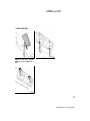
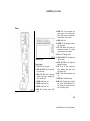
1. Rear view mirror remote control levers
2. Side defroster outlets
3. Side vents
4. Instrument cluster
5. Center vents
6. Personal lights
7. Electric moon roof switches and
personal light
8. Power door lock switches
9. Power window switches
10. Glove box
11. Portable ashtray
12. Cup holders
13. Power outlet (12 VDC)
14. Parking brake lever
15. Auxiliary boxes
16. Automatic transmission selector lever
or manual transmission gear shift lever
17. Hood lock release lever
18. Window lock switch
Instrument panel overview

’04 MATRIX_U (L/O 0307)
3
2004 MATRIX from Oct. ’03 Prod. (OM12861U)
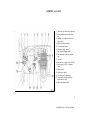
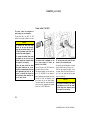
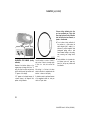
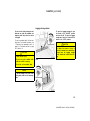
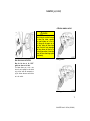
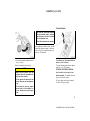
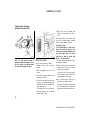
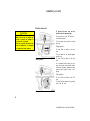
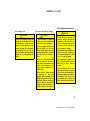
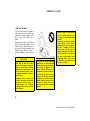
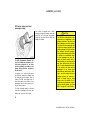
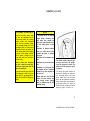
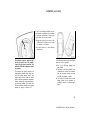
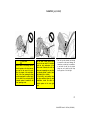
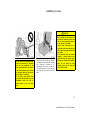
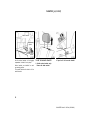
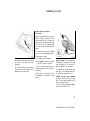
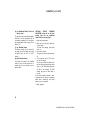
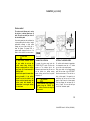
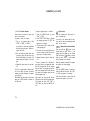
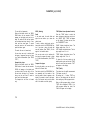
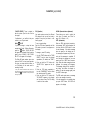
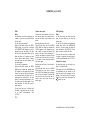
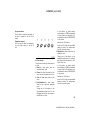
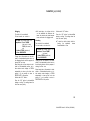
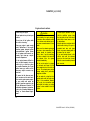
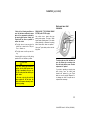
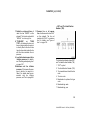
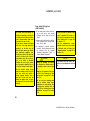
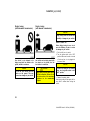
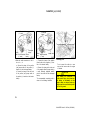
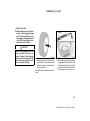
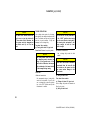
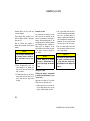
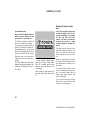
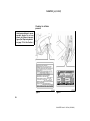
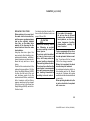
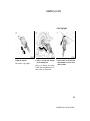
1. Power rear view mirror control switches
2. Interior/instrument panel light control
dial
3. Headlight, turn signal and front fog
light switches
4. Wiper and washer switches
5. Air conditioning controls
6. Emergency flasher switch
7. Rear window defogger switch
8. Front passenger’s seat belt reminder
light
9. Car audio
10. Auxiliary box or power outlet (115 VAC)
11. Power outlet (12 VDC) or cigarette
lighter
12. Ignition switch
13. Cruise control switch
14. Tilt steering lock release lever
15. Toyota vehicle intrusion protection
system indicator light
16. Glass hatch opener switch

’04 MATRIX_U (L/O 0307)
4
2004 MATRIX from Oct. ’03 Prod. (OM12861U)
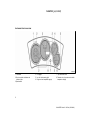
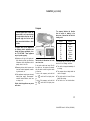
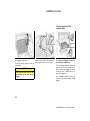
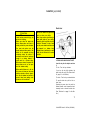
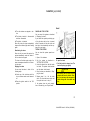
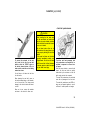
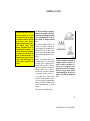
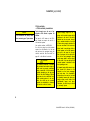
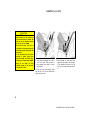
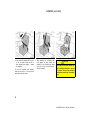
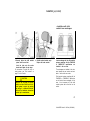
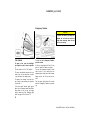
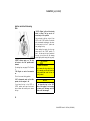
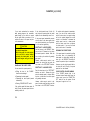
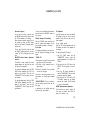
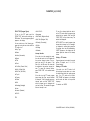
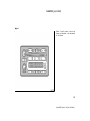
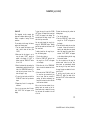
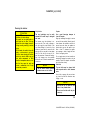
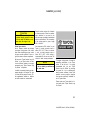
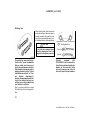
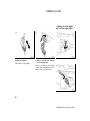
1. Tachometer
2. Service reminder indicators and
indicator lights
3. Speedometer
4. Fuel gauge
5. Low fuel level warning light
6. Engine coolant temperature gauge
7. Trip meter reset knob
8. Odometer, two trip meters and outside
temperature display
Instrument cluster overview

’04 MATRIX_U (L/O 0307)
5
2004 MATRIX from Oct. ’03 Prod. (OM12861U)
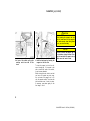
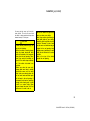
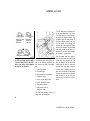
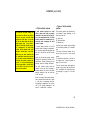
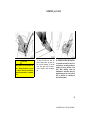
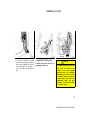
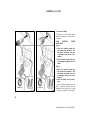
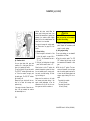
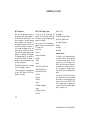
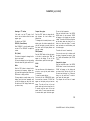
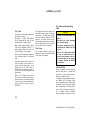
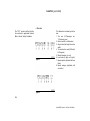
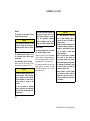
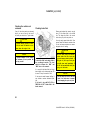
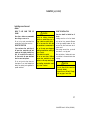
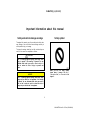
Brake system warning light
∗
1
Discharge warning light
∗
1
Low engine oil pressure warning light
∗
1
Malfunction indicator lamp
∗
1
Headlight high beam indicator light
SRS warning light
∗
1
Driver’s seat belt reminder light
∗
1
Open door warning light
∗
1
Anti−lock brake system warning light
∗
1
or
Low windshield washer fluid level warning light
∗
1,
∗
3
or
Front passenger’s seat belt reminder light
∗
1
or
Headlight low beam indicator light
Tail light indicator light
Indicator symbols on the instrument panel

’04 MATRIX_U (L/O 0307)
6
2004 MATRIX from Oct. ’03 Prod. (OM12861U)
∗
1
: For details, see “Service reminder indicators and warning
buzzers” on page 91 in Section 1−6.
∗
2
: If this light flashes, see “Cruise control” on page 105 in
Section 1−7.
∗
3
: This symbol equipped only on vehicles sold in Canada.
Cruise control indicator light
∗
2
Overdrive−off indicator light
Turn signal indicator lights

’04 MATRIX_U (L/O 0307)
153
2004 MATRIX from Oct. ’03 Prod. (OM12861U)
OPERATION OF INSTRUMENTS AND
CONTROLS
Other equipment
Clock 154. . . . . . . . . . . . . . . . . . . . . . . . . . . . . . . . . . . . . . . . . . . . . . . . . . . . . .
Cigarette lighter and portable ashtray 154. . . . . . . . . . . . . . . . . . . . . . . . .
Power outlets (12 VDC) 155. . . . . . . . . . . . . . . . . . . . . . . . . . . . . . . . . . . . .
Power outlet (115 VAC) 156. . . . . . . . . . . . . . . . . . . . . . . . . . . . . . . . . . . . . .
Compass 157. . . . . . . . . . . . . . . . . . . . . . . . . . . . . . . . . . . . . . . . . . . . . . . . . .
Glove box 161. . . . . . . . . . . . . . . . . . . . . . . . . . . . . . . . . . . . . . . . . . . . . . . . . .
Auxiliary box 161. . . . . . . . . . . . . . . . . . . . . . . . . . . . . . . . . . . . . . . . . . . . . . .
Rear console box 162. . . . . . . . . . . . . . . . . . . . . . . . . . . . . . . . . . . . . . . . . . .
Cup holders 164. . . . . . . . . . . . . . . . . . . . . . . . . . . . . . . . . . . . . . . . . . . . . . . .
Seatback tables 164. . . . . . . . . . . . . . . . . . . . . . . . . . . . . . . . . . . . . . . . . . . .
Luggage storage boxes 165. . . . . . . . . . . . . . . . . . . . . . . . . . . . . . . . . . . . .
Tie−down hooks and tire tie−down belts 166. . . . . . . . . . . . . . . . . . . . . . .
Luggage deck rails 167. . . . . . . . . . . . . . . . . . . . . . . . . . . . . . . . . . . . . . . . .
Luggage cover 168. . . . . . . . . . . . . . . . . . . . . . . . . . . . . . . . . . . . . . . . . . . . .
Floor mat 169. . . . . . . . . . . . . . . . . . . . . . . . . . . . . . . . . . . . . . . . . . . . . . . . . .
SECTION 1− 10

’04 MATRIX_U (L/O 0307)
154
2004 MATRIX from Oct. ’03 Prod. (OM12861U)
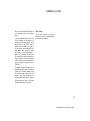
Type A
Type B
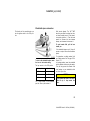
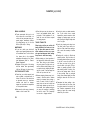
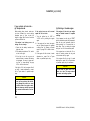
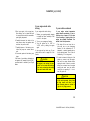
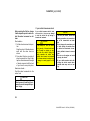
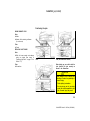
The digital clock indicates the time
when the key is in the “ACC” or “ON”
position. Even when the ignition switch
is off, you can turn on the clock dis-
play for a few seconds by pushing the
“RCL” button.
Type A—To set the time, push and hold
the “HR” or “MIN” button until the “:”
starts flashing. Then set the time by push-
ing the “HR” (hour) and the “MIN” (minute)
buttons. If the time is before 12 noon,
“AM” appears on the display when the
time being set.
Type B—To set the time, push and hold
the “H” or “M” button until the “:” starts
flashing. Then set the time by pushing the
“H” (hour) and the “M” (minute) buttons.
When the time is being set, “AM” or “PM”
appears on the display.
RDS CLOCK UPDATE FUNCTION
You can update the clock with RDS
(Radio Data System) data. Push and hold
the “HR” and “MIN” (type A) or “H” and
“M” (type B) buttons at least 2 seconds
while receiving an RDS station. “TIME
UPDATED” will appear on the display with
a beep and the clock will be updated. If
setting could not be completed
successfully, “NO UPDATED” will appear
on the display.
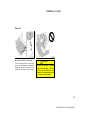
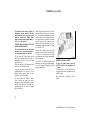
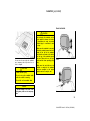
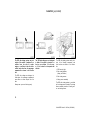
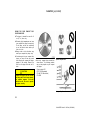
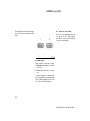
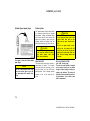
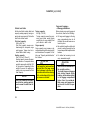
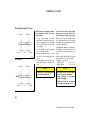
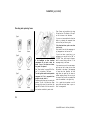
CIGARETTE LIGHTER
To use the cigarette lighter, press it in.
After it finishes heating up, it automati-
cally pops out ready for use.
If the engine is not running, the key must
be in the “ACC” position.
Do not hold the cigarette lighter pressed
in.
Use a Toyota genuine cigarette lighter or
equivalent for replacement.
Clock
Cigarette lighter and portable
ashtray

’04 MATRIX_U (L/O 0307)
155
2004 MATRIX from Oct. ’03 Prod. (OM12861U)
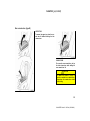
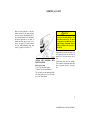
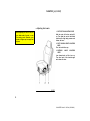
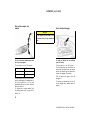
PORTABLE ASHTRAY
The ashtray can be removed and used
outside the vehicle. To use the ashtray,
open the lid.
When finished with your cigarette, thor-
oughly extinguish it in the ashtray to pre-
vent other cigarette butts from catching
fire. After using the ashtray, push it back
in completely.
To remove the ashtray, pull it out from the
front cup holder.
CAUTION
To reduce the chance of injury in
case of an accident or sudden stop
while driving, always completely close
the ashtray after use.
Instrument panel
Rear console box
Power outlets (12 VDC)

’04 MATRIX_U (L/O 0307)
156
2004 MATRIX from Oct. ’03 Prod. (OM12861U)
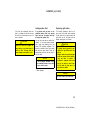
The power outlets are designed for
power supply for car accessories.
The key must be in the “ACC” or “ON”
position for the power outlets to be used.
NOTICE
z To prevent the fuse from being
blown, do not use the electricity
over the total vehicle capacity of 12
V/120W (instrument panel and rear
console box outlets together).
z To prevent the battery from being
discharged, do not use the power
outlets longer than necessary when
the engine is not running.
z Close the power outlet lids when
the power outlets are not in use.
Inserting a foreign object other than
the appropriate plug that fits the
outlet, or allowing any liquid into
the outlet may cause electrical fail-
ure or short circuits.
This power outlet is designed for use
as a power supply for electric ap-
pliances in the vehicle.
The key must be in the “ON” position for
the power outlet to be used.
The maximum capacity for this power out-
let is 115 VAC/100W. If you attempt to
use an appliance that requires more than
115 VAC or 100W, the protection circuit
will activate and cut the power supply.
The power supply will restart automatically
when you use an appliance that operates
within the 115 VAC/100W limits.
To use the power outlet, push the main
switch on the instrument panel.
An indicator light will illuminate to indicate
that the power outlet is ready for use.
Push the main switch once again to turn
the power outlet off. When the power out-
let is not in use, make sure that the main
switch is turned off.
NOTICE
z To prevent the battery from being
discharged, do not use the power
outlet longer than necessary when
the engine is not running.
Power outlet (115 VAC)

’04 MATRIX_U (L/O 0307)
157
2004 MATRIX from Oct. ’03 Prod. (OM12861U)
z Close the power outlet lid when the
power outlet is not in use. Inserting
a foreign object other than the ap-
propriate plug that fits the outlet
may cause electrical failure or short
circuits.
The power outlet is not designed for
the following electric appliances even
though their power consumption is un-
der 115 VAC/100W. These appliances
may not operate properly.
D Appliances with high initial peak watt-
age: cathode−ray tube type televisions,
compressor−driven refrigerators, electric
pumps, electric tools, etc.
D Measuring devices which process pre-
cise data: medical equipment, measur-
ing instruments, etc.
D Other appliances requiring an extremely
stable power supply: microcomputer−
controlled electric blankets, touch sen-
sor lamps, etc.
Certain electrical appliances may cause
radio noise.
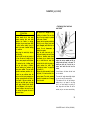
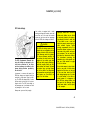
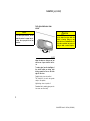
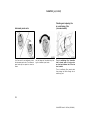
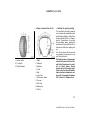
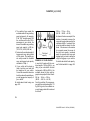
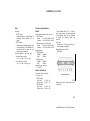
The direction is indicated on the inside
rear view mirror.
If the ignition switch was turned off with
the system on, the system will automati-
cally turn back on when the ignition switch
is turned on.
To turn on the compass, push and hold
the “
” switch until the display turns
on.
To turn off the compass, push and hold
the “
” switch until the display turns
off.
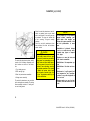
The compass indicates the direction
that the vehicle is heading. In the
above case, it shows that the vehicle is
heading north.
Displays
Directions
N
NE
E
SE
S
SW
W
NW
North
Northeast
East
Southeast
South
Southwest
West
Northwest
The compass may not show the correct
direction in the following conditions:
D The vehicle is stopped immediately af-
ter turning.
D The compass does not adjust while the
vehicle is stopped.
D The ignition switch is turned off imme-
diately after turning.
D The vehicle is on an inclined surface.
Compass

’04 MATRIX_U (L/O 0307)
158
2004 MATRIX from Oct. ’03 Prod. (OM12861U)
D The vehicle is in a place where the
earth’s magnetic field is subject to in-
terference by artificial magnetic fields
(underground parking, under a steel
tower, between buildings, roof parking,
near a crossing, near a large vehicle,
etc.).
D The vehicle is magnetized. (There is a
magnet or a metal object on or near
the inside rear view mirror.)
D The battery has been disconnected.
Your vehicle is out of the set zone. Refer
to the “CALIBRATING THE COMPASS” be-
low to set the zone number.
The compass works to calibrate the direc-
tion automatically while the vehicle is in
motion, if deviation is small.
For additional precision or for complete
calibrating, see “CALIBRATING THE
COMPASS” below.
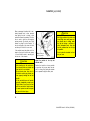
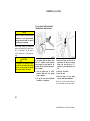
Compass sensor
The compass sensor is in the inside
rear view mirror.
NOTICE
Do not put magnets or a metal object
on or near the inside rear view mirror
of the vehicle. Doing this may cause
malfunction of the compass sensor.
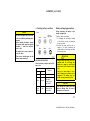
CALIBRATING THE COMPASS (deviation
calibration)
The direction display on the compass
deviates from the true direction deter-
mined by the earth’s magnetic field. The
angle of deviation varies according to the
geographic position of the vehicle.
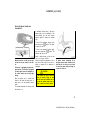
To adjust this deviation, stop the vehicle,
then push and hold the both personal light
switches until the zone number appears
on the display. Then push the right side
or left side personal light switch, referring
to the following map to select the number
of the zone where the vehicle is.

’04 MATRIX_U (L/O 0307)
159
2004 MATRIX from Oct. ’03 Prod. (OM12861U)
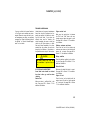
Zone number
After calibration, leaving the system for
several seconds returns it to the compass
mode.
CAUTION
Do not adjust the display while the
vehicle is moving. Be sure to adjust
the display only when the vehicle is
stopped.
Hawaii: 5
Samoa: 5
Guam: 8
Saipan: 8

’04 MATRIX_U (L/O 0307)
160
2004 MATRIX from Oct. ’03 Prod. (OM12861U)
CALIBRATING THE COMPASS (circling
calibration)
Sometimes the direction display on the
compass may not change after a turn. To
rectify this, stop the vehicle and push and
hold the both personal light switches until
“C” appears on the display.
If “C” appears on the display because of
a drastic change in the magnetic field,
perform circling calibration.
Drive the vehicle in a circle at 8 km/h (5
mph) or less. If there is not enough space
to drive in a circle, drive around the
block.
After driving 1 to 3 circles in the above
method, calibration is completed when the
direction is shown on the display.
If calibration cannot be performed because
of the magnetized vehicle etc., take your
vehicle to Toyota dealer.
Perform circling calibration just after
you have purchased your Toyota. And
then always perform circling calibration
after the battery has been removed, re-
placed or disconnected.
D Do not perform circling calibration of
the compass in a place where the
earth’s magnetic field is subject to in-
terference by artificial magnetic fields
(underground parking, under a steel
tower, between buildings, roof parking,
near a crossing, near a large vehicle,
etc.).
D During calibration, do not operate elec-
tric systems (moon roof, power win-
dows, etc.) as they may interfere with
the calibration.

’04 MATRIX_U (L/O 0307)
161
2004 MATRIX from Oct. ’03 Prod. (OM12861U)
CAUTION
D When doing the circling calibration,
be sure to secure a wide space,
and watch out for people and ve-
hicles in the neighborhood. Do not
violate any local traffic rules while
performing circling calibration.
D Do not adjust the display while the
vehicle is moving. Be sure to adjust
the display only when the vehicle is
stopped.
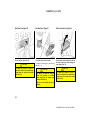
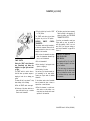
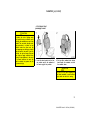
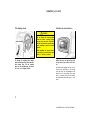
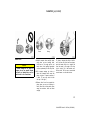
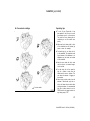
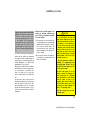
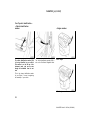
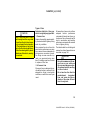
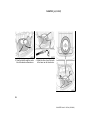
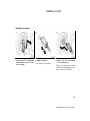
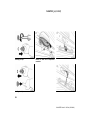
To open the glove box door, pull the
lever.
CAUTION
To reduce the chance of injury in
case of an accident or a sudden stop,
always keep the glove box door
closed while driving.
To use the box, pull on the handle.
CAUTION
D To reduce the chance of injury in
case of an accident or a sudden
stop, always keep the auxiliary box
closed while driving.
D Do not use this auxiliary box as an
ashtray.
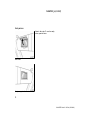
Glove box Auxiliary box (type A)

’04 MATRIX_U (L/O 0307)
162
2004 MATRIX from Oct. ’03 Prod. (OM12861U)
To use the box, push the lid.
CAUTION
To reduce the chance of injury in
case of an accident or a sudden stop,
always keep the auxiliary box closed
while driving.
To use the box, push the knob.
To remove the auxiliary box, open the box
and pull it up.
CAUTION
D To reduce the chance of injury in
case of an accident or a sudden
stop, always keep the auxiliary box
closed while driving.
D Do not use this auxiliary box as an
ashtray.
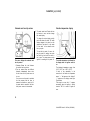
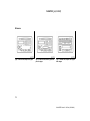
To access the rear console box, pull up
the lock release lever while raising the
rear console box lid.
CAUTION
To reduce the chance of injury in
case of an accident or a sudden stop,
always keep the console box closed
while driving.
Auxiliary box (type B) Auxiliary box (type C) Rear console box (type A)

’04 MATRIX_U (L/O 0307)
163
2004 MATRIX from Oct. ’03 Prod. (OM12861U)
UPPER TRAY
To access the upper tray, raise the con-
sole box lid without touching the lock
release lever.
CONSOLE BOX
To access the rear console box, pull up
the lock release lever while raising the
rear console box lid.
CAUTION
To reduce the chance of injury in
case of an accident or a sudden stop,
always keep the console box closed
while driving.
Rear console box (type B)

’04 MATRIX_U (L/O 0307)
164
2004 MATRIX from Oct. ’03 Prod. (OM12861U)
Front
Rear
The cup holder is designed for holding
cups or drink−cans securely.
Rear cup holder—To use the holder, pull
it out.
CAUTION
D Do not place anything else other
than cups or drink−cans in the cup
holder, as such items may be
thrown about in the compartment
and possibly injure people in the
vehicle during sudden braking or in
an accident.
D Rear cup holder—To reduce the
chance of injury in case of an acci-
dent or sudden stop while driving,
keep the cup holder closed when it
is not in use.
Front passenger’s seatback
Rear right side seatback
Cup holders Seatback tables

’04 MATRIX_U (L/O 0307)
165
2004 MATRIX from Oct. ’03 Prod. (OM12861U)
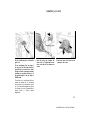
You can use the front passenger’s seat-
back and rear right side seatback as a
temporary table only when the vehicle
is stopped.
To use the seatback table, fold the seat-
back down. For detailed information, see
“—Fold−down front passenger’s seat” on
page 31 or “Fold−down rear seat” on page
32 in Section 1−3.
CAUTION
To avoid serious injury:
D Do not set up the seatback table
while the vehicle is moving.
D Do not sit on the seatback table.
NOTICE
To prevent damage to the seat, avoid
putting heavy loads on the temporary
table.
Front
Rear
To open the luggage storage box, turn
the knobs to the “UNLOCK” position
and open the lid. To close the luggage
storage box, lower the lid and turn the
knobs to the “LOCK” position.
CAUTION
To reduce the chance of injury in
case of an accident or a sudden stop,
always keep the luggage storage
boxes closed and locked while driv-
ing.
Luggage storage boxes

’04 MATRIX_U (L/O 0307)
166
2004 MATRIX from Oct. ’03 Prod. (OM12861U)
Rear luggage storage box—
To keep the lid open, attach the hook as
shown above.
NOTICE
Do not close the back door with the
hook attached, or the hook may be
damaged.
Keep the hook stored in its original posi-
tion as shown when it is not in use.
To secure your luggage, use the tie−
down hooks as shown above.
The tire tie−down belts are designed to
secure the flat tire. You can also use the
belts to secure your luggage. (To secure
the flat tire, see “—Stowing flat tire” on
page 225 in Section 4.)
See “—Stowage precautions” on page 192
in Section 2 for precautions when loading
luggage.
Tie−down hooks and tire
tie−down belts
Page is loading ...
Page is loading ...
Page is loading ...
Page is loading ...
Page is loading ...
Page is loading ...
Page is loading ...
Page is loading ...
Page is loading ...
Page is loading ...
Page is loading ...
Page is loading ...
Page is loading ...
Page is loading ...
Page is loading ...
Page is loading ...
Page is loading ...
Page is loading ...
Page is loading ...
Page is loading ...
Page is loading ...
Page is loading ...
Page is loading ...
Page is loading ...
Page is loading ...
Page is loading ...
Page is loading ...
Page is loading ...
Page is loading ...
Page is loading ...
Page is loading ...
Page is loading ...
Page is loading ...
Page is loading ...
Page is loading ...
Page is loading ...
Page is loading ...
Page is loading ...
Page is loading ...
Page is loading ...
Page is loading ...
Page is loading ...
Page is loading ...
Page is loading ...
Page is loading ...
Page is loading ...
Page is loading ...
Page is loading ...
Page is loading ...
Page is loading ...
Page is loading ...
Page is loading ...
Page is loading ...
Page is loading ...
Page is loading ...
Page is loading ...
Page is loading ...
Page is loading ...
Page is loading ...
Page is loading ...
Page is loading ...
Page is loading ...
Page is loading ...
Page is loading ...
Page is loading ...
Page is loading ...
Page is loading ...
Page is loading ...
Page is loading ...
Page is loading ...
Page is loading ...
Page is loading ...
Page is loading ...
Page is loading ...
Page is loading ...
Page is loading ...
Page is loading ...
Page is loading ...
Page is loading ...
Page is loading ...
Page is loading ...
Page is loading ...
Page is loading ...
Page is loading ...
Page is loading ...
Page is loading ...
Page is loading ...
Page is loading ...
Page is loading ...
Page is loading ...
Page is loading ...
Page is loading ...
Page is loading ...
Page is loading ...
Page is loading ...
Page is loading ...
Page is loading ...
Page is loading ...
Page is loading ...
Page is loading ...
Page is loading ...
Page is loading ...
Page is loading ...
Page is loading ...
Page is loading ...
Page is loading ...
Page is loading ...
Page is loading ...
Page is loading ...
Page is loading ...
Page is loading ...
Page is loading ...
Page is loading ...
Page is loading ...
Page is loading ...
Page is loading ...
Page is loading ...
Page is loading ...
Page is loading ...
Page is loading ...
Page is loading ...
Page is loading ...
Page is loading ...
Page is loading ...
Page is loading ...
Page is loading ...
Page is loading ...
Page is loading ...
Page is loading ...
Page is loading ...
Page is loading ...
Page is loading ...
Page is loading ...
Page is loading ...
Page is loading ...
Page is loading ...
Page is loading ...
Page is loading ...
Page is loading ...
Page is loading ...
Page is loading ...
Page is loading ...
Page is loading ...
Page is loading ...
Page is loading ...
Page is loading ...
Page is loading ...
Page is loading ...
Page is loading ...
Page is loading ...
Page is loading ...
Page is loading ...
Page is loading ...
Page is loading ...
Page is loading ...
Page is loading ...
Page is loading ...
Page is loading ...
Page is loading ...
Page is loading ...
Page is loading ...
Page is loading ...
Page is loading ...
Page is loading ...
Page is loading ...
Page is loading ...
Page is loading ...
Page is loading ...
Page is loading ...
Page is loading ...
Page is loading ...
Page is loading ...
Page is loading ...
Page is loading ...
Page is loading ...
Page is loading ...
Page is loading ...
Page is loading ...
Page is loading ...
Page is loading ...
Page is loading ...
Page is loading ...
Page is loading ...
Page is loading ...
Page is loading ...
Page is loading ...
Page is loading ...
Page is loading ...
Page is loading ...
Page is loading ...
Page is loading ...
Page is loading ...
Page is loading ...
Page is loading ...
Page is loading ...
Page is loading ...
Page is loading ...
Page is loading ...
Page is loading ...
Page is loading ...
Page is loading ...
Page is loading ...
Page is loading ...
Page is loading ...
Page is loading ...
Page is loading ...
Page is loading ...
Page is loading ...
Page is loading ...
Page is loading ...
Page is loading ...
Page is loading ...
Page is loading ...
Page is loading ...
Page is loading ...
Page is loading ...
Page is loading ...
Page is loading ...
Page is loading ...
Page is loading ...
Page is loading ...
Page is loading ...
Page is loading ...
Page is loading ...
Page is loading ...
Page is loading ...
Page is loading ...
Page is loading ...
Page is loading ...
Page is loading ...
Page is loading ...
Page is loading ...
Page is loading ...
Page is loading ...
Page is loading ...
Page is loading ...
Page is loading ...
Page is loading ...
Page is loading ...
Page is loading ...
Page is loading ...
Page is loading ...
Page is loading ...
Page is loading ...
Page is loading ...
Page is loading ...
Page is loading ...
Page is loading ...
Page is loading ...
Page is loading ...
Page is loading ...
Page is loading ...
Page is loading ...
Page is loading ...
Page is loading ...
Page is loading ...
Page is loading ...
Page is loading ...
Page is loading ...
Page is loading ...
Page is loading ...
Page is loading ...
Page is loading ...
Page is loading ...
Page is loading ...
Page is loading ...
Page is loading ...
Page is loading ...
Page is loading ...
Page is loading ...
Page is loading ...
Page is loading ...
Page is loading ...
Page is loading ...
Page is loading ...
Page is loading ...
Page is loading ...
Page is loading ...
Page is loading ...
Page is loading ...
Page is loading ...
Page is loading ...
Page is loading ...
Page is loading ...
Page is loading ...
Page is loading ...
Page is loading ...
Page is loading ...
Page is loading ...
Page is loading ...
-
 1
1
-
 2
2
-
 3
3
-
 4
4
-
 5
5
-
 6
6
-
 7
7
-
 8
8
-
 9
9
-
 10
10
-
 11
11
-
 12
12
-
 13
13
-
 14
14
-
 15
15
-
 16
16
-
 17
17
-
 18
18
-
 19
19
-
 20
20
-
 21
21
-
 22
22
-
 23
23
-
 24
24
-
 25
25
-
 26
26
-
 27
27
-
 28
28
-
 29
29
-
 30
30
-
 31
31
-
 32
32
-
 33
33
-
 34
34
-
 35
35
-
 36
36
-
 37
37
-
 38
38
-
 39
39
-
 40
40
-
 41
41
-
 42
42
-
 43
43
-
 44
44
-
 45
45
-
 46
46
-
 47
47
-
 48
48
-
 49
49
-
 50
50
-
 51
51
-
 52
52
-
 53
53
-
 54
54
-
 55
55
-
 56
56
-
 57
57
-
 58
58
-
 59
59
-
 60
60
-
 61
61
-
 62
62
-
 63
63
-
 64
64
-
 65
65
-
 66
66
-
 67
67
-
 68
68
-
 69
69
-
 70
70
-
 71
71
-
 72
72
-
 73
73
-
 74
74
-
 75
75
-
 76
76
-
 77
77
-
 78
78
-
 79
79
-
 80
80
-
 81
81
-
 82
82
-
 83
83
-
 84
84
-
 85
85
-
 86
86
-
 87
87
-
 88
88
-
 89
89
-
 90
90
-
 91
91
-
 92
92
-
 93
93
-
 94
94
-
 95
95
-
 96
96
-
 97
97
-
 98
98
-
 99
99
-
 100
100
-
 101
101
-
 102
102
-
 103
103
-
 104
104
-
 105
105
-
 106
106
-
 107
107
-
 108
108
-
 109
109
-
 110
110
-
 111
111
-
 112
112
-
 113
113
-
 114
114
-
 115
115
-
 116
116
-
 117
117
-
 118
118
-
 119
119
-
 120
120
-
 121
121
-
 122
122
-
 123
123
-
 124
124
-
 125
125
-
 126
126
-
 127
127
-
 128
128
-
 129
129
-
 130
130
-
 131
131
-
 132
132
-
 133
133
-
 134
134
-
 135
135
-
 136
136
-
 137
137
-
 138
138
-
 139
139
-
 140
140
-
 141
141
-
 142
142
-
 143
143
-
 144
144
-
 145
145
-
 146
146
-
 147
147
-
 148
148
-
 149
149
-
 150
150
-
 151
151
-
 152
152
-
 153
153
-
 154
154
-
 155
155
-
 156
156
-
 157
157
-
 158
158
-
 159
159
-
 160
160
-
 161
161
-
 162
162
-
 163
163
-
 164
164
-
 165
165
-
 166
166
-
 167
167
-
 168
168
-
 169
169
-
 170
170
-
 171
171
-
 172
172
-
 173
173
-
 174
174
-
 175
175
-
 176
176
-
 177
177
-
 178
178
-
 179
179
-
 180
180
-
 181
181
-
 182
182
-
 183
183
-
 184
184
-
 185
185
-
 186
186
-
 187
187
-
 188
188
-
 189
189
-
 190
190
-
 191
191
-
 192
192
-
 193
193
-
 194
194
-
 195
195
-
 196
196
-
 197
197
-
 198
198
-
 199
199
-
 200
200
-
 201
201
-
 202
202
-
 203
203
-
 204
204
-
 205
205
-
 206
206
-
 207
207
-
 208
208
-
 209
209
-
 210
210
-
 211
211
-
 212
212
-
 213
213
-
 214
214
-
 215
215
-
 216
216
-
 217
217
-
 218
218
-
 219
219
-
 220
220
-
 221
221
-
 222
222
-
 223
223
-
 224
224
-
 225
225
-
 226
226
-
 227
227
-
 228
228
-
 229
229
-
 230
230
-
 231
231
-
 232
232
-
 233
233
-
 234
234
-
 235
235
-
 236
236
-
 237
237
-
 238
238
-
 239
239
-
 240
240
-
 241
241
-
 242
242
-
 243
243
-
 244
244
-
 245
245
-
 246
246
-
 247
247
-
 248
248
-
 249
249
-
 250
250
-
 251
251
-
 252
252
-
 253
253
-
 254
254
-
 255
255
-
 256
256
-
 257
257
-
 258
258
-
 259
259
-
 260
260
-
 261
261
-
 262
262
-
 263
263
-
 264
264
-
 265
265
-
 266
266
-
 267
267
-
 268
268
-
 269
269
-
 270
270
-
 271
271
-
 272
272
-
 273
273
-
 274
274
-
 275
275
-
 276
276
-
 277
277
-
 278
278
-
 279
279
-
 280
280
-
 281
281
-
 282
282
-
 283
283
-
 284
284
-
 285
285
-
 286
286
-
 287
287
-
 288
288
-
 289
289
-
 290
290
-
 291
291
-
 292
292
-
 293
293
-
 294
294
-
 295
295
-
 296
296
-
 297
297
-
 298
298
-
 299
299
-
 300
300
-
 301
301
-
 302
302
-
 303
303
-
 304
304
-
 305
305
-
 306
306
-
 307
307
-
 308
308
-
 309
309
-
 310
310


Toyota 2004 Matrix Owner's manual
- Category
- Cars
- Type
- Owner's manual
- This manual is also suitable for
Ask a question and I''ll find the answer in the document
Finding information in a document is now easier with AI
Related papers
-
Toyota FJ Cruiser Owner's manual
-
-
Hyundai 2006 Matrix Owner's manual
-
-
-
-
-
-
-
Other documents
-
HoMedics HF768-SIPA-MH-MET User manual
-
Lexus 2003 Owner's manual
-
-
-
Wedo Electronic Scale OPTIMO Steel 5000 User manual
-
 Genuine Toyota PT398-34150 Installation guide
-
Lotus 2004 Eleven Service Notes
-
VDO CONTISYS SCAN Quick start guide
-
 Interphase Tech echo 200 User manual

