Page is loading ...

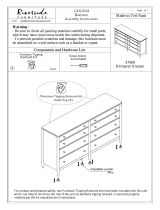
Adjustable Leveler
3Pcs
For product and personal safety, two Furniture Tipping Restraint kits have been included with this unit
which can help to minimize the risk of the unit accidentally tipping forward, if used and properly installed
per the kit manufacturer's instructions.
Furniture Tipping Restraint Kit
Screw Driver
not included
inside bag
Made in Viet Nam
Components and Hardware List
Page 1 of 1
27160
Dresser
Warning :
- Be sure to check all packing material carefully for small parts,
which may have come loose inside the carton during shipment.
- To prevent possible scratches and damage, this furniture must
be assembled on a soft surface such as a blanket or carpet.
A
Important Use Information: We recommend using coasters,
placemats and trivets when placing hot or cold containers
on this item. It is also recommended to quickly cleanup any
spills to minimize exposure to moisture. Doing so will prolong
the life and look of the item for many years.
email: info@riverside-furniture.com
LYDIA
Bedroom
Assembly Instructions
Furniture Tipping
Restraint Kit
2 set.
(B)
STEP 1
STEP 2
Remove Handle from
inside drawer
Front Front
Reattach Handle to
front of drawer
B
Dresser
1 pc.
A
/