STR-DH510 4-168-044-11(1) GB/FR/ES/DE
4-168-044-11(1)
Sony Corporation © 2010 Printed in Malaysia
Video components/ Eléments vidéo/ Componentes de vídeo/Videokomponenten
IN
OPTICAL
DIGITAL
(ASSIGNABLE)
COMPONENT VIDEO
DMPORT
AUTO CAL
MIC
SA-CD
/
CD
OPTICAL
COAXIAL
SAT/
CATV
IN
SAT/CATV IN
SAT
/
CATV
AUDIO
IN
AUDIO
IN
AUDIO
IN
DVD IN
MONITOR
OUT
DVD
IN
DC5V
Y
P
B
/
C
B
P
R
/
C
R
VIDEO
IN
VIDEO
AUDIO
OUT
AUDIO
OUT
VIDEO
OUT
AUDIO
IN
VIDEO
IN
DVD
VIDEO
IN
MONITOR
SUBWOOFER
VIDEO
OUT
AM
SURROUND
L
L
R
R
FRONT
R
L
DVD IN BD IN SAT/CATV IN TV OUT
ARC
HDMI
ANTENNA
0.7A MAX
TV
CENTER
SPEAKERS
TV
IN
OPTICAL
DIGITAL
(ASSIGNABLE)
COMPONENT VIDEO
DMPORT
SA-CD
/
CD
OPTICAL
COAXIAL
SAT/
CATV
IN
SAT/CATV IN
SAT
/
CATV
AUDIO
IN
AUDIO
IN
AUDIO
IN
DVD IN
MONITOR
OUT
DVD
IN
DC5V
Y
P
B
/
C
B
P
R
/
C
R
VIDEO
IN
VIDEO
AUDIO
OUT
AUDIO
OUT
VIDEO
OUT
AUDIO
IN
VIDEO
IN
DVD
VIDEO
IN
MONITOR
SUBWOOFER
VIDEO
OUT
AM
R
L
ARC
ANTENNA
0.7A MAX
TV
$$$
$
%
*
AUTO CAL
MIC
SAT/CATV IN
HDMI
TV OUTDVD IN BD IN
TV
HDMI
ARC
DI
ITA
(A
I
NABLE
MP
NENT VIDE
MP
R
PTICAL
AXIAL
AT
CAT
N
AT/CATV I
UDI
AUDI
UDI
DVD IN
MONITOR
I
D
V
/
IDE
IDE
DI
OU
DI
U
IDEO
DI
IDE
N
IDE
N
NIT
R
UBWOOFER
IDE
OU
.7A MAX
AUT
A
I
LINE
IN
OUT
IN
OPTICAL
DIGITAL
(ASSIGNABLE)
COMPONENT VIDEO
DMPORT
AUTO CAL
MIC
SA-CD
/
CD
OPTICAL
COAXIAL
SAT/
CATV
IN
SAT/CATV IN
SAT
/
CATV
AUDIO
IN
AUDIO
IN
AUDIO
IN
DVD IN
MONITOR
OUT
DVD
IN
DC5V
Y
P
B
/
C
B
P
R
/
C
R
VIDEO
IN
VIDEO
AUDIO
OUT
VIDEO
OUT
AUDIO
IN
VIDEO
IN
DVD
VIDEO
IN
MONITOR
SUBWOOFER
VIDEO
OUT
AM
SURROUND
L
L
R
R
FRONT
R
L
DVD IN BD IN SAT/CATV IN TV OUT
ARC
HDMI
ANTENNA
0.7A MAX
TV
TV
CENTER
SPEAKERS
AUDIO
OUT
SUBWOOFER
AUDIO
OUT
IN
OPTICAL
DIGITAL
(ASSIGNABLE)
COMPONENT VIDEO
DMPORT
AUTO CAL
MIC
SA-CD
/
CD
OPTICAL
COAXIAL
SAT/
CATV
IN
SAT/CATV IN
SAT
/
CATV
AUDIO
IN
AUDIO
IN
AUDIO
IN
DVD IN
MONITOR
OUT
DVD
IN
DC5V
Y
P
B
/
C
B
P
R
/
C
R
VIDEO
IN
VIDEO
AUDIO
OUT
AUDIO
OUT
VIDEO
OUT
AUDIO
IN
VIDEO
IN
DVD
VIDEO
IN
MONITOR
SUBWOOFER
VIDEO
OUT
AM
SURROUNDCENTER
L
L
R
R
SPEAKERS
FRONT
R
L
DVD IN BD IN SAT/CATV IN TV OUT
ARC
HDMI
ANTENNA
0.7A MAX
TV
TV
L
R
FRONT
IN
OPTICAL
DIGITAL
(ASSIGNABLE)
COMPONENT VIDEO
DMPORT
AUTO CAL
MIC
SA-CD
/
CD
OPTICAL
COAXIAL
SAT/
CATV
IN
SAT/CATV IN
SAT
/
CATV
AUDIO
IN
AUDIO
IN
AUDIO
IN
DVD IN
MONITOR
OUT
DVD
IN
DC5V
Y
P
B
/
C
B
P
R
/
C
R
VIDEO
IN
VIDEO
AUDIO
OUT
AUDIO
OUT
VIDEO
OUT
AUDIO
IN
VIDEO
IN
DVD
VIDEO
IN
MONITOR
SUBWOOFER
VIDEO
OUT
AM
SURROUND
L
L
R
R
FRONT
R
L
DVD IN BD IN SAT/CATV IN TV OUT
ARC
HDMI
ANTENNA
0.7A MAX
TV
TV
CENTER
SPEAKERS
CENTER
IN
OPTICAL
DIGITAL
(ASSIGNABLE)
COMPONENT VIDEO
DMPORT
AUTO CAL
MIC
SA-CD
/
CD
OPTICAL
COAXIAL
SAT/
CATV
IN
SAT/CATV IN
SAT
/
CATV
AUDIO
IN
AUDIO
IN
AUDIO
IN
DVD IN
MONITOR
OUT
DVD
IN
DC5V
Y
P
B
/
C
B
P
R
/
C
R
VIDEO
IN
VIDEO
AUDIO
OUT
AUDIO
OUT
VIDEO
OUT
AUDIO
IN
VIDEO
IN
DVD
VIDEO
IN
MONITOR
SUBWOOFER
VIDEO
OUT
AM
L
R
FRONT
R
L
DVD IN BD IN SAT/CATV IN TV OUT
ARC
HDMI
ANTENNA
0.7A MAX
TV
TV
CENTER
SPEAKERS
SURROUND
LR
SURROUND
LR
SPEAKERS
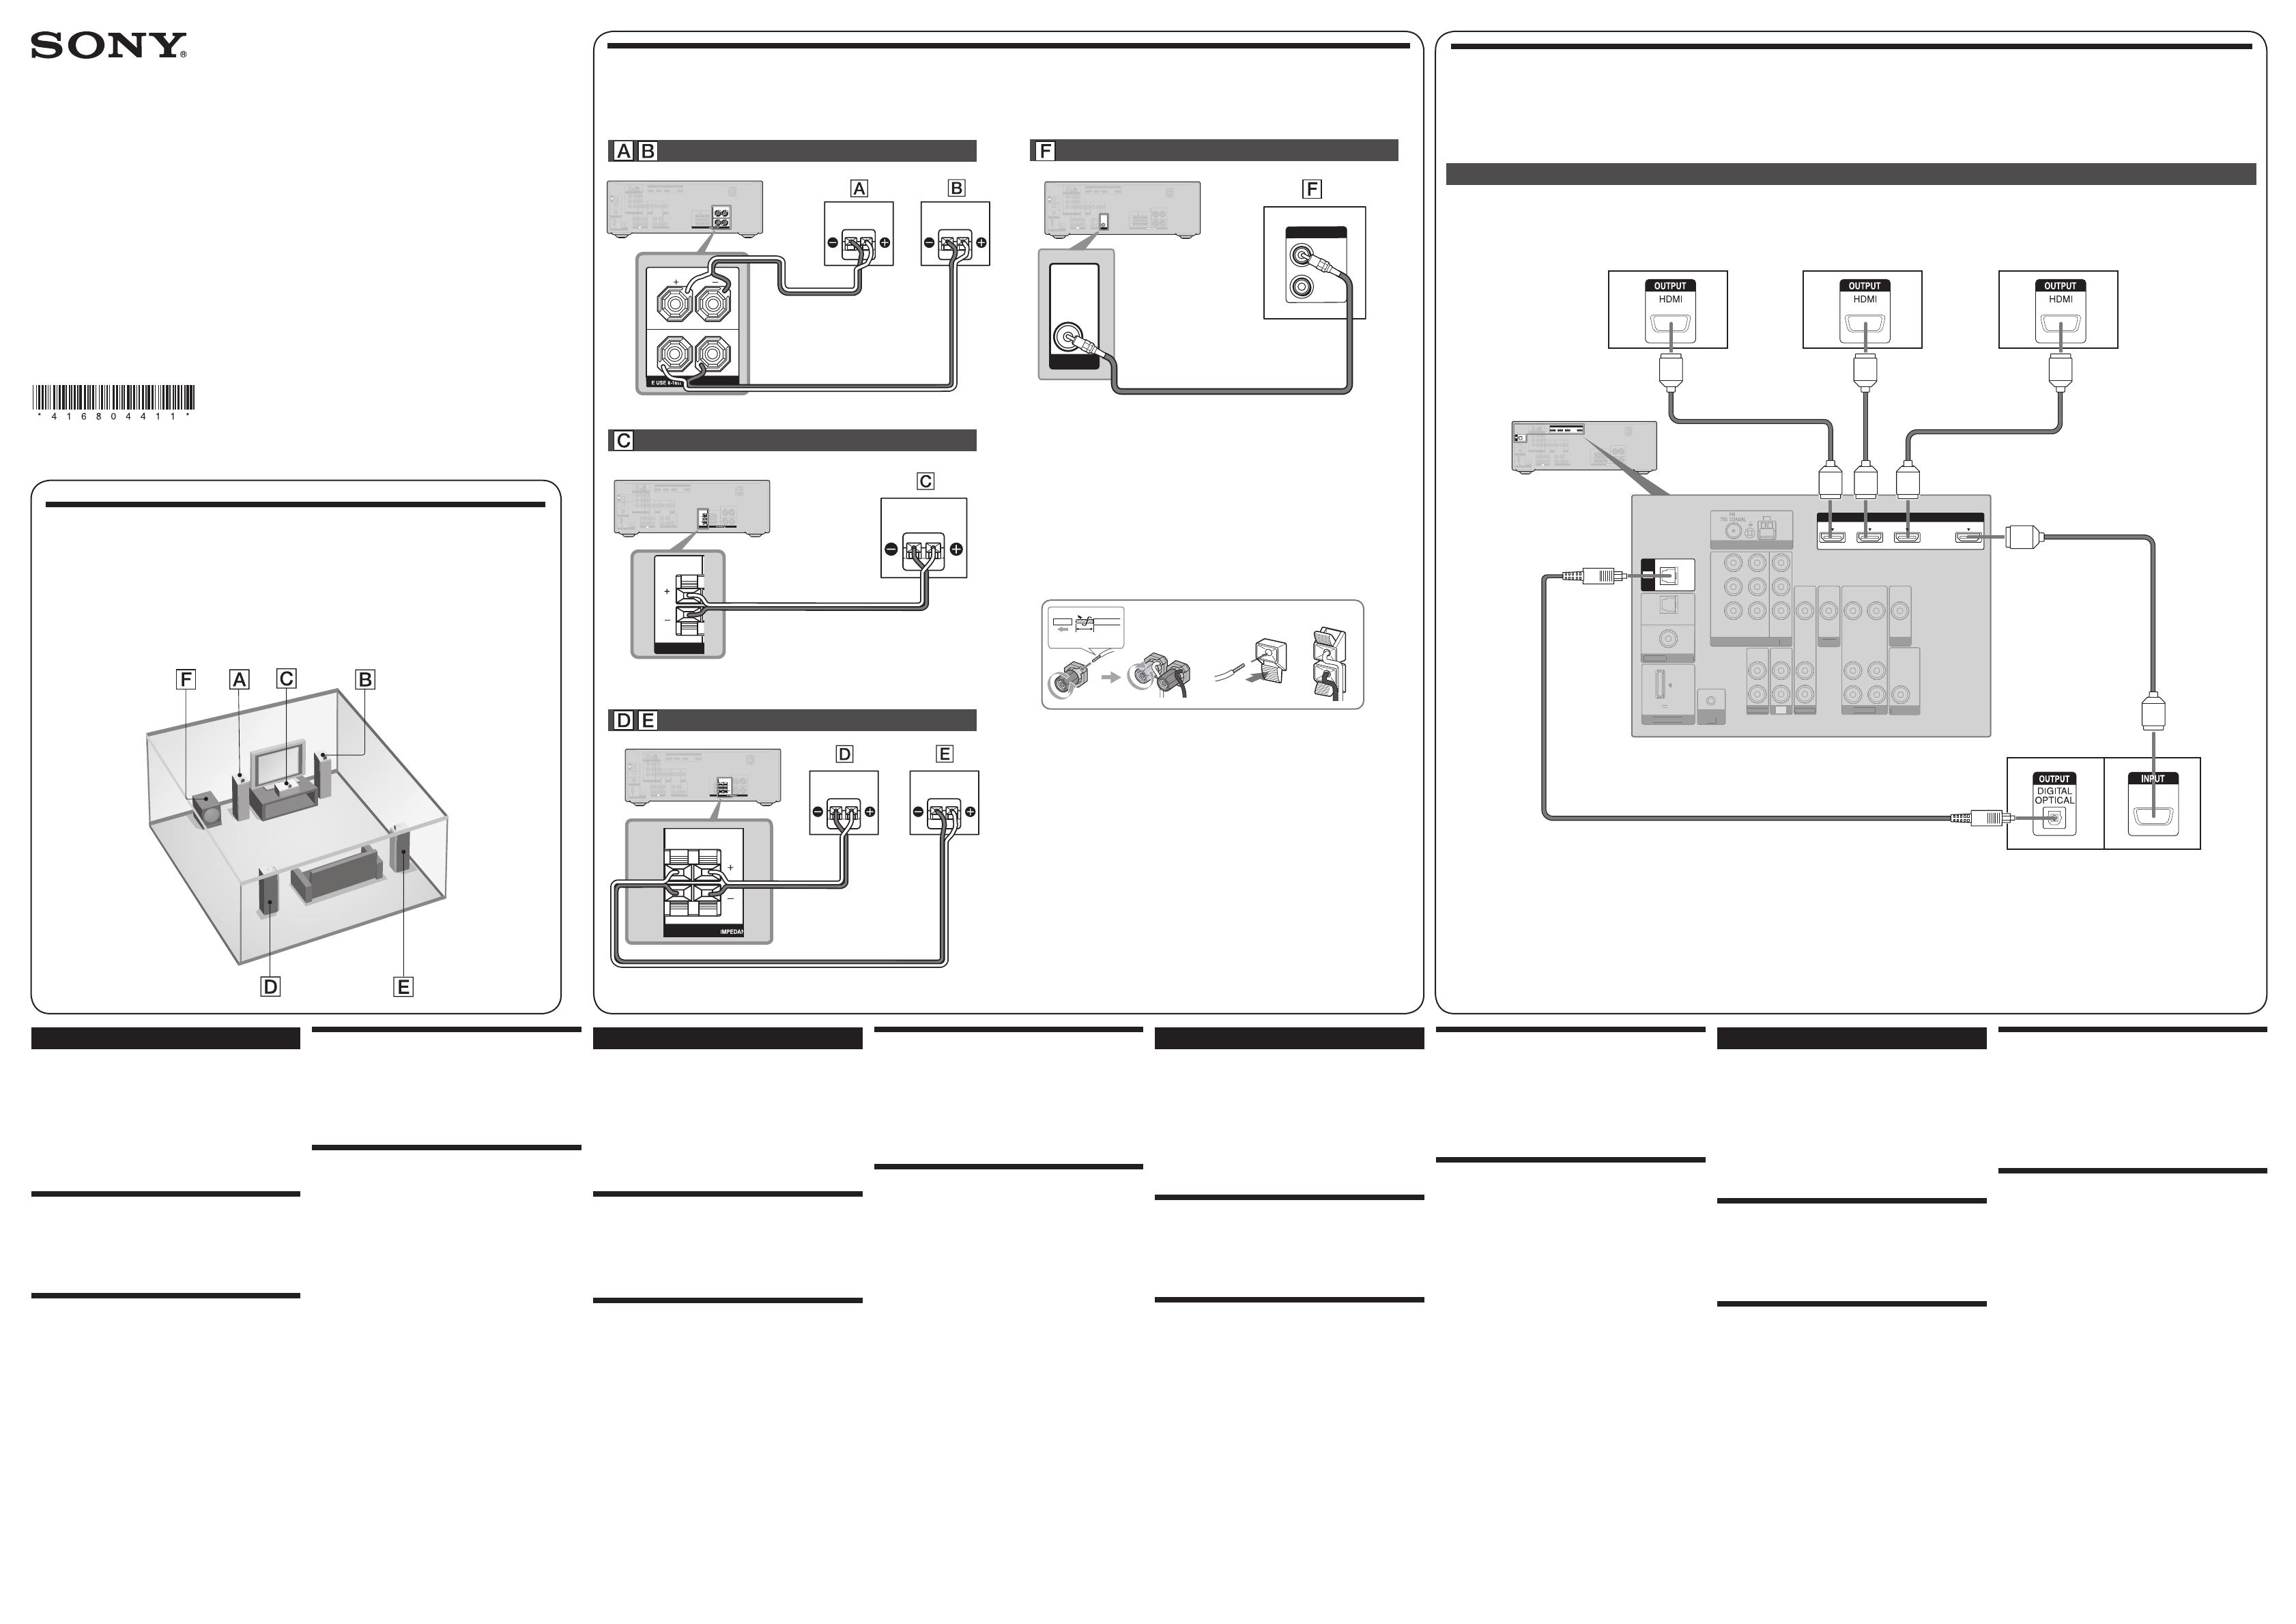
1: Installing the speakers/
1: Installation des enceintes/
1: Instalación de los altavoces/
1: Installieren der Lautsprecher
STR-DH510
Quick Setup Guide
Guide d’installation rapide
Guía de instalación rápida
Kurzanleitung
2: Connecting the speakers/2: Raccordement des enceintes/
2: Conexión de los altavoces/2: Anschließen der Lautsprecher
3: Connecting other components/3: Raccordement d’autres
éléments/3: Conexión de otros componentes/
3: Anschließen anderer Komponenten
English
The illustrations in the guide designate speakers as
A
through
F
.
A
Front speaker (left)
B
Front speaker (right)
C
Center speaker
D
Surround speaker (left)
E
Surround speaker (right)
F
Subwoofer
1: Installing the speakers
The illustrations above show an example of a 5.1
channel speaker system (fi ve speakers and one
subwoofer) confi guration. Refer to the operating
instructions supplied with the receiver.
2: Connecting the speakers
Connect the speakers according to the number and type
of your speakers.
About speaker cords and terminals
• Use speaker cords, which are appropriate for the
width of the room.
• The speaker cord may have different colors or
markings on them. To make the correct connection,
decide which to connect to the plus (+) and minus
(–) terminals on the speaker. Then connect the plus
(+) terminal to the plus (+) terminal on the receiver
and the minus (–) terminal to the minus (–) terminal
on the receiver.
• Refer to the illustration above for details of
connecting speaker cords and terminals.
3: Connecting other components
This is an example of how to connect this receiver
and your components. Refer to step 3 and 4 of
“Connections” of the operating instructions supplied
with this receiver for details on other connections and
other components.
4: Connect all power cords last
Connect the AC power cord to a wall outlet.
Refer to “6: Connecting the AC power cord (mains
lead)” in the operating instructions supplied with the
receiver.
Français
Les illustrations du guide désignent les différentes
enceintes, de
A
à
F
.
A
Enceinte avant (gauche)
B
Enceinte avant (droite)
C
Enceinte centrale
D
Enceinte surround (gauche)
E
Enceinte surround (droite)
F
Caisson de graves
1: Installation des enceintes
Les illustrations ci-dessus montrent un exemple
de confi guration d’un système à 5.1 canaux (cinq
enceintes et un caisson de graves). Reportez-vous au
mode d’emploi fourni avec l’ampli-tuner.
2: Raccordement des enceintes
Raccordez les enceintes en fonction de leur nombre et
de leur type.
A propos des bornes et des cordons
d’enceinte
• Utilisez des cordons d’enceintes adaptés à la largeur
de la pièce.
• Le cordon d’enceinte peut avoir une couleur ou porter
un marquage différent. Pour un raccordement correct,
choisissez les cordons à raccorder aux bornes plus (+)
et moins (–) de l’enceinte. Raccordez ensuite la borne
plus (+) à la borne (+) de l’ampli-tuner, et la borne
moins (–) à la borne moins (–) de l’ampli-tuner.
• Reportez-vous à l’illustration ci-dessus pour plus
de détails sur le raccordement des bornes et des
cordons d’enceinte.
3: Raccordement d’autres
composants
Ce guide donne un exemple de raccordement de cet
ampli-tuner et de vos composants. Reportez-vous aux
étapes 3 et 4 de la section « Raccordements » du mode
d’emploi fourni avec cet ampli-tuner pour plus de
détails sur le raccordement à d’autres composants.
4: Raccordez tous les cordons
d’alimentation en dernier lieu
Raccordez le cordon d’alimentation secteur à la prise
murale.
Reportez-vous à la section «6: Raccordement du
cordon d’alimentation secteur » dans le mode
d’emploi fourni avec l’ampli-tuner.
Español
En las ilustraciones de la guía, los altavoces se
identifi can de
A
a
F
.
A
Altavoz frontal (izquierdo)
B
Altavoz frontal (derecho)
C
Altavoz central
D
Altavoz de sonido envolvente (izquierdo)
E
Altavoz de sonido envolvente (derecho)
F
Altavoz de graves
1: Instalación de los altavoces
Las ilustraciones anteriores muestran un ejemplo de
confi guración de sistema de altavoces de 5.1 canales
(cinco altavoces y un altavoz de graves). Consulte el
manual de instrucciones suministrado con el receptor.
2: Conexión de los altavoces
Conecte los altavoces en función del número y tipo de
altavoces de que disponga.
Acerca de los cables de altavoz y los
terminales
• Utilice cables de altavoces que resulten apropiados
para la anchura de la habitación.
• El cable de altavoz puede tener distintos
colores o marcas. Para llevar a cabo la conexión
correctamente, decida el modo de conectar los
terminales (+) y (–) del altavoz. Seguidamente,
conecte el terminal (+) al terminal (+) en el receptor
y el terminal (–) al terminal (–) en el receptor.
• Consulte la ilustración anterior para saber cómo
conectar los cables de altavoz y los terminales.
Deutsch
In den Abbildungen in dieser Anleitung sind die
Lautsprecher mit
A
bis
F
gekennzeichnet.
A
Frontlautsprecher (links)
B
Frontlautsprecher (rechts)
C
Centerlautsprecher
D
Surroundlautsprecher (
links
)
E
Surroundlautsprecher (rechts)
F
Subwoofer
1: Installieren der Lautsprecher
Die Abbildungen oben zeigen ein 5.1-Kanal-
Lautsprechersystem (fünf Lautsprecher und
ein Subwoofer). Schlagen Sie bitte in der
Bedienungsanleitung zum Receiver nach.
2: Anschließen der Lautsprecher
Nehmen Sie die Lautsprecheranschlüsse je nach
Anzahl und Typ der vorhandenen Lautsprecher vor.
Die Lautsprecherkabel und Anschlüsse
• Verwenden Sie für die Raumgröße geeignete
Lautsprecherkabel.
• Das Lautsprecherkabel kann unterschiedliche
Farben oder Markierungen aufweisen. Um die
Anschlüsse ordnungsgemäß vorzunehmen,
entscheiden Sie, welches an die Plus (+)- und
Minus (–)-Anschlüsse des Lautsprechers
angeschlossen werden soll. Verbinden Sie dann den
Plus (+)-Anschluss mit dem Plus (+)-Anschluss am
Receiver und den Minus (–)-Anschluss mit dem
Minus (–)-Anschluss am Receiver.
• Nähere Informationen zum Anschluss der
Lautsprecherkabel an die Anschlüsse fi nden Sie in
der Abbildung oben.
3: Anschließen anderer
Komponenten
Hier sehen Sie ein Beispiel für das Anschließen
anderer Komponenten an den Receiver. Nähere
Informationen zum Anschließen anderer Komponenten
fi nden Sie in Schritt 3 und 4 unter „Anschlüsse“ in der
Bedienungsanleitung zum Receiver.
4: Zum Schluss: Anschließen
der Netzkabel
Schließen Sie das Netzkabel an eine Netzsteckdose an.
Näheres dazu fi nden Sie unter „6: Anschließen des
Netzkabels“ in der Bedienungsanleitung zum Receiver.
3: Conexión de otros componentes
Este es un ejemplo de cómo conectar este receptor
a los componentes. Consulte los pasos 3 y 4
de “Conexiones” del manual de instrucciones
suministrado con el receptor para obtener más
información sobre cómo realizar otras conexiones y
sobre otros componentes.
4: Conecte todos los cables de
alimentación en último lugar
Conecte el cable de alimentación de ca a una toma de
pared.
Consulte el apartado “6: Conexión del cable de
alimentación de CA” del manual de instrucciones
suministrado con el receptor.
A
A
TV/
Téléviseur
/
Televisor/
Fernsehgerät
(1)
A
B
10 mm
Cords used for connection (not supplied)/
Cordons utilisés pour le raccordement (non fournis)/
Cables utilizados para la conexión (no suministrado)/
Zum Anschließen verwendete Kabel (nicht mitgeliefert)
A
Speaker cord/Cordons d’enceinte/Cables de altavoz/
Lautsprecherkabel
B
Monaural audio cord/Cordon audio mono/Cable de audio monoaural/
Mono-Audiokabel
C
HDMI cable/Câble HDMI/Cable HDMI/HDMI-Kabel
D
Optical digital cord/Cordon optique numérique/Cable digital óptico/Optisches Digitalkabel
Cords used for connection (not supplied)/Cordons utilisés pour le raccordement (non fournis)/
Cables utilizados para la conexión (no suministrado)/Zum Anschließen verwendete Kabel (nicht mitgeliefert)
* You do not need to connect this cord if your TV is compatible with Audio Return Channel (ARC) function./
Il n’est pas nécessaire de raccorder ce cordon si votre téléviseur est compatible avec la fonction Audio Return Channel (ARC)./
No es necesario conectar este cable si el televisor es compatible con la función ARC (Canal de retorno de audio)./
Sie müssen dieses Kabel nicht anschließen, wenn Ihr Fernsehgerät mit der Funktion Audio Return Channel (ARC) kompatibel ist.
Blu-ray disc player, “PlayStation 3”/
Lecteur de disques Blu-ray,
« PlayStation 3 »/Reproductor de
discos Blu-ray, “PlayStation 3”/
Blu-ray-Disc-Player, „PlayStation 3“
DVD player, DVD recorder/
Lecteur DVD, Enregistreur DVD/
Lector de DVD, Grabadora de
DVD/
DVD-Player, DVD-Recorder
Satellite tuner, Cable TV tuner/
Tuner satellite, Tuner TV par câble/
Sintonizador por satélite,
sintonizador de televisión por cable/
Satellitentuner, Kabelfernsehtuner

