
ge.com
D
©
L)
Sa]bOl Instructions .... 2-9
Operating Instructions
Auto Features ......... 20
Care and
Cleaning .......... 33, 34
Changing the
Power I,e\'el .......... 13
Cooking Guide ..... 15, 16
Deti'osting Guide .... 18
Exhaust Feature . .37, 38
Features of Your
Microwave Oven . .11, 12
Microwave Temps ...... 32
Other Features .... 95-31
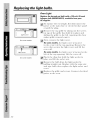
Replacing Bulbs .... 35, 36
Sensor Features .... 91-24
Time FeattH'es ...... 14-19
7}rmbleshoodng Tips ...39
Things That Are
Nomml _'\ith Your
Microwaxe Oxen ....... 4(1
Consumer Support
Consumer
Support ...... Back Cover
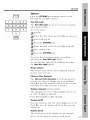
Optional Kits ......... 10
Product
Registration ....... 41, 42
X_hrrantv ............. 43
Espa_d
For a Spanish version
ot this manual,
visit our _,Vebsite at
ge.colll.
PaI'a COiiS/lltai" tlIla
ve_ion en espafiol
de este manual
de instrucciones,
visite nuestro sitio
de internet ge.com.
,[VM l850
,IVM l85 l
,[VM l870
,tq/M18 71
,/VM2050
,/VM3670
HDM 1853
1_2M04000
Write the model and serial numbers here:
Model #
Serial#
Find lhese numbers on a label inside
tile o\en.
DE68-O2560A 49-40477 01-06JR

IMPORTANTSAFETYINFORMATION.
READALLINSTRUCTIONSBEFOREUSING.
ii_?iiiii!+++;;iii!li_+¸
WARNING!
For your safety the information in this manual must be
foflowed to minimize the risk of fire or explosion, electric
shock, or to prevent property damage, personal injury,
or loss of life.
PRECAUTIONSTOAVOID
POSSIBLEEXPOSURETO
EXCESSIVEMICROWAVEENERGY
_: Do Not Attempt to operate
tiffs ()\ell with the door open
Sill((' Op('//-dooF Op('l_Hioll
(an r('suh in hm:mflfl
exposure to l//i( rOW_lVO
ene_g}. It is important not
to (te_b_t or umlper _itl/
die s_d('tv interhxks.
_: Do Not Place any object
b('tw('('11 th(' o\('11 [l'()ll[
{i_(e and tl/e door or allow
soil or cleaner tvsidue to
t_((un/ulate on setding
SHFJitC('S+
Do Not Operate the oven if it
is damaged. It is particularly
importam that the oven door
(lose properly and that there
is no damage to the:
(,oo1(,is,.>.
h.lg(+.,l(__..h(+
.........................(broken or loosened),
(.,o1-s(++,_++,,l(_s(+..,l+
.........................Stll?t_t( (!S+
The Oven Should Not be
a(!justed or repaired by
_H_y()]l(' ('x(('])t p£op('r|y
(tu_diIied s('r\'i((' t)('r.',onn('l.
SAFETYPRECAUTIONS
When using electrical appfiances, basic safety
precautions should be followed, including the following:
+5}Re_d an(I _()llOW the i_: Install or lo(_te this
specific precautions ill
the Precautions to Avoid
Possible Exposure to
Excessive Microwave
Energy se(doH above.
J} This _t)pli_ul( e must be
grounded. Conne(t only
to _ t)roperly grounded
outlet. See the Grounding
InstFuctZons Se(tiOl/ Oil
page 8.
appliance only in
accordance with the
t)rovided [nstMlation
Inswtl( lions.
i_i;This mi(rowa_e oven is
illtellded £)r house]lold rise
+uld is UI listed [br
installation over ele(tri(
and g+_srmlges.
ii::This mi(-row_ve oven is
not approved or tested lot
marine use.

_e.com
Use this appfiance only for its intended purpose as described in this
Owner's Manual
_5}Do not lnount this applimace over a
sink.
J? To reduce the risk of fire in the ()\el/
J? This ovel-d/e-rm/ge oven _,_s (tesiglled
{i)r use over ranges no wider d/an 36"
It mm be installed o\er both g_s and
elecuJc cooking equipment.
J? Do not operate this appliance if it has
a (Imnaged power cord or plug, if it is
not working llml)( fly or it it has been
damaged or dropped. If die power
(ord is damaged, it must be replaced
1)v General Ele(tric SelMce or an
authorized service agent using a
power cord a\ ailable tix)m General
Ele(t)Jc.
_: I)o not c(wer or block any openings
on tilt' al)plim/t e.
_: List, this applimlce only/or its
intended else as described in dfis
manual. Do not use corrosive
chemicals or vapors in this appliance.
This microwave oxen is specifically
designed {o heat, (tV_ r or took fi.)o(I,
mid is not intended t_)r laboratory or
ind usuJal use.
J? Do not store this appliance outdoors.
Do not use this pro(tu({ near Watt'_m
{or ex_tlIIple, ill a wet b_tselI/ell{, I/e_tr
a swimming pool, near a sink or in
similar locations.
_: Keel/power cord awa} fl:on/heated
sIIrJitces.
_: I)o not immerse power cord or plug
ill WaWl3
J? Do not store am, ihing (tirecfly on top
of t]le iiliel'ow;4\ e ()\ell S/ll?lilee when
the llliet'ow_\ e ()\ell is ill opet'ation.
- Do not over(ook/ood. Carefllllv
auend applian(e when pallet; plastic
or oilier combusdble mawrials are
placed inside the o\en while cooking.
- P-enlo\e wire twist-ties and metal
handles/i'om paper or l)lasue
containers 1)e/ore placing them in
the oven,
I)o not use tl/e ()\ell lot storage
puqloses./)o not lea\ e paller
products, cooking utensils or t[)od
in the oven when not in use.
- If materi_ds inside the o',en iglfite,
kee t) {lie oven door closed, turn file
o_'n off and disconnect the power
cord, or shut off power at the fllse or
circuit breaker panel. It the door is
opened, the {ire _l_r spread.
- Do not use tl/e Sensor Features
t_,_ice in succession on tl/e same tbod
pordon. If/ood is undercooked after
the/irs{ countdown, use JJllle Cook t_)r
additional cooking ume.
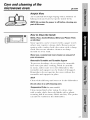
N See door surli_ce cleaning
insmmtions ill die Care and cleaning
of the microwave oven section of this
mamml.
_: This appliance should be serviced
only by (tualilied service t)ers(mnel.
Conta(t nearest authorized selMce
/imility lot examination, repair or
a(!iustment.
J_ ,ks with rely appliant e, (lose
supervision is necessary when used
by children.
iiii iiii//!!iliiii!!iii!
iiiii+,+,i?i'ii_iii++/+++
i+il+
3

IMPORTANTSAFETYINFORMATION.
READALLINSTRUCTIONSBEFOREUSING.
WARNING!
ARCING
If you see arcing, press the CLEAR/OFFpad and correct
the problem.
Arcing is the ini_ rowave ternl
Ior sparks in the oven. Arcing
is caused Iv:
N The metal shelf not
installed correctly so it
touches the n/ierowa_e wall.
_: Metal or fi)il touching the
side of tile oven.
i;i;Foil not molded to fi)od
(upturned edges act like
_llltel/ll_lS).
+;i:Metal, smh as twist-ties,
t/ouhry t)ins or gold-
rinmled dishes, ill the
llli(rowave.
ii::Recycled paper towels
containing small metal
pieces being used ill tile
nlicrowave.
FOODS
_: l)o not t_ot / l/opeorn ill
Your mi_ rowave oven unless
ill a special lni(ro_,,ave
t/ot)(orn a((essory or mlless
you use t_Ol/Corn labeled
ti)r use ill lni(rowave ovens.
_: Son/e llro/hlcts such as
whole eggs and sealed
( ont ainers--/k)r exal//l)le ,
eh)sed.jarslare at/le to
exlflode and should not be
heated ill this mi_ rowave
oven. Such use o/ tile
nlicrowave oven could
resuh ill il_ju W.
_? l)o not boil eggs ill a
lllicrowave oven. Pressllre
will build u 11inside egg yolk
and will cause it to burst,
t/ossibly resulting ill il_.j_?r.
()perating tile microwave
with no/ood inside tor
nlore than a minute or two
may cause danlage to tile
oven and could start a fire.
It increases tile heat around
the n/agnetron and can
shorten the lilt, of the oven.
Foods with untlroken outer
"skill" sH(h as t)ot:atoes, hot
dogs, sausages, ton/aloes,
apples, chicken li_ers and
other gJt)lets, and egg yolks
should tie pierced to allow
stealil to escape (lilting
cooking.

_e.com
SUPERHEATEDWATER
Liquids, such as water,
coffee or tea are able to be
overheated beyond the
boiling point without
appearing to be boiling.
Visiblebubbling or boiling
when the container is
removed from the microwave
oven is not always present.
THISCOULDRESULTIN VERY
HOTLIQUIDSSUDDENLY
BOILINGOVERWHEN THE
CONTAINERIS DISTURBED
ORA SPOONOROTHER
UTENSILISINSERTEDINTO
THELIQUID.
To red uce die risk of illi m_y
to peFsons;
-- I)o not oveflleat the liquid.
-- Stir tile liqtfid both betbre
and halt\v_ W throtNh
heisting it.
--Do not use str_ight-sided
(omainers with narrow
necks.
-- After heating, alh)w tile
cont_liner to st_*.nd ill tile
microwave oven tk)r _ short
ti]ne betk)re removi]lg the
contMne_:
-- Use extrelile C_tre when
inserting _1st)oon or ()tiler
utensil into the (ontaine_
ii::A_oid heating baby tbod in
glass jars, even with tile lid
o/E Make sure all in/hnt
/ood is dloroughly cooked.
Stir/t)od to distrit)me tile
heat evenh. Be carefill to
prevent scal(ling when
w_rl/ling /t)rl//Hl_ ()r bre_tst
milk. The (ontainer m_lv
/vel cooler them tile milk
really is. Alwa_'_ test the
milk heir)re/eeding tile
hal )_r.
i;i;Don't (te/i'ost/i'ozen
beverages in narrow-necked
bottles (espe(ially
(arbonated bever_lges).
E_en if tile container is
o])ened, 1)ressm:e can 1)uild
ut). This can (raise tile
container to burst, 1)ossibly
resulting in iqiuvy.
ii:;Itot /oo(ts and steam (an
cause bm:ns. Be careflfl
WlleI/ opening ;-uly
containers of hot tt)o(I,
in(luding t)op_ orn b_gs,
(()()king pouches _md
boxes. To t)revent t)ossible
illjm_y, direct ste_lm _r_'
/i:om hmMs mM/h(e.
i;i;Do not overcook t)otatoes.
They could dehydrate and
(at(h fire, (_msing dam_ge
to your o_en.
i;i;Cook meat and poultr}
thoroughly--me_t to at
least an INTERNAl,
tenq)eratm:e of 160°F
and poultt) to at least an
INTERNAl teml)eramre
of 180°E Cooking to these
teml)erat iires llSllally
protects against /ood-
borne illness.
5

IMPORTANTSAFETYINFORMATION.
READALLINSTRUCTIONSBEFOREUSING.
A WARNING!
MICROWAVE-SAFECOOKWARE
Make sure all cookware used
in your microwa_ e oven is
suitable lk)r microwa'_ing.
Most glass casseroles, cooking
dishes, measuring cups,
ctlstard cllps, t)otter_ or china
dinn(rware which do(s not
ha_e metallic trim or glaz_
with a metallic sheen can lie
used. Sore( cookware is
lal/eled "suitable/or
microwaving."
How to test fo ra microwave-
safedish,
ii::If you are not sure if a dish
is microwave-sa/i,, use this
test: Place in the oven both
tlle dish you are testing and
a glass measuring cut) filled
with 1 cup of watetmset file
measm:ing cup either in or
next to file dish. Microwave
30-4..5 seconds at high. If
the dish heats, it should not
be used/or mi( rowaving.
If the dish remains cool
and only the water ill the
cup heats, then the dish is
microwave-sa/i,.
ii:: If you use a meat
thermon/eter while
cooking, make sure it is
sa](' tk)r lisp ill microwave
ovel/s.
_} Do not use recycled paper
products. Recycled paper
towels, nat)kins and waxed
t)aper can contain metal
flecks which mm cause
arcing or ignite. Pal)er
prod uets containing nvlon
or talon filaments shouM
be avoided, as they lna_
also ignite.
01_ Sol//e StVFO/k)_llll tl';-ivs
(like those that meat is
t)a(kaged on) have a thin
strip of metal eml)edded
in the t)ottom. When
microwaved, tile metal can
burn tile floor of tile oven
or ignite a paper towel.
_} I)o not use the microwave
to dr} newst)apers.
N Not all plastic wrap is
suitable/i)r use in
microwave ovens. Check
file package/or proper use.
N Paper towels, waxed paper
and plastic wrap can be
used to cover dishes in
order to retain moisture
and prevent spattering.
Be sure to vent plasdc wrap
so steam/cm/esc_q)e.
;_} (',ook\,,rare l/lay t)econ/e hot
because of heat transit'fred
t_:om tile heated tood. Pot
holders italy be needed to
handle tile cook\vaFe.

_e.com
J? "Boilal)le" cooking pouches
and tightly closed plastic
bags should be slit, pierced
or vented as dire(ted b_
t)ackage. If they are not,
t)lastic (ould burst d uring
or imme(tiawlv alter
cooking, t)ossibly resulting
in i_im_y. Also, plastic
storage containers shouM
be +_tleast partially
mtcovered t)e(mlse they
torm a tight seal. When
looking with comainers
tightly co_ered witll t)lastic
wYat) , Fet//ove coveril/g
carefltllv and direct steam
away fi:om hands and fi_ce.
_: Llse loll only as directed
in this mmmal. When using
loll in the mi(rowave o_en,
kee t) the/i)il at least 1" away
h'om the sides of the oven.
ii::Plastic cookware -Plastic
cookware designed fi)r
microwave cooking is very
useflfl, but should 1)e used
carefltlh. E_en microwave-
sa/i' t)lastic may not be as
tolerant ot overcooking
conditions as are glass or
ceramic materials and may
sofwn or char if sut)jected
to short t)eriods of
o_ercookh_g. In h)nger
exl)osllres to ovel'cookiltg,
the/ood and cookware
could ignite.
Follow thoso Ouidolinos:
Use microw_x e-sat2:
t)last cs only art(
use them in strict
(x)mt)limtce with
the cook\_ aFe
lltal/tt/_tc| IIY(W_S
l'eCOlttl//elt (t_ltioI/s.
I)o not microwaxe
etttt)t" }' (oltiaitteFs.
:13'!Do.,,t t,e,',t itthild,:e.
to use t)lasti( (ookware
without COml)lete
supervision.
iiii iiii//!!iliiii!!iii!
iiiii_,_,i?i'ii_iiiii/ii!
7

IMPORTANTSAFETYINFORMATION.
READALLINSTRUCTIONSBEFOREUSING.
WARNING!
Improper use of the grounding plug can result in a risk of
electric shock.
ii_iiiiii!iii+iL_iii_!li_i¸
GROUNDINGINSTRUCTIONS
Ensureproperground
existsbeforeuse.
This applian(e iil[lst l)e grotmded.
lit the ev(ll| Of all electri(al shot|
circlfit, gromMing re(hines d_e risk
of ele<tri( shock by l)roviding an
escal)(? wit( tor tlle elec|ri( (;/trrel/i.
This appliance is equit_ped wid_ a
power (ord having a gromMing
wit( wid_ a gromMing l_lug. The
l)lug must be plugged into an omlet that is prop( rly installed
and gromMed.
Constllt a qualitied e/(etrician or s(rxice technician if the
grounding instructions are not completely !lnderstood, or if
doubt exists as to whether the appliance is ln:Op( rly gromMed.
If the outlet is a standard 2-prong wall omlet, it is yore: personal
responsibility and obligation to have it replaced with a properly
grounded 3-prong wall omleL
Do I/or/Hl(ler any (ir€/llnsta_l( es (tit or rei/lOVe the third
(gromM) prong fi:om the pow(r cord.
Do not use an adapter plug with this appliance.
Do not use an (xtension cord with this appliance. If the power
cord is too short, haxe a qualil]ed el(etrieian or service
technician install an omlet near the appliance.
For best operation, 1)h_g this appliance into its own el(etrical
outlet to pre_ent flickering of lights, blowing of fl_se or tripping
of circtfit breake_a

ge.COIgl
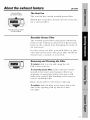
THEVENTFAN
The tml will operate automatically under certain condi6ons
(see Automatic Fan t_ature). Take care to prevem the starting
and spreading of accidemal cooking fres while tile veil| t_lll
is in use.
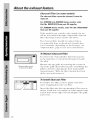
ii::Clean tile mlderside of die microwave often, l)o n()t allow
grease to build ut> on tile microwave or the/hn tilte_
ii::[n tile e_em of a grease fre on the sur/ace units below tile
lnicrow_+ve oven, Sl/lother a/lalllillg [)all Oil tile stlrl_€e tlllit
by covering the pan completely with a lid, a cookie sheet or
a/lat tl?_.
i_i;Else care when cleaning tile veto lira filter. Corrosive cleaning
agents, such as lye-based oven cleaners, may damage tile tilter:
N When preparing flaming/oods under the microwave, turn
the/hn on.
ii::Never leave surthce milts beneath your microwave oven
unattended at high heat settings, goilo_ers (ause sn/oking
and greasy spillovers that may ignite and spread if the
n/icrowa_e veto/hn is operating. "Ik>minimize autonlatic tml
ol)eration, use adequate-sized cookware and use high heat
on sm:thce units only when he< essarv.
READANDFOLLOWTHISSAFETY
INFORMATIONCAREFULLY.
SAVETHESEINSTRUCTIONS
i_iiiiiii,,,,,,,,,iiiiiiii
9

;ii!iiiiii','_iiiiiiii/i/iiii[iii!iii
ii l !iiii!iiiiii!!
Aboutoptionalkits.
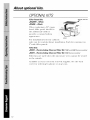
OPTIONALKITS
Filler Panel Kits
JX52WH- White
JX52BL - Black
When repbwing _136" r_mge
hood, filler panel kits fill in
the additional width to
provide a (ustom built-in
_q)t)em:ance.
JX52
JX81B, JX81H
For installation between cabinets
only; not tk)r en(t-o/:cabinet installation. Each kit comains two
3"-wide filler panels.
Filter Kits
JX81B - Recirculating Charcoal Filter Kit (1800and 3600Series models)
JX81H- Recirculating Charcoal Filter Kit (2000Series models)
Filter kits are used when the Hli(row_lve oven (_l]ll/o[ be vcl/ted
to the outside.
A'_ailable at extra (()st fi'om "vottr (;E stq)l)lier. See the ba(k
(over tor orderilJ_g l)y t)hone or at ge.(ol//+
10

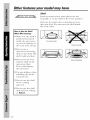
Aboutthefeaturesofyour
microwaveoven.
ge.com
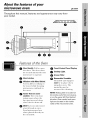
Throughout this manual, features and appearance may vary from
your model
////////!!!\\\k_'_.
0
I! I1!
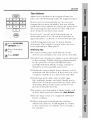
Featuresof the Oven
O Door Handle. Pull to open
the d()()_ The door must
be securely latched lot tl/e
micro_+avc to ot)emte.
Door Latches.
Window with Metal Shield.
S(1;('('ll ;_lll/)WS ( ooking to
1)1' Vi('W('(| whih' kccl)ing
IIIiCI'OWOV('S conIined ill
the ()_ell.
_ Active Vent (on some
models). The _ent door
SWil/gN op('n wh('n till'
Jill/ ol)era[es _tlld €loses
when die tim shuts oJtl
O Shelf. Lets you microwave
sc\eral [()o(ts _t[ once.
Food microwm es best
\qlen placed (lir('ctlv on
the turntable.
O TouchControIPanel Display.
0 Cooktop Light.
O Grease Filter.
O Removable Turntable.
Turntable _md support
using till' o\cn. The
ttu:nt:able 1rim' be
remo_'d tk)r cleaning.
NOTE: Rating plate is located on
the inside wail of the microwave,
or on the upper left front behind
the dooc Oven vent(s) and oven
light are located on the inside
walls of the microwave oven.
11

iIiii'ii'i' ii iii
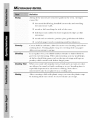
Aboutthe features of yourmicrowave oven.
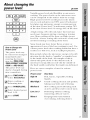
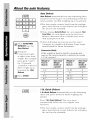
Youcan microwave bytime, with the sensor features or with theauto features.
0 0
CookingControls
O Timeand AutoFeatures
Press Enter
TIME COOKI & II Amountof cookingtime
Pressonceor twice
AUTO/TIME DEFROST Amountof defrostingtime
Presstwice
CUSTOM (onsomemodels) Followdisplayedinstructions
EXPRESSCOOK Starts immediately!
ADD 30 SEC Starts immediately!
POWER LEVEL Powerlevel 1-10
AUTO/TIME DEFROST Foodweight
Pressonce upto 6 Ibs.
1 lb. QUICKDEFROST Starts immediately!
O SensorFeatures
Press Enter Option
POPCORN Starts immediately! more/lesstime
BEVERAGE Starts immediately!
REHEAT Starts immediately! more/lesstime
POTATO Starts immediately! more/lesstime
VEGETABLE Starts immediately!
Pressonce(freshvegetables) more/lesstime
Presstwice (frozenvegetables) more/lesstime
Pressthreetimes (cannedvegetables) more/lesstime
(onsomemodels)
CHICKEN/FISH(onsomemodels) Starts immediately! more/lesstime
Pressonce(chickenpieces)
Presstwice (fish)
12

Aboutchangingthe
power level. ge.com
tree Aummm_
+ 2
4 ........
E2I
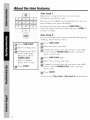
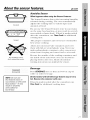
How to Change the
Power Level
The power level may
Ill' entered or (hanged
immediately atter
entering tile/_'ature
tinle tot TIME COOK,
TIME DEFROST, EXPRESS
COOK or ADD 30 SEC.
The t)oweF hweI may
also be changed during
time cotmtdown.
:>'" * ) S
++_'I++l _e,s TIME COOKor
sele<t Time Defrost.
++ P _ss POWER LEVEL
le'_el 1-1 l).
X_triable power levels add flexibility to microwave
cookill}g ++Wh( t)o*,vel? lexels on the l/li(l?OWa'_e o_en
c}tn t)e ( OII/t)}tYed to the Sl[Yt_l(( tlllits on }t l'}tl/ge+
I ligh (pov, er lexel lit) or ttdl t)owey 1s the t_lstest
Way tO (ook alld g{'_es )Oil 100%, t)()_re]7. E_t(tl t)oweF
Ie'_el gixes you illi(l'owa'_e eneFg?' a (el?lain tleF(ellt
ot the til//e. I)()x_r(_IFlexel 7 is iili(rowaxe energ?' 7(1%
ot the til//e. I)()x_rel"lexel 3 is , _ _'enel'_y o0 7o of the til//e.
A hig'h settillg,- (10) vail (ook faster bill toed may
need more fi:equent stirring, rotating or tm:ning
over. Most (ookiug will be done on t ]igh (t/ower
le'_el 10). A lovvrel7setting *,*,rill(ook l/lore e'_enl}' and
need less stirring or rotating of the toed.
Solile leeds ma} have better flavor, texture or
at)pearance if one of the lower settings is used. Use
a lower power hwel when cooking fi)ods that have a
temh,ncv to boil over, such as scalloped potatoes.
Rest lleriods (when the nficrowave energ-} Q, ch's o/t)
give time tot tile/oDd to "equalize" or transtcr heat
to the inside of tile toDd. All example of this is
shown with power level 3--the (/eti:ost cycle. If
microwaxe energy did not cycle ott, the outside of
tile/ood would cook be/ore tile inside was de/i'osted.
Here are some examples of uses tor various
power levels:
Power Level Best Uses
High 10 /qsh, bacon, vegetables, boiling
liquids.
Med-High 7 (',emle cooking of llleat and poul0T;
baking casseroles and reheating.
Medium 5 Slow cooking and tenderizing such
as stews and less temter cuts of meat.
Low2or3 De/i'osting without cooking;
simmering; delicate sauces.
Warm 1 Keeping/ood warm without
overcooking; softening butter.
ii+/ili+++++{+!iiii+++/+++/iii
iiiiiiiiiiiiiiiiiiiiiiiiiiiiiiiiiiiii
i+il+
73

ii!l;
iIiii'ii'i' ii iii
Aboutthetimefeatures.
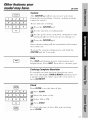
1
Pr( ss TIME COOK.
t'ull t)owei'\ (Press
POWER LEVEL.
S(,h,(-t _ desired
t)owel" level 1-10.)
...... Press START
Time Cook /
,\llo_s _o/l 10 illi(rowa_e for _'tl/} lillle /t l) lo
99 minutes and 99 s((onds.
Power lexel 10 ([tigh) is _/ oma i( _ ly sel, lml ?_'ou
in_}. chmlge it li)r more fl(xibilit\..
Y(m m m open the door d m:ing TIME COOK to
check the li)o(t. Clos( the door _md l)r(ss STARTto
resume cooking.
Time Cook II
I,(ts you eh_mge pow(r h'vels mHom_ticMly dm'ing
cooking. Her( 's how to do it:
P ess TIME COOK
I
Enter _he first (ook time.
....... l)o_er. (Press POWER LEVEL. S(lecl a desired
power lex(1 1-10.)
P ess TIME COOK again.
El/leT lhe se(ol/d (ook li_//e.
!i!i&iiii_il
...............l)o_er. (Press POWER LEVEL. S(lec_ a po_er
level 1-10.)
Press START
N
A_ _he end of Time Cook I, Time Cook II c(mn_s do_,_/ll.

ge.com
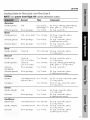
Cooking Guide for -time Cook I and -time Cook II
NOTE."Use power level High (10) unless otherwise noted.
Amount Time Comments
Asparagus
(fi-esl _ spears) l lb. 6 to 9 rain.,
Med-t tigh (7)
(ti'ozen spears) llt-oz pa(kage 5 to 7 rain.
Beans
(fi-esh green ) 1 lb. (ut in halt 9 to 11 rain.
(l¥ozen green ) 10-oz pa(kage 6 to 8 rain.
(li'ozen lima) llt-oz package 6 to 8 117i1/.
In 11/2-qt. ot)l(mg glass baking
dish, t)la(e 1/4 (up x_ater.
117 1-qt. (asserole.
In 1 ½-qt. casserole, place
1/2 cup water.
In 1-qt. casserole, place
2 tal)lest)oolTs watel_
In 1-qt. casserole, place
1/4 cup watel_
ii_/iiiiiiii{_!iiiiiii/iii/iii
(fi'esh, whole) 1 lmnch 17 to 21 rain. In 2-qt. (asserole, place
1/2 (u l) water.
(fi+esh Cut) l t)un(h 7 to 10 rain.
(1V+ to 1½ lbs.)
(!i+esh Spears ) 1 t)un(h 9 to 13 rain.
(1V+ to 1½ lbs.)
(fiozer,_, lO-oz pa(kage 5 to 7 mi_,.
chopped)
(fi'ozen spears) lO-oz package 5 to 7 rain.
Cabbage
(fl-esh)
(wedges)
1 meditate, 17ead 8 to 11 mi_,.
(about 2 lbs.)
7 to 10 mi_,.
In 2-qt. casserole, place
1/2 cup water.
In 2-qt. obhmg glass baking
dish, place 1/4 cup water.
In 1-qt. casserole.
117 ]-qt. (asserole, t)la(e
[al)lesl)OO77S wa[er.
In 11/'_,-or 2-qt. casserole, place
1/4 cup water.
In 2- or 3-qt. casserole, place
1/4 cup watel_
(ffeslL sliced) 1 lb. 7 to 9 rain.
(ti+ozen) ll)-oz pa(kage 5 to 7 rain.
Caufiflower
(flowerets)
1 medium head 9 to 14 mi+_,.
In 1 _/2-qt.casserole, t)lace
1/4 cup water.
In 1-qt. casserole, t)lace
2 tablest)oons water:
In 2-qt. casserole, place
1/2 cup water.
In 2-qt. casserole, place
1/2 cup wateT:
In 1-qt. casserole, t)lace
2 tablesl)oons water.
(fresh, whole)
(fi-0ze n)
1 medimn head 10 to 17 rain.
lO-oz pa(kage 5 to 7 mi_,.
/5

ii!l;
iIiii'ii'i' ii iii
Aboutthetimefeatures.
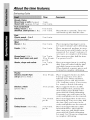
16
:: :::::_i Amount Time Comments
Corn
(fi'ozen kernel lO-oz pa(kage 5 to 7 rain. /n l-ql. (assero|e. t)la(e
Corn on the cob
(ti'esh)
(Jrozell
] [0 _) ears 3 to 4 rain.
t)er ear
] ear 5 to 6 min.
2_to 6 ears 3 to 4 miu.
t)er ear
In 2-qt. oblong glass baking
dish, place corn. If corn is ill
husk, else no water; if corn has
been husked, add 1/4 cut/
water. Rearrange a/ler half
of lime.
Place in 2-qu oblong glass
baking dish.
Cover widl vented plastic wrat).
Rearrange alter half of _ime.
Mixed
vegetables
(fi'ozen lO-oz pa(kage 5 to 7 rain. /n 1-qt. (assero|e. t)la(e
Peas
fi'esh, shelled' 2 lbs. m_shelled 9 to 12 rain. /n 1-qt. (assero|e. t)la(e
1/4 cut) water.
(fi'ozell 10-oz package 5 lo 7 rain. In 1-ql. casserole, t)lace
2 lal)|eSl)OOllS water,
Potatoes
(lresh. cubed. 4 pouuoes 9 to 12 rain.
white. ,6 to 8 oz each)
_Ii'esh. whole. ] m _/) b oz_ 3 to 4 rain.
sweet or while,
Peel an(t cut into 1 inch cut)es.
Place ill 2-qt. casserole with
1/2 cup water. Stir a/ler half
of dine.
Pierce widl cooking tork.
Place ill center of the oven.
I,et stand 5 mimues.
Spinach
(li'esh)
(fi'ozen.
chopped
and leaf
Squash
[I'estl. _ tllltllleI"
and yello_ !
(wime_, acorn,
l)t/tlerllllt)
10 _, 16 oz 5 to 7 rain.
lO-oz package 5 to 7 rain.
l lb. sliced 5 to 7 min.
l to 2 squash 8 to 11 min.
abottt 1 lb. each)
Ill 2-qt. casserole, t/lace washed
spinach.
Ill 1-<it. casserole, place
3 tablesl)oons water.
Ill 1½-qt. casserole, place
1/4 cup water.
Cut in half and remove fibrous
membranes. Ill 2-qt. oblong
glass baking dish, place squash
cut-side-down. "Ihrn cm-si(te-u t)
alter 4 lllill/lIes.

__ 9e.cor
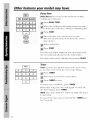
Time Defrost
A]|OWS you to de/i'osl toT the length of lime you
___ select. See the [)el]x)stiug (',tilde (or suggested tittles.
clnmge this toT more tlexil)ilitv. +_>tt m_-lvdet_x>st
small items more quickly by r;,isiv, g the t)ower level
_d]erentering the time.11owexer, they willneed
more l]x'qtteut ;ittelltiOll t]|_lll ttMl;+i|.
@
Press AUTO/TIME
DEFROST twi(e.
Emer detir)sti,lg
:: :::::::::tillle+
::: Press START
Power level 7 cuts the total det]'osting time in
about half; power level 10 cuts the total time to
approximately 1/3. Rotate or stir/ood/i'equentl}.
A dull tlmmping noise mm be heard d m:ing
det_'osting. This sotmd is normal when the oven
is not operating at Iligh t)ower.
Defrosting Tips
_: For l)est results, I)l_ce {oDd (/ire<tlv on the
(te/ir)st rack and place the rack on the turntable.
J? Foods/i'ozen in paper or plastic can be det_:osted
in the package. Tightly closed packages should
be slit, pierced or vented AFTER/oDd has
partially det]:osted. Plastic storage containers
should be at least partially tmcovered.
N Family-size, 1)repackaged t_'ozen dinners (an be
de/i'osted and microwaved. If the/oDd is in a/oil
container, trans/cr it to a microwave-sale dish.
_: Foods that spoil easily, such as milk, eggs,
fish, stu/lings, poultry and l)ork should not l>e
allowed to sit ()lit t()r IIlore thall ()lie hotlr a/ler
(te/i'osting. Uoolll tel//t)erattlre t)rolnotes the
growth of harnfful bacteria.
_: For more e_en (/e/i'osting of larger/oDds, such
as beck lamb and _eal roasts, use Auto Defrost
J? Be sure large meats are comt)letely de/i'osted
be/ore ( ooking.
J? When (te/i'osted,/oDd should be (ool but
so/tened in all areas. If still slightly icy. return
to the mi(rowaxe vet+),' briefly, or let it stand a
/i'w minutes.
17

ii!l;
iIiii+ii+i+ ii+iii
1'+
Aboutthetimefeatures.
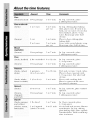
Defrosting Guide
Time Comments
Breads, Cakes
Bread, buns or rolls (l piece_ q rain.
Sweetrolls tapprox. 12 oz 3 t(_ 5 rain.
Fish and Seafood
Fillets, frozen ( 1 lb3 +;to 8 mhL
Shelffish, smallpieces (1 lb3 5 to 7 mhL Place t)lock iu casserole. Turn o\er
aud break ul) after half tl_(' time.
Fruit
Plastic pooch- I to2 :4to 6 rain.
(lO-oz package
Meat
Bacon (1 lb.) 2 to 5 rain. Place UUol)ened t>a(kage in o_en.
f *'t stm t(t 5 mi; rotes afl('r de/i'osting +.
Pla(e tmol)ened package in o_('n.
Mi(ro_a_ejust until/t'auks (an be
sel)arated, l.et staud 5 HIi/HIles, if
]ICCeSS_IF_, 10 co/II])|ete (|eJi'oMJt/_.
Tutti meat o\er alter half the lil//('+
Use power ]e_e] l.
Franks(1 lbA 2 to 3 miH.
Groondmeat (1 lb.
Roast:beef, lamb, veal, pork
Steaks, chops and cutlets
5 to 7 min.
12 to 16 min.
per lb.
5 to 7 min.
per lt)
Poultry
Chicken,broiler-fryer
cutup _2!_ _o 3 lbs,
15 to 19 min.
Chicken,whole
(2½to 3lbs.
17 to 21 min.
Cornish hen 7 to 13 mhL
per It)
Torkeybreast (4 to 6 f )s. 5 to 9 rain.
per lt)
78
Place tmwrapl)ed meat in cookh_g
dish. Turn over alter hall fl_e ume
and shield _r_]:_ _]:e_S with toil.
When finished, Sel)amte t)ieces and
let stand to (oml)lete (te/i'osting.
Place wrapt)ed chicken in dish.
UllW]_at ) al/(I HIFtl OVel" altel"
half the time. When tinished,
separate pieces and microwave
2 to 4 minutes more, if necessary.
Let stand to tinish del_:osting.
Place wrat)l)ed chicken in dish.
Alter half the time, tmwra t) and
turn (hicken oxer. Shield warm
areas with/oil. Finish deli'osting.
[t I/eCessarv, Frill cold vmter ill the
(a_i[_' until" gJl)lets (an 1)e removed.
Place tlHwrat)l)ed he1/ill the o_'//
l>reast-.qde-up. Turn over _Oer half
the time. Rtm cool x_;ttet" in the
(aviD; until g+l)lets call 1)e remo\ ed.
Place tmwral)t)ed breast in dish
breast-.qde-down. Alter half the
time, turn o\er and shield warm
area_, with/oil. Finish deti'osting.
I*'t stand 1 to 2 hours in re/iigemtor
to coml)lete de/i'osting.

ii_iiiiiiiiiii_!iiiiiii/iii/iii
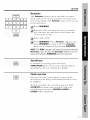
___ _his is a quick way to set cooking time for l-6 minutes
for ] to 6 mhmtcs o£ (o(Aing at power level 10.
• • " S •
For cx[,m/ple, press the 2 t)ad tor 2 mmutc._ ot
(ooking time.
"['h(! povvT!F l(!'_(_l (_1) 1)(_ ( h[,lllg(!d i-is fillip is (oH]ltil)_
down. Press POWERIEVEI [,rod cuter 1-10.
Add 30 Seconds
You can use this feature two ways:
_: It 'will add _0 so(ends to the time (ouutiug (|owl)
ea(h dine the t)[,_(] is t)ressed.
J} It (an be used _s _ qui(k r_y to set 30 se(ouds of
cooking time.
19

ii!l;
iIiiiiii :i+iii
Aboutthe auto features.
iiii/(i; !!i(?;ii¸
E /, 11.1
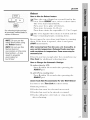
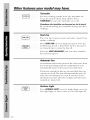
Auto Defrost
Auto Defrost automati(allv sets till' dei_:osth]g times
and t)()/_rer lexels to gixe exert (tetirlsting results tor
meats, t)ouhv} and fish weighillg u t) |o six t)om]ds.
_< For best results, remove todd fi'om tile t)a(kage,
t)la(e todd directly on tile de/i'ost ra(k and t)la(e
tile rack on dw mrmat)le.
PressAUTO/TIME
DEFROSTonce tor
AutoDefrost
(;uide
m riuhL eHler lood
weiuhl. For exmut)le.
press ]_a(ls 1 and 2
ior 1.2 t)olmds
1 t)o{||/(t. _ Ol|ll(-(_
Emer weighl u l) to
+;t)omMs tot Auto
Defrost
Press START
_:; "I\dce during Auto Defrost, tile oven signals Turn
Food Over. At ea/h signal, tm:n the foo(t oxer.
l),emoxe (tet_r>sted meat or shield warm _'treas
with small t)ie(es of/oil.
i+i;+\tter (lefix)sting, most meats need to stand
5 minutes to COml)lete defi'osting. I,arge roasts
should stand Jot about 30 minutes.
Conversion Guide
ff tile weight of'_bod is stated in pounds and
OtlllCeS. +lle ounces nltlSt be conver/ed to lentilS
.1) of>l poulld.
Weight of Enter Food
Food in Weight
Ounces (tenths of
apound)
1-2 .1
3 .2
4-5} .3
6-7 .4
8 .5
Weight of EnterFood
Foodin Weight
Ounces (tenths of
a pound)
9-10 .6
11 .7
12-13 ,8
14-15 .9
2O
I lb. Quick Defrost
I lb. Quick Defrost automati(allv sets the (lefix)sting
umes and power levels tor toods weighing one
t)oun(t.
Press 1 Ih, Quick Defrost. The oven starts
automati(allv. When tile oven signals, turn
todd men
_? For best results, remoxe todd fl_om die t)ackage,
t)la/e too(1 (tirectl'_ on the (letir>st ra/k and t)la/e
the ra(k on lhe lllrlltal)le.
Page is loading ...
Page is loading ...
Page is loading ...
Page is loading ...
Page is loading ...
Page is loading ...
Page is loading ...
Page is loading ...
Page is loading ...
Page is loading ...
Page is loading ...
Page is loading ...
Page is loading ...
Page is loading ...
Page is loading ...
Page is loading ...
Page is loading ...
Page is loading ...
Page is loading ...
Page is loading ...
Page is loading ...
Page is loading ...
Page is loading ...
Page is loading ...
-
 1
1
-
 2
2
-
 3
3
-
 4
4
-
 5
5
-
 6
6
-
 7
7
-
 8
8
-
 9
9
-
 10
10
-
 11
11
-
 12
12
-
 13
13
-
 14
14
-
 15
15
-
 16
16
-
 17
17
-
 18
18
-
 19
19
-
 20
20
-
 21
21
-
 22
22
-
 23
23
-
 24
24
-
 25
25
-
 26
26
-
 27
27
-
 28
28
-
 29
29
-
 30
30
-
 31
31
-
 32
32
-
 33
33
-
 34
34
-
 35
35
-
 36
36
-
 37
37
-
 38
38
-
 39
39
-
 40
40
-
 41
41
-
 42
42
-
 43
43
-
 44
44


Ask a question and I''ll find the answer in the document
Finding information in a document is now easier with AI
Related papers
Other documents
-
Kenmore 72180409400 Owner's manual
-
Whirlpool GM8155XJT2 Owner's manual
-
Frigidaire LEVM30FE Owner's manual
-
-
Hotpoint RVM1625SJ01 Owner's manual
-
-
KitchenAid KHMS147HWH2 User manual
-
Amana MMV1153BAS - Microwave Oven in User manual
-
-