
USER’S
MANUAL
B1-780
Iconia One 7

2 -
© 2016 All Rights Reserved
Acer Iconia One 7 User’s Manual
Covers: B1-780
Regulatory Model Number (RMN): A6004
This revision: May 2016
Acer Iconia One 7 B1-780
Model number: _______________________________________________
Serial number: _______________________________________________
Date of purchase: ____________________________________________
Place of purchase: ___________________________________________
Important
This manual contains proprietary information that is protected by
copyright laws. The information contained in this manual is subject to
change without notice. Images provided herein are for reference only
and may contain information or features that do not apply to your
computer. Acer Group shall not be liable for technical or editorial errors
or omissions contained in this manual.
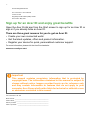
Sign up for an Acer ID and enjoy great benefits
Open the Acer Portal app from the Start screen to sign up for an Acer ID or
sign in if you already have an Acer ID.
There are three great reasons for you to get an Acer ID:
• Create your own connected world.
• Get the latest updates, offers and product information.
• Register your device for quick, personalized customer support.
For more information, please visit the AcerCloud website:
www.acer.com/byoc-start

Table of contents - 3
TABLE OF CONTENTS
Getting started with your tablet 4
Features and functions ............................ 4
Unp
acking your tablet.............................. 4
Getting to know your tablet...................... 5
Turning on for the first time...................... 6
Charging your tablet 8
Assembling the power adapter ................ 8
Using your tablet 10
Using the touchscreen........................... 10
T
he Home screen .................................. 10
The onscreen keyboard......................... 20
Editing text............................................. 21
Shutting down your tablet ...................... 23
Connecting devices to your tablet 24
Connecting to AC power........................ 24
Inserting a microSD card
....................... 24
Transferring files between your tablet
and a PC................................................ 24
Connecting a Bluetooth device.............. 25
Accessories ........................................... 26
Going online 27
Managing Wi-Fi connections ................. 27
Bro
wsing the internet............................. 27
Google services ..................................... 28
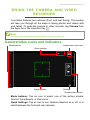
Using the camera and video recorder 33
Camera/video icons and indicators........ 33
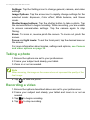
Ta
king a photo ....................................... 34
Recording a video.................................. 34
Camera and video options..................... 35
Supported formats ................................. 36
Advanced settings 37
Wireless & Networks.............................. 37
Device
.................................................... 39
Personal................................................. 40
System................................................... 41
Updating your tablet’s operating system 42
Resetting your tablet.............................. 42
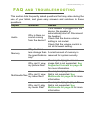
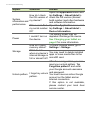
FAQ and troubleshooting 43
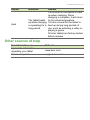
Other sources of help ............................ 45
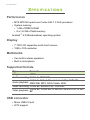
Specifications 46
Guidelines for safe battery usage 49
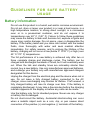
Battery information................................. 49
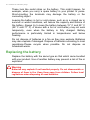
Replacing
the battery............................. 50
End user license agreement 51

4 - Getting started with your tablet
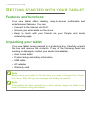
GETTING STARTED WITH YOUR TABLET
Features and functions
Your new tablet offers leading, easy-to-access multimedia and
entertainment features. You can:
• Connect to the Internet via Wi-Fi.
• Access your email while on the move.
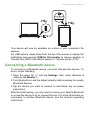
• Keep in touch with your friends via your People and social
networking apps.
Unpacking your tablet
Your new tablet comes packed in a protective box. Carefully unpack
the box and remove the contents. If any of the following items are
missing or damaged, contact your dealer immediately:
• Acer Iconia tablet
• Product setup and safety information
• USB cable
• AC adapter
• Warranty card
Note
Before using your tablet for the first time, you need to charge it for at least
four hours. After that you can recharge the battery as needed.
Note
If the battery has been depleted for a while, please charge the tablet for at
least 30 minutes using the adapter.

Getting started with your tablet - 5
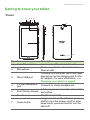
Getting to know your tablet
9
10
5
6
41 32
7
8
Views
No. Item Description
1 microSD card slot Insert a microSD card into the slot.
2 Microphone
Receives audio for video chats and
Internet calls.
3 Micro USB
port
Connects to a computer via a USB cable.
Also serves
as the charging port for the
AC adapter. For more information, see
Charging your tablet on page 8.
4
3.5 mm headphone
jack
Con
nects to stereo headphones.
5 Front-facing camera
A 0.3-megapixel camera for video chats
and se
lfies.
6 Touchscreen 7" LED-backlit LCD.
7 Power button
Long press to turn the tablet on, press
br
iefly to turn the screen on/off or enter
sleep mode; press and hold to turn the
tablet off.

6 - Getting started with your tablet
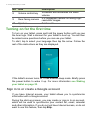
Turning on for the first time
To turn on your tablet, press and hold the power button until you see
the Acer logo. Wait a moment for your tablet to boot up. You will then
be asked some questions before you can use your tablet.
To start, tap to select your language then tap the arrow. Follow the
rest of the instructions as they are displayed.
If the tablet’s screen turns off, it has entered sleep mode. Briefly press
the power button to wake it up. For more information see Waking
your tablet on page 22.
Sign in to or create a Google account
If you have Internet access, your tablet allows you to synchronize
information with a Google account.
During the start-up process, you may create or sign in to an account,
which will be used to synchronize your contact list, email, calendar
and other information. If you do not yet have Internet access, or do not
want to use this feature, then tap Skip.
8 Volume control key
Increases and decreases the tablet
vol
ume.
9 Rear-facing camera
A 2-megapixel camera for taking high-
resolution image
s.
10 Speaker
Emits audio.
No. Item Description

Getting started with your tablet - 7
If you have multiple Google accounts, such as separate accounts for
personal and business contacts, you can access and synchonize
them from the Accounts settings section. See Multiple Google
accounts on page 41
Important
You must sign in to a Google Account to use Gmail, Hangouts, Google
Calendar, and other Google apps; to download apps from Google Play;
to back up your settings to Google servers; and to take advantage of
other Google services on your tablet.

8 - Charging your tablet
CHARGING YOUR TABLET
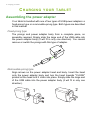
Assembling the power adapter
Your tablet is bundled with one of two types of USB power adapters: a
fixed-prong type or a removable-prong type. Both types are described
in this manual.
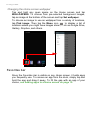
Fixed-prong type
The prongs and power adapter body form a complete piece, no
assembly required. Simply slide the large end of the USB cable into
the power adapter body (it will fit in only one direction). You cannot
remove or switch the prongs with this type of adapter.
Removable-prong type
Align arrows on the power adapter head and body. Insert the head
onto the power adapter body and turn the head towards "CLOSE"
printed on the head until it clicks into place. Simply slide the large end
of the USB cable into the power adapter body (it will fit in only one
direction).
CLOSE
OPEN
1
C
OPEN
2

Charging your tablet - 9
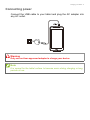
Connecting power
Connect the USB cable to your tablet and plug the AC adapter into
any AC outlet.
Warning
Only use an Acer-approved adapter to charge your device.
Note
It is normal for the tablet surface to become warm during charging or long
periods of use.

10 - Using your tablet
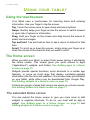
USING YOUR TABLET
Using the touchscreen
Your tablet uses a touchscreen for selecting items and entering
information. Use your finger to tap the screen.
Tap: Touch the screen once to open items and select options.
Swipe: Quickly swipe your finger across the screen to switch screens
or open lists of options or information.
Drag: Hold your finger on the screen and drag across the screen to
select text and images.
Tap and hold: Tap and hold an item to see a menu of actions for that
item.
Scroll: To scroll up or down the screen, simply drag your finger up or
down the screen in the direction that you want to scroll.
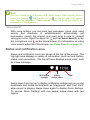
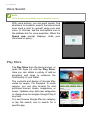
The Home screen
When you start your tablet, or wake it from power saving, it will display
the Home screen. This screen gives you quick access to apps
("applications"), widgets, and folders. See Adding apps to a Home
screen on page 15.
Widgets provide special functions, quick shortcuts to a certain app
features, or serve as small apps that display constantly-updated
information (like the time and weather). Some have been pre-installed
on your tablet, while others may be downloaded from Google Play.
See Adding widgets to a Home screen on page 16.
Folders are groups of apps that occupy one space on a Home screen.
See Adding folders to a Home screen on page 17.
The extended Home screen
You can extend the Home screen to give you more room to add
widgets or organize shortcuts. To do so, you must add an app or
widget. See Adding apps to a Home screen on page 15 and
Adding widgets to a Home screen on page 16.

Using your tablet - 11
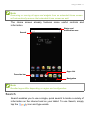
The Home screen already features some useful controls and
information.
Search
Search enables you to use a single, quick search to locate a variety of
information on the internet and on your tablet. To use Search, simply
tap the icon and type words.
Note
Removing or moving all apps and widgets from an extended Home screen
will automatically remove that extended Home screen as well.
Search
Status and
notification area
Navigation
Favorites bar
Apps List
Note
Bundled apps differ depending on region and configuration.

12 - Using your tablet
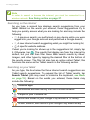
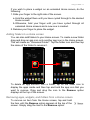
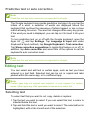
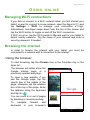
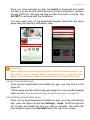
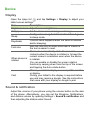
Searching on the internet
As you type, a second box displays search suggestions from your
tablet. Based on the words you entered, these suggesstions try to
help you quickly access what you are looking for and may include the
following:
• A previous search you performed on any device while you were
logged into your Google account and performed a Google search;
• A new internet search suggesting what you might be looking for;
• A specific website address.
If what you’re looking for shows up in the suggestions list, simply tap
it. Otherwise, tap . The results that display are from the internet by
default, but you can then filter these Web search results by News,
Images, and other types by tapping the desired filter at the bottom of
the results screen. The filter list also has an option called Tablet; this
functions the same as the Tablet search in the following section.
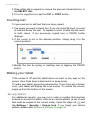
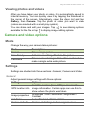
Searching on your tablet
As you type, the box below the three internet search suggestions are
Tablet search suggestions. To expand the list of Tablet results, tap
Search Tablet (you may need to minimize the keyboard, see Back
on page 19). Based on the words you entered, these items may
include the following:
Note
In order to search or browse the internet, you must be connected to a
wireless network.
See Going online on page 27.
Installed apps
Bookmarks and web history from the Chrome browser
People in your Contacts list
Movie and shows in your Google Play Movies & TV library
Artists, albums, and tracks in your Google Play Music library

Using your tablet - 13
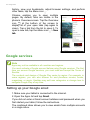
Voice search
With voice actions, you can send text messages, place calls, send
emails, find directions of establishments, automatically call
businesses, search the internet and even send a note to yourself
using your voice. Open the Apps list and tap Voice Search, or tap
the microphone icon on the Home screen. For information on using
voice search within the Chrome app, see Voice Search on page 30.
Status and notification area
Status and notification icons are shown at the top of the screen. The
top-right area displays a variety of information, such as time, battery
status, and connectivity. The top-left area displays event icons, such
as a new message.
Swipe down from the top to display notification details such as current
downloads and media controls such as "play/pause" and "next track"
when music is playing. Swipe down again to display Quick Settings.
To access Quick Settings with one swipe, swipe down with two
fingers.
Note
You can choose what is included in a Tablet search. After entering search
words and tapping , tap the Menu icon on the left side of the search
box. Then tap Settings > Tablet search. Select the items you want to be
included in a Tablet search.
Battery
charge status
Wi-Fi signal
strength
Time

14 - Using your tablet
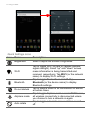
Quick Settings icons
Icon Name Description
Brightness Slide to adjust the screen’s brightness.
Wi-Fi
Tap to toggle Wi-Fi on and off (waves indicate
signal st
rength). Small "up" and "down" arrows
mean information is being transmitted and
received, respectively. Tap Wi-Fi (or the network
name) to display Wi-Fi settings.
Bluetooth
Tap to toggle Bluetooth on and off. Tap
Bluetoo
th (or the device name) to display
Bluetooth settings.
Do not disturb
Tap to silence some or all no
tifications or alarms
at certain times.
Airplane mode
Tap to toggle Airplane mode on and off. When on,
all wireless connectivity
is disconnected unless
you choose to turn a network on again.
Auto rotate
Tap to toggle automatic screen rotation on and
off.

Using your tablet - 15
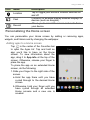
Personalizing the Home screen
You can personalize your Home screen by adding or removing apps,
widgets, and folders and by changing the wallpaper.
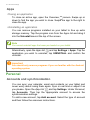
Adding apps to a Home screen
Tap in the center of the Favorites bar
to open the Apps list. Tap and hold an
app you’d like to have on the Home
screen. To view information about the
app, drag it to App info at the top of the
screen. Otherwise, release your finger to
place the app.
To place the app on an extended Home
screen, do the following:
1. Slide your finger to the right side of the
screen.
a. Hold the app there until you have
cycled through to the desired Home
screen.
b. Otherwise, hold your finger until you
have cycled through all extended
Home screens and a new one is
created.
Location
Tap to toggle your device’s location services on
and o
f
f.
Cast
Connects to wireless display-enabled displays or
devices
(such as dongles).
Record
Allows you to record the screen and audio from
your device.
Icon Name Description

16 - Using your tablet
2. Release your finger to place the app.
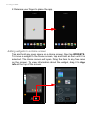
Adding widgets to a Home screen
Tap and hold any open space on a Home screen, then tap WIDGETS.
To move a widget to the Home screen, tap and hold an item until it is
selected. The Home screen will open. Drag the item to any free area
on the screen. To view information about the widget, drag it to App
info at the top of the screen.

Using your tablet - 17
If you wish to place a widget on an extended Home screen, do the
following:
1. Slide your finger to the right side of the screen.
a. Hold the widget there until you have cycled through to the desired
Home screen.
b. Otherwise, hold your finger until you have cycled through all
extended Home screens and a new one is created.
2. Release your finger to place the widget.
Adding folders to a Home screen
You can also add folders to your Home screen. To create a new folder
drag and drop an app icon onto another app icon in the Home screen.
This will create an "Unnamed Folder". Tap the folder icon and then tap
the name of the folder to rename it.
To delete an app shortcut from a folder, tap on the folder icon to
display the apps inside and then tap and hold the app icon that you
want to remove. Drag and drop the icon to the Remove option
displays at the top of the screen.
Removing apps, widgets, and folders from a Home screen
To remove an item from the Home screen, tap and hold
the item until the Remove option appears at the top of the
screen. Simply drag the item to the Remove option.

18 - Using your tablet
Changing the Home screen wallpaper
Tap and hold any open space on the Home screen and tap
WALLPAPERS. To choose from pre-selected background images,
tap an image at the bottom of the screen and tap Set wallpaper.
To choose an image to use as wallpaper from a variety of locations,
tap Pick image. Then tap the Menu icon to display a list of
locations where you might have images stored, such as Google Drive,
Gallery, Dropbox, and others.
Favorites bar
Since the Favorites bar is visible on any Home screen, it holds apps
you frequently use. To remove an app from the dock, simply tap and
hold the app and drag it away. To fill the gap with an app of your
choice, see Adding apps to a Home screen on page 15.

Using your tablet - 19
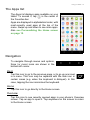
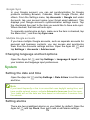
The Apps list
The Apps list displays apps available on your
tablet. To access it, tap in the center of
the Favorites bar.
Apps are displayed in alphabetical order, with
most-recently used apps at the top of the
menu. Swipe up and down to see more apps.
Also see Personalizing the Home screen
on page 15.
Navigation
To navigate through menus and options,
three (or more) icons are shown in the
bottom-left corner.
Back
Tap this icon to go to the previous page, or to go up one level
in a menu. This icon may be replaced with the hide icon in
certain cases (e.g. when the keyboard is dislayed). In this
case, tapping the icon minimizes the keyboard.
Home
Tap this icon to go directly to the Home screen.
Overview
Tap this icon to see recently opened apps in your phone’s Overview
screen. Tap an app to open it. Tap anywhere on the screen to return
to the Home screen.
Back Home Overview
Hide

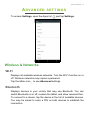
20 - Using your tablet
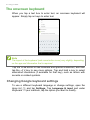
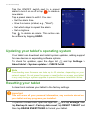
The onscreen keyboard
When you tap a text box to enter text, an onscreen keyboard will
appear. Simply tap on keys to enter text.
Tap the ?123 button to see numbers and special characters, and then
tap the ~ [ < key to see more options. Tap and hold a key to select
alternative characters (if available for that key), such as letters with
accents or related symbols.
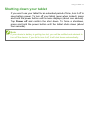
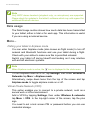
Changing Google keyboard settings
To use a different keyboard language or change settings, open the
Apps list and tap Settings. Tap Language & input and under
Keyboard & input methods, tap the option you want to modify.
Note
The layout of the keyboard (and some button icons) vary slightly, depending
on the app and information that is required.
Page is loading ...
Page is loading ...
Page is loading ...
Page is loading ...
Page is loading ...
Page is loading ...
Page is loading ...
Page is loading ...
Page is loading ...
Page is loading ...
Page is loading ...
Page is loading ...
Page is loading ...
Page is loading ...
Page is loading ...
Page is loading ...
Page is loading ...
Page is loading ...
Page is loading ...
Page is loading ...
Page is loading ...
Page is loading ...
Page is loading ...
Page is loading ...
Page is loading ...
Page is loading ...
Page is loading ...
Page is loading ...
Page is loading ...
Page is loading ...
Page is loading ...
Page is loading ...
Page is loading ...
-
 1
1
-
 2
2
-
 3
3
-
 4
4
-
 5
5
-
 6
6
-
 7
7
-
 8
8
-
 9
9
-
 10
10
-
 11
11
-
 12
12
-
 13
13
-
 14
14
-
 15
15
-
 16
16
-
 17
17
-
 18
18
-
 19
19
-
 20
20
-
 21
21
-
 22
22
-
 23
23
-
 24
24
-
 25
25
-
 26
26
-
 27
27
-
 28
28
-
 29
29
-
 30
30
-
 31
31
-
 32
32
-
 33
33
-
 34
34
-
 35
35
-
 36
36
-
 37
37
-
 38
38
-
 39
39
-
 40
40
-
 41
41
-
 42
42
-
 43
43
-
 44
44
-
 45
45
-
 46
46
-
 47
47
-
 48
48
-
 49
49
-
 50
50
-
 51
51
-
 52
52
-
 53
53


Ask a question and I''ll find the answer in the document
Finding information in a document is now easier with AI
Related papers
-
Acer Iconia One 10 - B3-A30 User manual
-
Acer Iconia One 7 B1-790 User manual
-
Acer Iconia Tab 10 A3-A40 User manual
-
-
-
Acer Iconia TAB A701 User manual
-
Acer Iconia TAB A701 User manual
-
Acer A200 User manual
-
Acer Iconia Tab A501 User manual
-
Other documents
-
Gateway TAB G1-715 User manual
-
Venturer Mariner 10 Pro User manual
-
Venturer Mars 8 User manual
-
LG WK7 Quick setup guide
-
Venturer Juno 10 User manual
-
Venturer Aura 7 User manual
-
Venturer Mercury 7 User manual
-
Naxa NID-7010 Operating instructions
-
-