Page is loading ...

1
CONTENTS
SCHOLTES OVENS ............................................................................................................................. 1
Description ........................................................................................................................................... 2
Accessories .......................................................................................................................................... 2
Control Panel ........................................................................................................................................ 3
Instruction for use the programmer...................................................................................................... 4
COOKING MODES.............................................................................................................................. 5
Defrosting.............................................................................................................................. 6
Prove function ....................................................................................................................... 6
Baking ................................................................................................................................... 7
Pastry Baking........................................................................................................................ 8
Forced Air Cooking................................................................................................................ 9
Traditional Cooking .............................................................................................................. 10
Roasting .............................................................................................................................. 11
Spit-roasting ........................................................................................................................ 12
Barbecue Cooking............................................................................................................... 13
SELF-DECREASING BY CATALYSIS...........................................................................................14
TIPS AND RECOMMENDATIONS...............................................................................................14
For more than 80 years, Scholtès has been designing electrical appliances.
As the leader of built-in appliances, Scholtès offers well-designed, high quality products. Its creative
approach and high standards have made Scholtès the foremost manufacturer of built-in appliances.
Scholtès actively guarantees your safety while using your oven (cool door, interlocking controls, etc.).
In cooperation with a cookery consultant, Scholtès has developed 11 cooking methods that optimise all
the parameters for each type of dish: moisture level, still or circulating air, heat distribution, etc.
Please read this booklet carefully. It explains how to take full advantage of the many features that your
appliance offers.
You will find all the answers to questions you may have on technical terms, cooking procedures, functions,
accessories, etc.
ENJOY COOKING with
SCHOLTES OVENS
Design & Durability

2
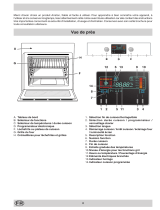
FP 655 Description
Control Panel
Door
Rack
Spit Unit
Enamelled Tray
Accessories
Your oven comes supplied with:
• 1 enamelled trays recommended for all types of
cooking.
• 2 racks recommended for cooking on 3 levels and
for cooking meat in combination with an enamelled
tray.
• 1 spit unit (see spit-roasting methods, pages 12).
LEVEL 1
LEVEL 2
LEVEL 3

3
T F
220
200
200
210
250
250
160
P
T F
220
200
200
210
250
250
160
P
Temperature
selector
Clock
Cooking mode selector
Oven control panel
Indicator light
Programmer
Auto-timer
Cooking time: (End time of cooking)
+/- Regulation keys
Manual mode
function light
Knob «F» is used to select the cooking mode
Turn knob «F» to select the cooking mode.
The oven will begin to heat up as
soon as the temperature is selected.
Knob «T» selects the temperature
Turn knob «T» to select the
temperature required.
The indicator light comes on when you have selected the temperature. It indicates that the oven is
heating up. When the light goes out, the required temperature has been reached inside the oven. When
the light alternately comes on and goes out, it means that the thermostat is working properly to maintain
the oven temperature.
Indicator light
Nota
Switching off the oven
Return knobs «T» e «F» to position «0» to switch off the
oven.
Nota
T F
220
200
200
210
250
250
160
P
T F
220
200
200
210
250
250
160
P

4
The programmer
The electronic programmer has the function of automatically
switching on the oven (at the required time) and switching
it off at the end of the set cooking time. The 4 figure luminous
display showing the actual time and the programming times,
also shows the current state of the oven by means of the
following symbols:
Oven on
Minute minder
Automatic programme AUTO
Point • (this divides the hour from the minutes on the
display). All the functions may be programmed for a total of
23 h and 59 min. Maximum cooking time is 10 hours.
Adjusting the clock
(At installation, after power failures, clock in advance or
behind). Select manual mode by pressing key , adjust
the hour and minutes using the - and +. keys.
Manual oven mode (Programming excluded)
Press the key ; and the oven is switched on, the AUTO
symbol goes out and the (oven on) symbol comes on.
This operation erases any set programme.
Semi-automatic oven mode
1st example: start in manual cooking mode - programmed
cooking time.
• Put the food to be cooked in the oven.
• Press the key (duration) and adjust the cooking
time using the - and + keys: the oven switches on, the
AUTO and (oven on) symbols light up.
• Turn the selector and the thermostat knobs onto the
required function and temperature respectively.
• At the end of the set cooking time, the oven is
automatically switched off, the symbol (oven on) goes
out and the AUTO symbol blinks; an acoustic signal
sounds.
2nd example: start with manual cooking mode - end with
programmed cooking mode.
• Put the food to be cooked in the oven.
• Press the key (end of cooking) and adjust the end
of cooking time using the - and + keys: the oven switches
on, the AUTO and symbols light up.
• Turn the selector and the thermostat knobs onto the
required function and temperature respectively.
• At the end of cooking, the oven is automatically switched
off, the symbol (oven on) goes out and the AUTO
symbol blinks; an acoustic signal sounds.
Automatic oven mode (programmed cooking duration and
end)
• Put the food to be cooked in the oven.
• Press the key (Duration) and adjust the cooking
time using the - and + keys: the AUTO and (oven on)
symbols light up (the oven switches on).
• Press the key (end of cooking) and adjust the end
of cooking time using the - and + keys: the symbol
goes out (the oven switches off).
• Turn the selector and the thermostat knobs onto the
required function and temperature respectively.
• The programmer automatically sets the start of cooking
time, which is shown by the symbol (oven on) coming
on. When the cooking time has elapsed, the oven is
automatically switched off, the (oven on) symbol goes
out and the AUTO symbol blinks; an acoustic signal
sounds.
Minute minder
Press the key (minute minder) and set the time required
using the - and + keys. An acoustic signal sounds at the
end of the programme.
Buzzer
The buzzer emits a sound for 7 minutes after the end of the
selected programme; it may be stopped by pressing any
function key. It is possible to choose 3 different types of
acoustic signal. By pressing the - key the actual signal
tone appears. Now, within 7 seconds, every further press
of the - key changes the signal tone.
Program control
Press the key for the remaining time to be displayed,
and the key to check the end of cooking time.
Erasing programs
Once a program has been carried out, it is automatically
erased; it can also be cancelled by pressing the key
(manual).

5
Your oven’s various cooking modes were devised in consultation with the Scholtès cookery consultant. He is a
professional chef and is an integral member of Scholtès’ research and development team.
The cooking modes, temperatures and oven shelf levels reflect our expert’s own experience in the kitchen, and will
allow you to achieve the best cooking results with a variety of dishes.
Recommendation:
• Take care not to touch the heating elements inside the oven during use, as they become very hot.
•• Do not place dishes or aluminium foil on the interior base of the oven, as you will cause permanent damage to
the enamel surface.
Comments from our cookery consultant
Scholtès ovens use various methods for producing, diffusing and conserving heat.
Your oven has 9 cooking functions, suited to various types of dishes.
Easy-to-recognise symbols help you select the appropriate function for the food you want to cook.
Defrosting
Proving to gently raise dough
Baking for bread, cakes and pizza
Pastries for baking tarts and pastries
Forced Air for cooking on several levels
Traditional for conventional cooking
Roasting for meat, poultry and
au gratin
dishes
Spit-roasting for roasting on the spit, oven door closed
Barbecue for grills and
au gratin
dishes, door partly open
Cooking modes

6
Defrosting
Certain precautions should be taken when defrosting so that the outer parts of the food, which are defrosted first,
are not contaminated by the rapid proliferation of microbes. Usually defrosting is done in the refrigerator (slow
defrosting). You can defrost faster (in half the time) in the oven.
This function is best for:
- food to be eaten raw (strawberries, etc.),
- food to be cooked: a chicken defrosts twice as quickly using this function.
We recommend that all defrosted food be eaten soon afterwards.
Place the items to be defrosted on the enamelled tray at level No. 2.
Turn «F» to select the symbol .
When defrosting is finished, turn «F» to
«0» to turn the oven off.
1
2
This function is essential for making yeast dough rise properly before it is cooked. It provides a constant
temperature of 40°C for the dough used in bread, brioche, pizza, etc.
The settings programmed for this function create and maintain an ideal atmosphere for helping dough rise.
To get a brioche to rise, place your preparation at level No. 2 on the enamelled tray.
Turn «F» and select the symbol
Once the dough has risen, turn «F» to «0» to
turn the oven off.
1
2
The Prove function
T F
220
200
200
210
250
250
160
P
T F
220
200
200
210
250
250
160
P
T F
220
200
200
210
250
250
160
P
T F
220
200
200
210
250
250
160
P

7
Baking
This cooking mode is ideal for cakes (prepared using baking powder).
This process avoids the dough drying out pastry and favours rising before the surface turns a crispy golden-
brown.
We recommend that you preheat the oven.
Place your dish on the enamelled tray at level No. 2.
Turn knob «F» to select the symbol .
Turn «T» to select the baking temperature.
Recommended temperature: 220 °C
Wait until the oven has heated before putting your dish in the oven.
At the end of the cooking cycle, turn «F» and
«T» to«0» to turn the oven off.
If you wish to set a delayed start time for cooking or programme a cooking time, see page 4
1
2
3
Nota
Nota
T F
220
200
200
210
250
250
160
P
T F
220
200
200
210
250
250
160
P
T F
220
200
200
210
250
250
160
P

8
Pastry cooking
This mode is ideal for tarts, quiches, etc.
The bottom crust is perfectly cooked, while the filling stays soft.
Use an enamelled tray at level No. 2.
For manual cooking, preheating the oven is recommended.
Turn knob «F» to select the symbol .
Turn «T» to select the baking temperature.
Recommended temperature: 220 °C
Wait until the oven has pre-heated before putting your dish in the oven.
At the end of the cooking cycle, turn «T»
and «F» to «0» to turn the oven off.
If you wish to set a delayed start time for cooking or programme a cooking time, see page 4.
1
2
Nota
Nota
T F
220
200
200
210
250
250
160
P
T F
220
200
200
210
250
250
160
P
T F
220
200
200
210
250
250
160
P

9
Forced Air Cooking
This mode is ideal for cooking identical or different dishes placed on several levels. Cooking several different
types of dishes at once does not affect their respective flavours. This mode requires that all the dishes being
cooked can be cooked at the same temperature.
We recommend that you preheat the oven.
Cooking on 2 levels Cooking on 3 levels
Levels No. 1 and 3 Levels No. 1, 2and 3
Turn knob «F» to select the symbol .
Turn «T» to select the cooking temperature.
Recommended temperature: 200 °C
Wait until the oven has preheated before placing
your dishes in the oven.
At the end of the cooking cycle, turn «F» and «T» to
«0» to turn off the oven.
If you wish to set a delayed start time for cooking or
programme a cooking time, see page 4.
1
2
3
Nota
Nota
T F
220
200
200
210
250
250
160
P
T F
220
200
200
210
250
250
160
P
T F
220
200
200
210
250
250
160
P

10
Traditional Cooking
This cooking method is particularly recommended for dishes cooked at lower temperatures (casseroles,
stews, etc.) or for ‘bain marie’ cooking.
Use an enamelled tray on level No. 2.
We recommend that you preheat the oven.
Turn knob «F» to select the symbol .
Turn «T» to select the cooking temperature.
Recommended temperature: 190 °C
Wait until the oven has preheated before
putting your dish in the oven.
At the end of the cooking cycle, turn «F»
and «T» to «0» to turn the oven off.
If you wish to set a delayed start time for
cooking or programme a cooking time, see
page 7.
1
2
3
Nota
Nota
T F
220
200
200
210
250
250
160
P
T F
220
200
200
210
250
250
160
P
T F
220
200
200
210
250
250
160
P

11
Roasting
This method of cooking is particularly recommended for red and white meats, and
au gratin
dishes.
Use an enamelled tray on level No. 1 and place the meat to roast on a rack on level No. 2. We recommend
that you do not preheat the oven.
Turn knob «F» to select the symbol .
Turn «T» to select the roasting temperature.
Recommended temperature: 210 °C.
Put your dish in the oven.
At the end of the cooking cycle, turn «F» and
«T» to «0» to turn the oven off.
If you wish to set a delayed start time for
cooking or to programme a cooking time, see
page 4.
1
2
3
Nota
T F
220
200
200
210
250
250
160
P
T F
220
200
200
210
250
250
160
P
T F
220
200
200
210
250
250
160
P

12
Spit-roasting
The spit supplied with your oven comprises:
• A cradle that is placed on level No. 2° so that the spit assembly fits into the hollow motor shaft located in the back of
the oven cavity, behind the perforated panel.
• A spit that pierces the meat to be roasted. The meat is held in place at both ends by two sliding forks that are held onto
the shaft with wing nuts.
Important: When assembling the unit, make sure that the spit is properly inserted into the hollow drive shaft of the motor.
Check that:
- the spit passes through the centre of the meat to be roasted
-the meat is equidistant from the ends of the spit.
• A removable handle made of insulating material and that screws onto the spit shaft. The user is protected from being
burned when taking the roast out at the end of the cooking cycle. Screw the handle on tight before removing the spit.
Spit timer
Scholtès ovens are equipped with a timer device for the spit. At the end of the cooking cycle, the motor continues to turn
the spit and only stops when the temperature has dropped sufficiently. This eliminates any risk of burning the meat by
residual heat.
In order to use the spit timer, you must first programme the spit roasting time (see page 7).
Wing screw
Spit
Spit handle
Prong
Spit cradle
This function is especially recommended for cooking on the spit with the oven door closed. The meat turns slowly and
browns evenly until it is done. Use an enamelled tray at level No. 1 for recovering the juices, and place the spit cradle at
level No. 3.
We recommend that you do not preheat the oven.
Turn knob «F» to select the symbol .
Turn «T» to select the cooking temperature.
Recommended temperature: 250 °C
Place the meat and spit in the oven.
At the end of the cooking cycle, turn «F» and «T» to«0»
to turn the oven off.
If you wish to set a delayed start time for
cooking or programme a cooking time, see
pages 4.
1
2
3
Nota
T F
220
200
200
210
250
250
160
P
T F
220
200
200
210
250
250
160
P
T F
220
200
200
210
250
250
160
P

13
Barbecue cooking
With the barbecue cooking mode, the accessible oven parts may be hot.
Keep young children away.
This function is especially recommended for cooking ribs of beef, grills,
au gratin
dishes on plates, with the
door partially open (a notch in the hinge is provided for this purpose).
We recommend that you do not preheat the oven.
Use an enamelled tray at level No. 1 for recovering the juices.
Place the meat on a rack and choose a level according to the thickness of the cut.
Turn knob «F» to select the symbol .
Turn «T» to select the cooking temperature.
Recommended temperature: 250°C.
Put your dish in the oven.
At the end of the cooking cycle, turn «F» and
«T» to «0» to turn the oven off.
If you wish to set a delayed start time
for cooking or programme a cooking
time, see page 4.
1
2
3
Nota
T F
220
200
200
210
250
250
160
P
T F
220
200
200
210
250
250
160
P
T F
220
200
200
210
250
250
160
P

14
Self-decreasing by catalysis
In this process, the interior walls of the oven are coated with a self-degreasing catalytic enamel. This enamel oxydizes
and destroys all grease particles which splash on to the oven walls. The temperature of the walls must be over 170° for
oxydization to occur. The porosity of the catalytic enamel increases the surface exchange required for oxydizing the
grease particles by catalysis.
Towards the end of the cooking period, if there are still traces of grease particles, leave the empty oven turned on with
the door closed, set the temperature selector to maximum, the function selection control to for 60 to 90 minutes
according to the amount of grease residue. Hot water and a soft brush can also help remove spatterings of grease.
Important: The Scholtès catalytic enamel is very resistant. However, scraping the enamel with sharp objects (a knife for
example) or cleaning with detergents and abrasives should be avoided as this may cause irreversible damage to the self-
degreasing agents in the enamel. The enamel is very resistant, and enables easy sliding action of the various accessories
(main rack, drip-pan, spit) without risk of damage to the enamel. Fine white dust may appear where the surfaces make
contact, however this is no cause for concern.
Observations:
1. If the walls need to be replaced, they are removable. Your local Scholtès distributor will supply you with a new set.
2. The grill element and roof are self-cleaning by the automatic destruction of residues due to the heat emitted from the
element itself .
3. Other parts inside the oven such as the floor, the door the light fixture, can be cleaned with a soapy sponge. Rinse well
and dry.
The accessories are produced from quality materials for easy cleaning, like everyday tableware, in a dish-washer.
1 2 3
Email catalytique
poreux
Coupe
d'une paroi
catalytique
Email de masse
Tôle d'acier
Différentes étapes d'oxydation des graisses
Stages in the oxidation of grease and fats
Section
of catalytic
enamel
Porous catalytic
Enamel Solid
enamel Steel sheet
First use:
• Before using your oven for the first time, heat it once while empty, in a well-ventilated room. We
recommend that you use the “Forced air” mode at 250°C for 1 hour.
If your oven gives off a lot of smoke:
• Check that you have selected the appropriate function for the dish, that you are using the right accessories and
cooking at the recommended level.
• Also check the displayed temperature: it is probably too high for the dish in question.
• Check whether the oven needs cleaning. Smoke and acrid odours are often the result of charred deposits stuck to
the enamel.
If the fan continues to operate after the cooking ends:
• Do not be surprised if the fan continues to function even if you have turned the oven off. It will stop automatically
once the oven has cooled sufficiently.
If the oven does not heat up:
• Check:
- that the electrical fuses have not blown,
- that the circuit breaker has not been triggered,
- that there is no mains power supply failure.
If the problem persists, contact your Distributor or After-Sales Service representative.
Tips and recommendations

3
T F
220
200
200
210
250
250
160
P
T F
220
200
200
210
250
250
160
P
Sélecteur de
température
Horologe
Sélecteur des fonctione
Le tableau de commande
Voyan de chauffe
Temps de cuissons
Heure
Depart differe
+/- Touche de regolationne
Fonction manual
Voyan de
functionemant
La manette « F» permet la sélection des modes de cuisson
Tournez la manette «F» pour sélectionner le mode
de cuisson souhaité.
Le four commence à chauffer lorsqu’une
température est sélectionnée.
La manette «T» permet le réglage de la température
Note
The indicator light comes on when you have
selected the temperature. It indicates that the
oven is heating up. When the light goes out,
the required temperature has been reached inside the
oven. When the light alternately comes on and goes out,
it means that the thermostat is working properly to
maintain the oven temperature.
Tournez la manette «T» pour choisir la température de
cuisson désirée.
Voyant de chauffe
Arrêt de fonctionnement du four
Ramenez les manettes «T» et «F» à «0» pour arrêter le
fonctionnement du four.
Note
T F
220
200
200
210
250
250
160
P
T F
220
200
200
210
250
250
160
P

Merloni Electroménager S.A.
CUISSON - AÉRATION - CONSERVATION - LAVAGE
SOCIÉTÉ ANONYME AU CAPITAL DE 110 000 000 F
RC THIONVILLE B 335 075 404 000 12 - APE 297 A
http://www.scholtes.fr - 195035325.00
/