Candy RTT 2131WSZ-19 User manual

Category
Washing machines
Type
User manual

This manual is also suitable for

RTT 2131WSZ-19
RTT 2151WSZ-19
0030516072
Contents
Safety precautions.............................................................................. 2
Packing list ............................................................................................... 4
Machine components
.........................................................................................
4
Installation and adjustment
.....................................................................
5
Pre-wash preparation
...................................................................
7
Washing sequence
................................................................................
9
Disposal after washing
.........................................................................
12
Troubleshooting
...................................................................................
1
1
4
Speci cations
............................................................................
Back cover
2
Safety precautions
WARNING
FORBIDDEN
Meaning and description of the symbols
Contents marked with this symbol relate to product and
user safety. Please operate the machine in strict
conformity to the contents of this manual to minimize
the risk of personal injury and/or damage to the
machine.
Contents marked with this symbol describe actions
prohibited to perform. If performed these actions will
endanger the user’s personal safety and may result in
injury.
Please insert the power cord into a rated
voltage outlet. Be sure to use a
single-phase three pin outlet. Also, the
terminal of the outlet must be grounded.
If possible, please install an electric
leakage protector.
When the machine is in use, place the
power plug in a location where it can be
easily inserted and extracted by hand.
Be sure to remove the plug if power
failure occurs, when moving or cleaning
the machine, or when the machine is
idle.
If the supply cord is damaged, it must
be replaced by the manufacturer, its
service agent or similarly qualified
persons in order to avoid a hazard.
Use only the supplied hose set for
the connection.
Never reuse old hose sets!
Do not place the machine in a damp
place like the bathroom and never
wash it with water. Do not place wet
laundry on the
control panel.
Do not use water warmer than 50 °C .
If the washing machine is installed on the
ground near carpet, make sure to keep
the ventilation hole clear of obstruction.
Ventilation hole
atthe bottom of
the washing
machine
To avoid abnormal vibrations in spinning,
do not use the machine to wash
water-proof laundries like raincoats,
bike covers etc.
3
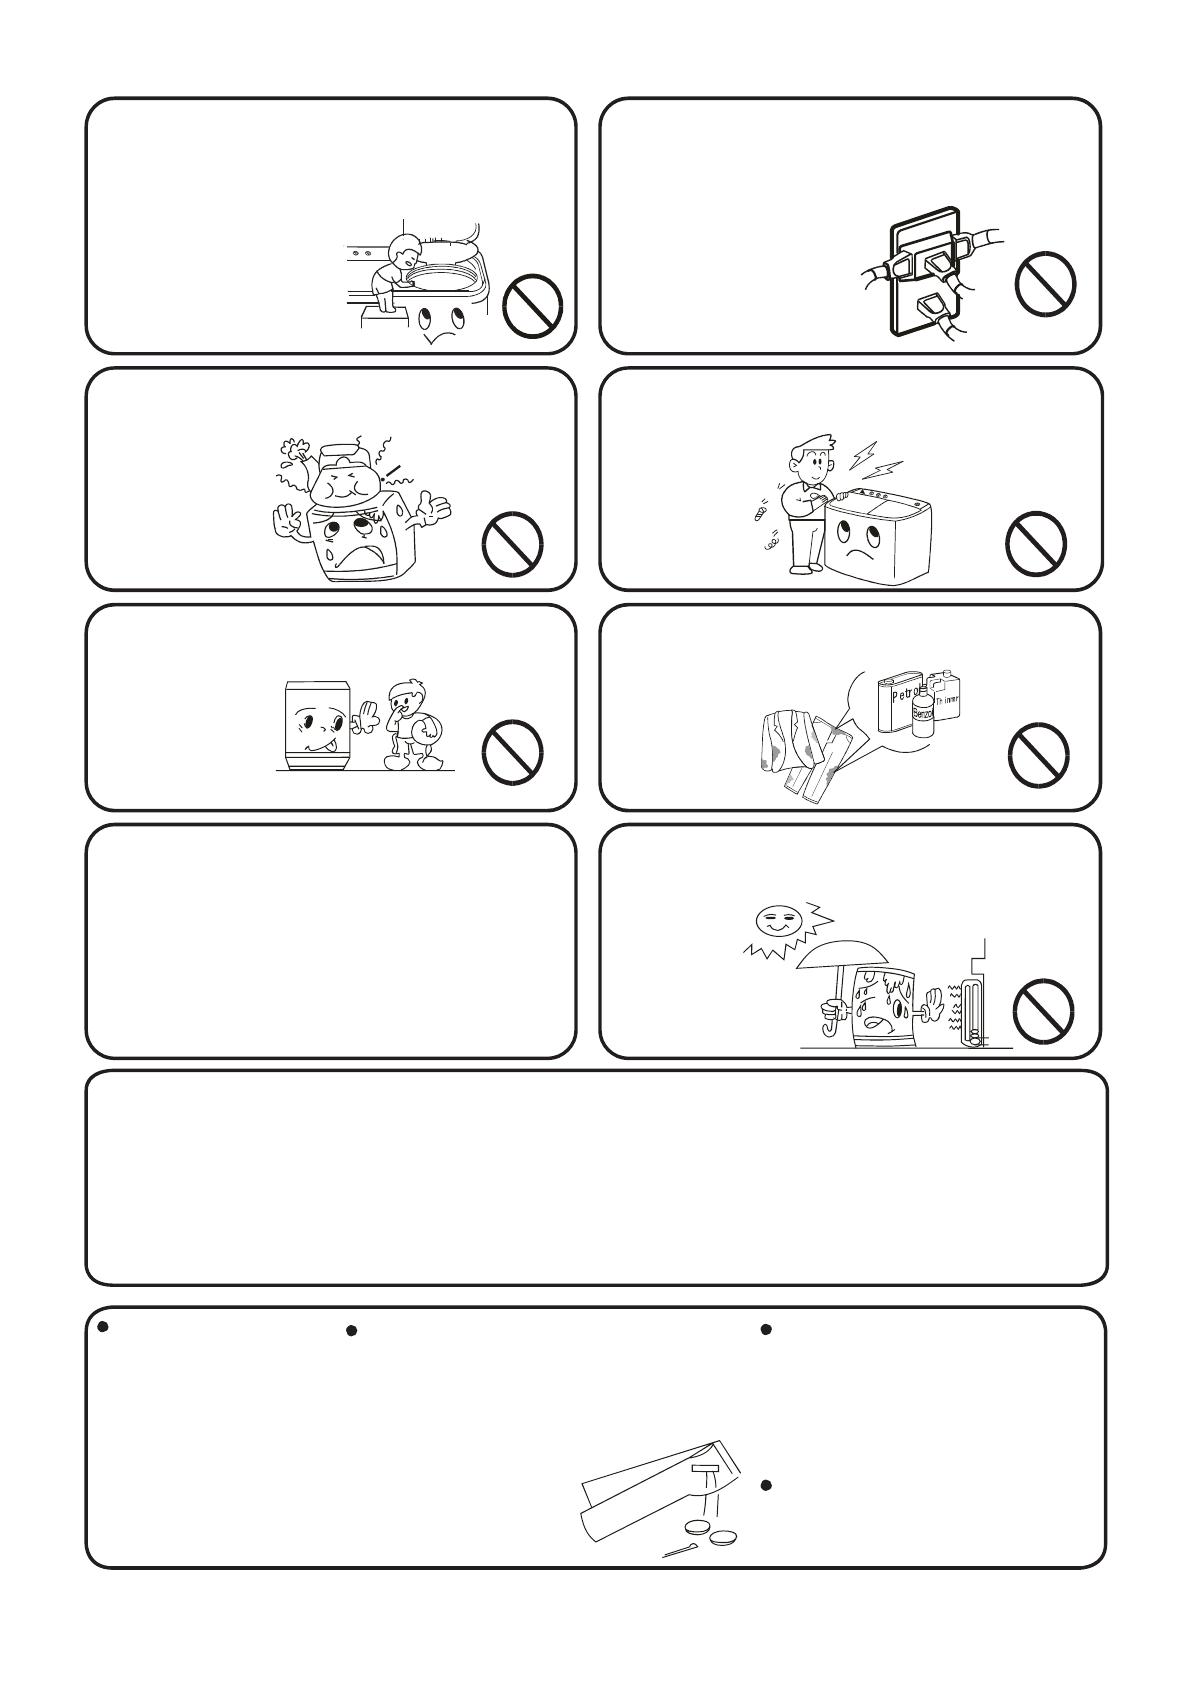
Do not attempt to take apart, repair
or alter the machine by yourself.
Do not wash laundry with volatile or
flammable materials (such as thinner,
petrol etc.).
Do not put any high temperature or
heavy objects on the washing machine.
Keep the machine away from direct
sunlight and heat sources like the
radiator.
Disabled children or those not under
adult supervision should not operate
the machine.
To guarantee your
safety, please
ensure the power
outlet is grounded
before use.
To protect your laundry and the
washing machine,please remove
all coins,buttons,sand,hairpins
and other foreign materials before
washing.
This appliance is intended to be used in household and similar applications such as:
– staff kitchen areas in shops, offices and other working environments;
– farm houses;
– by clients in hotels, motels and other residential type environments;
– bed and breakfast type environments;
– areas for communal use in blocks of flats or in launderettes.
Please check if the water
faucet is turned on and
make sure you have the
proper water pipe
connection
It is recommended to use
foamless washing powder.
Do not share the outlet with other electric
appliances. If the power plug is damaged,
or feels loose when plugged into the
outlet, stop using the
plug immediately.
Do not stretch hands into the workingmachine.It is
dangerous even if the
rotation is slow.
Take special
care o
f the
children.This appliance is not intended
for use by persons (including children)
with educe
physical
, sensor
y
or mental
capabilities
,
of lack of
experience andknowledge,
unless they have been
given
supervision or
instruction
conceming use of the
appliance
by a person
responsible for their safety.
This appliance is not intended for use by persons
(including children) with reduced physical, sensory
or mental capabilities,or lack of experience and
knowledge, unless they have been given supervision
or instruction concerning use of the appliance by a
person responsible for their safety. Children should
be supervised to ensure that they do not play with
the appliance.
4
Machine Components
Wash time Drain
Wash program
Spin time
Control panel
If you wish to set it
for less than 2
min, you should
first turn past 6
min and then turn
back.
Intensity can be
set to mormal
or soft.
Warning: do not
set the switch on
Drain position
during washing.
If to set to less than
1 min, in order to
ensure a long
service life, please
first turn past 2 min
and then turn back.
Packing list
Twin-tub washing
machine
Water intake
hose
Gland Draining
hose
Bottom
leg
off
drain
5
0
10
15
30
45
normal
soft
wash time wash program drain spin time
0
1
2
3
4
5
5
Drain hose drainage should be smooth and unobstructed.
Installation and adjustment
overflow filter
lint filter
For your security and to ensure correct operation of the machine, please install and
adjust the machine according to this manual’s instructions.
Installation of the lint filter
Place the bottom side of the lint filter into the
overflow filter, then push the top side into the
overflow filter.
After installation, please double check to
make sure that the lint filter is installed in the
correct location; otherwise it may fall off
during operation.
Drain hose usage
1.The height of the drain hose shall be
less than 10cm, or the drainage will
not be smooth enough and cause
incomplete drainage.
2.Do not tramp or press the drain hose.
3.If the drain hose is too long, cut it at mid point.
To make smooth drainage, cut the front end of
the hose slantingly.
4.If extra drain hose is needed, please make
separate purchase. The inner diameter of the
extra hose shall not less than 30mm,and the
length shall not exceed 1.5m.
If the extra hose is too long, cut it either
at point A or B.
6
Insert the water intake hose
into the water-inlet entrance
on the control panel.
Water intake hose
Water inlet
Add water as necessary.
The drain hoses in the wash tub when out off factory ,before use the machine,
please screw the drain hose on the drain valve parts , make sure the drain hose
fixing as necessary.
Drain valve parts
2.Install the drain hose
1.Remove the cover
Install the washer legs
1.Carefully tilt the washing machine to the back and install the bottom legs at the
front of the base.Make sure that the legs are installed in place.(Figure 1).
2.Carefully tilt the washing machine to front and install the bottom legs at the back
of the base.Make sure that legs are installed in place.(Figure 2)
On model RTT 2131WSZ-19.
Bottom legs
Bottom legs
Figure 1 Figure 2
Change the direction of the drain hoses
Install the water intake hose
7
Pay attention to followings before washing the laundries
Basic know-how
Pre-wash Preparation
The maximum capacity during washing and spinning cycles
refers to the max weight of standard dry laundry that can be
washed or spun at one time. The laundry quantity during one
washing cycle should be lower than the rated capacity.
Thickness, size, and the type of cloth will influence actual
washing capacity. It is acceptable to put in a reasonable amount
of laundry as the laundry will be mixed around during the
washing process.
To avoid splashing, do not select the “Maximum” water level for
low loads.
Using high sudsing detergent is not recommended.
Check to see if
the items have
special washing
requirements.
Put hard to
absorb water
items into the
machine by hand.
Empty out
pockets. Take
out any coins,
sand, hairpins
Check to see if
the items are
appropriate for
use with the
washing
Do not overload the washer.
Stretch and loosen the laundry
before putting it into the washer.
Tie any long strips;
fasten buttons; and
close any zippers.
For laundry that
is susceptible to
lint balls and/or
has long fur,
turn it inside out
before putting it
in the washer.
Do not put
laundry
polluted by
chemicals into
the washing
machine
directly.
For heavily soiled laundry, try to
remove dirt such as mud or dust
first and apply detergent in
advance. This will help to
remove the stains more easily.
Divide
non-colorfast
laundry from
other laundry.
When the pulsator is running, some noise may emit from
laundry that contains buttons. To minimize this noise,
surround laundry with buttons with other laundry.
8
Detergent use
Using bleach detergent:
How to add detergent:
Method 1 - directly dissolving in the machine:
1.Add a small quantity of water to the machine.
2.Add the detergent powder. Run washing machine for 30 seconds to dissolve powder
completely.
3.Place laundry into the washing machine and select a suitable water level.
Method 2 - instantly dissolving the detergent powder:
1.Prepare warm water at 30 °C and a container.
2.Add the detergent powder while stirring until it dissolves fully.
Laundry powder is more prone to damage laundry than liquid detergent. Please exercise
caution and do not exceed the maximum quantity.
Dosages of detergent powder may vary. Please follow the instructions on the detergent
Add water to suitable levels. Dilute the bleach with a separate container. Pour it slowly
into the washing machine.
Avoid using whitening agents on laundry with colors and/or patterns as they are prone to
lose color.
The whitening agent should not come in direct contact with the laundry.
Refer to the product instructions for information on proper usage and quantity
Dissolve powder whitening agents before use.
Note:
The energy test program(RTT 2131WSZ-19)
Full load Cotton 60:Manually fill in hot water(35 to 36 liters)and cold water up to the 4 water
level after Normal wash 45min,then keep washing 30min Drain Spin twice each for 5min 5min
cold rinse with 4 water level Drain Spin twice each for 5min
Partial load Cotton 60:Same as Full load Cotton 60 but with 28 to 29 liters hot water in washing
process and spin once after washing and rinsing Water level select 1
Partial load Cotton 40:Same as Full load Cotton 60 but with 24 to 25 liters hot water in washing
process and spin once after washing and rinsing Water level select 1
The energy test program(RTT 2151WSZ-19)
Full load Cotton 60:Manually fill in hot water 47 to 48 liters and cold water up to the 4 water
level after Normal wash 45min then keep washing 45min Drain Spin twice each for 5min 5min
cold rinse with 4 water level Drain Spin twice each for 5min
Partial load Cotton 60:Same as Full load Cotton 60 but with 28 to 29 liters hot water in washing
process and spin once after washing and rinsing Water level select 1
Partial load Cotton 40:Same as Full load Cotton 60 but with 23 to 24 liters hot water in washing
process and spin once after washing and rinsing Water level select 1
9
Washing sequence
Washing
Figure 1
Figure 6
Figure 4
Figure 5
Figure 2
TOR
1.Inlet se
l
e
c
tor
4 Select intensity..
2.Add water
Set the selector to WASH”.(Figure1)
Machine begins to dispense detergent uniformly.(Figure2)
3.Put in the wash load. Add more water as
necessary.(Figure3)
Select “SOFT or “NORMAL” water flow
intensity according to the wash load.(Figure4)
5.Select wash time.
Select wash time according to the wash load.(Figure5)
6.After the wash is completed, set the switch to the “DRAIN”
position.(Figure6 )
Figure 3
The washing instruction with soaking:
1 0-15 minutes is normal washing;
2 15-45 minutes is sport soaking and the pulsator will
run 2.5 minutes each 7.5 minutes interval, until sport soaking
is end, finally it is 15 minutes normal washing;
3 When the user select the soaking, firstly make sure the
detergent power is fully dissolved. Otherwise it may be
harmful to clothing.
off
drain
drain
normal
soft
wash program
5
0
10
15
30
45
wash time
10
Push
Push
Proper
Proper
Outer cover of
The spin tub
Inner cover of
The spin tub
The laundry
is slanted.
Gland
No gland
1. Put the laundries into the spin tub evenly and smoothly.
2.Spin:(1) Distribute the laundry into the spin tub smoothly and evenly.
(2)Close both the inner and outer covers of the spin tub.
(3) Spin for 1-2 minutes.
Note: the gland must be inserted properly even if the laundry quantity is small.
3.Run the foam-removing spinning.
(1) Open the outer cover of the spin tub.
(2) Set the water-filling selector control
rod at the "SPIN" side. Fill water for
about 1 minute.
If the water quantity filled is too large,
the water may flow out from the wash
tub side. Please twist the water tap to
limit the water filling.
(3) Close the outer cover of the spin tub.
Spin for 1-2 minutes.
Mid-wash spin cycle
TOR
11
Rinse with water-filling
1.Place laundry into the washing machine.
Place laundry into the washing machine. Select the appropriate current
according to the laundries.
2.Add water.
Add the appropriate amount of water.
3.Rinse
Adjust the wash timer to 5-7 minutes for the rinse cycle
Rinsing with stored water
(Repeat the mid-wash spin cycle and rinse cycle with stored water 2-3 times)
1.Place laundry into the washing machine. Select the appropriate current
according to the laundries.
2.Fill up water to the preset level.
3.Rinse
Adjust the wash timer to 2-3 minutes for rinsing.
When the laundry quantity is low, use the “SOFT” current. If you use the
“NORMAL” current, the water may splash.
The rinse cycle
Spinning
1. Distribute laundry into the spin tub evenly and smoothly.
2. Insert the gland into the tub properly.
Close the inner and outer cover of the spin tub.
3. Spin
Select an appropriate spin time according to the condition of the laundry, and start the
spinning cycle.
sound occurs, it is generally due to the laundry
being placed in a slanted fashion. Please stop the machine and re-arrange the laundry
accordingly.
pause if the outer cover of the spin tub is
opened. Close it to resume the spinning cycle.
To run spinning and draining or
rinsing with water-filling one after
the other, first run the spinning
cycle for around 1 minute, then
draining or rinsing with
water-filling. Otherwise the
spinning will stop automatically
because of the excess water in the
spin tub.
12
Disposal after washing
Cleaning the lint lter
After each use, be sure to clean the lint and foreign materials from the lint filter and the
overflow filter in a timely fashion. Removing lint is important for healthy operation of the
machine.
Please remove the plug from the power outlet first before cleaning.
The lint filter should always be used during washing and should be cleaned after each use
in a timely fashion.
1.To remove the lint filter, first press the elastic piece at the upper end
of the filter to release the tab from the filter cover, then pull outward.
2.Pull the lower end of the lint filter rear cover outward to
separate it from the lint filter front cover. Remove lint completely
by rinsing with clear water.
3.Re-install the lint filter.
Lint filter rear cover
Lint filter front cover
Disassemble
Assemble
13
Cleaning the over ow lter
1.Take off the over ow lter.
2.Clean the over ow lter.
3.Re-install the overflow filter.
Elastic fixing
claw
Nip the elastic fixing claw and
pull in the direction of the arrow
to remove (as demonstrated in
the figure to the right).
Clean the lint around the lter and ush with tap water.
1) Install the corrugation pipe.
2) Attach the mounting plate
at the bottom of the filter onto
the valve cover.
3) Hang the hook on the left
upper side.
4) Push in the upper part.
Hook
Cleaning the unit
Thinner
Alcohol
Petrol
Wipe the entire unit with a
soft dry cloth.
Use neutral detergent to wipe
if the machine is excessively
dirty.
Do not apply water directly
when cleaning.
After washing, disconnect the water intake hose.
Do not store water in the machine for long
periods of time. Drain the water immediately after
each use.
Pull out the power plug and hang up the power
cord.
Hang up the drain hose. Wipe off water drops on
the surface and inside the machine with a clean
soft cloth.
Open the cover of the wash cycle compartment
and the inner/outer covers of the spin cycle
compartment for a short period (about one hour),
then close them.
Too much lint in the overflow filter will influence normal usage of the machine.
Remember to clean it once every two months.
14
Troubleshooting
Phenomena The reason
When the remaining water is frozen
2~3L
Below 50
Prevent the freezing
Pour hot water below
50°C into the wash cycle
compartment to soak it
completely, then using
your hands gently turn
the pulsator. Confirm that
the drainage function is
operating normally before
next use.
(be sure to drain the water
completely after each use)
After completely draining, set
the “DRAIN SELECTOR” to
“OFF”. If it is set to “DRAIN”, it
will be difficult for the frozen
water to melt.
(If a breakdown occurs, always pull remove the power plug before inspecting the machine)
The following situations do not always indicate a breakdown. Please double confirm
before sending the machine to be repaired.
If an actual breakdown occurs, visit the special maintenance department or after-sales
service department of our company. Do not attempt to repair the machine by yourself.
The machine does not start.
The draining function does
not work
Abnormal sound during
washing
Abnormal sound and violent
vibration during the spin
cycle
Water flowing out of the
drain hose during the
first use of the machine.
Is there a power failure?
Is the power plug loose?
Is the pulsator twisted by foreign materials?
Is the drain hose frozen?
Is the drain hose blocked by foreign material?
Is there laundry adhering to the outer side of
the spin tub?
Are there hair pins, coins or metal items inside
the tub?
Is the machine slanting?
Is the gland pressed evenly?
Is there laundry adhering to the outer side of
the spin cycle compartment?
Is the spin cycle compartment overloaded?
This is the water left over after the factory
performance inspection.
The spin part does not work Is the spin tub outer cover open?
Is the drain hose put down?
Speci cations
Model RTT 2131WSZ-19 RTT 2151WSZ-19
Rated Voltage 230V~ 230V~
Rated Frequency 60Hz 60Hz
Washing Capacity 13kg 15kg
Spin-dry Capacity 10kg 14kg
Rated Wash Power 420W 450W
Rated Spin Power 280W 310W
Total Input Power 700W 760W
Rated Current of Fuse 10A 10A
Degree of Water-Proof IPX4 IPX4
Rated Annual Energy Consumption 439kWh 506kWh
Rated Annual Water Consumption 29480L 39380L
Net Weight 32kg 37.5kg
Dimensions (915
x
558
x
1020)mm (1025
x
605
x
1115)mm
Injection pressure 0.02 - 0.2MPa 0.02- 0.2MPa
4(Max)/140L,3/118L,
2/92L,1/67L
Water level/Water quantity
(
approximately)
4(Max)/97L 3/81L,
2/60L,1/39L
MADE IN CHINA
T
0 .02
IPX4 IPX4
6060
2
6
www.candy.ae
14
.
( )
.
.
.
.
.
.
50
.
.
)
(
"
( )
"
.( ) " "
( ) " "
.
13
.
.
.
)
.(
.
.
.
.
.
.
.
.
.
/
. ( )
1
.
.
2
.
. (1
(2
.
. (3
. (4
3
12
. .
.
.
.1
.
. .2
.
.3
  • Page 1 1
  • Page 2 2
  • Page 3 3
  • Page 4 4
  • Page 5 5
  • Page 6 6
  • Page 7 7
  • Page 8 8
  • Page 9 9
  • Page 10 10
  • Page 11 11
  • Page 12 12
  • Page 13 13
  • Page 14 14
  • Page 15 15
  • Page 16 16
  • Page 17 17
  • Page 18 18
  • Page 19 19
  • Page 20 20
  • Page 21 21
  • Page 22 22
  • Page 23 23
  • Page 24 24
  • Page 25 25
  • Page 26 26
  • Page 27 27
  • Page 28 28
  • Page 29 29
  • Page 30 30
  • Page 31 31
  • Page 32 32

Candy RTT 2131WSZ-19 User manual

Category
Washing machines
Type
User manual
This manual is also suitable for

Ask a question and I''ll find the answer in the document

Finding information in a document is now easier with AI