Page is loading ...

Installation of E-Clip
(#2 and #3)
1. If necessary, remove existing E-Clip
(#3) by prying it away from the pin
with a at head screw driver.
2. To install a new E-Clip (#3), place
the E-Clip (#3) on the surface of the
tool with it’s opening positioned
around the groove of the pin. Use
needle nose pliers to push the
E-Clip (#3) onto the pin until it
snaps into place. (Note: The
E-Clip will rotate freely but should
not come o without prying with
force.) Follow same procedure
for E-Clip #2 (see above diagram
for E-Clip #2 location).
Replacing Batteries (#1)
1. To replace the batteries, (that
power the LED light), use a Phillips
head screwdriver to remove the two
screws that hold down the cover by
rotating them counter clockwise.
2. Gently move the battery cover
to the side, exposing the two
batteries, which are stacked one on
top of the other. Be careful not to
damage the wire that’s attached to
the battery cover.
3. Remove both batteries but leave
the spring installed in the bottom
of the battery compartment (large
side of spring faces down).
4. Place the two new batteries (#1)
into the battery compartment, one
on top of the other, with the + side
facing down.
5. Carefully move the battery cover
over the batteries and line up the
screw holes. Use your thumb to
press the battery cover against
the tool to overcome the tension of
the battery compartment spring.
With the battery cover held rmly
in place, insert one of the screws
into the rear hole and tighten it
down, clockwise, halfway with a
Phillips head screwdriver. Insert
the remaining screw into the front
hole and tighten it down, clockwise,
fully. Return to the rear screw and
tighten it down fully. Engage the
jaws, to verify that the LED light
operates properly.
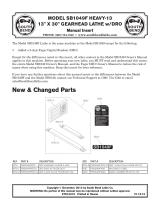
Kit Includes:
1. Batteries, Qty. 2
2. E-Clip (larger), Qty. 1
3. E-Clip (smaller), Qty. 1
4. Spring/Pin Jaw Retainer, Qty. 1
5. Jaw Stop Screw, Qty. 1
6. Reverse Thread Screw, Qty. 1
7. Guide/Stop Washer, Qty. 1
INSTALLATION INSTRUCTIONS
QCRTLDMRKIT-1 -
Small Parts Repair Kit
For QCRTLDM - Large Diameter Compact Crimp Tool
1
2
3
4
4
5
6
7
1
1
2
3
4
7
5
6
Watch our PEX Tool Repair Video
on our One Zurn YouTube Channel.

Installation of Spring/Pin
Jaw Retainer (#4)
1. If necessary, remove existing
spring/pin jaw retainer (#4), from the
tool, by using a Phillips head screw
driver to rotate the screw counter
clockwise. (Note: The spring around
the pin is also removed.) Lift the
tool from the work surface to reveal
the jaw retainer, that was attached
to the pin, laying on the work
surface. You can now remove the
jaw from the tool.
2. To install the new spring/pin jaw
retainer (#4), start by disassembling
the new jaw retainer from the
new pin. This is accomplished
by holding the Phillips head side
of the pin rmly in one hand and
turning the jaw retainer counter
clockwise with the other hand
until they separate.
3. With the pin inserted through the
spring, place the spring/pin into
the recessed hole of the tool. (Large
end of spring and threaded end of
pin, enter recessed hole.) Holding
the tool upright in one hand, push
the Phillips head side of the pin with
your thumb until the threaded end
of the pin clears the other side of
the tool. With the threads exposed,
Use your other hand to thread the
jaw retainer, (at side of jaw retainer
facing tool), clockwise onto the
pin, until it stops by reaching the
unthreaded portion of the pin (#4).
Check installation by attaching the
jaw to the tool. Verify that the jaw
stays in place.
Installation of Jaw
Stop Screw (#5)
1. If necessary, remove existing jaw
stop screw (#5), from the tool,
by using an Allen wrench to rst
loosen the Allen screw, that holds
the jaw stop screw in place, two
rotations counter clockwise. Using
a slotted screw driver, remove the
jaw stop screw from the tool by
turning it counter clockwise.
2. To install the new jaw stop screw
(#5) into the tool, you must rst
engage the jaws, as you would
when making a crimp, until the LED
light comes on. Using a slotted
screw driver, thread the jaw stop
screw into the tool, clockwise, until
the screw stops when it touches
the other side of the tool. Turn the
jaw stop screw counter clockwise
between 1/4 and 1/2 of a rotation.
This leaves a proper gap between
the end of the jaw stop screw and
the opposing side of the tool. Now
use the Allen wrench to tighten the
Allen screw, clockwise, to lock the
jaw stop screw in place.
Installation of Reverse
Thread Screw (#6) and
Guide/Stop Washer (#7)
1. If necessary, remove existing
reverse thread screw (#6), from the
tool, by placing a wrench on the at
sides of the screw head. Turn the
screw clockwise until the reverse
thread screw and the guide/stop
washer, are no longer attached to
the tool.
2. To install the new reverse thread
screw (#6) and guide/stop washer
(#7), you must rst place the guide/
stop washer onto the reverse thread
screw. Thread the screw with
washer into the tool by turning the
screw counter clockwise with your
ngers. Place a wrench on the at
sides of the reverse thread screw
head and turn it counter clockwise
until tightened completely. Run
the screw/nut up and down the
threaded shaft several times by
hand, to verify proper operation.
INSTALLATION INSTRUCTIONS
QCRTLDMRKIT-1 - Small Parts Repair Kit
for QCRTLDM - Large Diameter Compact Crimp Tool
Form No. ZMKTG370-88, Rev. 04/16
ZURN PEX
®
, INC. 116 Maple Street, Commerce, TX 75428 Phone: 855-ONE-ZURN (855-663-9876) • 1-800-209-2148
Note: Parts subject to change without notice.
For troubleshooting and repair assistance,
do not return tool directly to wholesaler.
Call Zurn Customer Care for assistance
at 1-855-ONE-ZURN.
See www.zurn.com for warranty information.
/