Page is loading ...

Wireless-N USB Adapter
User’s Manual
Copyright 2007 EUSSO Technologies, Inc. All rights reserved.

T
T
a
a
b
b
l
l
e
e
o
o
f
f
C
C
o
o
n
n
t
t
e
e
n
n
t
t
s
s
PREFACE........................................................................................................................................................ 3
WIRELESS LAN BASICS................................................................................................................................. 3
Warning ...................................................................................................................................................... 3
INSTALLATION OVERVIEW..................................................................................................................... 4
INTRODUCTION .............................................................................................................................................. 4
INSTALLATION PROCEDURE .......................................................................................................................... 4
UNINSTALLING THE USB DRIVER ................................................................................................................. 8
CONFIGURATION...................................................................................................................................... 10
WIRELESS USB ADAPTER UTILITY ............................................................................................................. 10
CONFIGURATION.......................................................................................................................................... 11
STATUS ........................................................................................................................................................ 19
OPTION......................................................................................................................................................... 20
ABOUT ......................................................................................................................................................... 22
MISCELLANEOUS...................................................................................................................................... 23
WINDOWS ZERO CONFIGURATION .............................................................................................................. 23

P
P
r
r
e
e
f
f
a
a
c
c
e
e
Thank you for purchasing the EUSSO Networks Wireless USB Adapter. This manual
will assist you with the installation procedure.
W
W
i
i
r
r
e
e
l
l
e
e
s
s
s
s
L
L
A
A
N
N
B
B
a
a
s
s
i
i
c
c
s
s
Wireless LAN (Local Area Networks) systems offer a great number of advantages
over a traditional, wired system. Wireless LANs (WLANs) are more flexible, easier to
setup and manage, and often are more cost effective than their wired equivalents.
Using radio frequency (RF) technology, WLANs transmit and receive data over the air,
minimizing the need for wired connections. Thus, WLANs combine data connectivity
with user mobility, and, through simplified configuration, enable movable LANs.
With wireless LANs, users can access shared information without looking for a place
to plug in and network managers can set up or augment networks without installing or
moving wires. Wireless LANs offer the following productivity, convenience, and cost
advantages over traditional wired networks:
y Mobility - Wireless LAN systems can provide LAN users with access to real-time
information anywhere in their organization. This mobility supports productivity
and service opportunities not possible with wired networks.
y Installation Speed and Simplicity - Installing a wireless LAN system can be fast
and easy and can eliminate the need to pull cable through walls and ceilings.
y Installation Flexibility - Wireless technology allows the network to go where
wires cannot go.
y Reduced Cost-of-Ownership - While the initial investment required for wireless
LAN hardware might be higher than the cost of wired LAN hardware, overall
installation expenses and life-cycle costs will be significantly lower. Long-term
cost benefits are greatest in dynamic environments requiring frequent moves,
additions, and modifications.
y Scalability - Wireless LAN systems can be configured in a variety of topologies
to meet the needs of specific applications and installations. Configurations are
easily changed and range from peer-to-peer to full infrastructure networks. They
also allow roaming over a broad area.
W
W
a
a
r
r
n
n
i
i
n
n
g
g
y Compatibility with IEEE 802.11n future versions is not guaranteed.
y Compatibility with IEEE 802.11n draft devices from other manufacturers is not
guaranteed.

I
I
n
n
s
s
t
t
a
a
l
l
l
l
a
a
t
t
i
i
o
o
n
n
O
O
v
v
e
e
r
r
v
v
i
i
e
e
w
w
I
I
n
n
t
t
r
r
o
o
d
d
u
u
c
c
t
t
i
i
o
o
n
n
Before installing the Wireless USB Adapter, make sure that there is already an Access Point
existing on the wireless network. It is necessary for use with the Infrastructure network mode.
Here are some steps you will perform in establishing your wireless network
connection:
y Install the USB Driver for the Wireless USB Adapter by using the Install CD.
y Install the Wireless Adapter.
y Configure network protocol(s) required to communicate on your network. Most likely
you will need the TCP/IP protocol.
I
I
n
n
s
s
t
t
a
a
l
l
l
l
a
a
t
t
i
i
o
o
n
n
P
P
r
r
o
o
c
c
e
e
d
d
u
u
r
r
e
e
Important !!
Do not insert the Wireless USB Adapter in your computer before
you install the USB driver for the Wireless USB Adapter
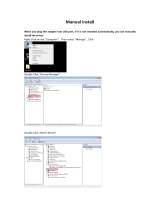
Follow the steps below to install the USB driver.
1. Insert the CD into your computer. The following opening InstallShield Wizard window
will appear:

2. The InstallShield Wizard window will appear as follows. Please click Next.
3. Now, you can insert the Wireless USB Adapter into the USB port of your computer.
Connect with USB cable
Connect directly

4. The default destination folder will be specified in this InstallShield Wizard window.
Also, you can click Browse... to choose another folder for storing the driver. Click Next.
5. A default Program Folder will be offered by the setup program in this InstallShield
Wizard window. If you do not want to change it, simply click Next.

6. The setup program executes the installation by copying corresponding files to your
computer in this InstallShield Wizard window.
7. Now the system will ask you to restart your computer to complete the whole installation.
After choosing the proper setting, please click Finish.
8. After restarting your computer, the system will find the hardware (wireless LAN card)
automatically. When it is located, a message will be shown on the system tray.
9. Now, you can find the Wireless USB Adapter utility icon in the system tray.
Double-click it to open the configuration window of Wireless USB Adapter.

U
U
n
n
i
i
n
n
s
s
t
t
a
a
l
l
l
l
i
i
n
n
g
g
t
t
h
h
e
e
U
U
S
S
B
B
D
D
r
r
i
i
v
v
e
e
r
r
If you want to remove the driver for this wireless card, please do the following:
1. Run Start > Programs > Normal > WLAN Monitor > Utility Uninstallation.
2. The following InstallShield Wizard window will appear:
3. When the following Confirm Uninstall window appears, please click OK.
4. Now, the system will start to remove the corresponding files in the following
InstallShield Wizard window.

5. When the following InstallShield Wizard window appears, click Finish.

C
C
o
o
n
n
f
f
i
i
g
g
u
u
r
r
a
a
t
t
i
i
o
o
n
n
W
W
i
i
r
r
e
e
l
l
e
e
s
s
s
s
U
U
S
S
B
B
A
A
d
d
a
a
p
p
t
t
e
e
r
r
U
U
t
t
i
i
l
l
i
i
t
t
y
y
After the driver installation is finished, it is the time to configure the wireless utility for
accessing the Internet through a wireless connection. Double-click the Wireless USB Adapter
utility icon on the system tray. Or open the wireless monitor utility by clicking Start >
Programs > Normal > WLAN Monitor > WLAN Monitor.
The WLAN Monitor window will appear as follows. The software will scan and display
available wireless Access Points automatically.
This chapter will introduce each tab in detail. Also, an example of configuration will
be provided for your reference.

C
C
o
o
n
n
f
f
i
i
g
g
u
u
r
r
a
a
t
t
i
i
o
o
n
n
The Wireless USB Adapter utility will find all the available Access Points and then list them
automatically for you to choose from. The following figure is just an example. The actual
available list depends on the AP(s) that are found around your computer system.
In the Available WLANs section, you can see:
SSID This displays the SSID of the AP.
This means the AP is ready for you to connect.
This means a successful connection to an AP.
This means the connection has failed.
If there are many available APs, scroll bars will appear for the
user to scroll and select the preferred AP. Please select the
Access Point that you want to connect to for accessing the
Internet.
MAC (BSSID) This is the MAC address of the current wireless card.
Signal The greater the percentage, the better the link quality will be.
Security This displays the security method that the AP is using.
CH This displays the connection channel that the AP is using.
Refresh This button can initiate a new search for available APs on the
wireless network whenever the user clicks it. In addition, the
whole list will be periodically refreshed automatically.

Connect This button starts the process of creating a connection between
the station (client) and the AP.
In the Profile Group Control section, you can see:
New This allows you to add a new profile to group several APs.
Click New to open the following dialog box. Type a new name
in the box and click OK.
The new group with the name you typed will be shown as the
following.
Rename This allows you to modify the selected profile name.
Delete This allows you to delete the selected profile.
Select This allows you to select one profile for use.

In the Preferred WLANs section, you can see:
SSID This displays the SSID of the AP.
Security This displays the security method that the AP is using.
New This allows you to add a new profile.
Move to This allows you to move a selected profile to another profile
group. After clicking this button, the following dialog will
appear for you to assign which group that you want to move to.
Remove This allows you to select and remove one of the existing
profiles.
Export This allows you to save the profile record as a file with the file
format .AWP. Please type the required password as shown in
the following dialog.
Properties This displays properties of the current connected AP.
Import This allows you to load a pre-saved profile record into a
currently connected AP. When you want to import such a
profile, you have to type the correct password for that AWP file.
Re-Connect This allows you to select one of the existing profiles to apply
with a currently connected Access Point.
To add a new WLAN AP, please click New to open the following dialog.

Different authentication mode will guide different data encryption, key length, default key,
and so on.
Wireless network name
(SSID)
Please type the name for the AP or wireless router you want to
connect to.
Authentication Mode There are six modes provided for you to choose for data
encryption.
Data Encryption This will be different according to the Authentication Mode
you choose.
For Open System/Shared Key and Open System, the data
encryption can be disabled or assigned with WEP.
For Shared, WPA, WPA-PSK, WPA2, and WPA2_PSK, the
data encryption can be TKIP or AES. You have to choose the
one which is the same with the setting configured in the AP that
you want to connect to.

Key Length Choose the key length for the wireless card. The method you
choose here must be the same as the method set in the
connected AP.
The number you typed here should be the same as the number
set in the connected AP. According to the input method you
selected, the characters that you have to set will differ.
For 10/26 Hexadecimal digits: Type 10/26 hexadecimal
numbers in this field.
For 5/13 ASCII digits: Type 5/13 ASCII characters in this
field.
Default Key Specify the Default Key which is the same as the setting in the
connected AP.
Enable 802.1X This will be available when you choose Open System.
Authentication Config This button will be available after you tick the Enable 802.1X
check box.
You have to type the same parameters as set in the connected
AP. Otherwise the connection will not be successful.

WPA Passphrase - Type the password for authentication with
AP while using WPA PSK mode.
Check Passphrase - Tick this check box to allow the characters
of passwords to be visible.
EAP Type - A type for authentication between station and
RADIUS server while executing 802.1X mode. For some EAP
types, you have to choose a sub-item from the drop-down menu
on its right side for using together. Refer to the following
sample graphics.
User Certificate – The RADIUS server will assign a user
certificate for users. Type the characters in this box.

Validate Server Certificate - Tick this check box to validate
the server certificate for RADIUS server.
User Name - Type the certificate account for the RADIUS
server.
Domain Name - Type the domain name for the RADIUS server.
Password – Type the password for connection in WPA-PSK
mode.
Confirm Password - Type the password again to confirm it.
TTLS Identify – Type the TTLS ID for the RADIUS server.
Add – You can add a trusted CA server by clicking Add. The
following dialog will appear for you to enter a new name.
Remove – For a CA server which is not wanted, please select it
from the Trusted CA List and then click this button to delete it.
IP & Proxy Setting This setting allows you to set the IP and proxy. Please click this
button to open the following window.
Obtain an IP address automatically – Tick this check box to
get an IP address automatically for the wireless card. If you do
not tick this check box, you have to type the IP address, subnet
mask, and default gateway manually.
IP Address – Type the LAN IP address for the wireless card.
Subnet mask – Type the subnet mask for the wireless card.

Default gateway – Type the default gateway for the wireless
card.
Obtain DNS server address automatically - Tick this check
box to get a DNS server address automatically. If you do not
tick this check box, you have to type a Preferred DNS server
address and Alternative DNS server manually.
Preferred DNS server – Type the address for the primary DNS
server.
Alternate DNS server – Type the address for the secondary
DNS server.
Primary WINS - Type the IP address for the primary WINS.
Secondary WINS - Type the IP address for the secondary
WINS.
To set a proxy setting, click the ProxySetting tab. The
following window appears:
Automatically detect settings – Tick this check box to allow
the system to detect proxy settings automatically.
Use automatic configuration script – Tick this check box to
use the configuration script automatically according to the IP
address typed below.
Address - Type the LAN IP address to get the configuration
information for the proxy.
Use a proxy server for LAN – Tick this check box to enable
the proxy server to be used for the LAN.
Bypass proxy server for local address – The proxy server will
not be used for a local address if you tick this check box.
HTTP/Port – Type the proxy IP and port number used for
HTTP.
Use the same proxy server for all protocols - Tick this check

box to make all the protocols use the same proxy server.
Secure/Port – Type the proxy IP and port number for security.
FTP/Port - Type proxy IP and port number for FTP.
Gopher/Port – Type the proxy IP and port number for Gopher.
Socks/Port - Type the proxy IP and port number for Socks.
Do not use proxy server for address beginning with - Type
the heading of the IP address that you do not want to use as a
proxy server.
S
S
t
t
a
a
t
t
u
u
s
s
This tab provides connection status and hardware information for the device. To view this tab,
simply click Status on the WLAN Monitor window.
Connection Status This displays the current status of the connection.
SSID This displays the SSID of the AP that your computer is connected
to.
BSSID This displays the MAC address for the current device.
Network Type This displays the mode (Infrastructure or Ad-Hoc) that you set for
connecting to the AP.
Frequency This displays the frequency that this wireless card is using.
Channel This displays the channel being used by this wireless card.
Data Encryption This displays the encryption type of the authentication mode being
used for this wireless card.
Speed This displays the current transferring rate for the link.
Authentication State This displays the encryption status for the connection.
Signal Strength The longer the signal strength red bar, the better the connection
will be. The graph is active only when you choose Access Point as
the network type.

MAC Address This displays the MAC address for the AP or the wireless router
that the station is connected to.
Regulatory Domain This displays the Regulatory Domain for different areas. For
example, it will display ETSI (CH1~CH13) for nations in Europe,
FCC (CH1~CH11) for USA, etc.
Radio Status This displays whether the wireless card is ON or OFF.
O
O
p
p
t
t
i
i
o
o
n
n
This tab displays miscellaneous options. To view this tab, simply click Option on the WLAN
Monitor window.
Auto launch when
Windows start up
Tick this check box to launch the wireless connection when
Windows starts up. If you do not tick this check box, you must
launch the wireless connection manually.
Remember mini status
position
Tick this check box to remember and fix the position of the mini
status dialog.
Auto hide mini status
Tick this check box to hide the mini status icon that appears at
the right bottom corner of the desktop.
Set mini status always
on top
Tick this check box to set the mini status icon to be displayed on
the top of the desktop.
Enable IP Setting and
Proxy Setting in Profile
Check this box to enable IP setting and Proxy Setting in profile.
Refer to IP & Proxy Setting on page 20 for more information.
Group Roaming
You can configure several groups with different APs. The
wireless card allows the station to be roamed among different
groups of APs. Simply tick this check box to enable group
roaming.
Infrastructure and
Ad-hoc network
Infrastructure and Ad-hoc network are the common two types
for connection through wireless LAN. Click this radio button to
/