Page is loading ...

701 S. RIDGE AVENUE
TROY, OHIO 45374-0001
937 332-3000
www.hobartcorp.com
FOOD WASTE DISPOSER
MODEL
FD4-500
FORM 38477 (May 2015)

– 2 –
© HOBART CORPORATION, 2014

– 3 –
TABLE OF CONTENTS
SAFETY ............................................................................................................................................4
INSTALLATION .................................................................................................................................5
Fabricating ..................................................................................................................................5
Plumbing Connections ................................................................................................................ 5
Electrical Connections ................................................................................................................6
Grounding ...................................................................................................................................6
OPERATION ......................................................................................................................................8
Cleaning ......................................................................................................................................8
MAINTENANCE ................................................................................................................................8
Lubrication ..................................................................................................................................8
Overload Protection ....................................................................................................................8

– 4 –
Installation, Operation and Care of
MODEL FD4-500
FOOD WASTE DISPOSER
SAVE THESE INSTRUCTIONS
SAFETY
RECOGNIZE SAFETY INFORMATION
When you see this symbol on your machine or in this manual, be alert to the potential
for personal injury.
READ ALL INSTRUCTIONS
Read this owner's manual before using the machine. Failure to follow the instructions provided could result
in personal injury or equipment damage.
KEEP OUT OF REACH OF CHILDREN
This disposer is intended for commercial use only.
THIS APPLIANCE IS NOT INTENDED FOR USE BY PERSONS (INCLUDING CHILDREN) WITH
REDUCED PHYSICAL, SENSORY OR MENTAL CAPABILITIES, OR LACK OF EXPERIENCE AND
KNOWLEDGE, UNLESS THEY HAVE BEEN GIVEN SUPERVISION OR INSTRUCTION CONCERNING
USE OF THE APPLIANCE BY A PERSON RESPONSIBLE FOR THEIR SAFETY.
DO NOT PUT HANDS OR ANY IMPLEMENT IN THE DISPOSER WHILE IN OPERATION.
NEVER FEED WASTE BY HAND PAST VINYL SILVER TRAP SCRAPPING RING.
DO NOT OPERATE IF DAMAGED.
Do not install or operate this disposer if the disposer has been dropped or damaged in any manner. Contact
the nearest factory-authorized service center for examination, repair, or adjustment. (Refer to the service
list included in the Owner's Information Packet.)
DO NOT LEAVE DISPOSER UNATTENDED WHILE OPERATING.
SET THE POWER SWITCH TO OFF BEFORE CLEARING JAMS OR REMOVING OBJECTS FROM
DISPOSER.
When the disposer is wired to a Group 5 Control Panel, SHUT OFF the branch circuit main switch or
disconnect.
When the disposer is wired to a Group 6 Control Panel, TURN OFF emergency disconnect.
Use long-handled tongs or pliers to remove objects.
TO REDUCE THE RISK OF INJURY BY MATERIALS THAT MAY BE EXPELLED BY DISPOSER, DO
NOT PUT THE FOLLOWING INTO DISPOSER: drain cleaner; glass, china, or plastic; large, whole
bones; metal (bottle caps, tin cans, aluminum foil, etc); whole cornhusks.
ALWAYS KEEP VINYL SILVER TRAP SCRAPPING RING OR SINK STOPPER IN PLACE, EVEN
WHEN NOT IN USE.
This reduces the risk of objects falling into the disposer.
WHEN CLEANING KITCHEN AND DISPOSER AREA, ONLY DAMP WIPE OUTSIDE OF DISPOSER
AND CONTROLS. DO NOT AT ANY TIME HOSE DOWN THE EXTERIOR SURFACES OF THE
DISPOSER AND CONTROLS.

– 5 –
INSTALLATION
Immediately after unpacking the disposer, check for possible shipping damage. If the disposer is found
to be damaged, save the packaging material and contact the carrier within 15 days of delivery.
Prior to installation, test the electrical service to make sure that it agrees with the specications on
the disposer data plate.
Temporary support, such as blocking, must be provided for the disposer during installation to avoid
excessive stress at welded or soldered cone to table connection.
FABRICATING
1. Consult installation and connection data and installation diagrams on the following pages for
cone or sink attachment dishtable cutout sizes.
2. For cone attachment, position cone so water swirl inlet tting is nearest to operator.
3. Weld the total circumference of the cone or sink attachment to prevent leakage.
4. Smooth grind and polish to match and blend weld seams.
Do not place control mounting brackets in direct water splash areas.
PLUMBING CONNECTIONS
Plumbing connections must comply with applicable sanitary, safety, and plumbing
codes.
1. Consult installation and connection data and
installation diagrams on the following pages
for mounting, hookups, and pipe sizes.
2. Slide in, or position, disposer to connect to
waste line, avoiding as many bends, elbows,
and tees as possible.
3. Connect disposer from a
3
⁄4" IPS cold water
supply line. Install the ow control supplied
with the disposer. If the water line pressure
exceeds 60 psig, a pressure reducing valve (not
supplied) should be installed. The minimum ow
pressure for the disposer to function properly
is 16 psig. Install a shut-off valve (not supplied)
for proper servicing of the disposer.
4. All controls are supplied with a solenoid valve which must be installed in the water supply line as
shown.
5. Install a vacuum breaker according to local plumbing codes. If local plumbing codes prohibit the
use of vacuum breaker, install an air gap water inlet (not supplied) observing the local codes.
6. Secure disposer to oor using the holes provided in the feet.

– 6 –
ELECTRICAL CONNECTIONS
Electrical and grounding connections must comply with the applicable portions of
the National Electrical Code and/or other local electrical codes.
Disconnect the electrical power to the machine and follow lockout/tagout procedures.
This unit must be connected to a dedicated, acceptable motor control switch with a marked OFF
position to disconnect the appliance from all ungrounded supply conductors. The switch must be
mounted within sight of the disposer or sink opening for the disposer.
Knockouts are provided in the motor junction box for making electrical connections to the unit. Flexible
conduit should be used to permit moving the unit for periodic servicing and maintenance.
Select and follow wiring diagram, furnished with machine, applicable to your disposer and electrical
service.
Do not place control in direct water splash areas.
Follow supplied wiring schematics for all controls, solenoid valves and pre-wired custom control centers.
Size and fuse disposer branch circuit or use circuit breakers as required by motor nameplate rating.
Check that motor voltage wiring matches incoming voltage.
All conduit and ttings shall be of the NEMA 4 watertight type.
Disposers have thermal protection of the manual reset type in motor. Check that reset button is not
jammed. Check that all connections are tight, secure, and well grounded.
Disposers are designed to operate in both a clockwise and counter-clockwise direction.
Direction of rotation does not have to be considered when wiring motor.
GROUNDING
Connect disposer to a grounded metal permanent wiring system or run a disposer grounding conductor
with the circuit conductors and connect it to the disposer grounding terminal or lead on the disposer.

– 7 –
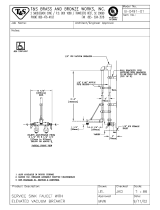
*27 3/8"
6 1/2"
34"
6 1/2"
15"
8 1/2"
9"
0"-6" FOOT
ADJUSTMENT
2" DRAIN LINE
5 1/8"
15 3/4"
* HEIGHT CAN VARY FROM 25-1/2" TO 31-3/4"

– 8 –
OPERATION
Before operating disposer make sure it is clear of foreign objects such as metal or wire clippings, screws,
nails, etc., which may have dropped into it during installation. Check the ywheel for free rotation.
Never use your hand to check rotation of ywheel or to remove foreign matter from
the dispower. Use a stick or similar object to turn the ywheel. Foreign matter can be removed
with tongs or pliers.
Start the disposer before feeding food waste. Be sure water is owing. With typical optional controls,
water ow and unit starting are simultaneous and automatic. Feed food waste into disposer. DO NOT
feed china, metal, rags, clam shells, or similar material into the unit. DO NOT put grease or oil in the
disposer. Oil or grease can clog the drain. Always allow the disposer to run for a short period after grinding
is complete to assure proper ushing of the disposer and waste line. This ushing is automatically
controlled with certain optional controls.
CLEANING
The food waste disposer should be kept in a clean and sanitary condition. Allow the disposer to run a
few minutes after disposing of all food waste to completely ush out the interior. If food waste is allowed
to accumulate due to improper clean-up, it will give off offensive odors. If this happens, cleaning can
be accomplished by using a stiff brush with a strong soap and hot water solution. Light cleaning can be
accomplished by grinding ice and a lemon through the disposer.
Do not use chemical solvents or other drain cleaning compounds through the
disposer.
MAINTENANCE
LUBRICATION
No lubrication is required for the food waste disposer. The disposer has grease packed sealed bearings
requiring no service.
OVERLOAD PROTECTION
The disposer motor is protected by a thermal, resettable overload protector and will trip if the motor is
overloaded. To reset, allow approximately ve minutes for cooling, then press the manual reset button
located on the motor shell opposite the motor junction box. An arrow on the motor shell indicates location
of the button. Restart the disposer using normal operating procedure. If overload protector continues to
trip, contact your local Hobart Service Ofce.
FORM 38477 (May 2015) PRINTED in U.S.A.
/