LiftMaster MYQ-SGC1WLM Installation guide

Type
Installation guide

LiftMaster MYQ-SGC1WLM is a smart indoor garage camera that lets you monitor your garage from anywhere using your mobile device. With its magnetic mounting base, you can easily attach it to your garage door opener or surface mount it to a wall. The camera has a wide-angle lens, ambient light sensor, microphone, and speaker, allowing you to see, hear, and speak to people in your garage. You can also receive alerts on your phone when the camera detects motion or sound. The camera comes with a one-year limited warranty.

LiftMaster MYQ-SGC1WLM is a smart indoor garage camera that lets you monitor your garage from anywhere using your mobile device. With its magnetic mounting base, you can easily attach it to your garage door opener or surface mount it to a wall. The camera has a wide-angle lens, ambient light sensor, microphone, and speaker, allowing you to see, hear, and speak to people in your garage. You can also receive alerts on your phone when the camera detects motion or sound. The camera comes with a one-year limited warranty.

MYQ-SGC1WLM
Smart Garage Camera™
Installation Guide
What's In the Box
Power
Adapter
Micro
USB
Cable
Reset Button LED
Camera Lens
Ambient Light
Sensor
Microphone
USB Input
Mounting
Screws
Magnet
Mounting
Base
Drywall Anchor
1. Connect Your Smart Garage Camera
Use the myQ®App, your mobile device, and your
router to control your Smart Garage Camera™.
Before You Start:
1. Be sure your mobile device's Wi-Fi®is on
and displays a strong signal where the
camera will sit.
2. Check that Bluetooth is enabled on your
mobile device.
3. Enable Location Services on your mobile
device.
4. Download the myQ®App.
TIP: If you already have the myQ®App,
confirm you have the latest version to
optimize your myQ®experience.
5. Create or sign in to your account.
6. Add your Smart Garage Camera™ to your
myQ®account.
2. Preparation
Check Your View Before You Mount:
lPower up the Smart Garage Camera™ in your
chosen mounting area.
lSmart Garage Camera™ is in reach of the
included 10' (3 m) Micro-USB cable and a
power outlet.
lHold the camera at your chosen mounting area,
free from visual and metal obstructions. Check
your mobile device view shows what you want
to see before you mount.
lIf using the magnetic mounting base screws for
a surface mount, mark the surface area to
install.
lPower off the Smart Garage Camera™ by
unplugging it to begin a surface mount.
See the Smart Garage Camera™ installation
video.
WARNING: This product can expose you to
chemicals including lead, which are known
to the State of California to cause cancer or
birth defects or other reproductive harm. For more
information go to www.P65Warnings.ca.gov
3. Mount the Smart Garage Camera
For Indoor Use Only
Items You May Need:
lLadder
lPhilips Screw Driver
lDrill and Drill Bit
lHammer
Choose from Options A or B:
Option A: Magnetically Set to Garage Door Opener
Smart
Garage
Camera™
1. Place the Smart Garage
Camera™ magnetic
mounting base on the
garage door opener, with
lens facing what you want
to see.
2. Wrap the cable around the
mounting base.
Option B: Surface Mount
1. Remove the
magnetic
mounting
base from the
Smart Garage
Camera™.
2. Position the
magnetic
mounting base at the desired installation
surface.
3. Insert screws provided with drywall anchors,
as needed.
4. Reassemble the Smart Garage Camera™ over
the magnetic mounting base.
5. Position the Smart Garage Camera™ with
lens facing what you want to see.
4. Connect Power
1. Power your Smart Garage Camera with the
included micro-USB power adapter and
cable. The LED lights solid white. After
approximately 40 seconds, the LED flashes
blue, blue-green, then solid green. You are
now connected.
2. From the myQ®App, tap your camera and
the live video displays.
3. Adjust the Smart Garage Camera™, twisting
the posable camera head to change the
viewing angle.
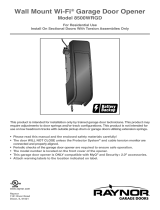
LED Status Indicators
What You See What It Means
Solid White Smart Garage Camera™ is
powering up.
Flashing Blue Ready to be set up in the myQ®
App.
Solid Blue Connected to your mobile
device. You are not yet
connected to the Internet. If this
persists after setup, check your
home router and Internet.
Flashing Blue and
Green
Connecting to Wi-Fi and
connecting to the myQ®App.
Flashing Green Connected to the router, but
there is no internet.
Solid Green Connected to the myQ®App.
Flashing Purple Receiving firmware updates.
One Year Limited Warranty
The Chamberlain Group, Inc. warrants to the first
consumer purchaser of this product that it is free
from defect in material and/or workmanship for a
period of 1 year from the date of purchase.
Software Agreement
Use of this product and the software embedded
within the product are subject to the copyright
notices, terms, and conditions accessible in the
myQ®App. Open the App Menu and select Help,
and then License and Terms of Use for more
information.
Need Help?
Go to: support.chamberlaingroup.com
NOTICE: This device complies with part 15 of the FCC rules and Innovation,
Science and Economic Development Canada license-exempt RSSs.
Operation is subject to the following two conditions: (1) this device may
not cause harmful interference, and (2) this device must accept any
interference received, including interference that may cause undesired
operation.
Any changes or modifications not expressly approved by the party
responsible for compliance could void the user’s authority to operate the
equipment.
This device must be installed to ensure a minimum 20 cm (8 in.) distance
is maintained between users/bystanders and device.
This device has been tested and found to comply with the limits for a Class
B digital device, pursuant to part 15 of the FCC rules and Industry Canada
ICES standard. These limits are designed to provide reasonable protection
against harmful interference in a residential installation. This equipment
generates, uses and can radiate radio frequency energy and, if not
installed and used in accordance with the instructions, may cause harmful
interference to radio communications. However, there is no guarantee that
interference will not occur in a particular installation. If this equipment
does cause harmful interference to radio or television reception, which
can be determined by turning the equipment off and on, the user is
encouraged to try to correct the interference by one or more of the
following measures:
lReorient or relocate the receiving antenna.
lIncrease the separation between the equipment and receiver.
lConnect the equipment into an outlet on a circuit different from that to
which the receiver is connected.
lConsult the dealer or an experienced radio/TV technician for help.
The device for operation in the band 5150-5250 MHz is only for indoor use
to reduce the potential for harmful interference to co-channel mobile
satellite systems.
© 2019 LiftMaster
All Rights Reserved
Wi-Fi®is a registered trademark of Wi-Fi Alliance
141-3899-000C
  • Page 1 1
  • Page 2 2

LiftMaster MYQ-SGC1WLM Installation guide

Type
Installation guide

LiftMaster MYQ-SGC1WLM is a smart indoor garage camera that lets you monitor your garage from anywhere using your mobile device. With its magnetic mounting base, you can easily attach it to your garage door opener or surface mount it to a wall. The camera has a wide-angle lens, ambient light sensor, microphone, and speaker, allowing you to see, hear, and speak to people in your garage. You can also receive alerts on your phone when the camera detects motion or sound. The camera comes with a one-year limited warranty.

Ask a question and I''ll find the answer in the document

Finding information in a document is now easier with AI