Goldair GPPAC400 Hot Cold Portable Air Conditioner Wifi Operating instructions
- Category
- Mobile air conditioners
- Type
- Operating instructions
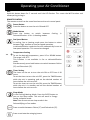
Goldair GPPAC400 Hot Cold Portable Air Conditioner Wifi is a versatile appliance that can cool, heat, and dehumidify your home or office space. With its adjustable fan speed and oscillating louvres, you can customize your comfort level. The unit also features a sleep mode, a 24-hour timer, and a remote control for added convenience.
Goldair GPPAC400 Hot Cold Portable Air Conditioner Wifi is a versatile appliance that can cool, heat, and dehumidify your home or office space. With its adjustable fan speed and oscillating louvres, you can customize your comfort level. The unit also features a sleep mode, a 24-hour timer, and a remote control for added convenience.


-
 1
1
-
 2
2
-
 3
3
-
 4
4
-
 5
5
-
 6
6
-
 7
7
-
 8
8
-
 9
9
-
 10
10
-
 11
11
-
 12
12
-
 13
13
-
 14
14
-
 15
15
-
 16
16


Goldair GPPAC400 Hot Cold Portable Air Conditioner Wifi Operating instructions
- Category
- Mobile air conditioners
- Type
- Operating instructions
Goldair GPPAC400 Hot Cold Portable Air Conditioner Wifi is a versatile appliance that can cool, heat, and dehumidify your home or office space. With its adjustable fan speed and oscillating louvres, you can customize your comfort level. The unit also features a sleep mode, a 24-hour timer, and a remote control for added convenience.
Ask a question and I''ll find the answer in the document
Finding information in a document is now easier with AI
Related papers
-
Goldair GCT330 User manual
-
-
-
Goldair GCPAC12 User manual
-
Goldair GCPAC110 User manual
-
Goldair vGCPAC350 3.5kW Portable Air Conditioner User manual
-
-
Goldair GCPAC07 User manual
-
Goldair GCPAC200 User manual
-
Other documents
-
Celsius CELHV145 User manual
-
Celsius CELAC250 Operating instructions
-
 GYMAX FP10115US-WH User manual
-
Celsius CELEV60 600ml Evaporative Cooler Operating instructions
-
 Germanica GPA33KW User manual
-
Kmart 43262854 User manual
-
-
Kmart HEG LF-01 User manual
-
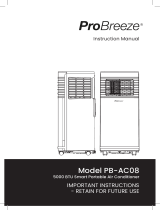 Pro Breeze PB-AC08-UK-FBA User manual
-
German pool EFB-226-SC User manual


