Bath
Installation Instructions
Quality Acrylic Baths
Manufactured in the UK
Bath
Installation Instructions
04
Year
Guarantee
25
– Prior to tting your bath, carefully remove all the
packaging and lm from the bath and examine the bath
for damage and suitability of colour match.
– Check the panel t and match prior to installation.
– Note instruction 10 before nal xing.
– Any rexing costs or claims for wrong colour match,
and/or any other faults will not be accepted after xing.
No claims for the above will be accepted once the
bath is tted
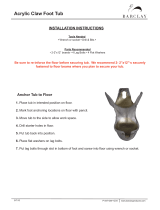
Centre Support
Align Cradle
Leg Toggle
Wall Fixing Bracket
1. Remove all packaging including the polyethylene lm, which
covers the entire bath.
2. Check that colour match is acceptable and that there is no
damage on the bath that may have occurred during transit.
This can only be done if the lm is removed completely.
3. Remove the two tubular cradle legs from the bath frame
(keep the screws for instruction 5).
4. If required using the 23mm xing screws attach the black
housing socket to the bath frame.
5. Align the cradle and hand screw directly into the baseboard
using the 32mm (1 ¼”) screws from instructions 3. YOU
MUST CHECK THE SCREW LENGTH – Should the bath have
an ‘H’ frame tted to the baseboard align and secure cradle
to it. If the cradle stands proud of the baseboard it can be
shortened using a hacksaw.
6. Once the cradles have been secured to the baseboard of the
bath secure them into the legs toggles with the self tapping
screw provided making sure the self tapping screw pierces the
steel leg. This will be easier if pre-drilled with a 3.2mm bit.
7. Secure the adjustable M10 feet to the cradles using M10
nuts provided.
8. Secure the adjustable centre support using screw and nuts
provided to the centre of the baseboard (or ‘H’ frame).
9. With the bath in the upright position set top face level using
threaded adjustment of feet and lock-nuts. When a panel is
to be tted set bath height to height of panel.
10. CHECK THAT THE BATH RIM IS LEVEL.
11. Before the nal xing of the bath, t tap and waste ttings using
a suitable sealing compound. When complete place bath into
position, re-check levels and make any nal adjustments
necessary. Finally secure the feet to the oor and the wall
brackets to the wall. Movement may occur if not tted correctly.
Bath tting instructions
Made in UK