Zenith SRV1300S Operating Manual & Warranty
- Category
- Cassette players
- Type
- Operating Manual & Warranty

Operating Guide
& Warranty
....'""___:_:_%!!!!!ii!iiiiiiiiiiiiiiiiiiiiiiiiiiiii.i:i.
13" ColorTV/VCR Combination
SRV1300S

[WARNIN, .' ...................................................... 1
TO REDUCE THE RISK OF' FIRE OR ELEC'I'RIC SHOCK, DO NOT EXPOSE THIS APPLIANCE TO RAIN OR
MOISTURE.
CAUTIONi TO REDUCE THE RISK OF ELECTRIC-
SHOCK, DO NOT REMOVE COVER (OR BACK) NO
USER SERVICEABLE PARTS INSIDE. REFER
SERVICING TO QUALIFIED SERVICE PERSON-
NEL.
THIS SYMBOL INDICATES THAT DAN-
GEROUS VOLTAGE CONSTITUTING A
RISK OF ELECTRIC SHOCK IS PRESENT
WITHIN THIS UNIT.
THIS SYMBOL INDICATES THAT
THERE ARE IMPORTANT OPERATING
AND MAINTENANCE INSTRUCTIONS
IN THE LITERATURE ACCOMPANYING
THE APPLIANCE.
The important note is located on the rear of the cabinet.
IMPORTANT SAFEGUARDS
1. Read instructions-All the safety and operating instruc-
tions should be read before the appliance is operated.
2. Retain Instructions-The safety and operating instruc-
tions should be retained for future reference.
3. Heed Warnings-All warnings on the appliance and inthe
operating instructions should be adhered to.
4. Follow Instructions-All operating and use instructions
should be followed.
5. Cleaning-Unplug TVNCR from the wall outlet before
cleaning. Do not use liquid cleaners or aerosol cleaners.
Use a damp cloth for cleaning.
EXCEPTION: A product that is meant for uninter-
rupted service and, thatfor some specific reason, such as
the possibility of the loss of an authorization code for a
CATV converter, is not intended to be unplugged by the
user for cleaning or any other purpose, may exclude the
reference to unplugging the appliance in the cleaning
description otherwise required in item 5.
6. Attachments-Do not use attachments not recommended
by the TV/VCR manufacturer as they may cause hazards.
7. Water and Moisture-Do not use this TV/VCR near
water-for example, near a bath tub, wash bowl, kitchen
sink, or laundry tub, in a wet basement, or near a swim-
ming pool, and the like.
8. Accessories-Do not place this TV/VCR on an unstable
cart, stand, tripod, bracket, or table. The TV/VCR may
fall, causing serious injury to someone, and serious dam-
age to the appliance. Use only with a cart, stand, tripod,
bracket, or table recommended
by the manufacturer, or sold with
the TV/VCR. Any mounting of PORTABLECARTWARNING
the applianceshould follow the _l_
manufacturer's instructions and
should use a mounting accessory
recommended by the manufac-
turer. An appliance and cart com-
bination should be moved with
care.
9.
Quick stops, excessive force, and uneven surfaces may
cause the appliance and cart combination to overturn.
Ventilation-Slots and openings in the cabinet and the
back or bottom are provided for ventilation and to ensure
reliable operation of the TV/VCR and to protect it from
overheating, these openings must not be blocked or cov-
ered. The openings should never be blocked by placing
the TV/VCR on a bed, sofa, rug, or other similar surface.
This TV/VCR should never be placed near or over a
radiator or heat register. This TV/VCR should not be
placed in a built-in installation such as a bookcase or rack
unless proper ventilation is provided or the manufac-
turer's instructions have been adhered to.
10. Power Sources-This TV/VCR should be operated only
from the type of power source indicated on the marking
label. If you are not sure of the type of power supply to
your home, consult your appliance dealer or local power
company. For TV/VCRs intended to operate from battery
power, or other sources, refer to the operating instructions.
II. Grounding or Polarization-This TV/VCR is equipped
with a polarized alternating-current line plug(a plug hav-
ing one blade wider than the other). This plug will fit into
the power outlet only one way. This is a safety feature. If
you are unable to insert the plug fully into the outlet, try
reversing the plug. If the plug should still fail to fit, contact
your electrician to replace your obsolete outlet. Do not
defeat the safety purpose of the polarized plug.
12. Power-Cord Protection-Power-supply cords should be
routed so that they are not likely to be walked on or
pinched by items placed upon or against them, paying
particular attention to cords at plugs, convenience recep-
tacles, and the point where they exit from the appliance.
-2-
EN
_.k _r_-k 5B13

F IL_U HI-- A
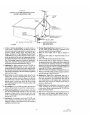
EXAMPLE OF ANTENNA GROUNDING AS PER
NATIONAL ELECTRICAL CODE
ANILNNA
LEAD IN
WIRE
• ANTENNA
DISCHARGE UNI_
(NEC SECTION 810-201
NEC - NATIONAL ELECTRICAL CODE
$2898A
13. Outdoor Antenna grounding-If an outside antenna or
cable system is connected to the TV/VCR, be sure the
antenna orcable system is grounded so as to provide some
protection against voltage surges and built-up static
charges. Article 810 of the National Electrical Code,
ANSI/NFPA No. 70, provides information with respect to
proper grounding of the mast and supporting structure,
grounding of thelead-in wire toan antenna discharge unit,
size of grounding conductors, location of antenna-dis-
charge unit, connection to grounding electrodes, and re-
quirements for the grounding electrode. (Fig. A)
14. Lightning-For added protection for this TV/VCR re-
ceiver during a lightning storm, or when it is left unat-
tended and unused for long periods of time, unplug it from
the wall outlet and disconnect the antenna or cable system.
This will prevent damage to the TV/VCR due to lightning
and power-line surges.
15. Power Lines-An outside antenna system should not be
located in the vicinity of overhead power lines or other
electric light or power circuits, or where it can fall into
such power lines or circuits. When installing an outside
antenna system, extreme care should be taken to keep
from touching such power lines or circuits as contact with
them might be fatal.
16. Overloadlng-Do not overload wall outlets and extension
cords as this can result in a risk of fire or electric shock.
17. Object and Liquid Entry-Never push objects of any kind
into this TV/VCR through openings as they may touch
dangerous voltage points or short out parts that could
result in a fire or electric shock. Never spill liquid of any
kind on the TV/VCR.
18. Servicing-Do not attempt to service this TV/VCR your-
self as opening or removing covers may expose you to
dangerous voltage or other hazards. Refer all servicing to
qualified service personnel.
= GROUNDING CONDUCTORS
(NEC SECTION 810-21)
GROUND CLAMPS
POWER SERVICE GROUNDING
.-'_"--_l--''-" ELECTRODE SYSTEM
(NEC ART 250, PART H)
19. Damage Requiring Service-Unplug this TV/VCR from
the wall outlet and refer servicing to qualified service
personnel under the following conditions:
a. When the power-supply cord or plug is damaged or
frayed.
b. If liquid has been spilled, or objects have fallen into the
TV/VCR.
c. If the TV/VCR has been exposed to rain or water.
d. If the TV/VCR does not operate normally by following
the operating instructions. Adjust only those controls that
are covered by the operating instructions, as improper
adjustment of other controls may result in damage and will
often require extensive work by a qualified technician to
restore the TV/VCR to its normal operation.
e. If the TV/VCR has been dropped or damaged in any way.
f. When the TV/VCR exhibits a distinct change in perform-
ance-this indicates a need for service.
20. Replacement Parts-When replacement parts are re-
quired, be sure the service technician has used replace-
ment parts specified by the manufacturer that have the
same characteristics as the original part. Unauthorized
substitutions may result in fire, electric shock, injury to
persons or other hazards.
2 I. Safety Check-Upon completion of any service or repairs
to this TV/VCR, ask the service technician to perform
routine safety checks to determine that the TV/VCR is in
proper operating condition.
22. Heat-This TV/VCR product should be situated away from
heat sources such as radiators, heat registers, stoves, or
other products (including amplifiers) that produce heat.
- 3 - EN
.It-k,, -k,_ 5C22

TABLE OF CONTENTS
IMPORTANT SAFEGUARDS ................................ 2
PRECAUTIONS ........................................................ 5
LOCATION .......................................................... 5
AVOID THE HAZARDS OF
ELECTRICAL SHOCK AND FIRE .................... 5
WARNING ........................................................... 5
FEATURES ............................................................... 6
SUPPLIED ACCESSORIES ..................................... 6
VIDEO CASSETTE .................................................. 7
OPERATING CONTROLS AND FUNCTIONS ..... 8
REMOTE CONTROL OPERATION ..................... 10
INSTALLING THE BATrERIES ..................... 11
ANTENNA CONNECTIONS ................................ 12
VHF/UHF COMBINED ANTENNA ................ 12
VHF/UHF SEPARATE ANTENNAS ............... 12
CABLE WITHOUT
CONVERTER/DESCRAMBLER BOX ............ 12
CABLE WITH
CONVERTER/DESCRAMBLER BOX ............ 13
EXTERNAL INPUT MODE .............................. 13
TV/CATV CHANNEL MEMORY PROGRAM-
MING ....................................................................... 14
SETI'ING THE CLOCK ......................................... 16
AUTO CLOCK SETrlNG ................................. 16
MANUAL CLOCK SETI'ING .......................... 17
TV OPERATION .................................................... 18
GAME MODE .................................................... 18
PICTURE CONTROL ........................................ 18
CLOSED CAPTION SYSTEM ......................... 19
PLAYBACK ............................................................ 20
SPECIAL PLAYBACK ........................................... 21
RENTAL PLAY .................................................. 21
AUTO REPEAT PLAYBACK ........................... 21
COUNTER MEMORY ............................................ 22
TIME SEARCH ....................................................... 23
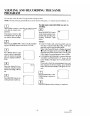
VIEWING AND RECORDING THE SAME
PROGRAM .............................................................. 24
OTR (ONE TOUCH RECORDING) ....................... 25
AUTOMATIC TIMER RECORDING .................... 26
QUICK SET PROGRAM ........................................ 28
SPECIAL FEATURES ............................................ 30
DEGAUSSING .................................................... 30
AUTO REWIND-EJECT .................................... 30
TRACKING ADJUSTMENT ............................. 30
TO CHANGE THE LANGUAGE ...................... 30
SETTING THE SLEEP TIMER ......................... 30
SETTING THE ALARM TIMER ...................... 31
TROUBLESHOOTING GUIDE ............................. 32
MAINTENANCE ..................................................... 33
SERVICING ........................................................ 33
CABINET CLEANING ...................................... 33
HEAD CLEANING ............................................ 33
SPECIFICATIONS .................................................. 34
GENERAL SPECIFICATIONS ......................... 34
ELECTRICAL SPECIFICATIONS .................... 34
OTHER SPECIFICATIONS ............................... 34
-4- EN
•&,k,k_ _ 5D05

PRECAUTIONS
Forsafe opclation and 5atisfactory performance of youx
unit, keep the following in mind when selecting a place
for its installation:
• Shield it from direct sunlight and keep it away from
sources of intense heat.
• Avoid dusty or humid places.
• Avoid places with insufficient ventilation for proper
heat dissipation. Do not block the ventilation holes
at the top and bottom of the unit. Do not place the
unit on a carpet because this will block the ventila-
tion holes.
• Install unit in a horizontal position.
• Avoid locations subject to strong vibration.
• Do not place the unit near strong magnetic fields.
• Do not move the unit from a cold to a hot place or
vice versa.
• Do not handle the power cord with wet hands.
• Do not pull on the power cord when disconnecting
it from an AC wall outlet. Grasp it by the plug.
• If, by accident, water is spilled on your unit, unplug
the power cord immediately and take the unit to an
authorized Sears service center for servicing.
• Do not put your fingers or objects into the TV/VCR
cassette holder.
• Do not place anything directly on top of the unit.
Moisture condensation may occur inside the unit when
it is moved from a cold place to a warm place, or after
heating a cold room or under conditions of high humid-
ity. Ifa tape is played in a TV/VCR which has moisture,
it may damage the tape and TV/VCR. Therefore when
the condensation occurs inside the unit turn the
POWER button on and allow at least 2 hours for the
unit to dry out.
FCC WARNING- This equipment may generate or use radio frequency energy. Changes or modifications
to this equipment may cause harmful interference unless the modifications are expressly approved in the
instruction manual. The user could lose the authority to operate this equipment ifan unauthorized change
or modification is made.
IMPORTANT COPYRIGHT INFORMATION
Unauthorized recording or use of broadcast television programming, video tape, film or other copyrighted
material may violate applicable copyright laws. We assume no responsibility for the unauthorized duplication,
use or other acts which infringe upon the rights of copyright owners.
The serial number of this product may be found on the back of the unit. No others have the same serial number
as yours. You should record the number and other vital information here and retain this book as a permanent record
of your purchase to aid identification in case of theft.
Date of Purchase
Dealer Purchase from
Dealer Address
Dealer Phone No.
Model No.
Serial No.
- 5 - EN
_r_ Or'Or_ 5D05

FEATURES
• Auto Power On and Off system-
Automatically turns the TV/VCR on as you insert
the cassette turnsoff after auto-rewind, and ejects
when the beginning of the tape is reached.
• OnScreen Programming- All majoroperating
and programming functions appear on your
TV/VCRscreen foroperatingconvenience.
• Bilingual on screen menu display selectable
in English or Spanish
• Auto Clock Setting- Allows you to use the clock
program of the PBS broadcast.
• Infrared Remote control unit- Allows you to
use most of the controls from a remote location.
• 181 Channel Capability PLL Frequency Syn-
thesizer Tuner with Direct Channel Entry-
(A CATV Box may be necessary to view scrambled
CATV channels.)
• Game Mode- Allows TV/VCR display to be suit-
able for use with a TV game.
• CCS (Closed Caption System)- You may
view specially labeled(cc) TV programs,movies,
news,prerecordedtapes,etc.with eithera dialogue
captionor textdisplayaddedtotheprogram.
• Three Different Record/Playback Speed-
Select SP mode (Standardplay), LP mode (Long
play)andSLPmode(Superlongplay)for uptoeight
hoursof recording/playback with a T-160 tape.
• Automatic Playback Speed Selection-
Automatically selects the proper playback speed
even if you select a different speed.
• Visual Search- Allows you to view a video tape
at a high speed in either a forward or reverse direc-
tion.
• STILL- "Freeze" the picture at any time, for close
viewing of a particular scene.
• Rental Play Mode- Improves playback picture
quality of worn tapes, especially rental tapes.
• Auto Repeat Playback- Allows you to repeat a
tape indefinitely without using the PLAY button.
You can select all feature(that repeat playback from
the beginning tothe end of the tape) orblank feature
(that repeat only recorded part,not blank pan).
• Time Search- Allows you to set the TV/VCR to
advance the tape by entering the desired playback
time you want to skip.
• OTR (One Touch Recording)- Automatic
timed recording from 30 to 480 minutes is possible
at the push of OTR button. (Timer adjustments for
recording are not required.)
• 1 Year, 8 Events Timer (including Today,
Daily and Weekly Timer Recording)- T h e
built-in timer allows you to record up to 7 programs
at different times on different channels up to 1 year
in advance. The Quick Set Program feature uses pro-
gram number 8. The daily timer will allow record-
ings to be made of daily broadcasts and the weekly
timer will allow recording to be made once a week
up to the end of the tape.
• Quick Set Program- Allows you to easily re-
cord oneprogramwithin thenext24 hours.
• Sleep Timer- Allows youtoturnoff theTV/VCR
without using the POWER button after a desired
time period.
• Alarm Function- Allows you to turn on the
TV/VCR without using the POWER button at a de-
sired time.
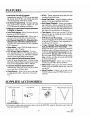
SUPPLIED ACCESSORIES
Remote Control Unit
D
PART NO.
(UREMT31MM005)
2 AA Batteries
Matching Adapter
(300ohm -75ohm)
VHF/UHF Dipole Antenna
• If you need to replace these accessories, please refer to the PART NO. under the illustrations and contact the
Sears parts department for ordering.
- 6 - EN
"k'k'A'_ 5DI I

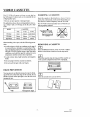
VIDEO CASSETTE
This TV/VCR will operate with any cassette that has
the VHS mark. For best results we recommend the use
of high-quality tapes.
• Do not use poor quality or damaged tapes.
The table below shows the recording/playback time us-
ing a T-60, T-120 or T-160 tape in the SP, LP or SLP
mode.
MODE
SP Mode
LPMode
SLPMode
T-60
1 hour
2 hours
3 hours
CASSE'Iq'E
T-120 T-160
2 hours 2-2/3 hours
4 hours 5-1/3 hours
6 hours 8 hours
INSERTING A CASSETTE
Insert the cassette in the direction as shown. Push in
gently, but continuously, on the center-back of the cas-
sette until it is drawn completely into the TV/VCR.
The TV/VCR will automatically turn on when the cas-
sette is properly inserted.
CORRECT ,,#- "_
WRONG
When handling video tapes, take the following precau-
tions:
• Avoid moisture, which can condense on the tape if
it is moved from a cold place to a warm place. Play-
inga tape that has moisture in it will damage the tape
and your TV/VCR. Before using a tape with these
conditions, wait until the tape has warmed to room
temperature and the moisture has evaporated.
• Avoid extreme heat, high humidity and magnetic
fields.
• Do not tamper with the cassette mechanism.
• Do not touch the tape with your fingers.
ERASE PREVENTION
You may prevent accidental erasing of a tape by break-
ing off the tab on the back edge of the cassette. If you
decide to record on the tape again, cover the hole with
transparent tape.
REMOVING A CASSETTE
Press STOP/EJECT button on the TV/VCR or EJECT
button on the remote control unit in the stop mode.
When the cassette stops moving, pull the cassette out
of the cassette compartment and store it properly.
Store the cassette in its case as shown.
\Tab
Transparent Tape
- 7 - EN
_ _ or.-* 5D05

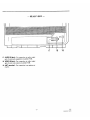
OPERATING CONTROLS AND FUNCTIONS
FRONT VIEW
2 1011 12 131415 16
m m
3456 789
i
|
1 VIDEO IN jack- For connection to video output
jack of your video camera or another VCR.
2 AUDIO IN jack- For connection to audio output
jack of your audio equipment or another VCR.
3 REC indicator- Lights up when recording.
4 TIMER REC indicator- Lights up in the Timer
Recordingmode.
5 POWER button- Pressto tum TV/VCR on and
off. Press to activate the automatic timer recording.
6 STOP/EJECT button- Press to stop tape mo-
tion. Press again to remove tape from TV/VCR.
7 REW button- Press to rewind tape, or to view
video in reverse during the Play mode at a faster than
normal speed. Press PLAY button to return
TV/VCR to normal playback speed.
8 PLAY button- Press to begin playback of a tape.
9 F.FWD button- Press to advance tape, or to view
video in forward during Play mode at a faster than
normal speed. Press PLAY button to return
TV/VCR to normal playback speed.
10 REC/OTR button- Press to begin manual record-
ing. Press again to activate One Touch Recording.
11 VOLUME • button- Press to decrease the vol-
ume level.
DELETE function- Press to cancel Quick Set
Program.
12 VOLUME • button- Press to increase the vol-
ume level.
SELECTfunction- Press to select the next step
when setting Quick Set Program.
13 CHANNEL &Iv buttons- Press to select the
channel for viewing or recording.
TRACKING ÷/- function- Press to minimize
video 'noise' (lines or dots on screen) during the
Play mode.
SET function - Press to adjust time using v or ^
button in the Quick Set Program.
14 Cassette Compartment
15 MONITOR button- Pressto turn the TV/VCR
screen on and off when in the Recording mode.
Quick Set Program function-
Press to set Quick Set Program.
16 EARPHONE jack- For connection to earphone
(not supplied) for personal listening. The size of jack
is 1/8" monaural (3.5mm).
-8-

-- REAR VIEW --
/
: ii !i ii ii ii ii ii ii ii
i L ,, .... ,, ,, ,, ,, ,, ,.
17 18 19
/
17 AUDIO IN jack- For connection to audio output
jack of your audio equipment or another VCR.
18 VIDEO IN jack- For connection to video output
jack of your video camera or another VCR.
19 ANT. terminal- For connection to an antenna or
CATV.
- 9 - EN
,_ _r _r-k * 5D05

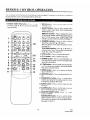
REMOTE CONTROL OPERATION
You can opcratc most of functions from the Remote Control (included). The buttons on the Rome)to Control have
the same functions as the corresponding buttons on the unit.
II_OI_rA_O] Le_3_!R_tl_[O_b'_[KO]_JU_O_
POWER/TIMER REC button- l'rt:,,,_ tt) tul, 2
TV/VCR on and off. Press to activatc the automatic
timer recording. 3
2
3
4
.ENU| 4 5 6
SELECt/ 7 8 9
- lcJ c3
_,C.A.i_--- 0 +100
-19
STOP •
5
PLAY•
6 ----
®REW F._D_
SPEED /STILL
-17
r- COUNTER
RESET MEMORY
__
10
11
--15
14
-13
12
J
12
13
14
MENU buttol=- t'rc_ to th_lAay Lllam,=clio tmthe
TV/VCR screen.
SELECT button- Press to select setting modes
(clock, counter, tape speed, timer programming,
channel preset, etc.).
DISPLAY function- Press to display the counter
or the current channel number and current time on
the TV/VCR screen. (See "CHECKING THE
COUNT, CLOCK AND CHANNEL NUMBER")
4 CHANNEL buttons-Press to select desired
channel by using either • or • button.
They may also be used to adjust the picture control.
(See page 18.)
TRACKING function- Press • or • button to
minimize video 'noise' (lines or dots on screen) dur-
ing the Play mode. (See page 30.)
5 STOP button- Press to stop the tape motion.
6 PLAY button- Press to playback the tape.
7 REWIND button- Press to rewind the tape, or to
view the picture rapidly in reverse during the Play
mode. (Rewind Search)
8 F.FWD button- Press to rapidly advance the tape,
or to view the picture rapidly in forward during the
Play mode. (Forward Search)
9 SPEED button- Press to set desired recording
speed. (SP/LP/SLP)
10 RECORD button- Press to begin manual record-
ing.
11 PAUSE/STILL button-Press to temporarily
stop the tape during the Recording mode or to view
a still picture during the Play mode.
EJECT button- Press to remove tape from the
TV/VCR.
ALARM button-Press to set the time to turn on
the TV/VCR automatically. (See page 31.)
COUNTER RESET button- Press to reset
counter to 0:00:00.
ADD/DELETE button- Press to add or delete
channel numbers. Press to cancel a timer program.
(This function is operative only in the Menu mode.)
(See pages 15 and 27.)
-10-
EN
_'_ 5D05

15 COUNTER MEMORY button- Press to use the
Counter Memory mode. (See page 22.)
16 MUTE button- Press to mute sound. Press it again
to resume sound.
17 SLEEP button- Press to activate the sleep timer
function. (See page 30.)
18 VOL buttons- Press to adjust desired volume
level by using either • or • button.
19 NUMBER buttons- Press to select desired chan-
nels and select item in the Menu mode. They cannot
be used to set desired channel during Timer Record-
ing. To select channels 1to 9, first press the 0button
and then 1 to 9.
+100 button-Press to select cable channels
which are equal or greater than number 100.
Slide the battery conipartmcnt cover by pressing the
cover on the remote unit in the direction of the arrow.
Insert 2 "AA" batteries into the battery compartment in
the direction as indicated by the polarity (+/-) markings.
J
Replace the cover.
-11 - EN
**_r*cr 5D05

ANTENNA CONNECTIONS
vtWIIIIIJIIi[I(l_ _.I_iiII_,l_,_1
The VHF/UHF Dipole Antmma (,supplied) is detach-
able. Push the stem of the antenna into the hole which
is located on the upper back cabinet of the unit.
Connect the VHF/UHF Dipole Antenna or VHF/UHF
Combination Antenna to the ANT. terminal of the
TV/VCR as shown in the diagram below.
,Antenna
VHF/UHF
CombinationAntenna
In some areas it will be necessary to use an outdoor
antenna.
VHF Antenna UHF Antenna
I-IIjW
2
"°'suit2
flDEOIN 0 '_ Fiat_,4_,;_a0
For the best reception, extend the VHF/UHF Dipole
Antenna fully and adjust its position. (Avoid handling
the top section when making adjustments.)
Usc this ctnmcction il yore cable system commcts di-
rectly to your TV/VCR without a converter box.
With this connection you, 1)can use your TV/VCR Re-
mote Control to select channels, 2) program one or
more unscrambled channels for Automatic Timer Re-
cording.
From Cable System
75-ohm
Coaxial Cable
(not supplied)
AUDIO IN _ ANT.
VIDEO IN 5 _i_
Ill/_I,i_i_I Ili
Note to CATV system installer
This reminder is provided to call the CATV system installer's attention to Article 820-40 of the NEC that
provides guidelines for proper grounding and, in particular, specifies that the cable ground shall be connected
to the grounding system of the building as close to the point of cable entry as practical.
- 12 - EN
_'lk'_ Jr 5D11

If your cable service supplies you with a converter box
you can use the basic connection shown here.
With this connection you can record and view any chan-
nel, including scrambled channels. However, channel
selection must be made with the converter box. This
means that channels cannot be changed using the
TV/VCR Remote Control. Unattended recording is
limited to one channel at a time.
TO RECORD AND VIEW A SCRAMBLED/UN-
SCRAMBLED CHANNEL
1. Set the TV/VCR channel selector to theoutputchan-
nel of the Cable Converter Box. (Ex. CH3)
2. Select the channel to be recorded or viewed on the
Cable Converter Box.
From Cable
| ._ System
lee_ I ,Nl!OableBox
_(not supplied)
75-ohm l llllll3111111 I
Coaxial Cable __.:__---' --'_.
(not supplied) II 11
AUDIO IN
VIDEO IN
NOTE: When using a cable converter box, you can not
record one channel and view.
When using an external input signal another VCR or
camcorder, connect the player's audio/video output ca-
bles to the AUDIO IN,
VIDEO IN jacks of your AUX
TV/VCR. Then press
CHANNEL • or • button
or enter "00" with number
button so that AUX appears
on the screen.
TO COPY A VIDEO CASSETTE
(Requires another VCR)
Connect your TV/VCR and a Source (Playing) VCR
using the following diagram, using the jacks on the
back of the TV/VCR or on the front of the TV/VCR
(priority):
1. Insert a pre-recorded video cassette into the Source
(Playing) VCR.
2. Insert a blank video cassette, or one you want to re-
cord over, into the TV/VCR's cassette compart-
ment.
3. Press SPEED button on the remote control to select
the desired recording speed (SP, LP or SLP).
4. Press CHANNEL • or • button repeatedly so that
"AUX" appears on the screen.
5. Begin playback of the tape in the Source (Playing)
VCR.
6. Press RECORD button on the TV/VCR.
NOTE: For best results during dubbing, use the
TV/VCR's front panel controls whenever possible. The
remote control might affect the Source (Playing) VCR's
playback operation.
[Back of the TV/VCR]
_UDtO _NQ_
[Source
(P ay, g)III
VCR]
AudioNideo
adapter cord
(not supplied)
AudioNideo adapter
cord (not supplied)
[Front of the TV/VCR]
-13-

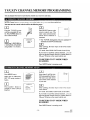
TV/CATV CHANNEL MEMORY PROGRAMMING
You can program the tuner to scan only the channels you receive in your area.
NOTE: Channel memo[ y pro_Jalnllllllg is l|ot nccded who, using ,tconvcrtcr/descrambler box.
You must use the remote control unit for the following steps:
Plug the TV/VCR power
cord into a standard AC out-
let. Press POWER button to
turn on the TV/VCR.
Select item 1 (ENGLISH) or
2 (ESPAlqOL=SPANISH)
using number 1 or 2 button.
- lANGUAGE 8ELECT -
1 ENGUSH ON
2 ESPAJ(IOL
I-- OH01
Press SELECT button on the
remote control unit. The
tuner scans and memorizes
all the active channels in
your area.
• The TV/VCR distinguishes between standard TV
channels and CATV automatically.
After scanning, the tuner stops on the lowest memo-
rized channel.
(TV mode: from CH 02/CATV mode: from CH 01 )
If you want to recall the selected channels, you can
select the desired channel directly by number button or
CH • or • button on the remote control unit.
TO RETURN TO TV MODE WHEN
SCANNING
Press MENU button in scanning mode.
IKI] IT_l_l [iJ_lfi_ll I_ii_O_q_ _TI_I l_l _.__1
Press MENU button.
Select item 4 (CHANNEL
SET UP) using number 4
button.
Press number ! button re-
peatedly to select [TV] or
[CATV].
-MENU-
1 TIMER PROG_MING
2 PIC'PJRECO_TROL
_SETTINGCLOCK
CHANNELSETUP
LANGUAGESELECT
_MESEARCH
U$ER'SSETUP
CCO SELECT
- CHANNEL SET UP -
I IV/C,6,TV [ "IV )
2 AUTO PRESET
3 ADD/DELETE CH
Select item 2 (AUTO PRE- CH02
SET) using number 2 button.
The tuner scans and memo-
rizes all the active channels
in your area.
After scanning, the tuner stops on the lowest memo-
rized channel.
(TV mode: from CH02 / CATV mode: from CH01)
If you want to recall the selected channels, you can
select the desired channel directly by number button or
CH • or • button on the remote control unit.
TO RETURN TO TV MODE WHEN
SCANNING
Press MENU button in scanning mode.
- 14- EN
*Jr*'** 5D05

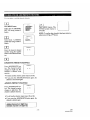
You can delete t)_ add the desired channels.
Press MENU button.
Select item 4 (CHANNEL
SET UP) using number 4
button.
-MENU-
I TIMER pROGRAMMING
2 PICllJRE CONTRC{.
3 SETTING CLC, CK
4 CHANNEL SET UP
$ LANGUAGE SELECT
6 l'_4E SEARCh1
7 USER'S SET UP
8 CCO SELECT
Select item 3 (ADD/DE-
LETE CH) using number 3
button.
- CHANNEL SETUP -
I TV;CATV i _/ |
2 AUTOPRESET
3 AD_DELE_IECH
I ADD4)ELE TE CH
Enter the desired channel .. o,_
number using the number
button or the CH • or• but-
ton.
DELETING PRESET CHANNEL
t'-
Press ADD/DELETE but- / ........
ton. The channel number l _ _''
changes to light red. The
channel is deleted from
memory.
• To delete another channel, repeat steps [3] and [4].
• If you press the ADD/DELETE button again, the
channel is memorized again.
ADDING PRESET CHANNEL
Press ADD/DELETE but- [ .......
ton. The channel number [ _ _
changes to light blue. The
channel is added to memory.
• To add another channel, repeat steps [3] and [4].
• If you press the ADD/DELETE button again, the
channel is deleted again.
Added channel is in light blue.
Deleted channel is in light red.
Press MENU button. The
TV/VCR screen returns to
TV mode.
NOTE: To confirm that channel(s) has been deleted or
added, press CH • or • button.
- 15 - EN
****.5_5

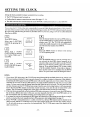
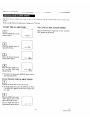
SETTING THE CLOCK
Setting the clock accurately for proper automatic timer recording.
• The TV/VCR power must be turned on.
• Confirm that the antenna connections are correct (See page 12 - 13).
• The cable converter box must be turned on if your TV/VCR is connected directly to it. (See HINT #4)
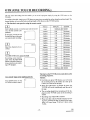
You can have tile IV/VCR set the clock automatically by using the Public Broadcasting Station (PBS) chanl_cl ill
your area. Once you have set the clock by using the following procedure, the TV/VCR will automatically monitor
the correct time and date being broadcast by the PBS station in your area, using a new service called Extended
Data Service (EDS).
EEl
I 1............
Press MENU button. , ........ ,_]
Select item 3 (SETTING ........... ET
CLOCK) by pressing the 3 ........... SET
button.
Cg!
Select item 1 (AUTO
CLOCK [ON]) by pressing
the 1 button. Make sure it
says [ON].
Select item 2 (AUTO
CLOCK CH SET) by press-
ing the 2 button.
- SETTING CLOCK - 1
J
1 AUTOCLOCK [ONI
2 AUTO CLOCK CH SET
3 MANUAL CLOCK SET
1
AUTO CLOCK CH SET |
J
O0 : AUTO
Enter the channel number of your local PBS station us-
ing the number buttons. If you do not know the channel
number, enter "00". The TV/VCR will automatically
search all available channels for the local PBS station,
and will select that channel. See HINT #1.
Press the MENU button to return to the normal
TWVCR operating mode.
Press the POWER button to turn the TV/VCR off. If
you selected the local PBS channel manually as in-
structed in Step 4, you will be able to turn the TV/VCR
back on in a few minutes, and the correct time will have
been set. If you selected channel "00" to start a search
of all the available channels, it may take as long as 2
hours for this search to be completed. See the HINTS
below. The power must remain off during this search.
HINTS:
1. If you choose "00" during step 4, the TV/VCR must search through all the available channels one, starting with
the lowest numbered channel. It must scan each channel for a couple of minutes to determine if that channel is
transmitting the EDS signal, because the PBS station will send this signal only once every minute. This search
could take up to 2 hours if the local PBS station is on a high numbered channel in your area or on your cable
system. You may want to start this channel search at night when the unit is not in use, This only has to be done
one time, because once the TV/VCR has been set up to use this auto clock setting feature, it will automatically
tune to the selected PBS channel and reset the clock if necessary, every time the unit is turned off for a few
minutes. The clock setting is changed only if the clock's time has become incorrect for some reason.
2. If the time that is automatically set by this selected PBS station is incorrect, it may not be your local PBS station,
but one from a different time zone. In this case, you must manually enter the correct local PBS station, or set
the clock manually and turn off the automatic clock setting feature. See page 17.
3. If no channel in your area is broadcasting the EDS signal, as evidenced by no time being set even after an overnight
search, you must set the clock manually and turn off the automatic clock setting feature. See page 17.
4. If your TV/VCR is connected directry to a cable converter box, the lacal PBS station must be selected on the
cable box itself, and the TV/VCR must be set to the output channel of the cable converter box (usually channel
3 or 4), to be able to set up or correct the clock automatically. The TV/VCR cannot control the channels of the
cable converter box.
- 16- EN
_r_r_ 5D05

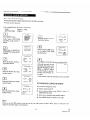
Set t)rc_)r]cct thc clock ma_ually.
• You must use the remote control unit tot the 1011ov,ing steps:
• Power must be turned on.
In the example below, the clock is to be set to:
DATE March Ist, 1995
SETTING TIME 5:40PM
El3
Press MENU button.
Select item 3 (SETTING
CLOCK) using number 3
button.
_MENU-
TIMER PR OGRAMM_NG
_C_URE ¢_NTnOL
3 SETTING CLOCK
CHANNEL _ET UP
5 LANGUAGE SELECT
T6TIME SEARC_
USER'S SET UP
8 CCD SELECT
Select item 3 (MANUAL
CLOCK SET) using number
3 button.
[Y]
Enter the desired month us-
ing number button.
Enter the desired day using
number button.
Enter the desired year using
number button.
Enter the desired hour using
number button.
- MANUAL CLOCK SET -
1 AUTO CLOCK [ON}
2 AUTO CLOCK CH SET
3 MANUAL CLOCK SET
I - MANUAL CLOCK S_T - 1
_r ..... EAR
__ _'_ ......
H_R MrNUTE A_,qRM
_'NT_ ....
HOUR MINUTE AP,NPM
r 1............
MoN'r_ DAY _EAR
03 I 0t WED 19_
_:.H_I_,_MIN U T E AM/PM
•<,__%
Enter the desired ].mute us-
ing number button.
MONTH bay YEAR
03 / DI WED 1_
.OUR_L_,_E AM_
_x
= _-'_ __
Enter 1to select "AM" oren-
ter 2 to select "PM" using
number button.
- MANUAL CLOCK SET -
MONTH DAY YEAR
o.1 i ol WEO t_
HOUR MINUTE _4_4_M
Press MENU or SELECT button to start the clock.
Although seconds are not ('-
displayed, they begin count-
ing from 00 when you press
MENU or SELECT button.
Use this feature to synchro-
nize the clock with the cor-
rect time.
• This unit has a built in calendar up to the year 2008.
TO CHANGE CLOCK SETTING
If you want to change the clock,
1) Follow steps [2] and [3].
2) Select desired digit using SELECT button or
ADD/DELETE button.
3) Enter correct numbers using number button.
4) Press MENU button to return to TV mode.
HINTI
If there is no local PBS station in your area or on your cable system, in step 2 above, press 1 to turn auto clock
setting off, and then adjust clock manually.
- 17- EN
-__-_,-k • 5D05

TV OPERATION
Press POWER button to turn
on the TV/VCR.
[g[_ [_o_o]lp -,
Select the desired channel
using number button or CH
• or • button.
Frl
Adjust the VOLUME to de-
sired listening level using
the VOLUME •or • but-
ton.
EJECT __ 54Opt_
CH2
COUNT o:oo:oc
CH06 1
VOLUME 20
IIIlioelloiu
Adju,st picture controls lor a natural looking m_agc.
• You must use the remote control unit for the fol-
lowing steps:
Press MENU button.
-MENU-
I TIMER PROGRAMMING
2 PICTURE CONTROL
3 SETTING CLOCK
4 CHANNEL SET UP
5 LANGUAGE SELECT
6 TIME SEARCH
7 USER'S SET UP
8 CCD SELECT
Select item 2 (PICTURE
CONTROL) using number 2
button.
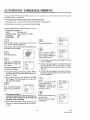
This function enables yt)u to adjust thc TV/VCR dis-
play making it suitable for use with a TV GAME.
• You must use the remote control unit for the fol-
lowing steps:
Press MENU button.
Select item 7 (USER'S SET
UP) using number 7 button.
-MENU- 1
_ TIMERPROGRAMMING
PICTURECONTROL
_ SETTINGCLOCK
CHANNEL SETUP
_ LAI_UAGE 8ELECT
T_E SEARCH
_ USER'S SET UP
COO SELECT
t GAME MODE [ONI
Press number 1 button to se- 2"ENTAL,ore
lect (GAME MODE [ON]). 3"EPEAT_AY,oPP]
Press MENU button to re-
turn to TV mode.
TO CANCEL THE GAME MODE
• Repeat steps [1] and [2]. Then, follow step [3] to
select [OFF]. Press MENU button to return to TV
mode.
OR
• Set the PICTURE CONTROL. The GAME MODE
will then automatically be turned [OFF].
Press SELECT button repeatedly until desired control
is displayed.
Each time you press SELECT button, CON-
TRAST, BRIGHT, COLOR, TINT and SHARP-
NESS will appear on the screen in sequence.
Adjust the picture control using CH • or • button.
• Your TV/VCR's picture controls -- CONTRAST,
BRIGHT, COLOR, TINT and SHARPNESS --
are preset to the factory specification. This is usually
best, but if you need to make any further adjust-
ments, use the following chart as a guide.
CH • CH •
CONTRAST to decrease to increase
contrast contrast
BRIGHT to decrease to increase
brightness brightness
COLOR to pale to brilliant
TINT to purple to green
SHARPNESS to soft to clear
NOTE: When setting the PICTURE CONTROL, the
GAME MODE will be automatically set to [OFF].
-18-

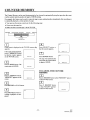
You nlay view spccially labcled (.co) TV programs, movies, news, prerecorded tapes, etc. with either a dialogue
caption or text display added to the program.
Caption Mode
You may watch dramas, movies andnews etc. while captioning the dialogues and the contents of news if you want
by choosing the caption mode.
Text Mode
You may watch full screen text information if you want by choosing the text mode.
C1/C2
You may get these captions or text information by selecting either CI or C2. C2, when used, wilt usually be for a
second language.
• You must use the remote control unit for the following steps:
• Power must be turned on.
Press MENU button.
Select item 8 (CCD SE-
LECT) using number 8 but-
ton.
Select your desired item 2
(CAPTION C1) through 4
(TEXT C2) using the num-
ber button. [ON] appears be-
sides the item.
Press the MENU button. The
selected caption broadcast
appears on the TV/VCR
screen.
-MENU- 1
t TIMER PROGRAMMING
2 PICTURE CONTROL
3 SETTING CLOCK
4 CHANNEL SETUP
S LANGUAGESELECT
6 "rIMESEARCH
? USER'SSET OP
0 CCOSELEOT
I
- CLOSEDCAPTION SETU0 -
CLOSED ¢APTK_N[OFF]
2CAPTK3NC1
3CAPT_N C2
4TEXT CI
5TEXT C2
I - CLOSED CAPTK)N SET UP - /
N
J
1CLOSEDCAPTK)N IONI
2CAPTK)N C1 ON
3CAPTK)N C2
TEXT O_
5TEXT C2
NOTE:
Not all programs are broadcast with closed captions.
Your television is designed to provide error free closed
captions from high quality antenna, cable and VCR sig-
nals. Conversely, poor quality signals are likely to result
in caption errors or no captions at all. Common signal
conditions which may cause captions errors are listed
below;
a) Automobile ignition noise.
b) Electric motor brush noise.
c) Weak snowy picture.
d) Multiplex signal reception displaying picture ghosts
or airplane flutter.
e) Playback of poorly recorded or worn VCR tapes.
f) If your TV/VCR displays a
black box on the screen,
this means that your
TV/VCR is set to TEXT
mode. To clear screen, se-
lect CAPTION C1, C2 or CLOSED CAPTION
JOWl.
When the Closed Caption mode is ON:
The On Screen Display will disappear after 5 seconds.
• This is true even if MUTE button is pressed, or
PAUSE/STILL button is pressed while recording.
However, On Screen Display will appear for 5 sec-
onds when SELECT button is pressed.
TO CANCEL THE CLOSED CAPTION
SYSTEM
Repeat steps [1] and [2]. Then, follow step [3], select
item 1 (CLOSED CAPTION [OFF]) using number 1
button.
- 19- EN
,Pr,k**'1_ 5B28

PLAYBACK
Power must be turned on.
Insert a cassette into the cas-
sette compartment.
NOTE: If the erase-protec-
tion tab has been removed,
the TV/VCR will start play-
back automatically.
If playback does not begin
automatically, press PLAY
button.
Press STOP button when
playback is completed.
PLAY Ib
s_oP
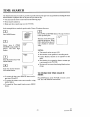
VISUAL SEARCH (SP/LP/SLP MODE)
You may view a video tape at a high speed in either a
forward or reverse direction. This feature is useful in
finding or skipping over a particular scene on a tape.
Forward Direction:
When in the Play mode, press F.FWD button to view
the tape at a fast speed in the forward direction. The
sound will be muted.
Reverse Direction:
To view the tape at a fast speed in the reverse direc-
tion, press REW button. The sound will be muted.
Press PLAY button to return to normal playback.
NOTE: The picture will not be as good as in normal
playback during Visual Search.
SUPER HIGH SPEED SEARCH
(LP/SLP MODE)
For Visual Search in super high speed:
1) Press either F.FWD or REW button while the unit is
in the Play mode.
2) Release button.
3) Depress it again. The unit will now search in supcr
high speed.
Press PLAY button to return to normal playback.
NOTE: Tapes recorded in the SP or LP mode will dis-
play a noise bar on the TV/VCR screen and the picture
may revert to Black and White. This is normal.
STILL PICTURE DURING PLAYBACK
If you press PAUSE/STILL button during the Play
mode, the picture will "freeze" on the TV/VCR screen.
You may use this feature to study details of a particular
scene. (Only tapes recorded in the SLP mode will show
the least amount of lines.)
Press PLAY button to continue playback.
NOTE: The TV/VCR will automatically switch to the
Stop mode, if it is left in the Pause/Still mode for more
than five minutes.
NOISE CANCELLING
If you use the PAUSE/STILL button to freeze the pic-
ture during playback with tapes recorded in the SLP
mode, usually there will be video "noise bars" on the
TV/VCR screen.
This is normal, however, this TV/VCR has a special
feature that allows you to reposition or reduce the lines.
Each time you press PAUSE/STILL button the lines
will change position on the TV/VCR screen. This en-
ables you to see the picture in its entirety without dis-
tracting noise lines.
If the tape was originally recorded in the SP or LP mode,
the still picture may, in addition to the "noise bars",
revert to black and white. This is normal.
- 20 - EN
_ "_""_""_""_"5D05
Page is loading ...
Page is loading ...
Page is loading ...
Page is loading ...
Page is loading ...
Page is loading ...
Page is loading ...
Page is loading ...
Page is loading ...
Page is loading ...
Page is loading ...
Page is loading ...
Page is loading ...
Page is loading ...
Page is loading ...
Page is loading ...
-
 1
1
-
 2
2
-
 3
3
-
 4
4
-
 5
5
-
 6
6
-
 7
7
-
 8
8
-
 9
9
-
 10
10
-
 11
11
-
 12
12
-
 13
13
-
 14
14
-
 15
15
-
 16
16
-
 17
17
-
 18
18
-
 19
19
-
 20
20
-
 21
21
-
 22
22
-
 23
23
-
 24
24
-
 25
25
-
 26
26
-
 27
27
-
 28
28
-
 29
29
-
 30
30
-
 31
31
-
 32
32
-
 33
33
-
 34
34
-
 35
35
-
 36
36


Zenith SRV1300S Operating Manual & Warranty
- Category
- Cassette players
- Type
- Operating Manual & Warranty
Ask a question and I''ll find the answer in the document
Finding information in a document is now easier with AI
Related papers
-
Zenith SRV1320S Operating Manual & Warranty
-
-
-
-
-
Zenith TVSC2040F Operating Manual & Warranty
-
-
-
-
